Developing and Testing Server-Side Swift with Docker and Vapor

Use Docker to develop and test your Vapor apps and learn to use Docker Compose to run different services, which include a database. By Natan Rolnik.

4.2 (5) · 3 Reviews

Download materials
Save for later
Share

Many developers who write Server-Side Swift applications come from an iOS or macOS-oriented background. For that reason, their environment is usually macOS itself, but the vast majority of servers run on Linux. When building web apps with Swift, one of your jobs is to make sure this difference doesn’t cause issues when you deploy your work.

To avoid this alignment problem, you can use containerization: a technique to package software, containing the operating system and the required libraries so they run consistently regardless of the hardware infrastructure. Docker is the most popular containerization tool. Docker containers use a fresh, lean and isolated environment, also known as images, that behave identically independent of the host machine’s OS.

Warning: If you have an Apple Silicon Mac you may experience issues running the Swift images on Docker. At the time of publication official Swift images aren’t available for the ARM64 platform. If you encounter issues you can try to use the Swift nightly images instead.

By using Docker during development, you can rest assured that what runs in the local image of your app is what will run on the server. “It works my machine” no more!

In this tutorial, you’ll build a Vapor app and learn how to:

  1. Run the app on your own machine with Docker, using a Linux image.
  2. Write Swift code that’s conditional to a specific platform.
  3. Run different services using Docker Compose, including a database that the main app depends on.
  4. Run your app’s tests within the Docker image.
Note: This tutorial requires Docker for Desktop on your Mac, which you can
download from Docker’s website. Check out this great tutorial by Audrey Tam if you want to read more about the basics of Docker on macOS.

Getting Started

Start by clicking the Download Materials button at the top or bottom of this tutorial. This folder contains the files you’ll use to build the Vapor app.

The sample project is the TIL app: a web app and API for searching and adding acronyms. It appears in our Server-Side Swift book and video course.

Unzip the file, open Terminal and navigate into the the starter folder. Now run this command:

swift run

This will fetch all the dependencies and run the Vapor app.

While the app is compiling, explore the project. Take a look at the configure.swift file, as well as the routes declared in routes.swift. Then, look at the files within the Controllers, Models and Migrations folders.

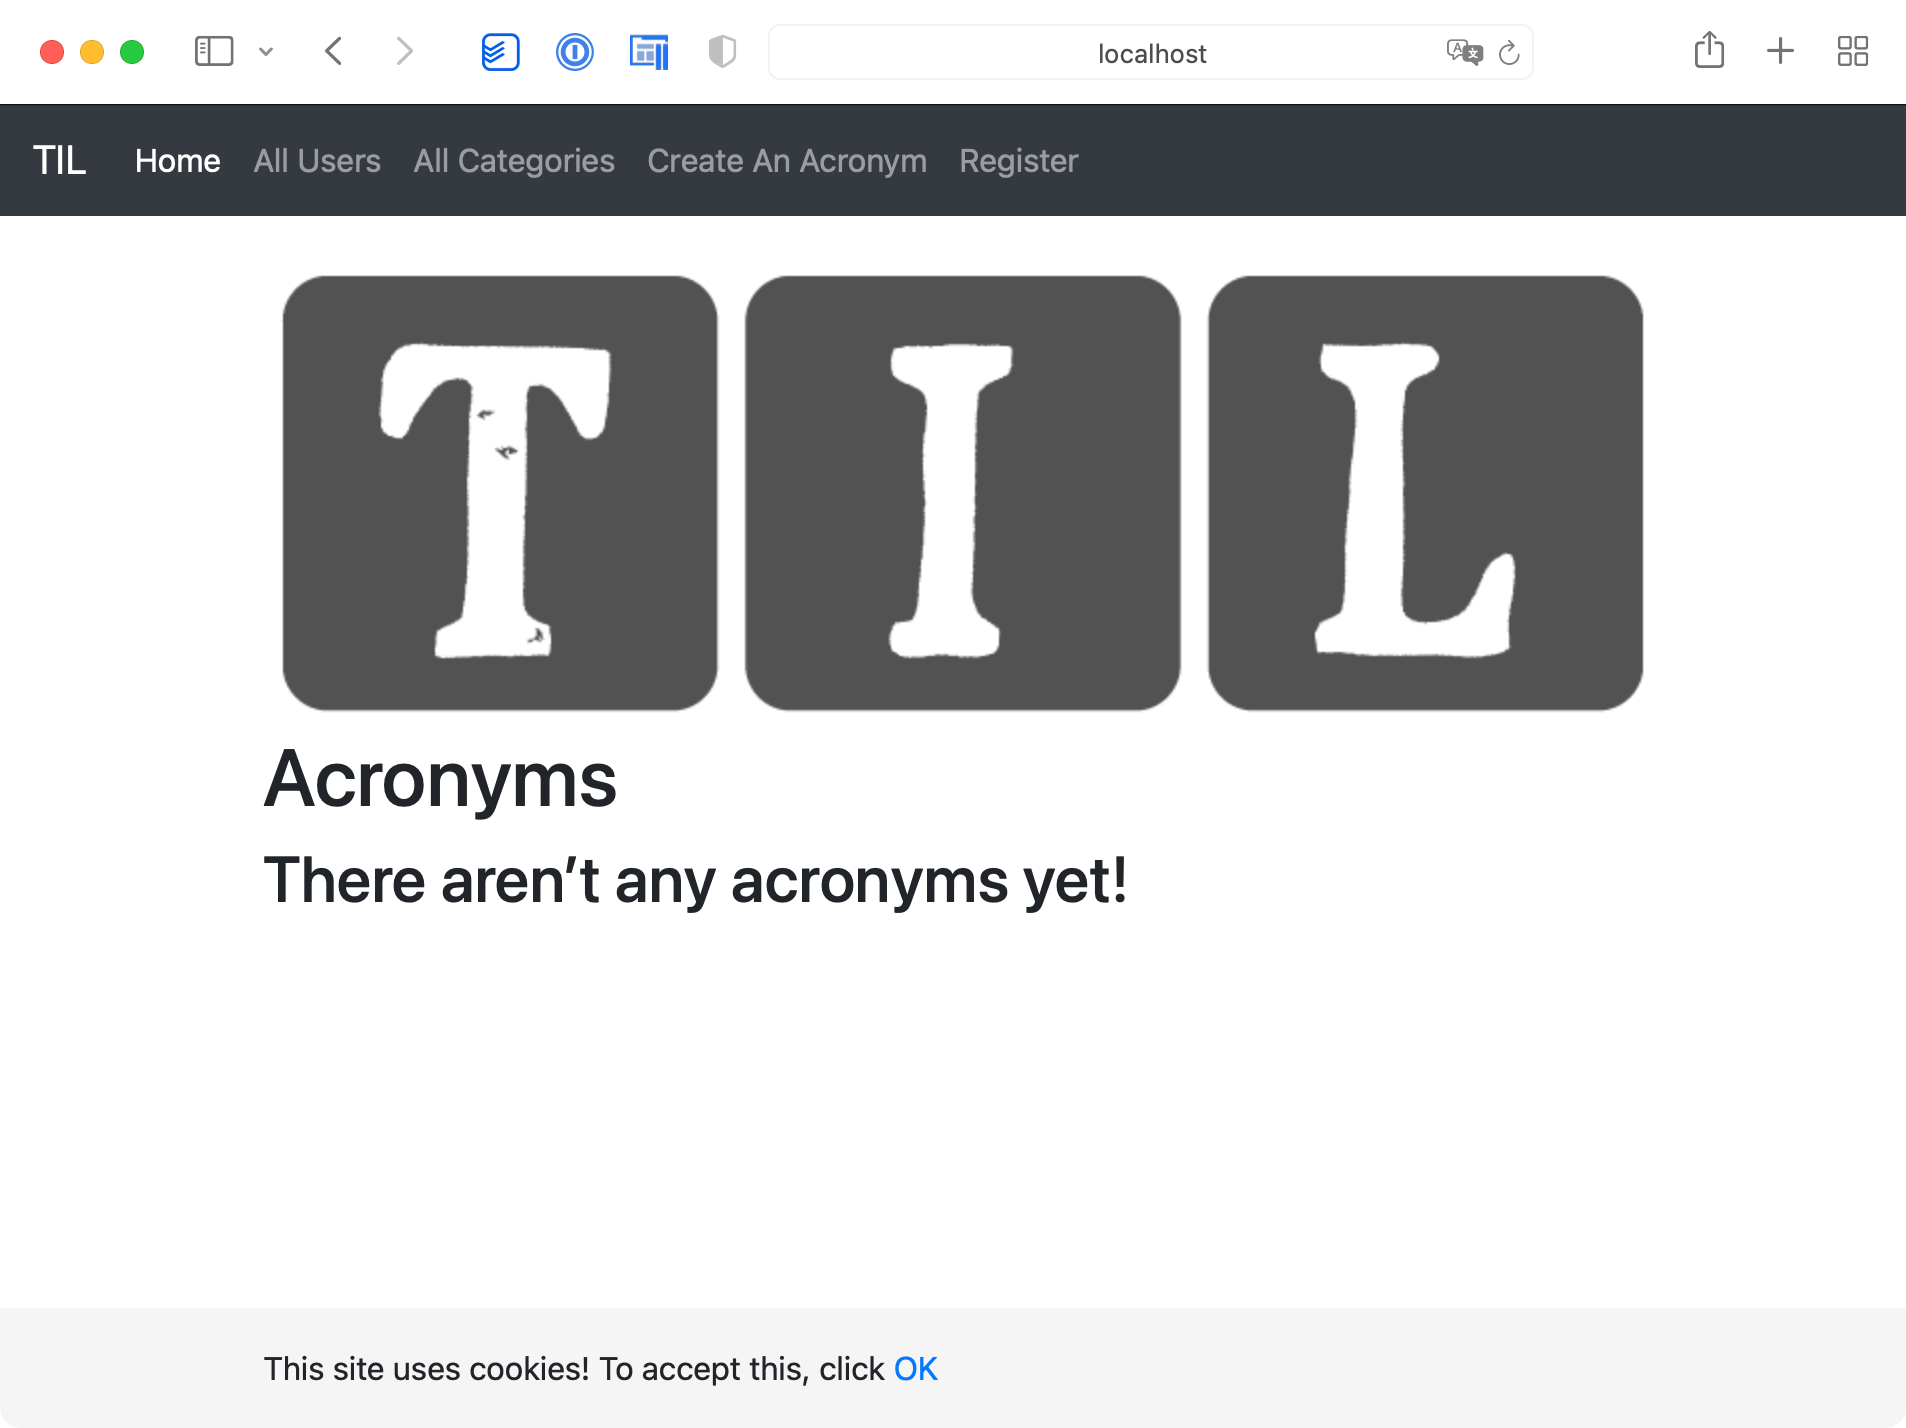
Once the app is running, visit http://localhost:8080 in your browser and you’ll see the TIL home page.

The TIL home page

The TIL home page.

Note: You can also run the starter project in Xcode. In that case, you first need to set the app’s Working Directory.
Edit the app scheme by clicking the TILApp scheme next to the play and stop buttons, and then select Edit Scheme. Now, do the following (you can reference the image below for help):
  1. Select Run from the left pane.
  2. Click the Options tab.
  3. Check the Use custom working directory box.
  4. Set the directory to ~/Downloads/DevelopingAndTestingWithDocker-ServerSideSwift/starter, or to the directory where this tutorial’s starter project is.
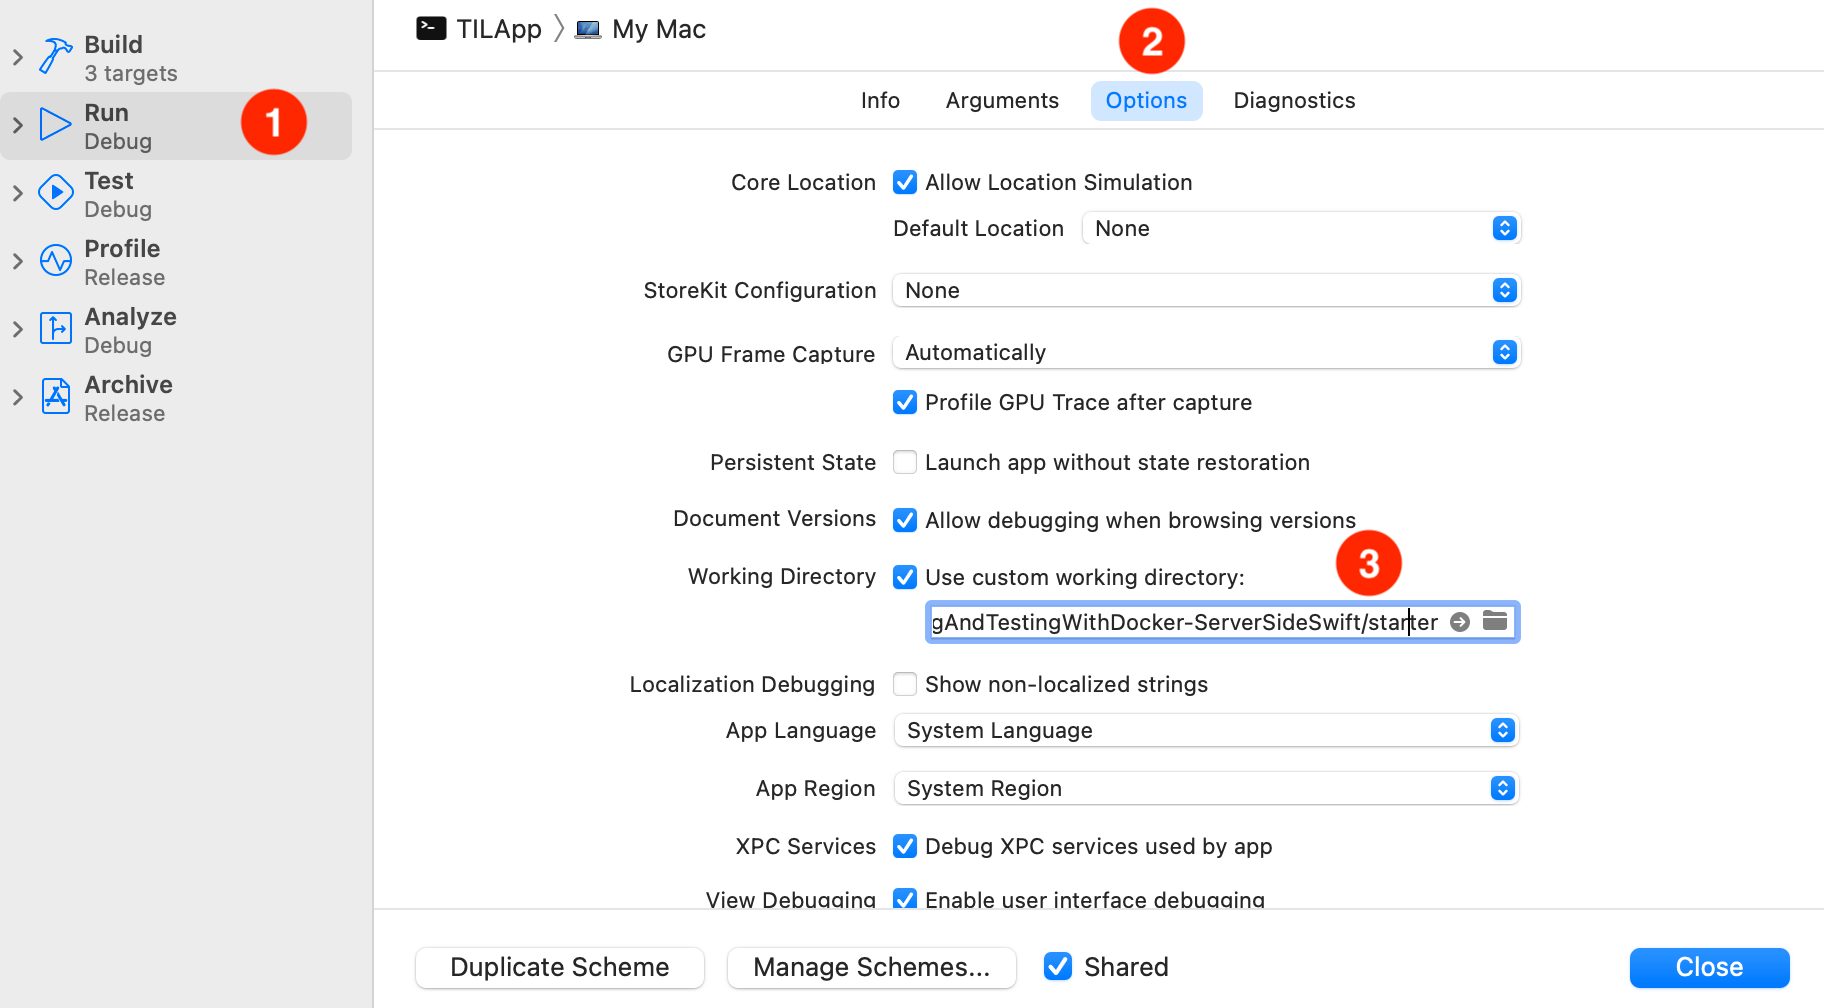
Choose the starter project's folder as the app's working directory.

Choose the starter project’s folder as the app’s working directory.

The Server Info Endpoint

In the controller’s directory, there is a file named ServerInfoController.swift, which declares a controller with the same name. It contains one single endpoint: /server-info. To check what it returns, run the following command in the Terminal:

curl http://localhost:8080/server-info

This endpoint returns a JSON object containing three values: the server start date, the uptime and the platform the server is running on. Notice how the platform in this response is macOS.
The infrastructure of the project is working. Now it’s time to tackle the first objective: run code that’s conditional to a specific platform.

Removing APIs That are Unavailable on Linux

To make sure your code runs smoothly on Linux, you need to remove the APIs that aren’t available on that platform. The function in ServerInfoController that calculates the server uptime uses DateComponentsFormatter, which is currently in Swift 5.5 but is unavailable on Linux. Therefore, trying to compile the app on Linux as is will fail.

One way to prevent this is to avoid using DateComponentsFormatter. Open the ServerInfoController.swift file. Scroll to uptime(since date: Date) and replace the existing implementation with the following code:

    
let timeInterval = Date().timeIntervalSince(date)
let duration: String

if timeInterval > 86_400 {
    duration = String(format: "%.2f d", timeInterval/86_400)
} else if timeInterval > 3_600 {
    duration = String(format: "%.2f h", timeInterval/3_600)
} else {
    duration = String(format: "%.2f m", timeInterval/60)
}

return duration

The code above formats a time interval manually, instead of relying on DateComponentsFormatter.

Next, change the returned platform name ServerInfoResponse. Remove the following line:

private let platform = "macOS"

And replace it with:

  #if os(Linux)
  private let platform = "Linux"
  #else
  private let platform = "macOS"
  #endif

The code above uses compiler directives to specify which code should compile in each platform. Notice that these change at compile time.

Now, the app is ready to run on Linux using Docker.

The Dockerfile

It’s time to create the app’s Dockerfile. This file is like a recipe that Docker reads: it tells Docker how to assemble the image, what actions and commands it should execute and how to start your app or service. This way, when running the build command, Docker can deterministically generate the same image in different host machines. Even better: You can build the image once, upload it to a container registry and use it to spin up new servers and more. You can automate this process with a few steps as you would in a Continuous Integration environment.

The Dockerfile. It works like a recipe

The Dockerfile. It’s just like a recipe, telling Docker what to do at each step.
Creating the Development Dockerfile

To get started, create a file named development.Dockerfile in the project’s root directory, at the same level of Package.swift. Use either your preferred text editor or run touch development.Dockerfile in Terminal, as long as you’re in the correct location. Open the file and add the following content:

# 1
FROM swift:5.5
WORKDIR /app
COPY . .

# 2
RUN apt-get update && apt-get install libsqlite3-dev

# 3
RUN swift package clean
RUN swift build

# 4
RUN mkdir /app/bin
RUN mv `swift build --show-bin-path` /app/bin

# 5
EXPOSE 8080
ENTRYPOINT ./bin/debug/Run serve --env local --hostname 0.0.0.0

Let’s go over the instructions you just added:

  1. The starting point of a Dockerfile is to set the base image. In this case, you’ll use the official Swift 5.5 image. Then, you set the current directory to /app and copy the contents of the project into the image working directory you specified.
  2. As the app is currently using SQLite as a database, you’ll install libsqlite3-dev in the image. Later, you’ll replace this with PostgreSQL.
  3. Then, you clean the packages cache and compile the app with Swift. The default configuration of Swift’s build command is debug, so there’s no need to specify it unless you want to build for release.
  4. Then, you create a directory to store the built product, which is the binary app executable. Then, fetch the binary path from the build process and copy its contents to the newly created /app/bin folder.
  5. Finally, you’ll tell Docker to expose the 8080 port, the default port Vapor listens to, and define the entry point. In this case, it’s the serve command from the executable.
Note: The Dockerfile reference contains the documentation of all available Dockerfile commands. Refer to this page if you want to learn more about each command and its different options and forms.

Building the Image

After you save the Dockerfile, go back to Terminal and run the build command, which tells Docker to build your app image:

docker build . --file development.Dockerfile --tag til-app-dev

A few notes about this command:

  • The dot is the path where Docker looks for the Dockerfile. In this case, it’s the current directory.
  • The --file flag is necessary because a named Dockerfile is being used. If the name of the file were just Dockerfile, Docker would find it automatically without the flag.
  • The --tag flag tells Docker how to identify this image. This makes it easier for Docker to access it later, when it’s time to run it.

Once you run this command, Docker will start by pulling the base image. Then it will run all the instructions present in the Dockerfile to build the application image.

This should take a few minutes, and it’s easy to follow the progress by looking at the logs.

After the build command finishes, check the existing images. Run:

docker images

Alternatively, you can also open the Docker for Desktop application, and select the Images item in the left menu. The image will appear in a list, like the screenshot below shows:

The app image in Docker for Desktop

The app image in Docker for Desktop.

Running the Image

After you confirm the app image is present, run it using the following command:

docker run \
  --name til-app-dev \
  --interactive --tty \
  --publish 8080:8080 \
  til-app-dev

This command is long so here’s a break down of all it’s doing:

  1. Creating a new container based on an image you specify.
  2. Passing a name to identify this new container. In this case, til-app-dev.
  3. Reading the app logs and stopping the container, passing --interactive and --tty.
  4. Publishing the 8080 port from the container and mapping it to the 8080 port on your computer.
  5. Passing the name of the image you built in the previous section.
Note: The name of the image doesn’t need to match the name of the container. Images and containers are two different Docker concepts.

Docker creates and runs the new container. You’ll see the logs in Terminal stating that the server started on the 8080 port. Since you published the port to the host machine, now visit http://0.0.0.0:8080 or http://localhost:8080 in your browser and you’ll see the home page of the TIL app. How cool is that? Your app is running on a Linux image within your Mac!

To stop the container, stop the process using the shortcut Control-C. This won’t delete the container; you can start it again later on.

If you try to refresh the page in your browser, you’ll see that now it fails. This error occurs because you stopped the container. Next, you’ll learn how to start a stopped container.

Starting and Attaching to a Container

To start a stopped container, use start. Run the container you want by passing its name, as follows:

docker start til-app-dev

You’ll notice that Docker returned immediately after starting the container without displaying any logs. That’s because Docker does only what you tell it to do. The start command only starts the container in the background and doesn’t attach to the container’s standard input, output and error streams. If you run docker container ls, you’ll see that the container is running. Alternatively, you could also open the Docker for Desktop app or refresh the browser to check that it’s running.

To see the container logs, run the attach command. It will connect your terminal to the running container:

docker attach til-app-dev

Now, you’ll notice that the command didn’t return immediately and that your Terminal is attached to the app. However, no logs are available because you started the container before attaching to it. Refreshing the browser is enough to trigger a new request to the app, which will print some more logs to the console.

Instead of running the start and attach commands separately, use the start command and pass the --attach --interactive flags, like so:

docker start til-app-dev --attach --interactive

Now that you are acquainted with the basics, it’s time to hook up TIL with a production-scale database, like Postgres.

Using Docker Compose to Configure PostgreSQL

The TIL app now uses SQLite, which is an easy-to-configure database, ideal for getting up and running locally.

Although SQLite is great for prototyping, you’ll still want to deploy your application with a production-scale database, like PostgreSQL.

Instead of installing PostgreSQL on your machine, a better approach is to use an existing PostgreSQL image, so that your development and production environments are the same. And here is where Docker Compose comes in handy.

Docker Compose is a tool for managing apps that require multiple containers. You define all your services in a YAML file, and each service has its Dockerfile or base image. Then, the tool builds all of them with a single command, saving you from the manual overhead of building each container separately and connecting them.

Creating the Docker Compose File

In the root directory of the project, create a file named docker-compose-development.yml. Open it and paste the following contents:

# 1
version: '3'

services:
  # 2
  til-app-dev:
    build:
      context: .
      dockerfile: development.Dockerfile
    ports:
      - "8080:8080"
    # 3
    environment:
      # 4
      - DATABASE_HOST=postgres
      - DATABASE_PORT=5432
    # 5
    depends_on:
      - postgres
  # 6
  postgres:
    image: "postgres"
    # 7
    environment:
      - POSTGRES_DB=vapor_database
      - POSTGRES_USER=vapor_username
      - POSTGRES_PASSWORD=vapor_password
  # 8
  start_dependencies:
    image: dadarek/wait-for-dependencies
    depends_on:
      - postgres
    command: postgres:5432

Let’s look at the instructions included in this file:

  1. Specify the version of your Compose file, followed by the list of services you want.
  2. The first service is the app itself. It will use development.Dockerfile and expose the 8080 port. Until now, this matches the flags you used in the previous sections when running the image.
  3. Use environment to pass the database hostname and port to the app. Some values can change depending on the configuration, and you shouldn’t commit secrets, such as passwords and tokens, into source control. For that reason, use environment variables in these situations, which your app will be able to access.
  4. Connect to the postgres container, defined a few lines below, using the postgres hostname and port 5432.
  5. Set the depends_on option, to indicate dependencies between services and startup order. In this case, the app depends on the database container.
  6. Define the database container, naming it postgres and using the Postgres base image.
  7. Pass the database name within the Postgres image, along with the user and password you chose.
  8. Use the wait-for-dependencies image to start the database container before starting the app.

You’ve now created the Docker Compose file. But, you can’t use it yet. The app is still using SQLite. Next, you’ll replace it with PostgreSQL.

Changing the App to Use PostgreSQL

Before building with the Docker Compose file, change the app to use PostgreSQL. The sample project already includes the Fluent Postgres driver, so you won’t need to add it to the package description.

Because you won’t be using SQLite anymore, you no longer need the package fluent-sqlite-driver. So remove it by following the instructions below:

  1. Open the Package.swift file and remove the two references to fluent-sqlite-driver. One is in the package’s dependencies, and the other one in the target’s dependencies.
  2. There’s no more need to install libsqlite3-dev in the docker image. Open development.Dockerfile and remove the line RUN apt-get update && apt-get install libsqlite3-dev.

To replace SQLite with Postgres in the app itself, open configure.swift and replace the statement import FluentSQLiteDriver with import FluentPostgresDriver. Then, replace the following line:

app.databases.use(.sqlite(), as: .sqlite)

with:

app.databases.use(.postgres(
  hostname: Environment.get("DATABASE_HOST") ?? "localhost",
  port: Environment.get("DATABASE_PORT").flatMap(Int.init) ?? 5432,
  username: Environment.get("DATABASE_USERNAME") ?? "vapor_username",
  password: Environment.get("DATABASE_PASSWORD") ?? "vapor_password",
  database: Environment.get("DATABASE_NAME") ?? "vapor_database"), as: .psql)

To configure a Postgres database, you need to configure a bunch of parameters. All of them use environment variables, and in case they’re not set, use the hardcoded fallback. The parameters are:

  1. The host name: the address of the database server. Use the environment variable and fall back to the localhost. In this case, that’s your local machine.
  2. The port to connect to: If not set, use the 5432 port by default.
  3. The username and password to authenticate with the server. The fallback values match the username and password environment variables you declared in the postgres service in the Docker Compose file.
  4. The database name. Although it’s also an optional parameter, it’s appropriate to set a name if you have different purposes, such as testing. This also must match the POSTGRES_DB environment variable from the postgres service.

You’re now ready to build your first Docker images using Compose.

Building and Running with Docker Compose

Open Terminal again in the root directory and run the following command:

docker-compose --file docker-compose-development.yml build til-app-dev

The --file flag tells Docker to use the docker-compose-development.yml file you just created and build only the app service with it (at least initially). Composing will take a few minutes to complete.

Now that the app image is ready, your next step is certifying that the database is running. Run this in Terminal:

docker-compose --file docker-compose-development.yml run --rm start_dependencies

This will ensure that the database container is up, running and ready to be connected to. Here, you use --rm to certify that Docker will remove this container after the command returns. Once the previous command has finished, run the app image using Docker Compose, as follows:

docker-compose --file docker-compose-development.yml up til-app-dev

Open http://localhost:8080 in the browser and you’ll see that the app is running and it’s now using PostgreSQL. Well done!

Note: If you delete the Postgres container, you’ll also remove the associated database data. Using Docker volumes to fix the data loss is the preferred way to persist data in the host machine. The Docker container will use the files saved in that volume. You can read more about this method in Docker on macOS: Getting Started.

Open Docker for Desktop and you’ll see that it lists the services and containers grouped by project, as defined in the Docker Compose file.

Services and containers grouped per project, as defined in the Docker Compose

Services and containers grouped per project, as defined in Docker Compose.

Running Your App’s Tests

The next critical piece is testing. Your tests need to run on Linux as well. Docker does the heavy lifting for you once again to make this happen.

Creating the Testing Dockerfile

Like running the development image, you’ll need two files for executing the tests: the Dockerfile and the Docker Compose file. Start by creating a file named testing.Dockerfile in the root directory and add the following:

# 1
FROM swift:5.5

# 2
WORKDIR /app
# 3
COPY . ./
# 4
CMD ["swift", "test"]

Here’s what you’re telling Docker to do:

  1. Use the Swift 5.5 image.
  2. Set the working directory to /app.
  3. Copy the contents of the current directory — the project directory — to the container.
  4. Set the default command to swift test, which is the Swift command for running a package’s tests. You’re doing this because when Docker runs a Dockerfile, it needs either an entry point or a command.

Creating the Testing Docker Compose File

Next, under the same location, create a file named docker-compose-testing.yml. Add the following contents to the file:

# 1
version: '3'

# 2
services:
  til-app-tests:
    # 3
    depends_on:
      - postgres_test
    # 4
    build:
      context: .
      dockerfile: testing.Dockerfile
    # 5
    environment:
      - DATABASE_HOST=postgres_test
      - DATABASE_PORT=5432
      - DATABASE_NAME=vapor_test
  # 6
  postgres_test:
    image: "postgres"
    # 7
    environment:
      - POSTGRES_DB=vapor_test
      - POSTGRES_USER=vapor_username
      - POSTGRES_PASSWORD=vapor_password

This Docker Compose file is similar to the development one. Here’s what it does:

  1. Sets the Docker Compose version.
  2. Declares the services you’ll want, starting with the app tests service.
  3. Sets a dependency on the Postgres service, which you’ll declare a few lines below.
  4. Uses the testing.Dockerfile you just created, which is in the current directory.
  5. Injects the database environment variables into the app tests container. As you did with the development dockerfile, use postgres_test to allow the app tests to find the database container, and set the port and the database name.
  6. Defines the database container for tests. Here, you use a different name to avoid conflicts with the development Postgres container.
  7. Sets the database container environment variables using the same name you passed to the til-app-tests service.

Because you already configured the environment variables in the previous sections, there’s no need to change the database configuration in the app.

Note:
If for some reason you still need to check whether your Vapor app is running under tests, use the following check in your code:
if app.environment == .testing {
  // app is running tests
}

Running Tests with Docker

Once the testing files are ready, you only need to build the images and run the tests.

First, build the images by running:

docker-compose --file docker-compose-testing.yml build

After Docker Compose finishes building the app images, run:

docker-compose --file docker-compose-testing.yml up --abort-on-container-exit

This will start both the til-app-tests and the postgres_test container. The entry point of the testing Dockerfile is swift test. The command exits after the tests finish. This action works differently from running the server, which only exits when the server stops, whether manually or due to a crash. For that reason, it’s better to use --abort-on-container-exit, which makes Docker Compose stop all containers should any container stop.

After tests finish running, you’ll see the test results in the container logs:

Tests passed.

Tests passed

Congrats! You have now a solid development and testing setup ready to build the next iteration of your web app.

Where to Go From Here

You’ve reached the end of this tutorial and learned many Docker and Docker Compose skills.

Download the completed project from this tutorial using the Download Materials button at the top and bottom of this page.

If you want to keep learning more, here are some challenges you could try next:

  • Adding another service to your compose files, such as Redis for caching.
  • Pushing your Docker images to a registry like Docker Hub or Heroku’s Container Registry.
  • Deploying to Heroku or a Linux instance on AWS.

To further widen your knowledge of Docker and Vapor, check out our book, our Getting Started tutorial and our videos.

We hope you enjoyed this tutorial, and if you have any questions or comments, please join the forum discussion below!