Building a Camera App With SwiftUI and Combine
Learn to natively build your own SwiftUI camera app using Combine and create fun filters using the power of Core Image. By Yono Mittlefehldt.
Adding a View Model
You’ll eventually do some fairly intensive business logic around what will be displayed on the screen. While you could put this in the ContentView or even the FrameView, that will get messy quickly. Often, it’s better and cleaner to separate this logic into a view model. The view model will then feed your view all the data it needs to display what you want.
Create a new Swift file named ContentViewModel.swift in the ViewModels group. Then, replace the contents of that file with the following code:
import CoreImage

class ContentViewModel: ObservableObject {
  // 1
  @Published var frame: CGImage?
  // 2
  private let frameManager = FrameManager.shared

  init() {
    setupSubscriptions()
  }
  // 3
  func setupSubscriptions() {
  }
}
In this initial implementation, you set up some properties and methods you need:
-
framewill hold the images thatFrameViewwill display. - Data used to generate
framewill come fromFrameManager. - You’ll add all your Combine pipelines to
setupSubscriptions()to keep them in one place.
To transform the CVPixelBuffer data FrameManager provides to a CGImage your FrameView requires, you’ll harness the power of Combine! You made this possible when you declared FrameManager.current @Published. Very smart! :]
Add the following code to setupSubscriptions():
// 1
frameManager.$current
  // 2
  .receive(on: RunLoop.main)
  // 3
  .compactMap { buffer in
    return CGImage.create(from: buffer)
  }
  // 4
  .assign(to: &$frame)
In this pipeline, you:
- Tap into the
Publisherthat was automatically created for you when you used@Published. - Receive the data on the main run loop. It should already be on main, but just in case, it doesn’t hurt to be sure.
- Convert
CVPixelBuffertoCGImageand filter out allnilvalues throughcompactMap. - Assign the output of the pipeline — which is, itself, a publisher — to your published
frame.
Excellent work!
Now, open ContentView.swift to hook this up. Add the following property to ContentView:
@StateObject private var model = ContentViewModel()
You declare the model to be a @StateObject instead of an @ObservedObject, because it’s created within the ContentView as opposed to being passed in. ContentView owns the model and doesn’t merely observe it.
Now replace FrameView(image: nil) with:
FrameView(image: model.frame)
Do you know what time it is? No, it’s not 9:41 AM. It’s time to build and run!

Finally, you can display the frames captured by the camera in your UI. Pretty nifty.
But what happens if there’s an error with the camera or capture session?
Error Handling
Before you can move on to even more fun, take care of any potential errors CameraManager encounters. For this app, you’ll display them to the user in an ErrorView. However, just like the capture frames, you’re going to route the errors through your view model.
Open ContentViewModel.swift. Add the following properties to ContentViewModel:
@Published var error: Error?
private let cameraManager = CameraManager.shared
Next, you’ll add a new Combine pipeline to setupSubscriptions(). Add the following code to the beginning of setupSubscriptions():
// 1
cameraManager.$error
  // 2
  .receive(on: RunLoop.main)
  // 3
  .map { $0 }
  // 4
  .assign(to: &$error)
With this code, you once again:
- Tap into the
Publisherprovided automatically for the publishedCameraManager.error. - Receive it on the main thread.
- Map it to itself, because otherwise Swift will complain in the next line that you can’t assign a
CameraErrorto anError. - Assign it to
error.
Now, to hook it up to your UI, open ContentView.swift and add the following line inside your ZStack, below FrameView:
ErrorView(error: model.error)
If you build and run now, you won’t see any difference if you previously gave the app access to the camera. If you want to see this new error view in action, open the Settings app and tap Privacy ▸ Camera. Turn off the camera permissions for FilterTheWorld.
Build and run and see your beautiful error!

The app correctly informs you that camera access has been denied. Success! Or, um, error!
Go ahead and turn camera permissions back on for the app! :]
Now you have a very basic, working camera app, which also displays any encountered errors to the user. Nice. However, the point of this app isn’t to just show the world as it is. After all, the app is called Filter the World…
Creating Filters With Core Image
It’s time to have a little fun. Well, even more fun! You’ll add some Core Image filters to the data pipeline, and you can turn them on and off via some toggle buttons. These will let you add some cool effects to the live camera feed.
First, you’ll add the business logic to your view model. So, open ContentViewModel.swift and add the following properties to ContentViewModel:
var comicFilter = false
var monoFilter = false
var crystalFilter = false
private let context = CIContext()
These will tell your code which filters to apply to the camera feed. These particular filters are easily composable, so they work with each other nicely.
Since CIContexts are expensive to create, you also create a private property to reuse the context instead of recreating it every frame.
Next, open ContentViewModel.swift. Replace the following code inside setupSubscriptions():
// 1
frameManager.$current
  // 2
  .receive(on: RunLoop.main)
  // 3
  .compactMap { buffer in
    return CGImage.create(from: buffer)
  }
  // 4
  .assign(to: &$frame)
With the following:
frameManager.$current
  .receive(on: RunLoop.main)
  .compactMap { $0 }
  .compactMap { buffer in
    // 1
    guard let image = CGImage.create(from: buffer) else {
      return nil
    }
    // 2
    var ciImage = CIImage(cgImage: image)
    // 3
    if self.comicFilter {
      ciImage = ciImage.applyingFilter("CIComicEffect")
    }
    if self.monoFilter {
      ciImage = ciImage.applyingFilter("CIPhotoEffectNoir")
    }
    if self.crystalFilter {
      ciImage = ciImage.applyingFilter("CICrystallize")
    }
    // 4
    return self.context.createCGImage(ciImage, from: ciImage.extent)
  }
  .assign(to: &$frame)
Here, you:
- Try to convert
CVPixelBufferto aCGImage, and if it fails, you return early. - Convert
CGImageto aCIImage, since you’ll be working with Core Image filters. - Apply the appropriate filters, which have been turned on.
- Render
CIImageback to aCGImage.
Now, to connect this to the UI, open ContentView.swift and add the following code within the ZStack after the ErrorView:
ControlView(
  comicSelected: $model.comicFilter,
  monoSelected: $model.monoFilter,
  crystalSelected: $model.crystalFilter)
Build and run one last time!

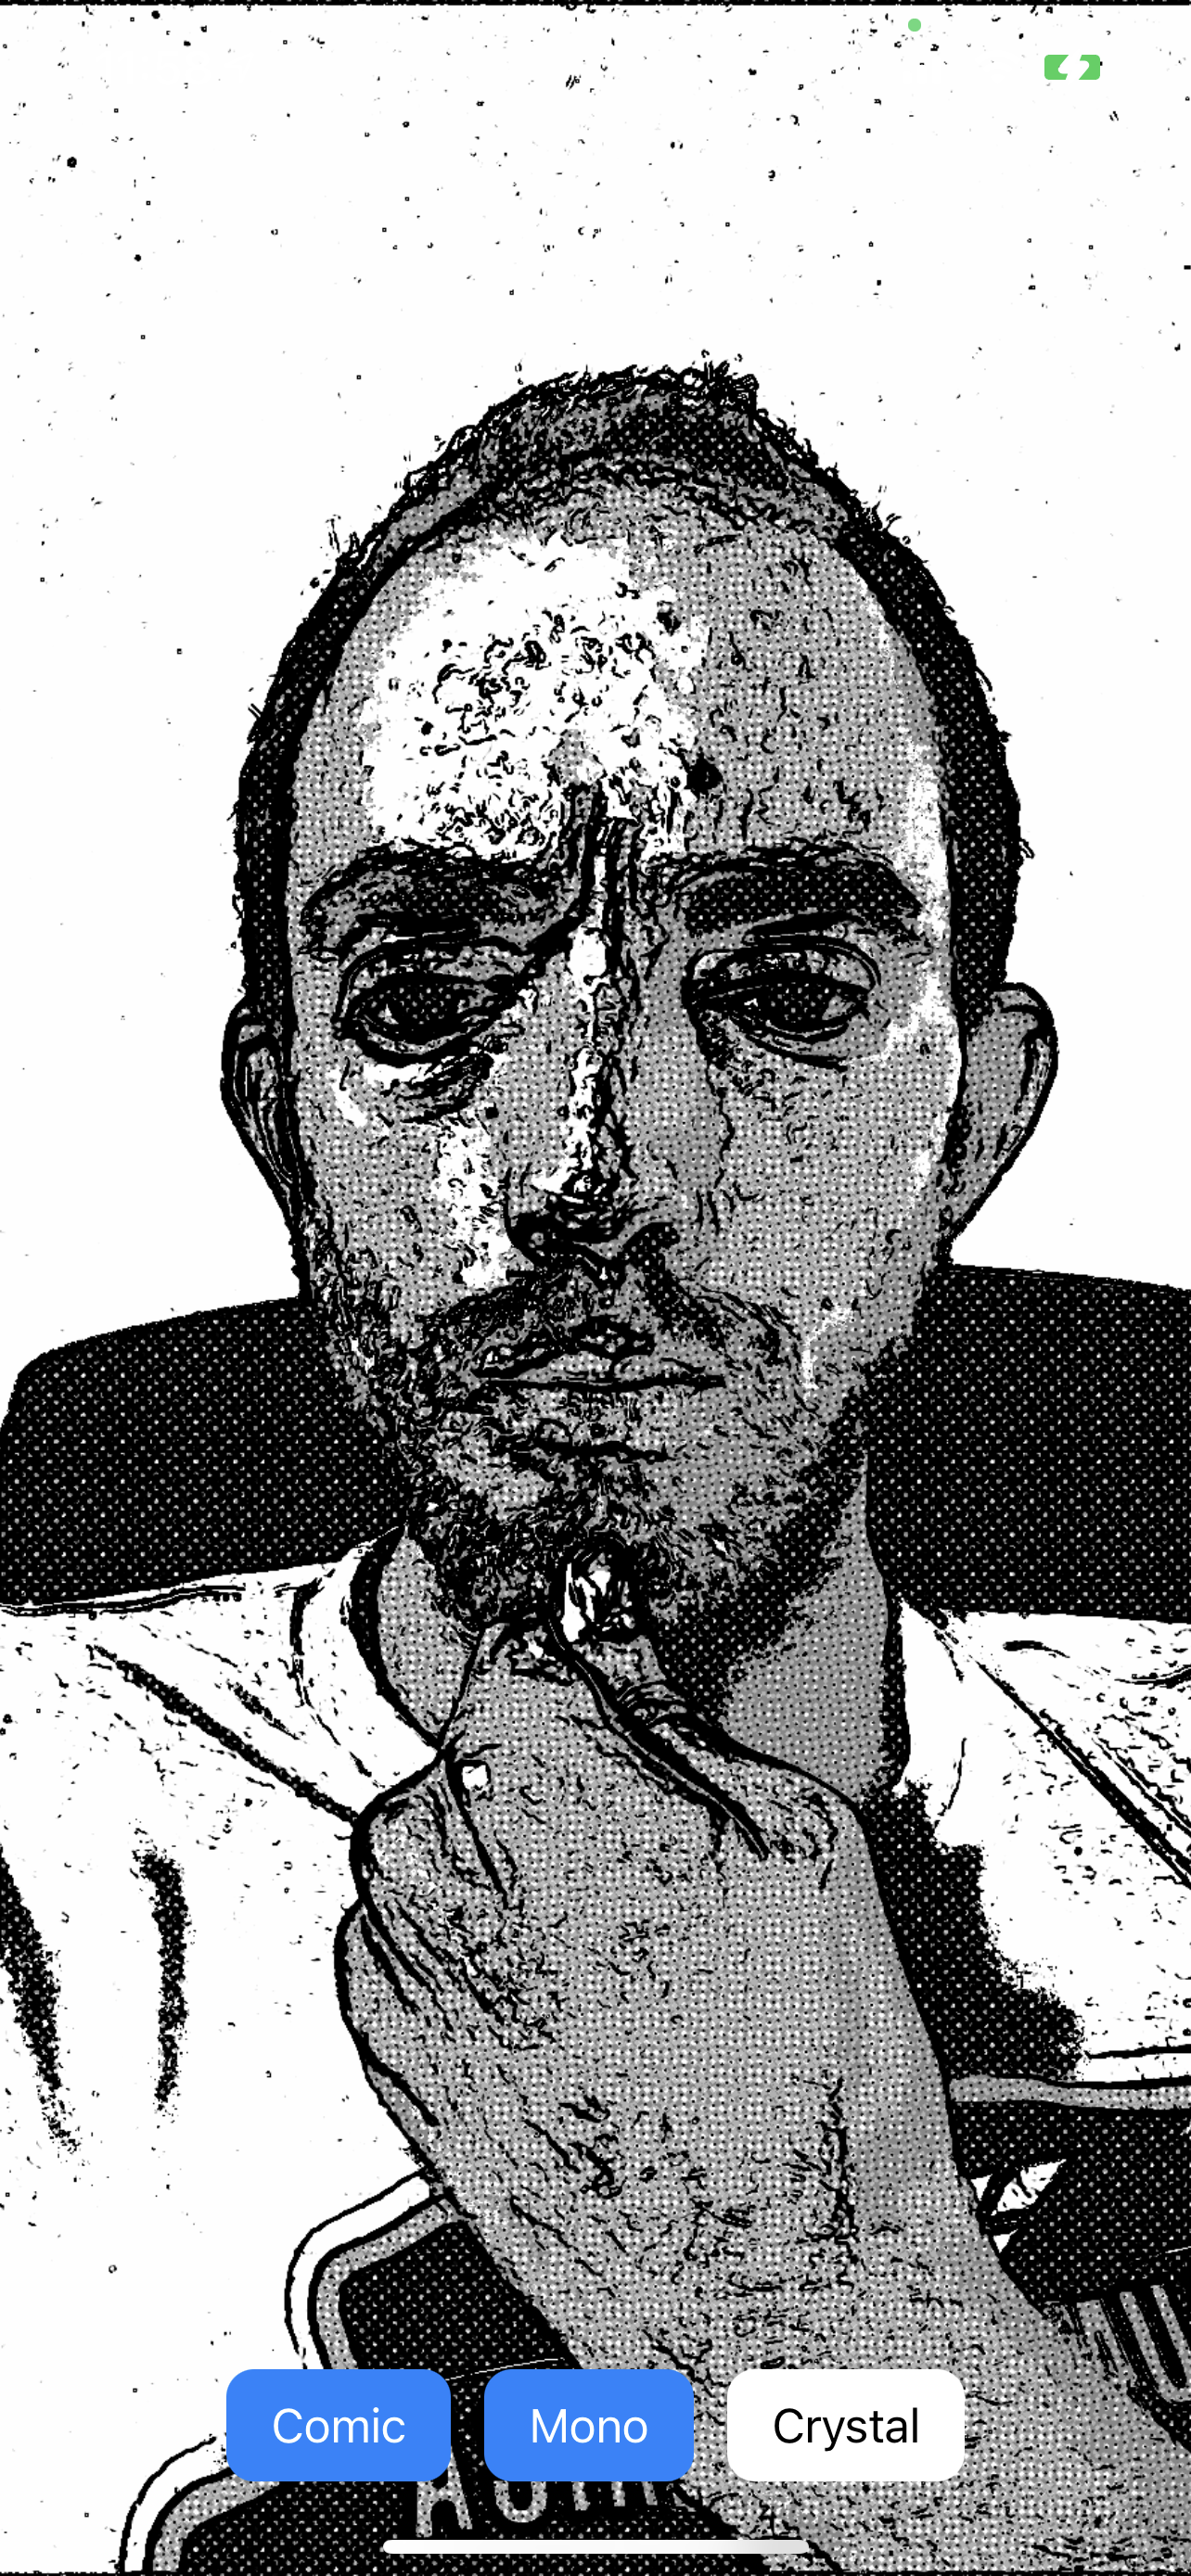

Above, you see examples of how the camera feed looks after applying different filters.