Raspberry Pi Airplay Tutorial
A tutorial that guides you through setting up a Raspberry Pi AirPlay receiver. It then shows you how to use a Raspberry Pi as a web server. By .
Expanding the File System
Now you need to expand the file system to take up the entire size of the SD card. You see, the image you loaded onto the SD card was of minimal size so that it would be quick to download and fit on all SD card sizes. Since we copied over the contents of the disk image onto the SD card, the partition size is the exact size of the disk image even though the size of your SD card might be bigger. But this leaves you with little space with which to work.
Your card probably looks something like this by now.
-
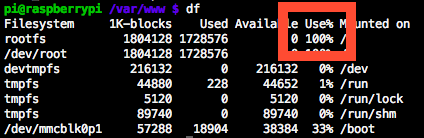
Your card probably looks something like this by now.
Your card probably looks something like this by now.
To set up the AirPlay receiver components and all the server components, you’re going to need more space. Luckily, it couldn’t be simpler to resize the partition to take advantage of the entire card. SSH back into your Raspberry Pi if you aren’t there already and run the following command:
sudo raspi-config
When the config menu comes up, select expand_rootfs.
The Raspberry Pi config menu.
-

The Raspberry Pi config menu.
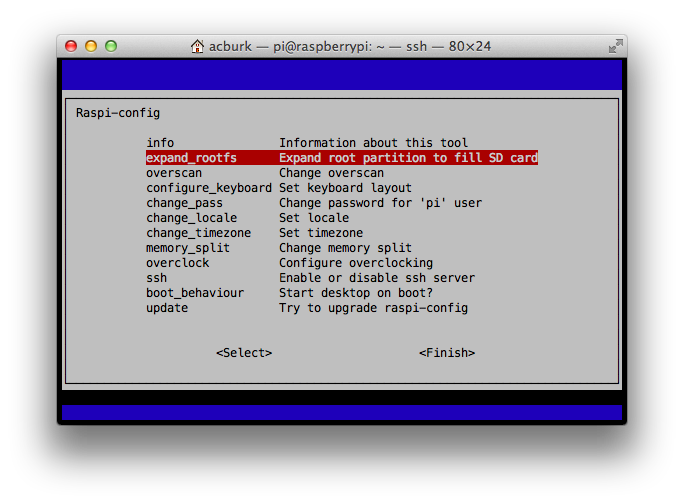
The Raspberry Pi config menu.
You’ll then see the following, letting you know that the root partition has been resized:

When it asks if you want to reboot now, select Yes.

You’ll have to wait a minute or two and then SSH back in. You should now have plenty of space for the server components.
The new space on my 32GB card
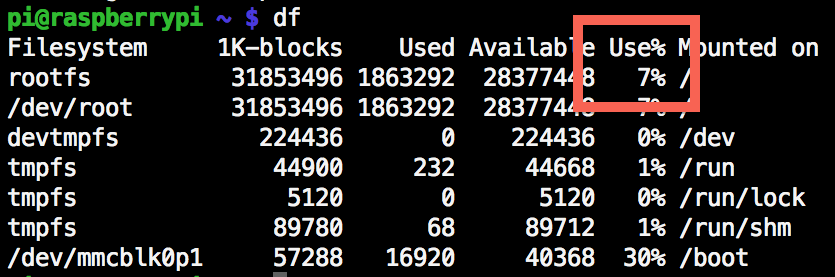
The new space on my 32GB card
Setting Up the Project
Now that you’re logged into the Raspberry Pi, you need to perform some basic setup. These include
- Update the current system
- Update the audio settings so sound comes out of the green, mini-jack port instead of the HDMI port
- Install some needed libraries for the Shairport project
- Install the Shairport project
- Daemonize the Shairport project so that it start at startup
Let’s get cracking!
Updating the Packages
First you should update the current package sources and packages. This is kind of like running Windows Update or Software Update on OS X. With Raspbian, the tool apt-get handles all software packages for you.
Run the following two commands, one at a time:
sudo apt-get update
sudo apt-get upgrade
The first command, update, updates the list of packages and the versions. The second command, upgrade, compares that new information to all the packages you currently have installed and upgrades them if an upgrade is available.
You will probably notice quite a few packages being updated. Just sit tight!
Changing the Default Audio Port
By default, the audio comes out of the HDMI port on the Raspberry Pi. You want to change that to the mini-audio jack since pretty much anything that connects to audio can connect to a mini-audio jack and if you leave it set to HDMI, you’d probably have to have it hooked up to a TV all the time. Run the following command:
sudo amixer cset numid=3 1
You should see these results:

The amixer command lets you view and set the options of sound cards. Here, you are setting the third soundcard element to 1, thereby activating the analog output for the Raspberry Pi. That might all sound magic, and, well, it is really. You just need to know that command. But fortunately I’ve found that out for you – that’s why you’re here!
Installing the Prerequisites
The Shairport project you are going to be using has a number of prerequisites. Enter the following command to download and install these prerequisites using the same mechanism you used to update the system earlier:
sudo apt-get install git libao-dev libssl-dev libcrypt-openssl-rsa-perl libio-socket-inet6-perl libwww-perl avahi-utils libmodule-build-perl
This is a pretty long command but its actually pretty simple. Lets look at each individual part:
-
sudo– Runs the next command in administrator mode -
apt-get– This the package manager program -
install– Tells the package manager program to install the following libraries -
git libao-dev libssl-dev libcrypt-openssl-rsa-perl libio-socket-inet6-perl libwww-perl avahi-utils libmodule-build-perl– These are the libraries we are installing. You can see there’s a couple here like git, some security/encryption libraries, and some libraries for the Perl programming language.
You’ll see the following:

It’s telling you what will be installed. This will include the libraries you asked specifically to be installed, and any prerequisites.
Installing Perl Net-SDP
Since iOS 6, AirPlay has used the SDP protocol. The Perl Net-SDP project will help communicate using this protocol. So you’re now going to install it.
Run the following commands (still in your Raspberry Pi SSH session!):
git clone https://github.com/njh/perl-net-sdp.git perl-net-sdp
This clones the GitHub repository of Perl Net-SDP so that now you have a copy of it on your Raspberry Pi. You’ll get the following output:

Now enter the following commands, one line at a time:
cd perl-net-sdp
perl Build.PL
sudo ./Build
sudo ./Build test
sudo ./Build install
cd ..
These commands compile and install the components of Perl Net-SDP in the proper locations.

Setting up your Raspberry Pi AirPlay receiver
You have reached the meat and potatoes of the project, the purpose of all of that setting up you just accomplished. Once you download and run Shairport, it’s only a few simple steps until you hear music!
Installing and Running Shairport
Run these commands, which will clone the Shairport repository, then build the software:
git clone https://github.com/hendrikw82/shairport.git
cd shairport
make

Then run one last command to start the Shairport script:
./shairport.pl -a RayPi
The -a command specifies the name of the AirPlay receiver, which in this case you are calling RayPi.
Live From Your Raspberry Pi…
Now if you open any audio or music app on your iOS device or open iTunes on your Mac, you should see RayPi on the list of AirPlay devices!

When you’re done, hit Control+C to stop the process. You can change RayPi in the previous command to anything you want to call your AirPlay receiver.
As it stands right now, every time you want to use Shairport, you have to start up the Raspberry Pi, SSH into it and run the Shairport program. That sounds horrible to me. What can you do about it?
*Deep daemon voice* DAEMONIZE IT *End deep daemon voice*
*cough*