Raspberry Pi Airplay Tutorial
A tutorial that guides you through setting up a Raspberry Pi AirPlay receiver. It then shows you how to use a Raspberry Pi as a web server. By .
Running the Web Service Script
This being a tutorial about the Raspberry Pi, I’ll provide the web service script – you just need to download it to the right location. Run the following commands, one at a time:
cd /var/www
sudo mkdir api
cd api
This changes your working directory to the web server directory, creates a new folder called api and then moves into that folder.
Now run these commands, one at a time:
sudo curl https://koenig-media.raywenderlich.com/uploads/2013/10/index.txt > ~/index.php
sudo mv ~/index.php .
curl downloads data from a remote address. The > at the end of the URL tells the command to redirect the output into a file. You then move the file from your home directory into the current directory, the web server directory.
Let’s examine a few parts of this script. Run the following:
sudo vi index.php

You will see the PHP script for the inserting and reading data from the database.
Changing Your Password
There is one thing you need to change on line 98:

The PHP script needs to know how to open the connection to the database, so it needs to have the root password to your MySQL database. Replace SQL-ROOT-PASSWORD with the MySql password you entered earlier.
Examining the Script
Rerun the command to examine the script. Look at line 80. You can see the chunk of code that reads and returns the top 10 chat messages.
You can type “:80” to jump to that line in vi

This looks a little different than the statement you used in the MySQL program above ( SELECT * from chat; ) in that this one limits it to just the last 10 messages and sorts it so the newest messages are at the bottom. Then it converts the PHP array into a JSON-encoded string and returns it from the web service.
Now look at the code chunk on line 69:
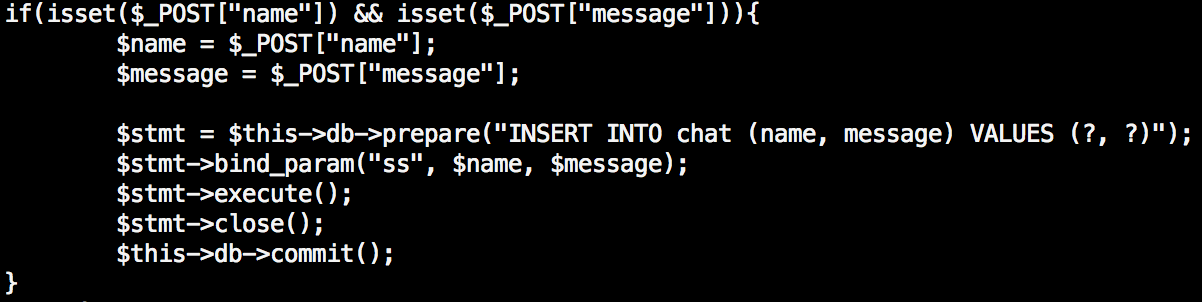
This is the other part of the web service, the one that lets you post messages to the database. If there are appropriate POST variables set in the call, then it will trigger this part of the service. This db call looks much more like what you ran before ( INSERT INTO chat(name, message) VALUES (“name”,”message”); ).
If you would like to learn more about writing your own web services, I suggest reading this other tutorial on the subject.
Testing the Script
Now that you have the script installed, it’s time to test it out. Just as you used curl to download files earlier, you can use it to hit your web services and test them out. Just as you were able to insert and read directly into the MySQL database, you can access the insert and read web services with curl to test them out.
Open a new Terminal window and run the following command from your local machine:
curl 10.0.1.18/api/
This uses the curl command to hit the read web service. This is the same as the SELECT statement you ran earlier. You should see a JSON array of the last 10 messages (up to 10).
Now try the insert test:
curl -F name="Adam" -F message="test insert" 10.0.1.18/api/
Note that you set the variables with the -F flag. You won’t see any response from this command because this web service doesn’t return any data but if you run the previous command to get the last 10 messages, you should see your new message there.
Perform both of these tests a few times. You should be able to insert new messages and see them when you call the list of all messages.
Using the Web Services with an iOS App
I’ve created a small iPhone app you can grab here that uses the web services. The only thing you should have to do is change the IP address to your Raspberry Pi. You’ll need to do that in the precompiled header file:

This is a pretty simple iPhone app. Open CHTRemoteCalls.m. Here you’ll see the remote API calls and how they are formed. There is one for getting messages and one for posting a message. Each uses an NSURLConnection to hit the server. In your case, this is hitting your Raspberry Pi!
Build & run the project. You’ll see something like this:

You can use the very basic interface to send a message and then wait for it to come back again. Messages are refreshed every 10 seconds, so you may need to wait until the next refresh to see your message.
Each time you send a message, it is actually hitting your Raspberry Pi and inserting a row into the database. Neat eh! Each time the messages are updated, the database is being read and the last 10 messages returned.
This is a very simple test app, but hopefully it has showed you what you might be able to use your own Raspberry Pi for. You might want to use it to host a website for you while you’re doing some development work on an app. Why bother going to the effort of setting up a web server somewhere in the cloud when you can use the tiny device sitting in front of you!
Where to Go from Here?
You’ve set up a Raspberry Pi with the necessary software to run a small web service and listen to some cool tunes while you do it. Here are some things you might want to try now:
- Securing your Raspberry Pi. This tutorial wasn’t written with much security in mind. Changing passwords, not using the root accounts and preventing SQL injection are all things you should do to make the system more secure.
- Create your own services. Look at the example in this project and try creating your own.
- Create your own iOS app to consume the services. Create an iOS app that needs a backend database then use the Raspberry Pi to create the database and the web service. Perhaps a online ordering system/menu app, score keeping app, or a online registry.
Many thanks to Jordan Burgess, who wrote the blog post that formed the basis of this tutorial.