Beginning Blender Tutorial: Animating and Rendering a Mushroom
Learn how to make a mushroom nod and bounce in this beginning blender tutorial on animation and rendering! By John R. Nyquist.
Making Sprites
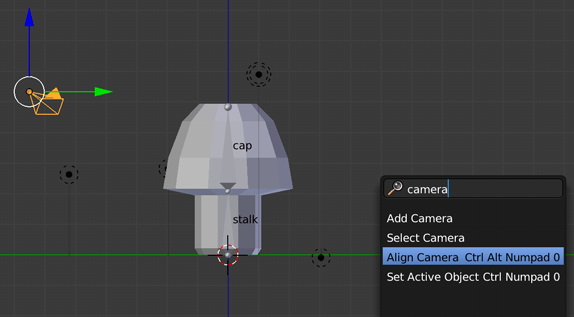
Now you need to move the camera so it is looking from the same point-of-view as the Right Ortho view. Fortunately Blender has an easy way to do this. Right-click the camera to select it. Press the spacebar, type camera and select Align Camera Ctrl Alt Numpad 0, like so:
Click on the first camera icon in the Properties window, the one that looks like a 35mm camera. This is the Render context button. The Dimensions panel is where you set the resolution to the size of the sprite you want to make. For this tutorial, imagine you want a sized 128×128 pixels. Set to X: 128, Y: 128, and 100%. Set the End Frame to 20, like so:

Press Option-Z to toggle Texture shading on again.
In the Properties window, click on the camera icon that looks like an old movie camera. You should be familiar with this button — it’s your old friend, the Object data context again. Make sure you have the Camera selected: left-click Camera in the Outliner panel if necessary.
Left-click Orthographic on the Lens panel and enter 8 into the Orthographic Scale field so that the mushroom animation fits within the bounds of the camera.

Position the camera so that the mushroom is centered in the viewport using the G key.
Now you need to assign the HopAction to your object. Right-click on the stalk bone, then navigate to the DopeSheet Action Editor and choose HopAction from the dropdown menu, as shown:

In the Shading panel of the Render context (the first one on the left that looks like a camera), set the Alpha to Transparent.

In the Output panel further down in the Render context, select the output folder for your rendered files and left-click the RGBA button, as so:
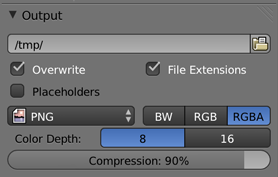
Note: By default, Blender names the render files as 0001.png, 0002.png, and so on. However, you have the option to add a name to the numbered files so that you can tell what they contain at a glance.
If you append “hop” to the path the files will be named as hop0001.png, hop002.png, and so forth. Furthermore, since you know you will have fewer than a hundred images, you can append “hop##” to the path and your output will be hop01.png, hop02.png, etc.
Click Animation at the top of the Render context in the Render panel. Blender will render your animation frames to individual files and save them to the folder you specified above. To view the fully rendered animation, click the Play button; if you don’t see the playback window immediately it may have popped up behind the main Blender window. If so, just press Command-Tab to find the playback window.
Where To Go From Here?
Congratulations! You’ve given life to your character with two different actions. You can now use these resources in your project through the many export options Blender provides. If you’re feeling ambitious, you can even your own export using Blender’s Python APIs. If you use Unity, you’re in luck — Unity natively supports the import of Blender files just by putting them in your project’s Assets director.
We’ve cooked up a few challenges for you to further your knowledge of Blender. Don’t worry, though: we’ve included the solutions as spoilers for you in case you get stuck!
Challenge 1

You’ve rendered out the HopAction — now render out the NodAction.
[spoiler title=”Solution”]
To render out the nod animation, select the armature, and select the NodAction in the Action editor of the Dope Sheet. Next, click the Animation button in the Render panel.
Remember to set the length of the animation, either by setting the End Frame in the Render panel, or by LMB on the Timeline and pressing E.
[/spoiler]
Challenge 2

You’ve rendered the actions from the side view — can you render one or all of the actions from the front?
[spoiler title=”Solution”]
Select View > Front from the 3D View header. With the camera selected, press space, type camera; and select Align Camera Ctrl Alt Numpad 0.
Position the camera if necessary for the mushroom to fit within the viewport using the G key. Set the End Frame in the Dimensions panel if necessary so that the end frame matches up with the end of the animation. Left-click the Animation button to render out the images.
[/spoiler]
If you want to take a look at our version of the finished project, you can download it here.
If you have any question or comments, we’d love to hear about it in the forum comments!