Beginning Blender Tutorial: Animating and Rendering a Mushroom
Learn how to make a mushroom nod and bounce in this beginning blender tutorial on animation and rendering! By John R. Nyquist.
Working in Pose Mode
Press Tab to enter Object mode. Right-click on the armature; you should already be in Pose mode, but if not, press Control-Tab to enter that mode.
Select all the bones by pressing A until they are all selected.
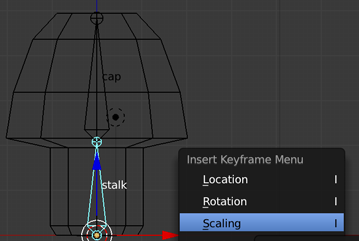
Right-click the stalk bone, and press I to view the Insert Keyframe Menu. Select Scaling.
The Timeline Window
The Timeline window appears at the bottom of your screen; it looks like the following image:
![]()
After you insert a keyframe, you’ll see a vertical yellow line appear in the green line. The green line indicates which frame you’re on.
Keyframing the Hop
Move the mouse over the Timeline window and press the Right-Arrow key three times to advance to frame 4. Leave the stalk bone selected, press S to scale and then press Z to restrict scaling to the Z axis. Move the mouse to squish that shroom, and left-click to accept the scaling. The screenshot below shows you about how much you should squish the mushroom.

Notice that the cap of the mushroom squishes as well; that’s because the cap bone is a child of the stalk bone. Type I and select Scaling from the Insert Keyframe Menu.
Advance to frame 8 using the right-arrow key and type Option-S to clear the scaling. Next, type I and select LocScale to set a keyframe for both location and scaling.
Note: You will see many options in the Insert Keyframe Menu, but typically you want to set keys for just what is necessary. In the case of the the mushroom, we didn’t need to set the location and the scale initially because we weren’t going to be changing the location yet.
Note: You will see many options in the Insert Keyframe Menu, but typically you want to set keys for just what is necessary. In the case of the the mushroom, we didn’t need to set the location and the scale initially because we weren’t going to be changing the location yet.
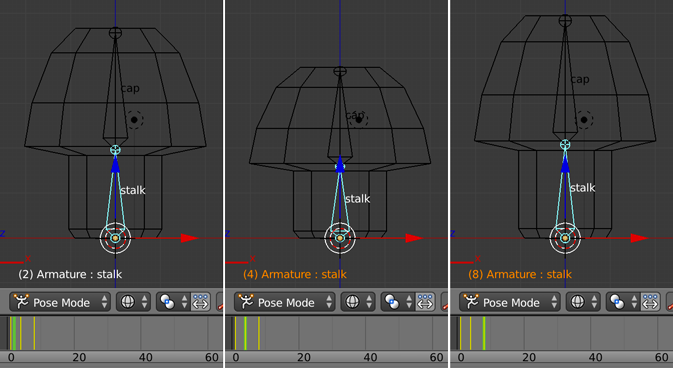
Left-click and drag on the Timeline window to scrub between the keyframes to see the transformation. Notice the text at the lower left of the 3D View is orange for frames that have keyframes and white for ones with no keyframe. The screenshot below shows what you may see at various keyframes as you scrub.
Go to frame 14, move the mushroom up in the air by typing G, then Z, and left-click to confirm when you like the height. Type I to insert a keyframe and select Location.
Advance another two frames and insert another keyframe for Location on frame 16, so your mushroom hangs like Michael Jordan at the top of its jump.
Finally, go to frame 20, type Option-G to clear the location, type I and set another Location keyframe.
Previewing the Animation
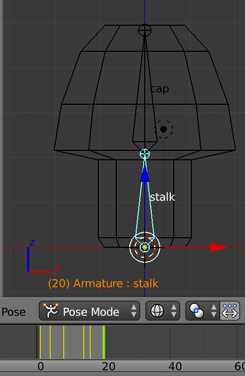
Move your mouse to the Timeline window and left-click on the last keyframe. Press E to set the end of the frame range; the lighter section of the timeline should change from extending to the right of the timeline window to being constrained between your keyframes, as you can see in the screenshot below.
It’s time for the big reveal! Press Option-A to see the mushroom animate in real-time. Press Escape when you’re done marveling at the life you’ve brought to the mushroom. Now you know why your mushroom is such a fun guy — because he’s so hoppy! (Okay… okay… I know that’s bad, but I’m lichen that pun quite a bit.) :]
Working With the Animation Screen
So far, you’ve done all your work in the Default screen layout, using only the Timeline to see keyframes. However, Blender comes with many handy screen layouts to make your life a little easier.
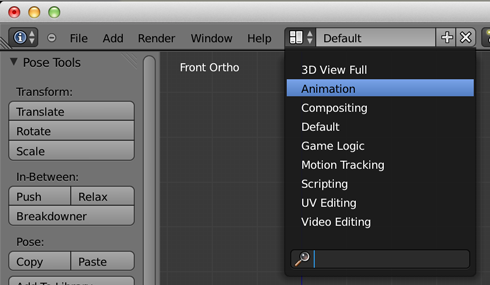
The Animation layout is a great example. Left-click the button next to the name of the screen layout and select Animation, as shown below:
In this layout, you’ll see a set of windows that relate to typical animation tasks. Notice the 3D View has changed: the mushroom is now in solid shading mode again and you’re viewing it in perspective, as shown below:

Dope Sheet Window
In the Dope Sheet window you are initially looking at the Dope Sheet mode: if you had multiple objects animating, they’d all be listed here. Where you could only see the keyframes of the selected object on the Timeline, here you can see it all.
Note: The term “dope sheet” comes from traditional animation where it is also known as an exposure sheet. Similar to traditional animation, Blender’s dope sheet gives the animator an overview of all the actions occurring in the timeline.
Note: The term “dope sheet” comes from traditional animation where it is also known as an exposure sheet. Similar to traditional animation, Blender’s dope sheet gives the animator an overview of all the actions occurring in the timeline.
In the Dope Sheet window, change the mode to the Action Editor, like so:

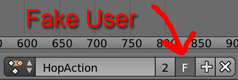
Now you’ll see just the Action that you’ve created for the mushroom and its keyframes. It has the default name of ArmatureAction, so rename the action to HopAction in the name field, indicated below:

If you want to zoom in on the keyframes so they don’t looks so squished together, you can use same commands you use in the 3D View for zooming: mouse wheel in or use Control-Middle-Mouse button. The point it scales from is the green line.
Creating a Fake User
Elements in a Blender file that are no longer referenced will have zero users. When you quit Blender and come back to it, those elements are not longer there. By creating a fake user, you keep Blender from trashing an unreferenced element that you might want to use later.
To the right of the name field is a button with an F on it; left-click it to create a fake user for this action.
Disconnecting the Hop Action
Next you need to disconnect the hop action so that you can create a second animation. If you didn’t do this, you’d be building on top of the hop animation (making it nod while it hopped), and that’s not what you want in this case.
Left-click the X the right of the F and +. This disconnects this action from the armature. The armature is no longer being used by the mushroom, but fortunately it now has a fake user to keep it from being discarded upon exit.
That takes care of the bounce — now you need to create another action to handle the nod.