Beginning Blender Tutorial: Animating and Rendering a Mushroom
Learn how to make a mushroom nod and bounce in this beginning blender tutorial on animation and rendering! By John R. Nyquist.
Extruding Your Armature
Just as you did to extrudes faces on a mesh in the previous tutorial, choose Extrude from the menu to the left of the 3D view (under Armature Tools), or alternatively press E to extrude from the tip of this bone. Next, press Z to constrain movement to the Z axis, and drag the new bone to the top of the mushroom’s cap, as such:

All bones must be uniquely named, so Blender automatically gives the new bone a unique name by appending a number to it. This bone will be the one associated with moving the vertices of the mushroom’s cap. You now have a skeleton for your mushroom.
Working in the Bones Context
The ominous sounding and looking Bone context button has a bone on it; it’s only available when the active object is an armature object. Left-click on the Bones context button to view the panels related to bones, as indicated below:
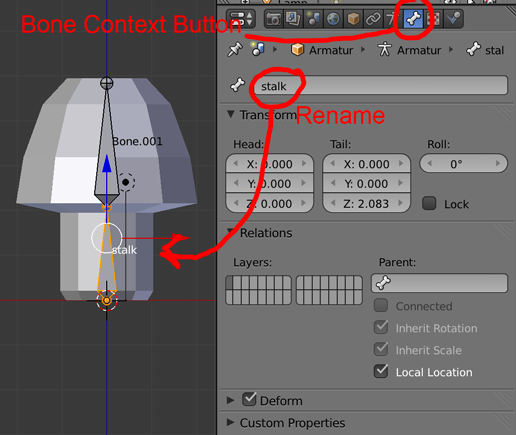
Right-click the bone named Bone in your 3D View. In the field at the top of the Bones context, rename this bone to stalk.
Now select the bone named Bone.001 in the 3D View and rename it cap.
Parenting the Mushroom to the Armature
Now you’ll create a relationship between the mesh object and the armature. Press Tab to exit Edit mode. Press Z to view your scene as wireframe, or alternately choose Wireframe from the Viewport Shading menu.
Right-click on the mushroom, then Shift-right-click on the armature. This selects both the mushroom and the armature, and sets the armature as the active object.
Skinning Your Bones
Another macabre sounding subject — skinning — is the process of associating the vertices with the bones. Fortunately, it’s fairly easy for you to do this with your mushroom.
Press Control-P to show the Set Parent To menu. Select With Automatic Weights under Armature Deform, as shown below:

This step parents the the mesh to the armature and sets the weight attribute — or the amount of influence that a bone has over a vertex — to “automatic”. This means that Blender will take a guess on the influence based on the proximity of the bones; it usually does a pretty good job.
Working in Pose Mode
Right-click the armature, then press Control-Tab to enter Pose mode; alternatively, you can select Pose Mode from the Mode menu. Note that selected bone turns cyan, as shown in the screenshot below:
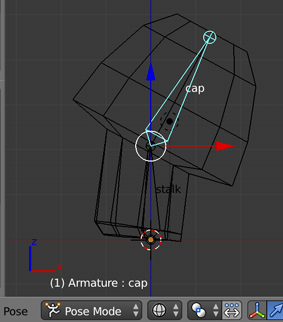
Right-click the cap bone, press R and move your mouse to rotate the bone. Note that the cap moves with the bone. By moving the bones, you can evaluate how well the automatic weighting work. It worked pretty good, but the base of the stalk is lifting a little. Since this is RayWenderlich.com, you’re going to take things a little further!
Working with Vertex Groups
So far, you have let Blender automatically associate which vertices are tied to which bone. However, it’s important to understand how you can do this manually if you want more fine-grained control. Note that this section is optional (since you’re simply doing what you’ve already done in an alternative way), so if you don’t care about this and want to get on with the animation, feel free to skip to the next section.
First, right-click to discard the rotation action. Next, right-click your mushroom and press Tab to enter Edit mode. Left-click the Object Data context button; you’ll note that it looks like a mesh triangle in your new context.
Look at the Vertex Groups panel; you may need to expand this section if it’s not visible. Your panel should look like the screenshot below:
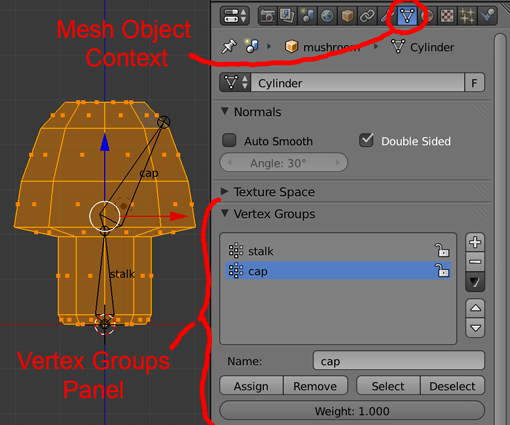
You’ll see two vertex groups that have the same names as the bones in the armature. That’s because bones are mapped to vertex groups by their names.
You’re going to remove the vertices from the existing groups and explicitly add them back. It’s possible to create named groups first and then add the vertices later, but then you wouldn’t have had the option to skip this section.
Leave all of the faces of your mushroom selected, left-click ‘stalk’ in the list, then left-click on the Remove button. Repeat this action for ‘cap’. Move your mouse over the 3D view and press A to deselect all.
Press B and select the vertices that belong to the stalk of the mushroom by dragging a box around them. In the Vertex Groups panel, select the ‘stalk’ group and click the Assign button, as so:

Now click Deselect.
Next, select the vertices of the cap (again using B to drag a box around them), select the ‘cap’ group, and click the Assign button.
You can use these groups to easily select specific groups of vertices — and more importantly, Blender knows exactly which vertices are moved by which bones.
Creating the Hop
Now that you’ve laid the framework for your mushroom to move, you can now add some animation to your object. You want your mushroom to squash and stretch while it hops; you create this effect by squishing the mushroom, stretching it as it hops into the air and squishing it again on landing.
In Blender, you perform animations by creating a series of keyframes. In each keyframe, you put the object in a different pose, and Blender will smoothly interpolate the movement between keyframes.
Note that when you create a keyframe, you need to specify the type of the keyframe – i.e. are you modifying the location, rotation, or scale of the object. Let’s take a look at how this works in practice now.