Spinner and Progress Bar in Swift: Getting Started
Learn how to implement a spinner indicator and progress bar in both UIKit and SwiftUI. By Adam Rush.
As iOS developers, you’re always thinking of how to make your users’ experience better. One surefire way to improve their experience is to use progress indicators while content loads. Progress indicators alleviate frustration by letting users know the app is working, not ignoring their requests.

In this tutorial, you’ll build two kinds of progress indicators in an iOS app that displays high-quality photos of dahlias, a type of flower. Specifically, you’ll learn how to:
- Use
UIActivityIndicatorViewto show indeterminate progress. - Integrate
UIProgressViewto show determinate progress. - Use SwiftUI’s
ProgressView.

This tutorial assumes you know the basics of building iOS apps in either UIKit or SwiftUI and have some familiarity with making network requests using URLSession. Check out our Networking with URLSession course if you want to know more about fetching data from the internet.
OK. Time to start!
Getting Started
Download the starter project using the Download Materials button at the top or bottom of this tutorial.
Build and run.

The sample app has four UIViewControllers within a UITabController.
Open FirstViewController.swift.
This small view controller is currently making a network request to the CDN server hosted on a website for a picture of a dahlia. You make the network request then load the image inside UIImageView, in Main.storyboard.
That network request won’t happen instantly, so you’ll add a progress indicator to let the user know what’s happening while they wait. But which kind of indicator should you use? Next, you’ll see when to use a spinner versus a progress bar.
Different Types of Progress Indicators
In this tutorial, you’ll build two different progress indicators:
- Spinner: An indeterminate progress indicator.
- Progress bar: A determinate progress indicator.
To understand the difference between the two, imagine this scenario:
It’s a hot day. You want ice cream, but there are six people in front of you. You don’t know how long it’ll take to get to the front of the line, but you know you’ll get your ice cream eventually. Your wait time is indeterminate.
The next hot day, you get in line for ice cream again. There are eight people in front of you now, but this time, there’s a sign telling you how long it’ll take to get served. Great news, it’ll only take five minutes! That’s a determinate wait time.

In your app’s case, you don’t know how long the image loading process will take, so you’ll implement an indeterminate progress indicator.
Understanding UIActivityIndicatorView
Use UIActivityIndicatorView when you don’t know how long a particular task will take. Some situations include:
- Network calls
- Downloading an image
- Background processing, such as database cleanup
Before you can use a UIActivityIndicatorView, you need to create a container view to allow the progress indicator to appear on different backgrounds.
Creating a Container View for UIActivityIndicatorView
You’ll start by adding a new view to contain the UIActivityIndicator. This lets you hide the whole view when the image finishes downloading, but it also means you’ll need to add some styling.
Open Main.storyboard.
Find the Pink Dahlia Scene, and add a new UIView to this ViewController‘s view, just below the image view in the view hierarchy.
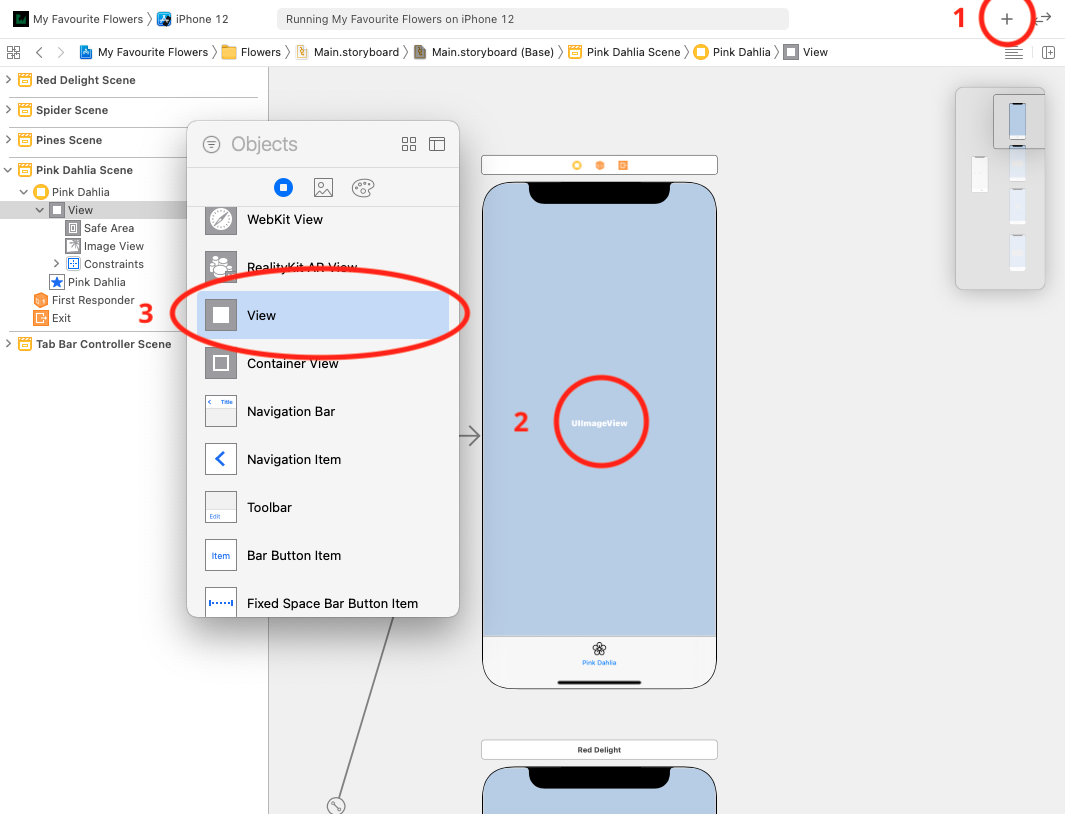
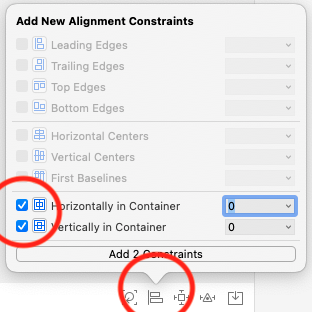
Open the Add New Constraints panel and set the UIView to 100 wide and 100 high.

Open the Align panel and align UIView horizontally and vertically.
Next, you’ll hook this UIView to its UIViewController. Open a new Editor tab in Xcode.
In FirstViewController.swift, add the following code directly below the UIImageView IBOutlet:
@IBOutlet weak var loadingView: UIView! {
  didSet {
    loadingView.layer.cornerRadius = 6
  }
}
You’ll see a small dot on the side. Drag this to the UIView you just added in the storyboard to make the connection. Notice that you’ve also set the cornerRadius value in the loadingView setter to 6. This makes the view look pretty. :]
Adding UIActivityIndicatorView
Now that you’ve created a container view, it’s time to add the UIActivityIndicator. This is a UIKit component that Apple provides. It’s designed to show an indeterminate loading time within your iOS app.
Open Main.storyboard.
Drag a new Activity Indicator View inside the Loading View you created in the previous step.
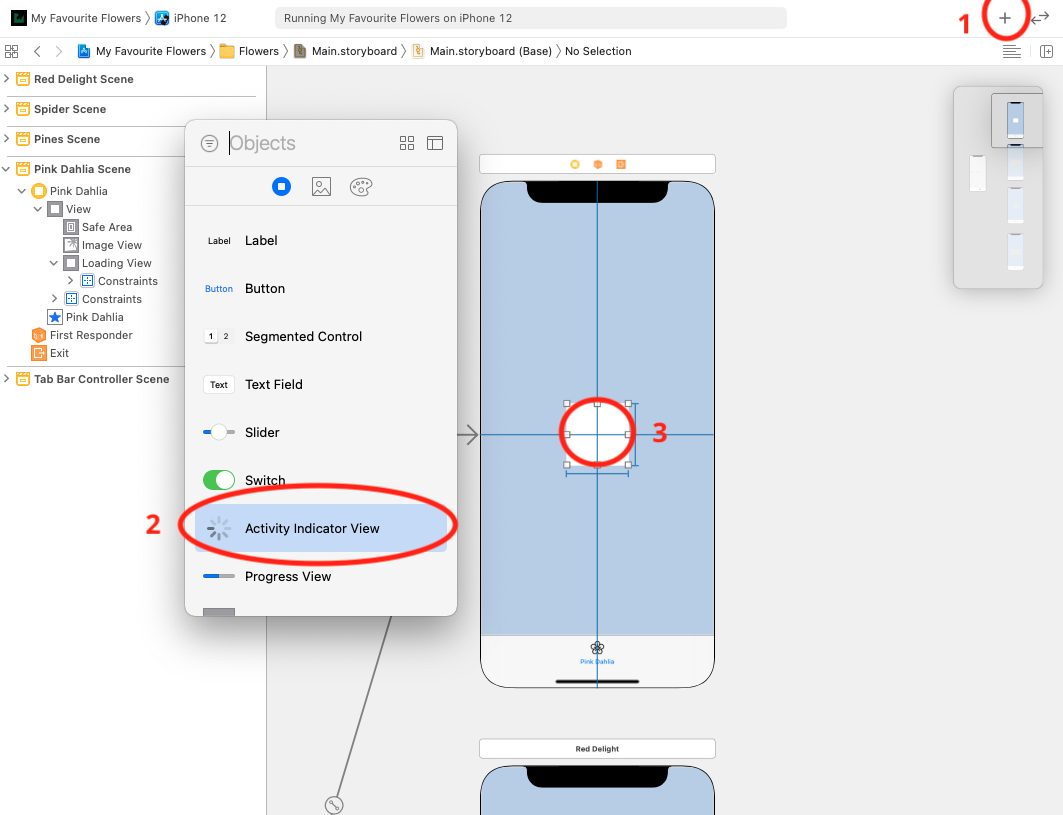
With the activity indicator selected, open the Align panel and align the view vertically and horizontally to make sure the activity indicator is centered in its container.
Next, open FirstViewController.swift.
Directly above the UIImageView IBOutlet, add the following code:
@IBOutlet weak var activityIndicator: UIActivityIndicatorView!
As you did before, open Main.storyboard in a second editor and drag the IBOutlet connection to the newly created activity indicator view.
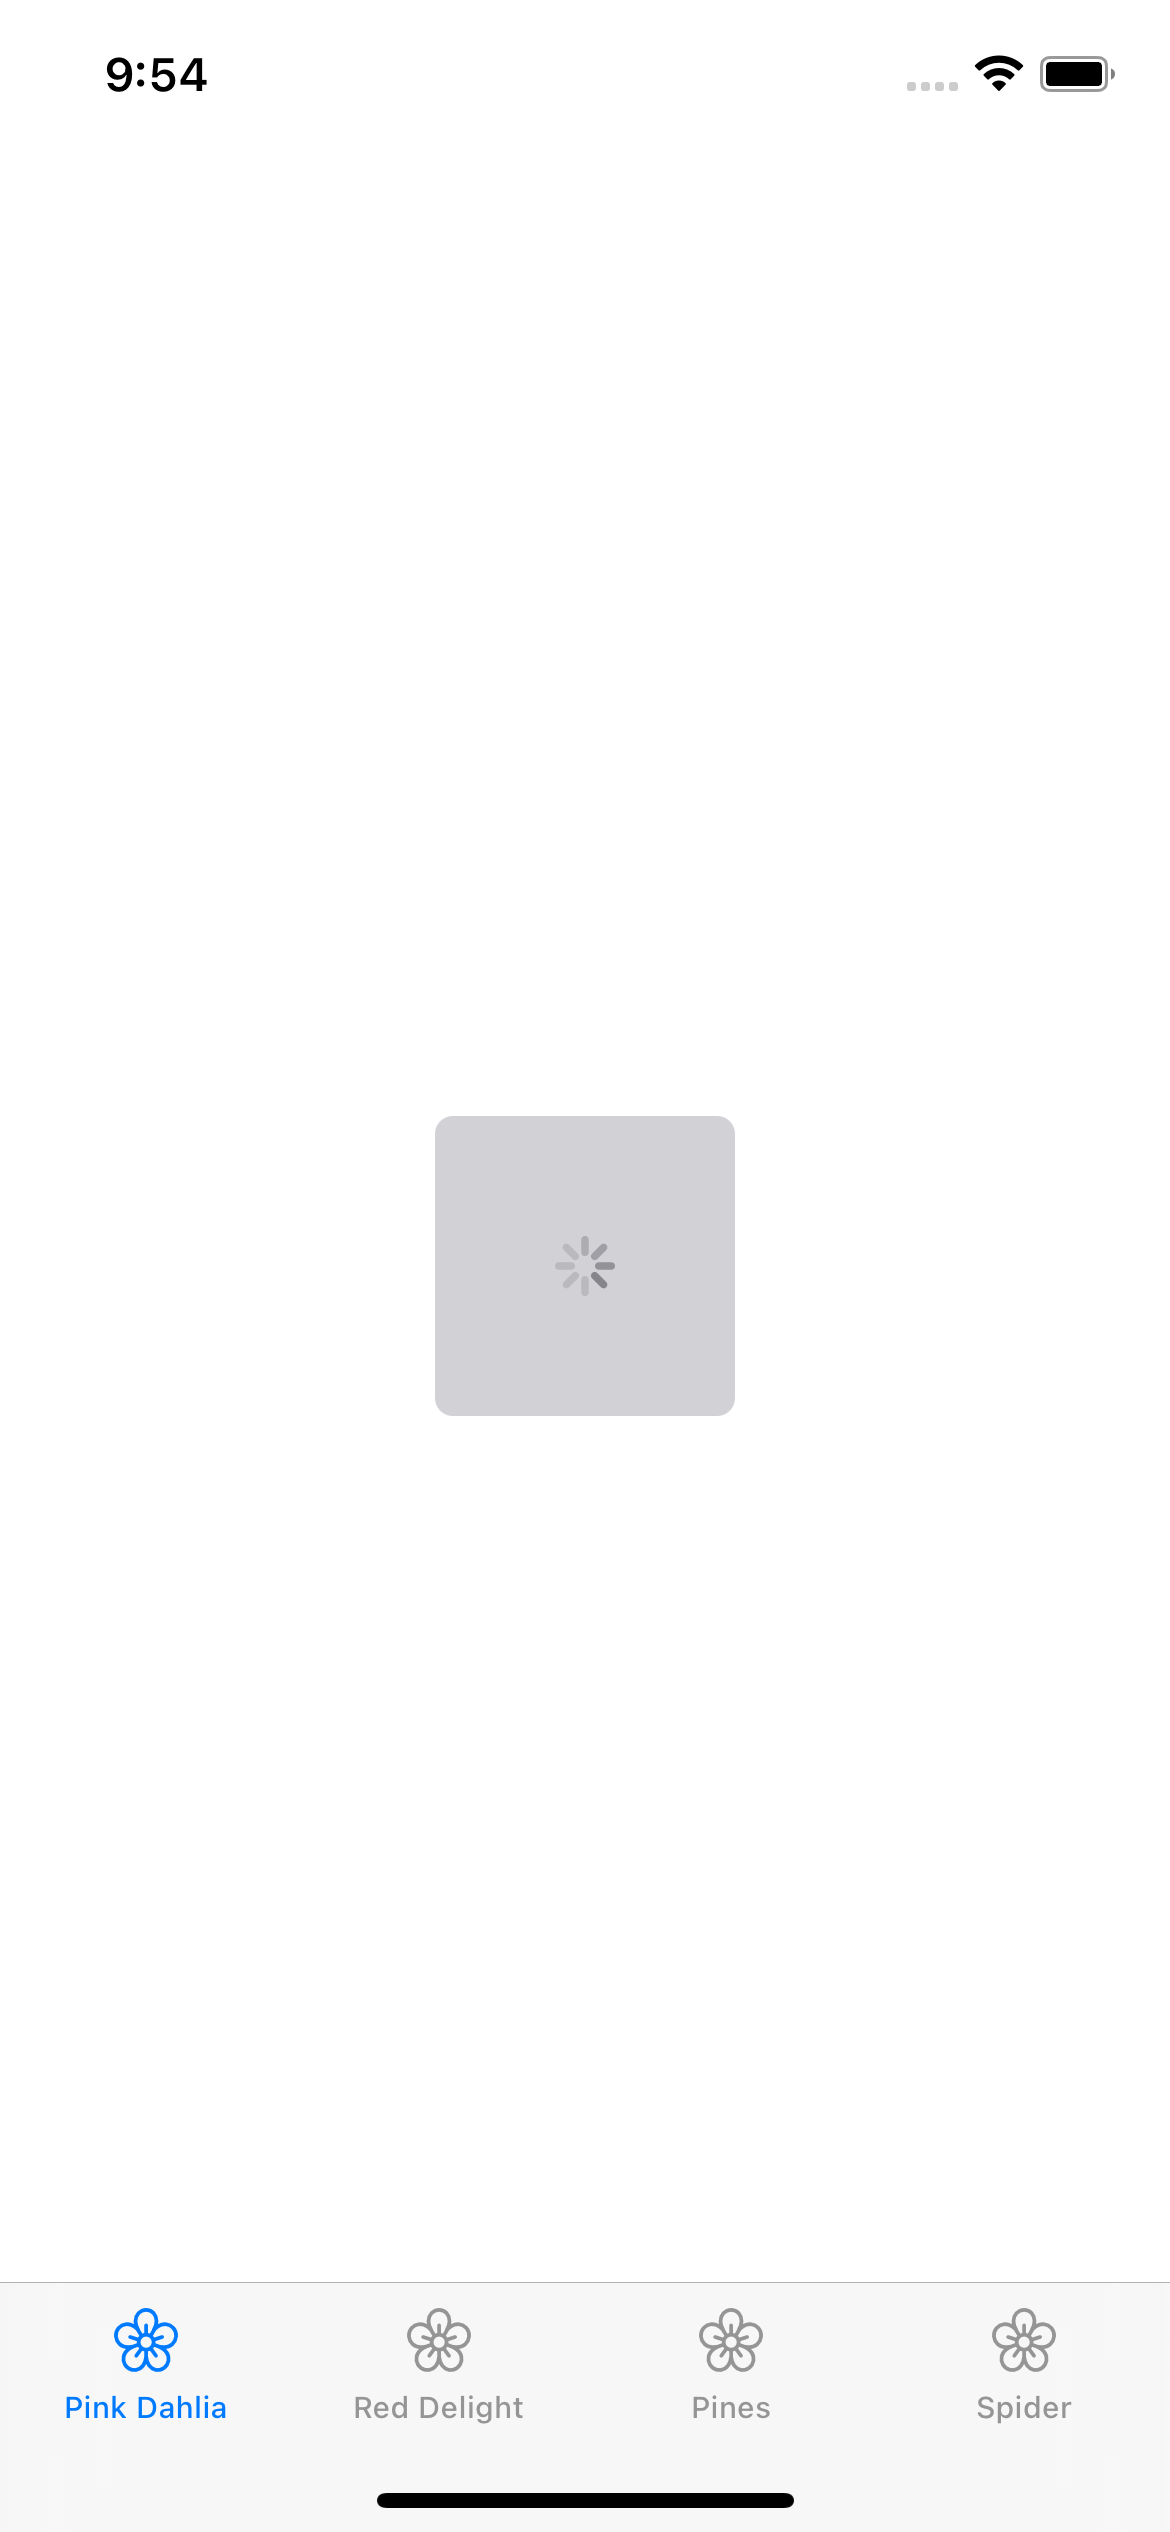
Build and run.

Your app now displays an indeterminate loading view. But you might notice two things:
- The loading indicator doesn’t spin.
- The loading view still displays, even after the image downloads.
You’ll fix these two issues next.
Making UIActivityIndicatorView Spin
UIActivityIndicatorView has two methods to control the spinning:
startAnimating()stopAnimating()
Open FirstViewController.swift.
You’ll create some private functions to start the spinner and hide the loading view after the image finishes downloading.
Directly below viewDidLoad(), add the following code:
private func showSpinner() {
}

private func hideSpinner() {
}
It’s good practice to have your own internal API design. This makes it easier to call a simple function that might do additional behavior, like hide the activity indicator’s container view.
Inside showSpinner(), add the following code:
activityIndicator.startAnimating()
loadingView.isHidden = false
This tells UIActivityIndicator to start spinning and makes loadingView visible.
Now, add the following code inside hideSpinner():
activityIndicator.stopAnimating()
loadingView.isHidden = true
The first line you added stops the UIActivityIndicator from spinning. The second line lets loadingView disappear.
Finally, you need to call the internal functions. Inside viewDidLoad(), above let url = ..., add the following code:
showSpinner()
As soon as the view loads, you’ll show the spinner.
When the image finishes downloading, you need to call hideSpinner().
Inside loadImage(with:), and directly below self.imageView.image = ..., add the following code:
self.hideSpinner()
As soon as a new image gets set, you’ll hide the spinner. Don’t forget to always show and hide the spinner on the main queue.
Build and run the app.
Congratulations, your indeterminate activity indicator is fully working! It now shows your users that the app is doing something while they wait for the photo to load.
Next, you’ll learn how to show a progress indicator for tasks with a determinate completion time.