Using Proxyman to Inspect Network Traffic
Learn how to use Proxyman as a man-in-the-middle proxy to inspect network traffic on your iOS device or simulator. By Danijela Vrzan.
Sign up/Sign in
With a free Kodeco account you can download source code, track your progress, bookmark, personalise your learner profile and more!
Create accountAlready a member of Kodeco? Sign in
Sign up/Sign in
With a free Kodeco account you can download source code, track your progress, bookmark, personalise your learner profile and more!
Create accountAlready a member of Kodeco? Sign in
Sign up/Sign in
With a free Kodeco account you can download source code, track your progress, bookmark, personalise your learner profile and more!
Create accountAlready a member of Kodeco? Sign in
Contents
Using Proxyman to Inspect Network Traffic
25 mins
- Getting Started
- Understanding Proxying
- Setting up Proxyman
- Installing Proxyman
- Getting Familiar With the Interface
- Setting up HTTPS Proxying
- Setting up the Root Certificate
- Enabling SSL Proxying
- Proxying on a Physical Device
- Proxying on the Simulator
- Inspecting Your App’s Network Traffic
- Filtering and Pinning Domains
- Adding Custom Previewer Tabs
- Composing Requests
- Using the Map Local Tool
- Using the Atlantis Framework
- Installing Atlantis With SwiftPM
- Initializing Atlantis Upon App Launch
- Adding Required Configuration for iOS 14 and Above
- Inspecting Your App’s Network Calls on Your iOS Device
- Where to Go From Here?
It’s almost impossible to write apps these days without using some kind of networking. It’s an essential concept every developer has to learn: Parse data from JSON and display it in your UI. Between fetching the data and displaying it, you often have a network call. Dealing with it can be frustrating at times. Have you ever coded everything right, with Xcode showing no errors, but still there’s no data displayed in your app? Fortunately, this is where Proxyman comes to the rescue. You can use its powerful toolkit to inspect and debug your network calls. It acts as a man-in-the-middle between your app and the web server.
In this tutorial you’ll learn how to:
- Set up Proxyman on your Mac.
- Enable SSL proxying of HTTPS requests.
- Inspect your app’s network traffic.
- Edit network responses to simulate different scenarios.
- Use the Atlantis framework to inspect network calls on a physical device.
You’ll need a physical device if you’d like to try out proxying a device’s traffic. However, if you don’t have one, you can skip that part of the tutorial.
First, take a look at the app you’ll use for this tutorial.
Getting Started
Download the starter project by clicking Download Materials at the top or bottom of the tutorial.
Open Jokester.xcodeproj inside the starter folder. Build and run to see the app in action:
Jokester is a simple, one-screen app that fetches a random dad joke from this JokeAPI and a random image using the Lorem Picsum random image generator. Every time you tap the card, the app makes two network calls: One that gets a random joke in JSON format, parses it and then displays it in a card view and a second that generates a random image. These two calls are independent of each other.
Before you begin, you ask: What sorcery is proxying?
Understanding Proxying
Networking — the Wingardium Leviosa of modern computing.
Sorcery or not, you’ll have a hard time finding an app that’s not using networking in some way.
Have you ever finished designing your UI, and the preview looks good, but once you build and run your app, it’s empty? You’re not getting any errors, and Xcode isn’t complaining when you need it to?
Xcode’s console output might give you some hints about what’s happening, but it’s not telling you much.
There’s a better way to debug your networking calls: using a proxy.
A proxy acts as a middleman between the client seeking the resources and a server that provides those resources:
When you have a proxy set up between the client and the server, the server doesn’t know to whom it’s sending the information. It’s only aware of the request and that it needs to send a response.
First, you need to download and set up Proxyman.
Setting up Proxyman
At the time of writing, version 2.31.0 is the latest version of Proxyman. While your version may be different, the concepts will still be the same.
Before you begin, you need to install Proxyman on your machine.
Installing Proxyman
Download the latest version from the Proxyman website. Click the button on the website entitled Download Proxyman for macOS and wait for the DMG file to download.
Open the file, then drag and drop Proxyman to Applications:
When you open Proxyman for the first time, it’ll prompt you to Install Proxy Helper Tool:
Proxyman uses a macOS command-line tool called networksetup to change the system proxy settings. It works, however it is less performant than installing Proxyman’s own helper tool for this. Installing it requires entering your password as it requires elevated privileges to function.
Click Install Helper Tool and enter your password when prompted. If you closed the pop-up or wish to install the helper tool later, go to Preference ▸ Advanced and install it from there.
Next, you’ll become familiar with the interface.
Getting Familiar With the Interface
The moment you opened Proxyman, it started inspecting all network calls on your machine. Depending on how many tabs you have open, it might be filling up the list very quickly. And you know you have more than one tab open, wink, wink.
Pause the proxying for now by clicking Pause Recording on the top-left:
When you want to resume recording, click the same button to Start Recording again.
Proxyman has three main panels, highlighted in the screenshot below.
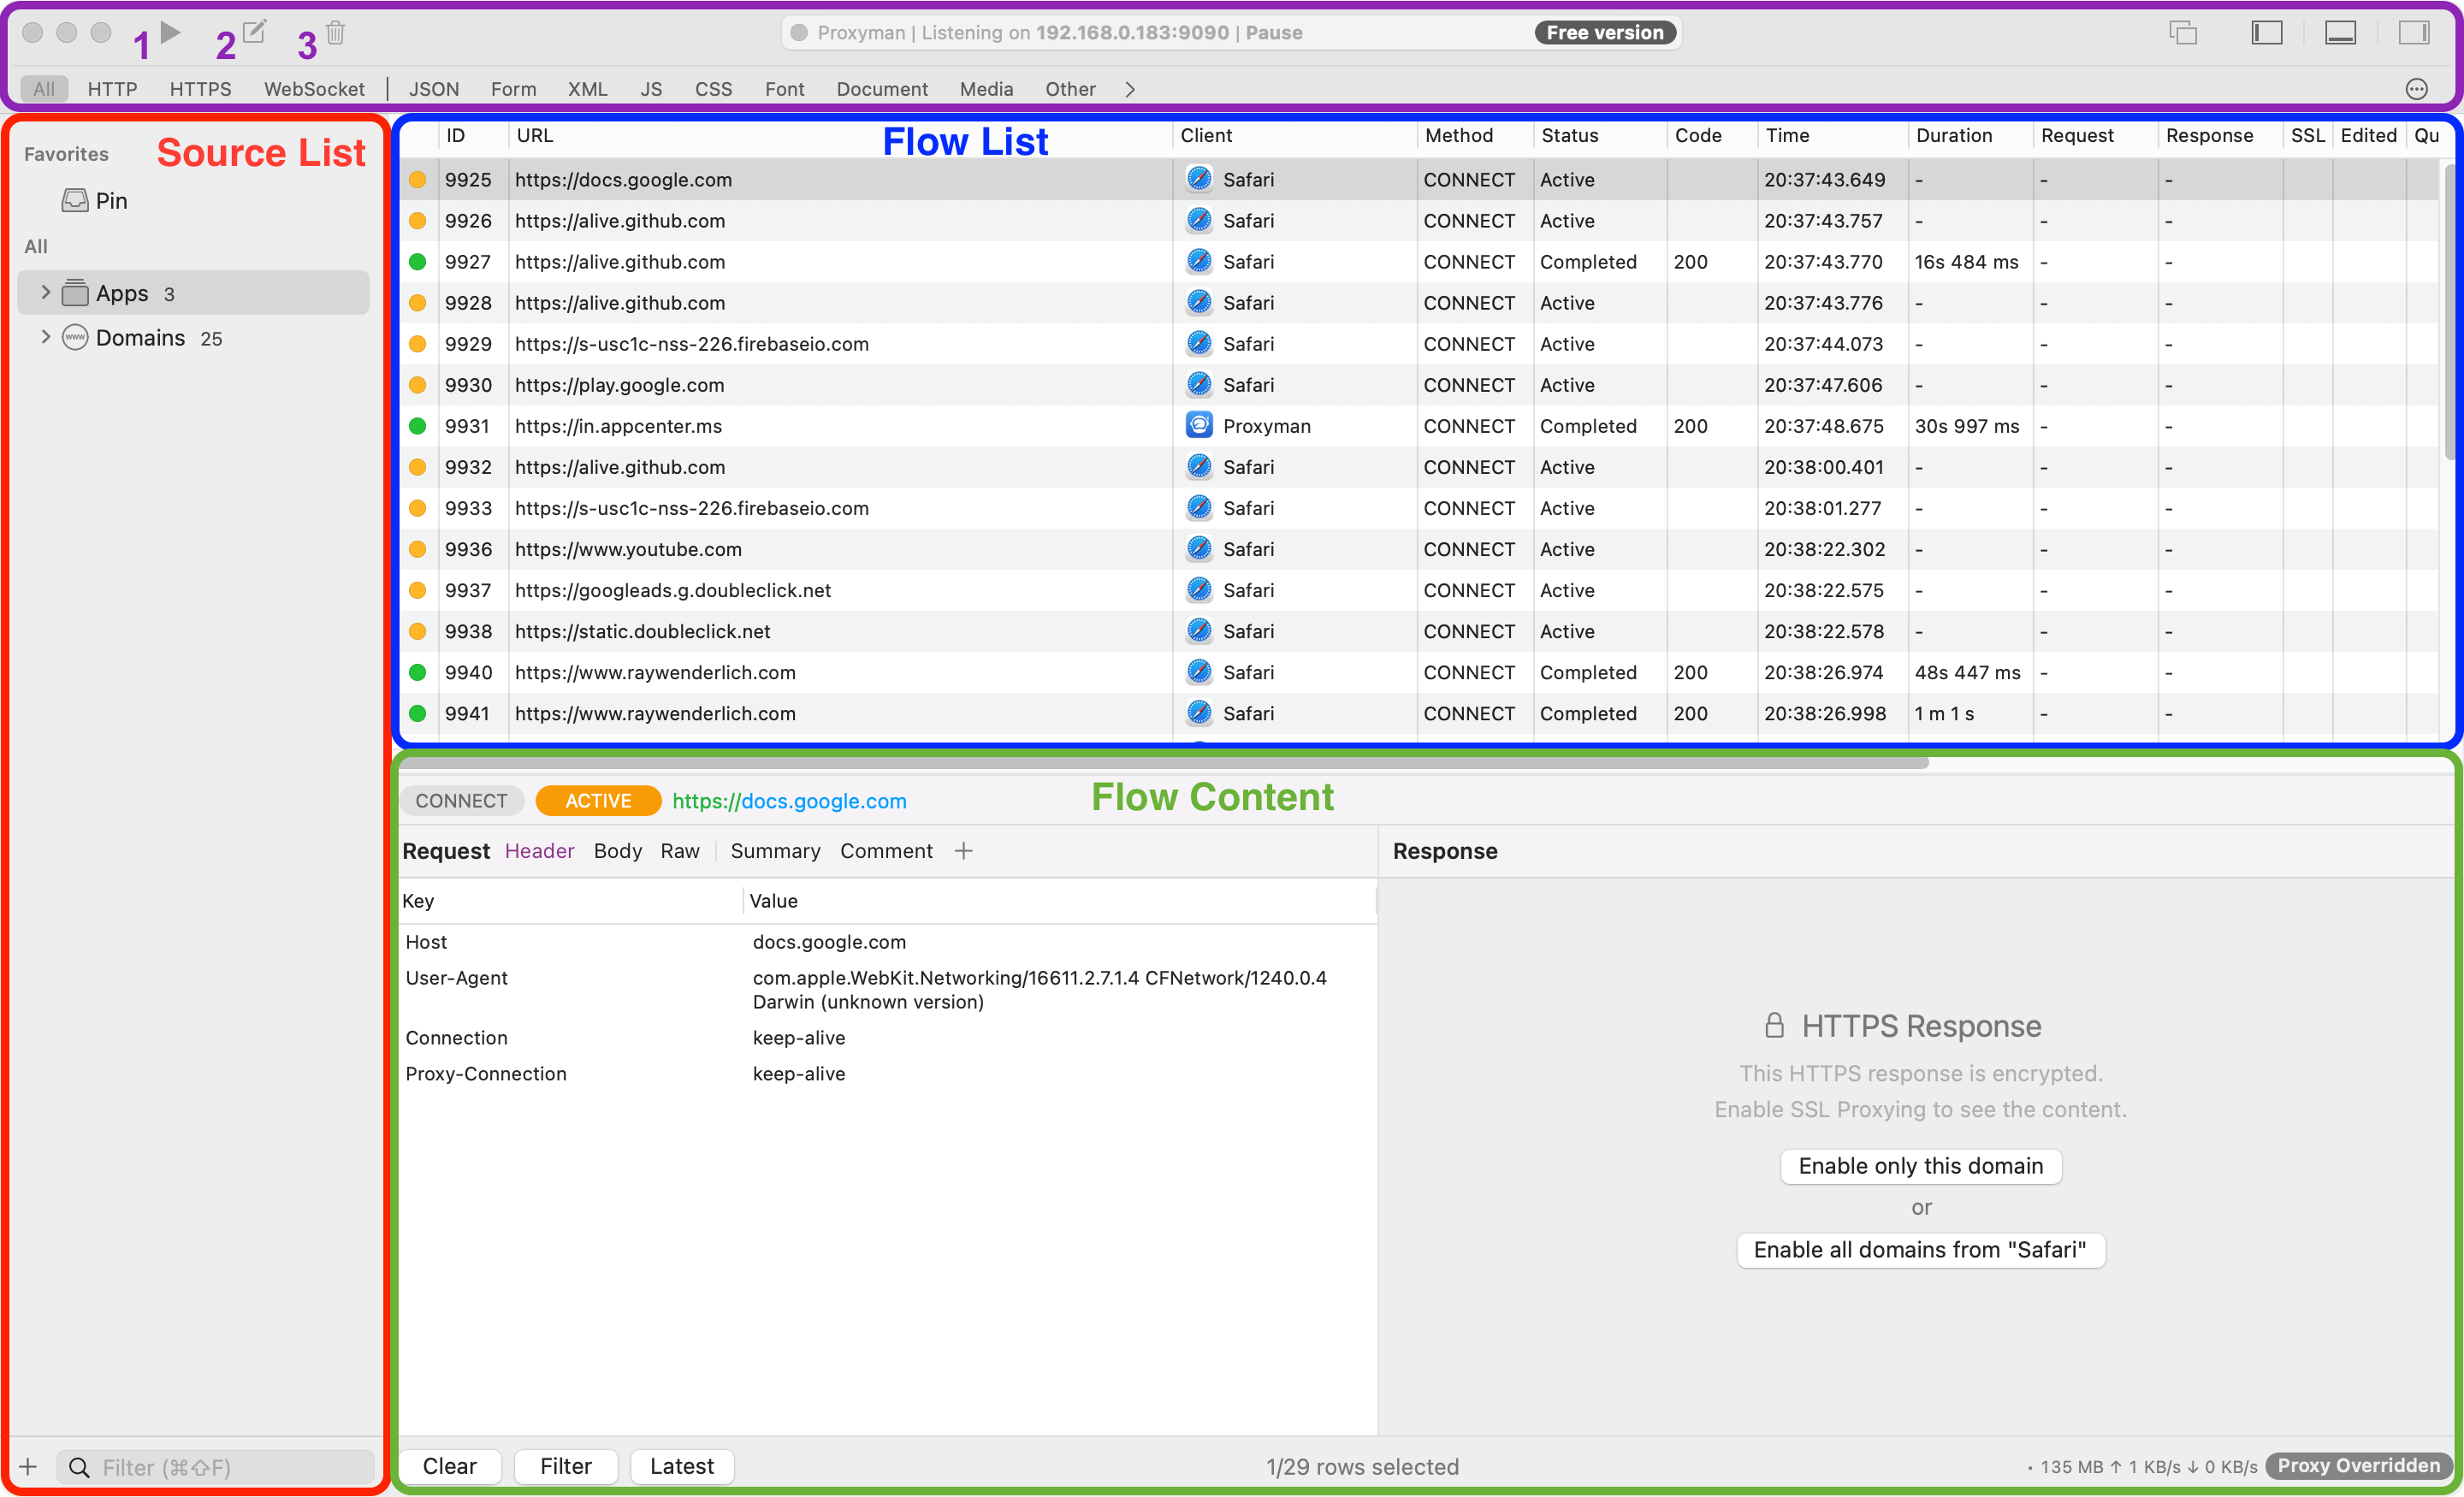
Here’s what each of these panels provide:
Source List displays aggregated information about all domains and apps connected to the network on your machine. Once you start inspecting networks in the simulator or your iOS device, they’ll appear on the list.
Flow List displays detailed information about each network call on a specific domain.
But the area that interests you the most is Flow Content. It’s split into two main parts: Request and Response windows.
You look at requests and responses while you’re inspecting your network calls. You can see detailed information and even read the JSON you’re fetching in plain text. All this may look confusing at first, but it’ll get much clearer once you start using it in your app.
The top area has three buttons. The first one you already used to pause recording. The second one is for composing your own requests, and the third one clears all the network calls from the list.
Below them is a filtering bar where you can filter your calls by a specific format.
Setting up HTTPS Proxying
HTTPS mean using the HTTP protocol over SSL. SSL itself is a protocol designed to create authenticated and encrypted links between computers in a network. SSL was deprecated when the newer protocol, TLS, released in 1999. However, it’s still referred to as SSL or sometimes as SSL/TLS.
Click a row in the flow list where the URL starts with https://
. Notice how the response tab has a lock that says This HTTPS response is encrypted and shows no information?
It’s like the Marauder’s Map — where the key to unlocking it is the magic words, “I solemnly swear that I am up to no good”.
You are actually performing a man-in-the-middle (MITM) attack on yourself when you proxy traffic. When you do it with HTTPS traffic you are technically tricking the server into believing that Proxyman is the app requesting data. However it’s not nefarious because you’re doing this to your own traffic on your machine!
To let Proxyman do its magic, you must first install a root certificate which Proxyman can use to encrypt/decrypt as it acts as the man-in-the-middle.
Setting up the Root Certificate
To show you the responses of your network calls in plain text, Proxyman requires you to install the Proxyman Root Certificate. The certificate is locally generated on your machine and stored and trusted in your Keychain.
Go to Certificate ▸ Install Certificate on this Mac…
You’ll see a new Mac Setup Guide window with instructions to set up your macOS certificate:
If you have administrator privileges, it’s easiest to install the certificate automatically on the default selected Automatic. If you don’t, you can still do it manually by following the instructions in the Manual tab.
On the Automatic tab, click Install & Trust. When prompted, enter your password. You should now see Installed & Trusted!, which means you’ve completed the process:
Start recording network calls if you are still paused. You’ll notice that, while you’re able to see the responses, some of them are still locked.
You’ve done everything. But to decrypt encrypted responses you still need to enable SSL proxying for whatever domains you need to inspect connections to.
Enabling SSL Proxying
You can enable SSL proxying for a single or multiple domains. You can even enable it for all your network calls without worrying about a domain. All you have to do is specify a wildcard symbol.
In regular expressions, a wildcard symbol is the *. It matches any number of any characters.
Go to Tools ▸ SSL Proxying List…:
Click + at the bottom-left and then select Add Wildcard:
Type * in the field and click Add:
A new wildcard entry will appear in the list. With this set up, you’re now able to read encrypted responses in plain text from any domain. Clear the list using Clear and then Start Recording again. You’re now able to read all your network calls.
Now that you’ve got HTTPS traffic proxying it’s time to learn how to inspect network calls on your physical device.
Proxying on a Physical Device
Proxyman has an iOS app to capture network traffic that you can install from the App Store. You can install and play with it, but you won’t use it in this tutorial.
Instead, you’ll configure a Wi-Fi Proxy on your iOS device to Proxyman and install a Proxyman CA Certificate. The process requires a few steps to set up. Once you’re done, you’ll be able to inspect your phone’s network calls and see them in Proxyman on your machine.
Go to Certificate ▸ Install Certificate on iOS ▸ Physical Devices…:
On your phone, open Settings then Wi-Fi and select your current Wi-Fi. Scroll down, select Configure Proxy and then turn on Manual configuration:
For the Server field, enter the value of the server from Proxyman. Enter 9090 for the Port and leave the Authentication toggle off. Tap Save.
Now, open Safari on your phone and navigate to the Proxyman local HTTP server: http://proxy.man/ssl.
A prompt will appear asking if you want to allow download of the configuration profile. Tap Allow. If you see a prompt asking you to choose a device on which you’d like to install this profile then choose iPhone.
Then close Safari and open the Settings app.
A new Profile Downloaded option appears right below your name. Select it and a modal screen will appear asking you to Install Profile:
Tap Install and when prompted, enter your passcode. You’ll see a warning saying you need to trust this certificate, which you’ll complete in the next step. Tap Install and then Done.
Next, in the Settings app, go to General ▸ About ▸ Certificate Trust Settings. Turn the toggle on and tap Continue.
That’s it, you’re done! Close Settings and go to Proxyman. You’ll see a new entry in Proxyman under Remote Devices where all your network calls from your phone appear:
Next, you’ll learn how to proxy the iOS Simulator.
Proxying on the Simulator
Proxying on a physical device is great when you’re testing out your app in production. But being able to inspect your app’s network calls from your iOS Simulator is a very convenient way to debug your code as you’re developing it. It’s also very simple to set up!
If you don’t have Xcode running, open Jokester.xcodeproj. Build and run the app:
In Proxyman, go to Certificate ▸ Install Certificate on iOS ▸ Simulators…:
Click Install and Trust. Once the process finishes, it’ll say Installed successfully!
Proxyman installs a certificate only on your booted iOS Simulators. If you need to run your app on a different Simulator, you need to repeat the process.
You can now proxy your network calls from the simulator.
Now, to test this, make sure Proxyman is still recording your network calls. In the simulator, tap the card to make a network call and load a new joke with a random image.
In Proxyman, expand the Apps group. You’ll see your app’s name in the list:
There are two network calls in your app: one to get a random image from picsum.photos and a second to get a random joke from joke.deno.dev. Click each of these rows in the flow list and inspect the response.
For example, on the joke API response you might see something like this:
{ "id": 15, "type": "programming", "setup": "What's the best thing about a Boolean?", "punchline": "Even if you're wrong, you're only off by a bit." }
For the image API response, you’ll see the actual image that was downloaded.
Now you’ve seen how to inspect some responses to the requests that your app is making! In the following sections, you’ll learn how to use Proxyman’s toolkit to help you debug your app.
Inspecting Your App’s Network Traffic
First, you’ll learn how to filter and pin a domain you’re inspecting to find it faster in a list.
Filtering and Pinning Domains
When working with Proxyman, or any other proxying tool, it’s proxying all the network calls on your machine. The list can fill up very quickly, and it may be hard to find what you need.
You apply filters using the bar at the top of the UI:
The first section highlighted in red is used to filter by protocol. You can select HTTP, HTTPS or WebSocket. The second section highlighted in blue will filter on a certain response format, e.g. JSON. And the final section highlighted in green will filter on the response status code. By holding down Command, you can select multiple filters.
When you’re using a filter, make sure you’ve selected All Apps or Domains, otherwise you’re only filtering your specific selection:
In addition to filtering, you can pin a domain or an app. In Source List, expand the list of apps and select Jokester. Right-click on Jokester and select Pin:
Your app is now pinned to the top and you won’t need to search for it in the list every time you need it:
Next, you’ll see how to view your network calls in JSON format.
Adding Custom Previewer Tabs
When it comes to requests and responses, you’re interested in seeing the correct status code and format of your JSON. The default Previewer Tab in both request and response windows is Header.
The headers in a request or response provide extra information between the client and the server. Since you’re interested in seeing the JSON, you’ll add it to the tab.
In Source List, under Jokester, select the joke.deno.dev domain. Select a network call in the Flow List. In the Response window, click +:
This opens a new Custom Previewer Tab window:
Here, you can select multiple formats you want to add to your previewer list. Under Response, select JSON and Images. Close the window.
You will notice in the Response window there are now two new tabs: JSON and Images. Select JSON:
Magic! You can see the JSON response you received from the server in plain text.
Now, select the i.picsum.photos domain and a network call from the Flow List. In the Response window, select Images preview:
You can see the exact image your response sent you!
Not only can you inspect your network calls in Proxyman, but you can also compose custom requests in the app. You’ll see how in the following section.
Composing Requests
Before you compose a new network request, make sure you pause recording and clear all the network calls with the clear button. This lets you see your composed request without searching for it.
If you don’t do this, you can still find your request under Apps ▸ Proxyman. That’s the app that sent the request after all.
Click the compose button in the top bar:
You can compose any request you choose. But since you’re inspecting your app, copy and paste https://joke.deno.dev into the text field.
Next to the text field is a drop-down menu where you can select the HTTP method of your request. The default is GET, and that’s what you want here, so leave that selected. When composing your request, Body, Header and Query are optional. If not defined, it uses the default configuration.
At the bottom-left, check Close window after send and click Send.
In the Flow List, you can now see your composed request:
Click it and inspect the response using the JSON tab. You’ll see the joke that the API randomly selected for you!
Next, you’ll learn how to use the Map Local tool to edit networking responses that your app is receiving.
Using the Map Local Tool
The Map Local tool allows you to intercept a response and alter it.
In Proxyman, make sure you’re recording network traffic on your simulator. In the Jokester app on your simulator, request a new joke.
Then, in Proxyman, select a network call from the joke.deno.dev domain. Right-click and go to Tools ▸ Map Local…:
You’ll see a new Map Local Editor window:
Edit the JSON body and replace setup with question:
Now close both windows and tap the card in the Jokester app to generate a new random joke. What happens to the UI?
The title of the joke says Ready? and the punchline stays the same no matter how many times you tap the card; only the image changes.
You changed the property name of a JSON object and now your code can’t decode it. So it’s defaulting to a string defined in the app’s code.
Changing responses is one of the most useful features when proxying network calls. You can use it to simulate response errors and see how your app responds.
You’ve seen how to set up your own device for proxying manually. Now, you’ll learn how to set it up in a much simpler way, using the Atlantis framework.
Using the Atlantis Framework
Atlantis makes proxying your app’s network calls simpler than setting it up manually. You only need to import the framework and add a few lines of code.
You’ll use Swift Package Manager to add Atlantis to your app.
Installing Atlantis With SwiftPM
Open Jokester.xcodeproj, if you haven’t already. In the Project navigator, select the Jokester root project. Then select Project ▸ Jokester ▸ Package Dependencies and finally click the + underneath the Packages list.
A new window will open. Copy and paste https://github.com/ProxymanApp/atlantis into the search field at the top right:
Keep all the options at the default and then click Add Package. Xcode will perform a fetch of the repository and set up the dependency. When it has finished, click Add Package again.
You’ll see Atlantis added under Package Dependencies:
Now you need to add Atlantis to the app. The first step is to initialize Atlantis when your app launches.
Initializing Atlantis Upon App Launch
In Xcode, open AppMain.swift and add the following line below import SwiftUI
:
import Atlantis
Then add the following at the beginning of AppMain
before body
:
init() {
Atlantis.start()
}
With a few lines of code, you tell your app to start using Atlantis when your app finishes launching.
Build and run. You’ll see the following lines in Xcode console:
--------------------------------------------------------------------------------
--------- [Atlantis] MISSING REQUIRED CONFIG from Info.plist for iOS 14+ -------
--------------------------------------------------------------------------------
Read more at: https://docs.proxyman.io/atlantis/atlantis-for-ios
Please add the following config to your MainApp's Info.plist
Now that Atlantis is up and running, a step is required for Atlantis to work on iOS 14 or later. Don’t skip this step, or Atlantis may not work.
Adding Required Configuration for iOS 14 and Above
In Xcode, find your Info.plist file in Document Outline. Right-click the file then Open As ▸ Source Code:
Add a new line below dict
on line 4, then copy and paste the following:
<key>NSLocalNetworkUsageDescription</key>
<string>Atlantis would use Bonjour Service to discover Proxyman app from your local network.</string>
<key>NSBonjourServices</key>
<array>
<string>_Proxyman._tcp</string>
</array>
Your Info.plist file will look like this:
Run the Jokester app again, and you’ll see this in your Xcode console:
--------------------------------------------------------------------------------
---------- Atlantis is running (version 1.0)
---------- Github: https://github.com/ProxymanApp/atlantis
--------------------------------------------------------------------------------
[Atlantis] Looking for Proxyman app in the network...
You’re done with the setup. Now, you can inspect your app’s network calls on your device.
Inspecting Your App’s Network Calls on Your iOS Device
Build and run Jokester on your phone. In Proxyman, make sure you’re recording your network calls. Now, get your daily dose of dad jokes and tap the card a few times:
In Proxyman, you’ll see your iPhone and your app added to the Source List:
Using the Atlantis framework instead of manually setting up Proxyman on your device comes with a few perks. The setup is simpler, and when you’re done, you don’t have to remove any profiles from your device.
If you’re using multiple devices, you don’t have to install profiles on each. All you need to do is install your app on the device you want to inspect your network on.
Mischief managed!
Where to Go From Here?
You can download the completed project files by clicking Download Materials at the top or bottom of this tutorial.
Well done — now you’re a networking wizard!
While networking errors aren’t everyone’s favorite, debugging them should now be a breeze for you. You’ve learned to navigate through some basic networking features that Proxyman offers. Check out Proxyman’s Official Documentation to explore all its other features and keep track of new updates that come along.
In the world of proxies, there’s another popular app called Charles Proxy. Check out the Charles Proxy Tutorial for iOS to learn the basics. And if you feel up for it, check out the Advanced Charles Proxy Tutorial for iOS, where you can learn about all the advanced features.
We hope you enjoyed this tutorial. If you have any questions as you navigate your way through this magical world of network debugging, don’t hesitate to leave a comment in the forum discussion below.