Internationalizing Your iOS App: Getting Started
In this tutorial, learn how to prepare your app to support multiple languages, including regional numeric formats, rules for plurals, and much more. By Richard Critz.
Adding a Spanish Localization
To add support for another language, click on the blue iLikeIt project folder in the Project navigator and select the iLikeIt Project in the center pane (NOT the Target). On the Info tab, you will see a section for Localizations. Click the + and choose Spanish (es) to add a Spanish localization to your project.
Xcode will list the localizable files in your project and allow you to select which ones it should update. Keep them all selected and click Finish.

But wait! Where is Localizable.strings? Don’t worry; you haven’t marked it for localization yet. You’ll fix that shortly.
At this point, Xcode has set up some directories, behind the scenes, to contain localized files for each language you selected. To see this for yourself, open your project folder using Finder, and you should see something similar to the following:

See en.lproj and es.lproj? They contain the language-specific versions of your files.
“en” is the localization code for English, and “es” is the localization code for Spanish. For other languages, see the full list of language codes.
So what is Base.lproj? Those are the files in the base, or development, language — in this case, English. When your app asks iOS for the localized version of a resource, iOS looks first in the appropriate language directory. If that directory doesn’t exist, or the resource isn’t there, iOS will fetch the resource from Base.lproj.
It’s that simple! Put your resources in the appropriate folder and iOS will do the rest.
Localizable.strings doesn’t do much good unless it exists in these .lproj directories. Tell Xcode to put it there by selecting it in the Project navigator, then clicking Localize… in the File inspector.

Xcode will ask you to confirm the file’s language. The default will be English since that’s your development language. Click Localize.

The File inspector will update to show the available and selected languages. Click the checkbox next to Spanish to add a Spanish version of the file.

Look at the Project navigator. Localizable.strings now has a disclosure triangle next to it. Expand the list and you’ll see that Xcode lists both the English and Spanish versions.

Select Localizable.strings (Spanish) in the Project navigator and replace its contents with the following:
"You have sold 1000 apps in %d months" = "Has vendido 1000 aplicaciones en %d meses";
"You like?" = "¿Es bueno?";
Xcode makes it easy to test your localizations without the bother of constantly changing languages or locales on your simulator. Click the active scheme in the toolbar and choose Edit scheme… from the menu (you can also Option-Click on the Run button).

The Run scheme will be selected by default and that’s the one you want. Click the Options tab, then change Application Language to Spanish. Click Close.

Build and run and you should see something like this when you click ¿Es bueno?:

Hooray! There’s some Spanish in your app!
Internationalizing Storyboards
UI elements in your storyboard, such as labels, buttons and images, can be set either in your code or directly in the storyboard. You have already learned how to support multiple languages when setting text programmatically, but the Hello label at the top of the screen has no IBOutlet and only has its text set within Main.storyboard.
You could add an IBOutlet, connect it to the label in Main.storyboard, then set its text property using NSLocalizedString(_:tableName:bundle:value:comment:) as you did with likeButton and salesCountLabel, but there is a much easier way to localize storyboard elements, without the need for additional code.
In the Project navigator, open the disclosure triangle next to Main.storyboard and you should see Main.storyboard (Base) and Main.strings (Spanish).

Click on Main.strings (Spanish) to open it in the editor. You should already have an entry for the Hello label which will look something like this:
/* Class = "UILabel"; text = "Hello"; ObjectID = "jSR-nf-1wA"; */
"DO NOT COPY AND PASTE.text" = "Hello";
Replace the English translation with the Spanish translation:
/* Class = "UILabel"; text = "Hello"; ObjectID = "jSR-nf-1wA"; */
"DO NOT COPY AND PASTE.text" = "Hola";
Change the localizations for the other two entries. Again, do not edit the unique ObjectID:
"DO NOT COPY AND PASTE.text" = "Has vendido 1000 aplicaciones en 20 meses";
"DO NOT COPY AND PASTE.normalTitle" = "¿Es bueno?";
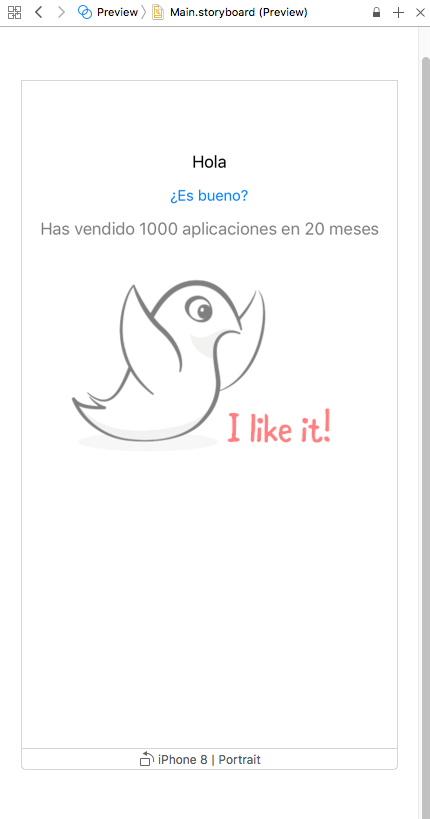
Xcode lets your preview your storyboard localizations. Select Main.storyboard in the Project navigator and open the assistant editor with View\Assistant Editor\Show Assistant Editor. Make sure it is showing the preview of the storyboard:

Click the language menu in the lower right corner and select Spanish.

Your preview, except for the image, should be in Spanish.
Internationalizing Images
Since the app uses an image that contains English text, you will need to localize the image itself. Unfortunately, while Apple recommends that you put all of your images into an asset catalog, they provide no direct mechanism for localizing those images. Not to worry, however, as there is a simple trick that makes it easy to do.
Open Assets.xcassets and you will see a Spanish-localized version of the image named MeGusta. Now open Localizable.strings (English) and add the following at the end:
"imageName" = "iLikeIt";
Next, open Localizable.strings (Spanish) and add the following at the end:
"imageName" = "MeGusta";
Finally, open MainViewController.swift and replace viewDidLoad() with:
override func viewDidLoad() {
  super.viewDidLoad()

  imageView.image = UIImage(named: NSLocalizedString("imageName",
                                                     comment: "name of the image file"))
}
You use the key imageName to retrieve the name of the localized version of the image and load that image from the asset catalog. You also deleted setting the title of the button from MainViewController.swift because it’s now set in the storyboard localization.
Internationalizing Numbers
You have made great progress in preparing your app to run in multiple languages, but there is more to the process than just changing the words. Formatting for other common data, such as numbers and dates, varies around the world. For example, in the US you might write “1,000.00”. In Spain, you would write “1.000,00” instead.
Luckily, iOS provides various formatters such as NumberFormatter and DateFormatter to do all of this for you. Open MainViewController.swift and in likeButtonPressed() replace:
salesCountLabel.text = String.localizedStringWithFormat(formatString, period)
with:
let quantity = NumberFormatter.localizedString(from: 1000, number: .decimal)
salesCountLabel.text = String.localizedStringWithFormat(formatString, quantity, period)
This creates a localized presentation of the number 1000 and inserts it in the formatted string assigned to the label.
Open Localizable.strings (English) and change the second “1000” to %@.
"You have sold 1000 apps in %d months" = "You have sold %@ apps in %d months";
Do the same in Localizable.strings (Spanish).
"You have sold 1000 apps in %d months" = "Has vendido %@ aplicaciones en %d meses";
Make sure your scheme is still set to run with the Application Language set to Spanish, then build and run. You should see something like this:
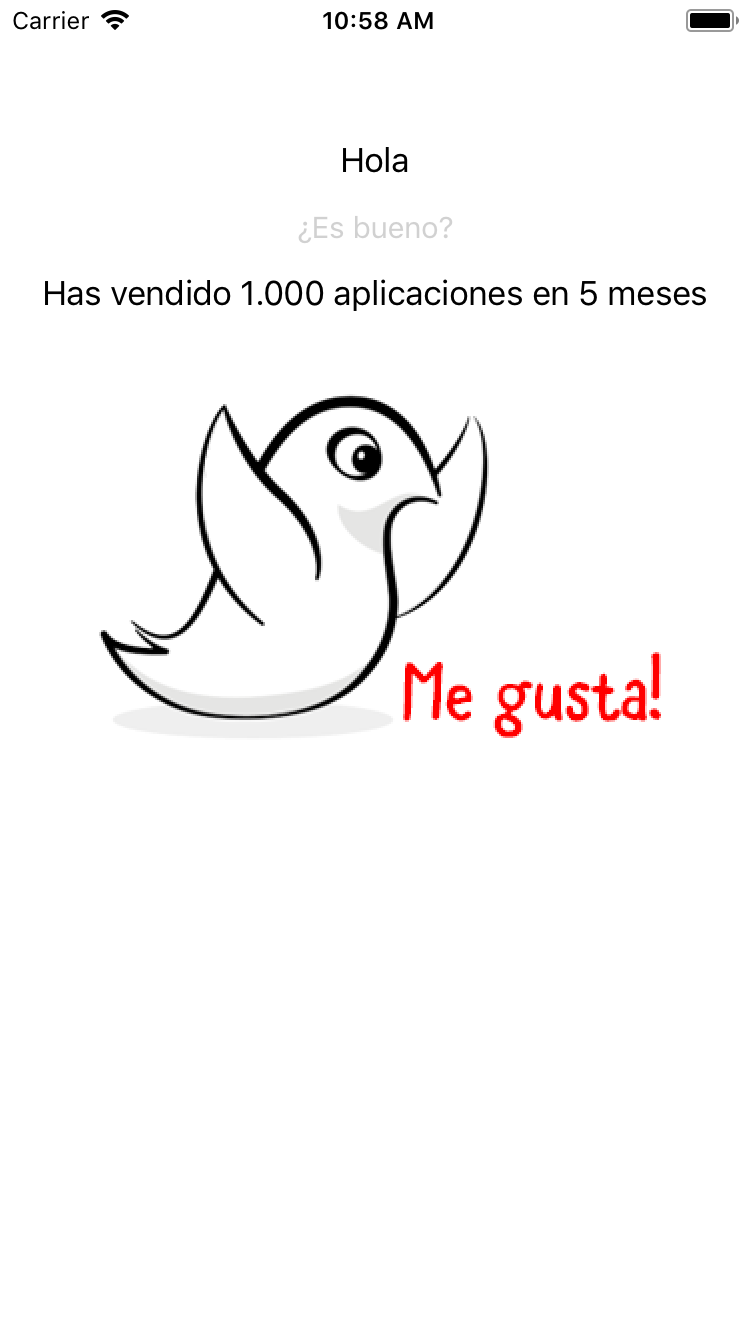
Edit your run scheme and change the Application Language back to System Language. Build and run again; this time you should see something like:

Using various combinations of Application Language and Application Region, you can test almost all localizations you desire.
Using various combinations of Application Language and Application Region, you can test almost all localizations you desire.