Internationalization Tutorial for iOS [2014 Edition]
Learn how to localize your app into different languages in this localization tutorial. By Ali Hafizji.
Adding a Spanish Localization
To add support for another language, click on the blue iLikeIt project folder on the left pane, select the Project in the next pane (NOT the Target), and under the Info tab you’ll see a section for Localizations. Click the + and choose Spanish (es).

The next screen asks you which files you want to localize. Keep them all selected and click Finish. Note: Localizable.strings will not show up in this list, so don’t panic!

At this point, Xcode has set up some directories, behind the scenes, containing separate versions of InfoPlist.strings and Main.storyboard for each language you selected. To see this for yourself, open your project folder using Finder, and you should see the following:
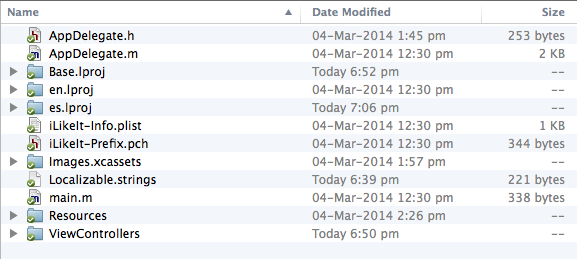
See en.lproj and es.lproj? They contain the language-specific versions of your files.
‘en’ is the localization code for English, and ‘es’ is the localization code for Spanish. For other languages, see the full list of language codes.
From now on, when your app wants to get the English version of a file, it will look in en.lproj, and when it wants the Spanish version of a file it will look in es.lproj.
It’s that simple! Put your resources in the appropriate folder and iOS will do the rest.
But wait, what about Localizable.strings? To let Xcode know you want it localized, select the file using the left pane, and open the File Inspector in the right pane. There you will see a button labeled Localize, click it, choose English (because it’s currently in English), and finally click Localize.

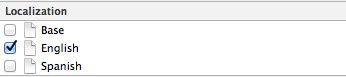
Now the File Inspector panel will show which languages this file belongs to. Currently, as you can see, the file is only localized for English. Add Spanish localization by checking that box to the left of Spanish.
Go back to the left panel and click on the arrow next to Localizable.strings, so it shows the sub-elements. You now have two versions of this file: one for English and the other for Spanish:

To change the text for Spanish, select Localizable.strings (Spanish) and replace its contents with the following:
"Yesterday you sold %@ apps" = "Ayer le vendió %@ aplicaciones";
"You like?" = "~Es bueno?~";
Congratulations, your app is now bilingual!
To test it out and verify everything worked, change the display language on your simulator/device to Spanish by launching the Settings app and choosing:
General -> International -> Language -> Espanol.
If you are still running the Xcode debugger, click Stop in Xcode, then click Build & Run and you should see:

Locale vs Language
1 million is a pretty impressive sales number; let’s make it look even better by adding some formatting.
Open ViewController.m and replace the line that sets the text for _salesCountLabel with the following:
NSNumberFormatter *numberFormatter = [[NSNumberFormatter alloc] init];
[numberFormatter setNumberStyle:NSNumberFormatterDecimalStyle];
NSString *numberString = [numberFormatter stringFromNumber:@(1000000)];
_salesCountLabel.text = [NSString stringWithFormat:NSLocalizedString(@"Yesterday you sold %@ apps", nil), numberString];
Build and Run the app and the number should now be a lot easier to read.

This looks great to an American, but in Spain 1 million is written as “1.000.000” not “1,000,000”. Run the app in Espanol and you’ll see commas used to separate the zeroes. In iOS, number formatting is based on the region/locale, not the language, so in order to see how someone in Spain will view the sales number, open Setting.app and change the locale by navigating to:
General -> International -> Region Format -> Spanish -> Spain

Build and Run the app again and you should now see the properly formatted number like this:

For a little extra work up-front, NSNumberFormatter automatically formats your numbers for the appropriate region. Whenever possible, resist the urge to re-invent the wheel, because on iOS, it usually pays to do things the Apple way.
Internationalizing Storyboards
UI elements in your storyboard such as labels, buttons and images can be set in your code or directly in the storyboard. You have already learned how to support multiple languages when setting text programmatically, but the “Hello” label at the top of the screen has no IBOutlet and only has its text set within Main.storyboard.
You could add an IBOutlet, connect it to the label in Main.storyboard, then set its text property using NSLocalizedString as with the likeButton and the salesCountLabel, but there is a much easier way to localize storyboard elements, without the need for additional code.
Open the disclosure triangle to the left of Main.storyboard and you should see Main.storyboard (Base) and Main.storyboard (Spanish). Clicking on Main.storyboard (Spanish) opens the editor with the localizable text in your storyboard. You should already have an entry for the Hello label which will look something like this:
/* Class = "IBUILabel"; text = "Hello"; ObjectID = "pUp-yc-27W"; */
"pUp-yc-27W.text" = "Hello";
Replace the two occurrences of “Hello” with the Spanish translation, “Hola” like this:
/* Class = "IBUILabel"; text = "Hola"; ObjectID = "pUp-yc-27W"; */
"pUp-yc-27W.text" = "Hola";
Note: Never directly change the auto-generated ObjectID. Also, do not copy and paste the lines above, as the ObjectID for your label may be different from the one shown above.
Internationalizing Images
Since the app uses an image that contains english text, you will need to localize the image itself, as having bits and pieces of English in a mostly Spanish app not only makes your app look amateur, but also detracts from the overall usability and market potential.
To localize the image, first download this Spanish version of the image (right-click -> Save Image As… on most browsers):

Open Images.xcassets and add the image to the asset catalog by dragging and dropping the newly downloaded megusta.png into the list of images on the left. Asset catalogs cannot be internationalized, so you wil need to use a simple work-around to localize the image.
Open Localizable.strings (English) and add the following to it:
"imageName" = "ilike";
Similarly add the following to the Localizable.strings (Spanish) file:
"imageName" = "megusta";
From now on, you will use the imageName key to retrieve the name of the localized version of the image. Open ViewController.m and add the following line of code to the viewDidLoad method:
[_imageView setImage:[UIImage imageNamed:NSLocalizedString(@"imageName", nil)]];
If needed, switch your simulator/device to Espanol, then Build & Run and you will see the localized version of the image displayed:

Congrats! You now have all the tools required to localize your apps for multiple different languages.
Note: This is just one way to do things, useful if you have different filenames per language. A perhaps better way of doing this is to localize a resources folder, as described in this article.