Supercharging Your Xcode Efficiency
Boost your XCode efficiency and learn how to become a coding ninja by following this tutorial. By Jack Wu.
Fixing the Bug
You need to determine if data made its way into members, so start by setting a breakpoint right below self.members = json[@"Team"]; and run the project.
Note: If you are new to setting breakpoints and debugging in general, check out our video tutorial series on debugging.
Note: If you are new to setting breakpoints and debugging in general, check out our video tutorial series on debugging.
Of the behaviors you looked at earlier, Generates output will get triggered first, and then Pause follows immediately after. Because of the custom setup you created for Pause, you’ll get a new tab named Fix with a layout that is perfect for debugging! Now you have another cool trick to show your friends at your next party.
Look at the variable inspector. Do you notice that self.members is nil a little, um, fishy. In loadData you can see that self.members is populated like this:
NSDictionary *json = [NSJSONSerialization JSONObjectWithData:data options:kNilOptions error:&error];
self.members = json[@"Team"];
Dig into json in the variable inspector, so you can determine if the dictionary loaded correctly.
You’ll see the first key in the data is @"RWTeam" instead of @"Team". When loading self.members, the key used the wrong data. Ah-ha! Eureka, there’s that little bug!
To resolve, you need to correct the data in the source file:
- First, enter Dev Mode with
Command .. - Press
Command + Option + Jto jump to the filter bar and type this: teammember. - Then, hold Alt and click on
TeamMembers.jsonto open it up in the assistant editor. - Finally, replace
"RWTeam"with"Team".
This is how it looks when you follow these steps:

Now remove the breakpoint, and then build and run. You should see this:

Much better, but it looks there is another bug. See how the descriptions below Ray and Brian’s titles are missing? Well, that’s a good thing because you’ll get to add more points to your coolness and ninja stats by resolving the problem.
Stats:
Coolness points gained:200
Total Coolness points:800
Ninja points gained:100
Total Ninja points:350
Stats:
Coolness points gained:200
Total Coolness points:800
Ninja points gained:100
Total Ninja points:350
Speeding It Up
Let’s try to utilize more ninja tools for this second bug.
You probably know that UITableViewCells are configured in tableView:cellForRowAtIndexPath:, so navigate there using Open Quickly and following these steps:
- Press
Command + Shift + Oto bring up Open Quickly. - Type in
cellForRow, then press down once to select the instance in CardTilt. - Hit Enter to open it in the primary editor.
Hold Command and click on setupWithDictionary to navigate to the definition. Look around a bit, and you’ll see some code that appears to be loading descriptions:
  NSString *aboutText = dictionary[@"about"]; // Should this be aboot?
  self.aboutLabel.text = [aboutText stringByReplacingOccurrencesOfString:@"\\n" withString:@"\n"];
It’s loading the label from data found in dictionary[@"about"].
Now use Open Quickly to bring up TeamMembers.json. This time, open in the assistant editor by pressing Alt + Enter.
Check for the about key, and you’ll see someone misspelled it as aboot—probably a Canadian, like me! To fix this, use global Find and Replace. Sure, you could do this directly in the file, but using the find navigator is infinitely cooler.
Open up the find navigator and change the mode to Replace by clicking on the Jump Bar at the top. Type aboot into the find field and press Enter.

Hmm… there is one other place that uses the word aboot outside of TeamMembers.json.
No worries! Click on CTCardCell.m in the search results and press Delete. Now you no longer need to concern yourself with replacing it – cool!
Go to the replace field and type in ‘about’, and then press Replace All to finish the job.
Here’s how that looks in action:

Ninja Dojo: This section already gave you tons of ninja points. To obtain even more, you can use Command + Shift + Option + F to open the Find navigator in replace mode.
If that’s a tad too ninja, you can use Command + Shift + F to open up the find navigator in Find mode and change the mode to Replace afterwards.
If that’s still too ninja, you can use Command 3 to open up the Find navigator and go from there!
Ninja Tip: There are many, many ways to perform actions in Xcode. Play around and find the way that suits you best :]
Build and run. You should now see all the cells properly loaded, like this:

Coolness points gained:
200Total Coolness points:
1000Ninja points gained:
50Total Ninja points:
400
Keeping Your Designer Happy
That’s it for debugging today. Give yourself a round of applause and pat on the back for getting the app up and running.
Before you go and show it to someone, you want to make sure the app’s interface is flawless. Especially if that someone is your designer, who likes to take his ruler to the screen.
This section will show you a few tricks in Interface Builder to achieve such perfection, and of course, help you become even cooler in the process.
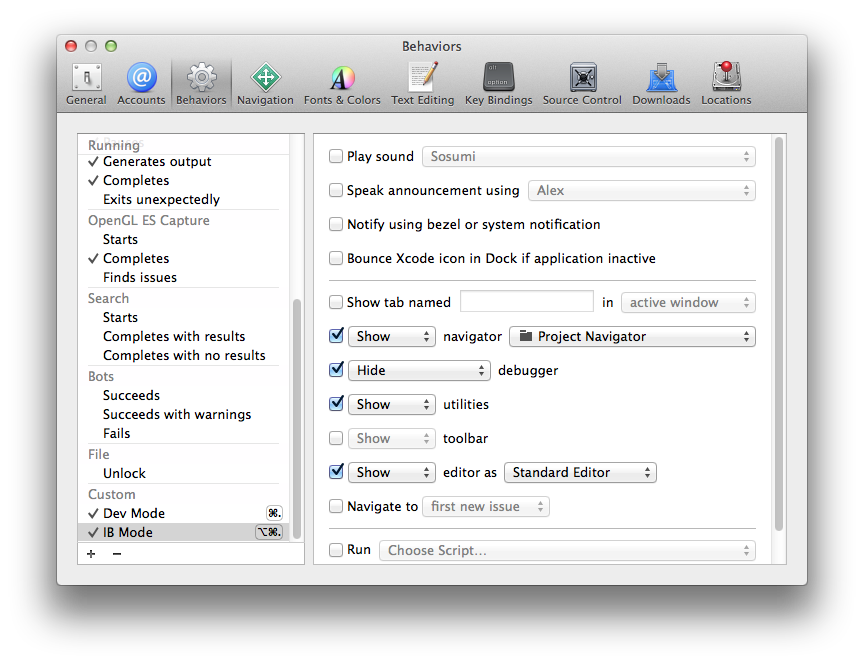
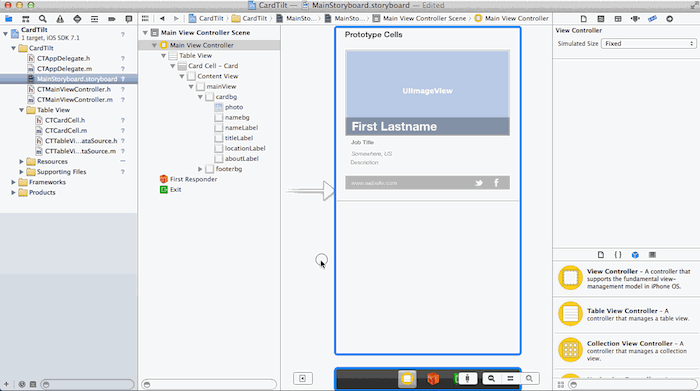
Open up MainStoryboard.storyboard. Usually, you want the standard editor and the utilities area open when working in interface builder, so create a new custom behavior for this called IB Mode. Feel free to use the version below, but try to create your own before you look at the solution used to create this tutorial. It’s cool to be different!
[spoiler title="IB Mode"]
[/spoiler]
You can see that I used Command Option . as the hotkey for IB Mode.
Now that you’re looking at a comfy Interface Builder, take a look at CTCardCell. First, you want to center mainView inside Content View. Here are two tricks make this relatively elementary:
Hold Control + Shift and left click anywhere on mainView within the editor.
You’ll see a popup that lets you choose between all the views under your mouse pointer like this: 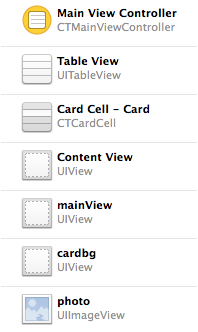
This allows you to select mainView easily, even though cardbg is blocking it.
Once you select mainView, hold Alt and move your cursor around the edges of Content View to see the spacing of the view.
Here’s how that looks:
Turns out the alignment isn’t much to behold. That’s not very ninja!
To fix this, you’ll need to resize the view. turn on Editor\Canvas\Live AutoresizingTo force subviews to re-size when you resize their parent view. Now drag the corners of mainView while holding Alt and adjust until there are 15 points on each side.

Try using the same trick to help align the three labels titleLabel, locationLabel and aboutLabel so that they have zero vertical spacing between them. Hold Alt to monitor the spacing while repositioning the labels with the arrow keys or your mouse.
Did you notice the left edges of these labels are also misaligned?
Your designer will definitely want them to be left-aligned with nameLabel and webLabel. To accomplish this easily, you’ll use a Vertical Guide.
Select cardbg and go to Editor\Add Vertical Guide. Take note of the hotkeys, they’re Command - for horizontal guide and Command | for a vertical guide.
Those two hotkeys probably make the most visual sense–ever.
Once you have the vertical guide on the screen, drag it to 10 points from the left edge of cardbg. Now views can snap to this vertical guide and align perfectly. Go ahead and line up those labels.
OK, so Xcode isn’t always perfect, and you may occasionally have issues selecting a guideline right after you create it.
If hovering over it doesn’t work, quickly open a different source file and then flip back to the storyboard. Once it reloads the storyboard, the issues typically resolve themselves.
Bonus Ninja Tip: The best part about vertical and horizontal guides is that all views can snap to them, they don’t have to be in the same hierarchy to align nicely!
Here is a replay of the steps to correct alignment in this scene:
I bet you can’t wait to show your work to your designer now!
Stats:
Coolness points gained:400
Total Coolness points:1400
Ninja points gained:0
Total Ninja points:400
Stats:
Coolness points gained:400
Total Coolness points:1400
Ninja points gained:0
Total Ninja points:400