OpenGL ES Pixel Shaders Tutorial
In this OpenGL ES pixel shaders tutorial, take a deep dive into GLSL and fragment shader math – including how to make gradients and random noise! By Ricardo Rendon Cepeda.
Pixel Shader Procedural Textures: Perlin Noise
In this section, you’ll learn all about texture primitives, pseudorandom number generators, and time-based functions - eventually working your way up to a basic noise shader inspired by Perlin noise.
The math behind Perlin Noise is a bit too dense for this tutorial, and a full implementation is actually too complex to run at 30 FPS.
The basic shader here, however, will still cover a lot of noise essentials (with particular thanks to the modular explanations/examples of Hugo Elias and Toby Schachman).
Ken Perlin developed Perlin noise in 1981 for the movie TRON, and it's one of the most groundbreaking, fundamental algorithms in computer graphics.
It can mimic pseudorandom patterns in natural elements, such as clouds and flames. It is so ubiquitous in modern CGI that Ken Perlin eventually received an Academy Award in Technical Achievement for this technique and its contributions to the film industry.
The award itself explains the gist of Perlin Noise quite nicely:
"To Ken Perlin for the development of Perlin Noise, a technique used to produce natural appearing textures on computer generated surfaces for motion picture visual effects. The development of Perlin Noise has allowed computer graphics artists to better represent the complexity of natural phenomena in visual effects for the motion picture industry."
Clouds: Noise translates in x and z

Clouds: Noise translates in x and z
Flames: Noise scales in x,y, translates in z

Flames: Noise scales in x,y, translates in z
So yeah, it's kind of a big deal… and you’ll get to implement it from the ground up.
But first, you must familiarize yourself with time inputs and math functions.
Procedural Textures: Time
Open RWTNoise.fsh and add the following lines just below precision highp float;
// Uniforms
uniform vec2 uResolution;
uniform float uTime;
You’re already familiar with the uResolution uniform, but uTime is a new one. uTime comes from the timeSinceFirstResume property of your GLKViewController subclass, implemented as RWTViewController.m (i.e. time elapsed since the first time the view controller resumed update events).
uTime handles this time interval in RWTBaseShader.m and is assigned to the corresponding GLSL uniform in the method renderInRect:atTime:, meaning that uTime contains the elapsed time of your app, in seconds.
To see uTime in action, add the following lines to RWTNoise.fsh, inside main(void):
float t = uTime/2.;
if (t>1.) {
  t -= floor(t);
}

gl_FragColor = vec4(vec3(t), 1.);
This simple algorithm will cause your screen to repeatedly fade-in from black to white.
The variable t is half the elapsed time and needs converting to fit in between the color range 0.0 to 1.0. The function floor() accomplishes this by returning the nearest integer less than or equal to t, which you then subtract from itself.
For example, for uTime = 5.50: at t = 0.75, your screen will be 75% white.
t = 2.75
floor(t) = 2.00
t = t - floor(t) = 0.75
Before you build and run, remember to change your program’s fragment shader source to RWTNoise in RWTViewController.m:
self.shader = [[RWTBaseShader alloc] initWithVertexShader:@"RWTBase" fragmentShader:@"RWTNoise"];
Now build and run to see your simple animation!
You can reduce the complexity of your implementation by replacing your if statement with the following line:
t = fract(t);
fract() returns a fractional value for t, calculated as t - floor(t). Ahhh, there, that's much better
Now that you have a simple animation working, it's time to make some noise (Perlin noise, that is).
Procedural Textures: "Random" Noise
fract() is an essential function in fragment shader programming. It keeps all values within 0.0 and 1.0, and you’ll be using it to create a pseudorandom number generator (PRNG) that will approximate a white noise image.
Since Perlin noise models natural phenomena (e.g. wood, marble), PRNG values work perfectly because they are random-enough to seem natural, but are actually backed by a mathematical function that will produce subtle patterns (e.g. the same seed input will produce the same noise output, every time).
Controlled chaos is the essence of procedural texture primitives!
Note: Computer randomness is a deeply fascinating subject that could easily span dozens of tutorials and extended forum discussions. arc4random() in Objective-C is a luxury for iOS developers. You can learn more about it from NSHipster, a.k.a. Mattt Thompson. As he so elegantly puts it, "What passes for randomness is merely a hidden chain of causality".
Note: Computer randomness is a deeply fascinating subject that could easily span dozens of tutorials and extended forum discussions. arc4random() in Objective-C is a luxury for iOS developers. You can learn more about it from NSHipster, a.k.a. Mattt Thompson. As he so elegantly puts it, "What passes for randomness is merely a hidden chain of causality".
The PRNG you’ll be writing will be largely based on sine waves, since sine waves are cyclical which is great for time-based inputs. Sine waves are also straightforward as it's just a matter of calling sin().
They are also easy to dissect. Most other GLSL PRNGs are either great, but incredibly complex, or simple, but unreliable.
But first, a quick visual recap of sine waves:
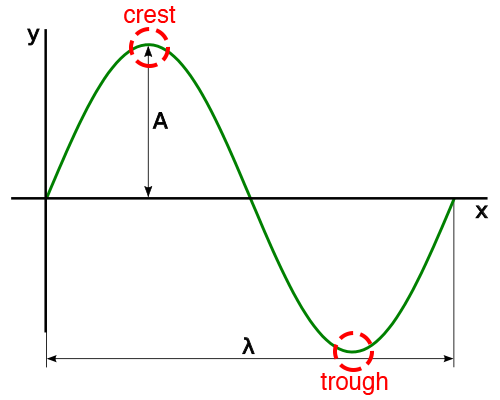
You may already be familiar with the amplitude A and wavelength λ. However, if you're not, don’t worry too much about them; after all, the goal is to create random noise, not smooth waves.
For a standard sine wave, peak-to-peak amplitude ranges from -1.0 to 1.0 and wavelength is equal to 2π (frequency = 1).
In the image above, you are viewing the sine wave from the "front", but if you view it from the "top" you can use the waves crests and troughs to draw a smooth greyscale gradient, where crest = white and trough = black.
Open RWTNoise.fsh and replace the contents of main(void) with the following:
vec2 position = gl_FragCoord.xy/uResolution.xy;

float pi = 3.14159265359;
float wave = sin(2.*pi*position.x);
wave = (wave+1.)/2.;

gl_FragColor = vec4(vec3(wave), 1.);
Remember that sin(2π) = 0, so you are multiplying 2π by the fraction along the x-axis for the current pixel. This way, the far left side of the screen will be the left side of the sin wave, and the far right side of the screen will be the right side of the sin wave.
Also remember the output of sin is between -1 and 1, so you add 1 to the result and divide it by 2 to get the output in the range of 0 to 1.
Build and run. You should see a smooth sine wave gradient with one crest and one trough.

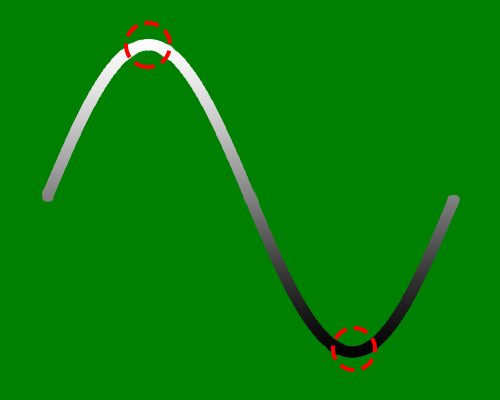
Transferring the current gradient to the previous diagram would look something like this:
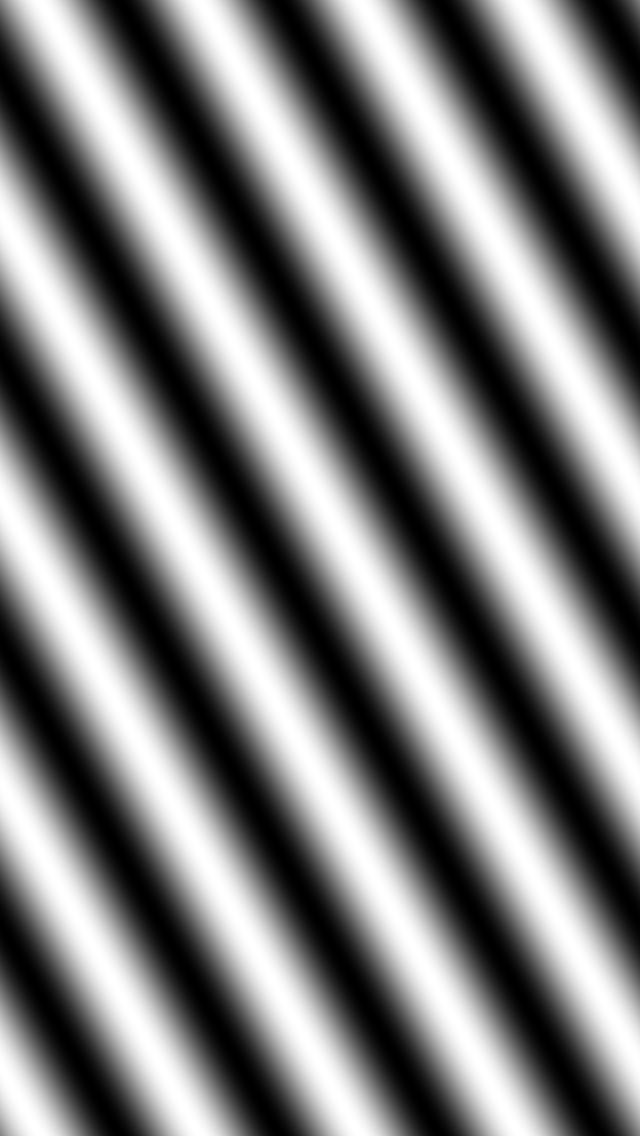
Now, make that wavelength shorter by increasing its frequency and factoring in the y-axis of the screen.
Change your wave calculation to:
float wave = sin(4.*2.*pi*(position.x+position.y));
Build and run. You should see that your new wave not only runs diagonally across the screen, but also has way more crests and troughs (the new frequency is 4).
So far the equations in your shader have produced neat, predictable results and formed orderly waves. But the goal is entropy, not order, so now it's time to start breaking things a bit. Of course, this is a calm, controlled kind of breaking, not a bull-in-a-china-shop kind of breaking.
Replace the following lines:
float wave = sin(4.*2.*pi*(position.x+position.y));
wave = (wave+1.)/2.;
With:
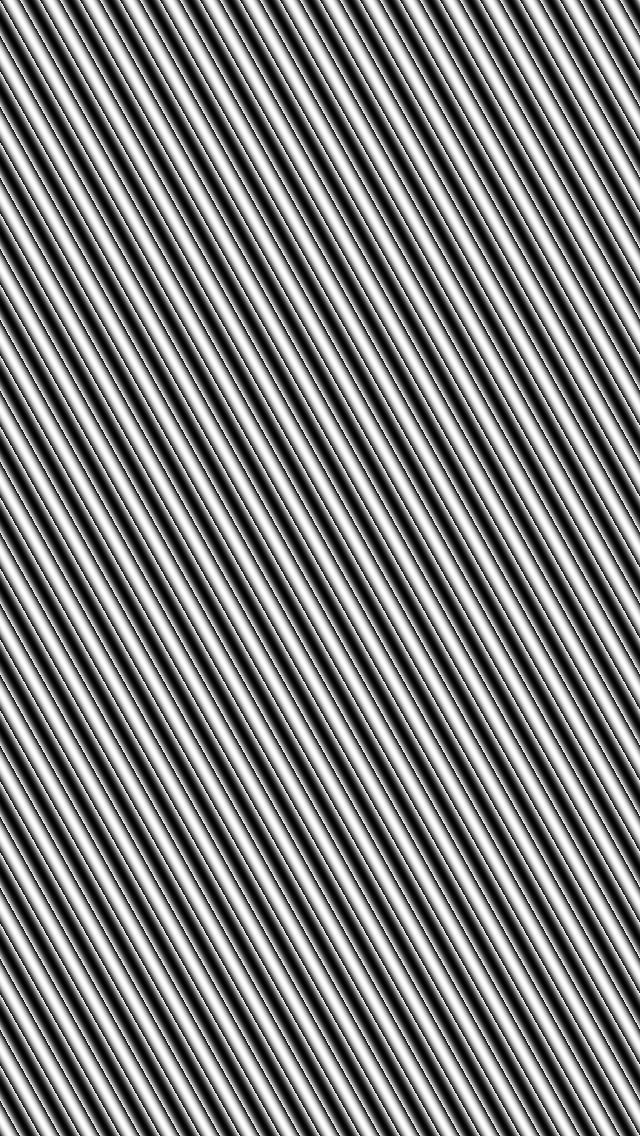
float wave = fract(sin(16.*2.*pi*(position.x+position.y)));
Build and run. What you’ve done here is increase the frequency of the waves and use fract() to introduce harder edges in your gradient. You're also no longer performing a proper conversion between different ranges, which adds a bit of spice in the form of chaos.
The pattern generated by your shader is still fairly predictable, so go ahead and throw another wrench in the gears.
Change your wave calculation to:
float wave = fract(10000.*sin(16.*(position.x+position.y)));
Now build and run to see a salt & pepper spill.
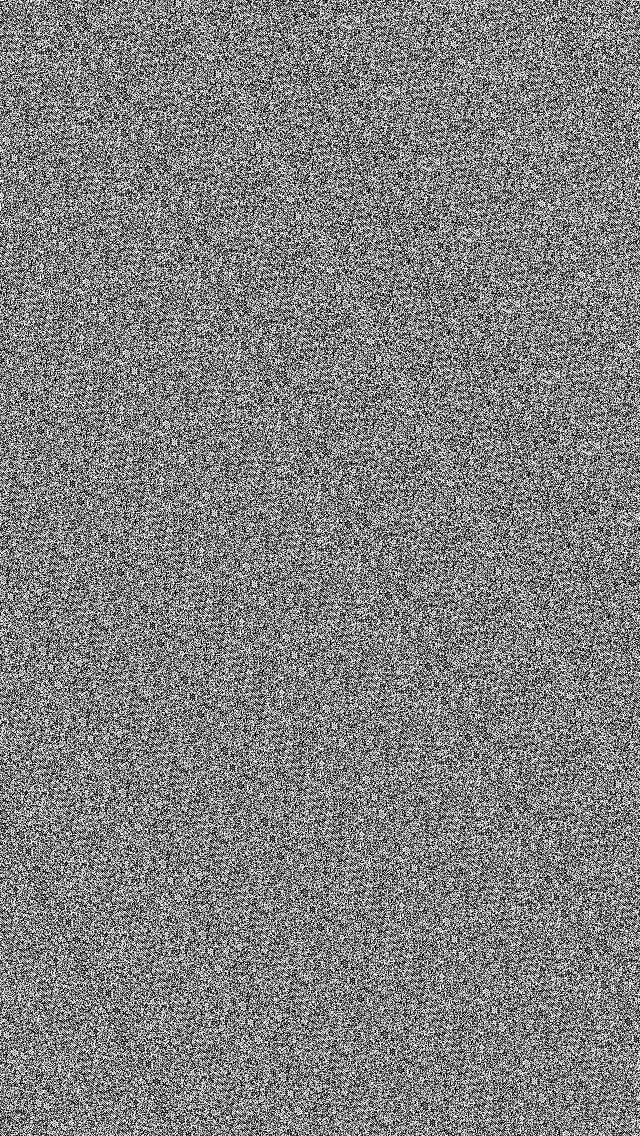
The 10000 multiplier is great for generating pseudorandom values and can be quickly applied to sine waves using the following table:
Angle sin(a)
1.0   .0174
2.0   .0349
3.0   .0523
4.0   .0698
5.0   .0872
6.0   .1045
7.0   .1219
8.0   .1392
9.0   .1564
10.0  .1736
Observe the sequence of numbers for the second decimal place:
1, 3, 5, 6, 8, 0, 2, 3, 5, 7
Now observe the sequence of numbers for the fourth decimal place:
4, 9, 3, 8, 2, 5, 9, 2, 4, 6
A pattern is more apparent in the first sequence, but less so in the second. While this may not always be the case, less significant decimal places are a good starting place for mining pseudorandom numbers.
It also helps that really large numbers may have unintentional precision loss/overflow errors.
At the moment, you can probably still see a glimpse of a wave imprinted diagonally on the screen. If not, it might be time to pay a visit to your optometrist. ;]
The faint wave is simply a product of your calculation giving equal importance to position.x and position.y values. Adding a unique multiplier to each axis will dissipate the diagonal print, like so:
float wave = fract(10000.*sin(128.*position.x+1024.*position.y));

Time for a little clean up! Add the following function, randomNoise(vec2 p), above main(void):
float randomNoise(vec2 p) {
  return fract(6791.*sin(47.*p.x+p.y*9973.));
}
The most random part about this PRNG is your choice of multipliers.
I chose the ones above from a list of prime numbers and you can use it too. If you select your own numbers, I would recommend a small value for p.x, and larger ones for p.y and sin().
Next, refactor your shader to use your new randomNoise function by replacing the contents of main(void) with the following:
vec2 position = gl_FragCoord.xy/uResolution.xy;
float n = randomNoise(position);
gl_FragColor = vec4(vec3(n), 1.);
Presto! You now have a simple sin-based PRNG for creating 2D noise. Build and run, then take a break to celebrate, you've earned it.
