How to Make Game Music for Beginners
Learn how to make your own game music even if you’re a complete beginner, using the Korg Gadget app for iPad! By Tim Mitra.
Adding a Melody to your Song
Tap Back to return the Mixer view and tap the + button to add a third Gadget. Choose the Wolfburg Gadget and tap the gadget to switch to Edit view.
Select the 020 Syn. Trumpet instrument using the arrow keys at the top of the console. You’ll create a pattern with this synthesizer much in the same way you created a pattern with the London synthesizer.
Replicate the pattern you see in the image below:

Each row in your grid now represents a different note, whereas with the London synthesizer each row represented a different instrument voice.
The A#3 note is played on the beat like the bass drum. I threw in a few C4 and D4 notes, some on the beat and some off the beat. On the fourth beat I add a little flare by playing F4, A#3 and G3 at the same time.
Here’s what I have so far:
Your song is quickly taking shape, but it still needs another element to pull everything together. To do this, you’ll add another low frequency drone to help fill in the bottom end.
Adding Another Low Drone
Tap Back to return to the Mixer view, and add another Gadget to your track by tapping the + button. Select the Berlin synthesizer, then enter the Edit view and set the Sound Program display to 005 Natural Lead using the + and – buttons.
Tap and drag a note across the entire measure at G1, much like you did with the other arpeggiated drone, as shown below:

Here’s the song up to this point:
You’ve covered the basics and created your first four-count bar of your song. Now it’s time to flesh this out and create a full song.
Stripping Down Your Song
When creating a song, I usually put together scenes that have a basic beat. I build the scene up as it progresses, then simplify it towards the end. Since I know the song will loop when I add it to my app, I’ll make the loop sound as smooth as possible by ending the track using the same beat with which I started.
So far, you have a single scene in your song. To flesh out your song and make it a little longer, you’ll duplicate the track you’ve already built, build the song up in the middle and then break it down towards the end. To accomplish this, you’ll use the Function button to copy, duplicate and delete the various elements of your song.
Have you been saving your work as you go along? If not, go back to the Mixer view, tap the document item and select Save to save your work in progress.
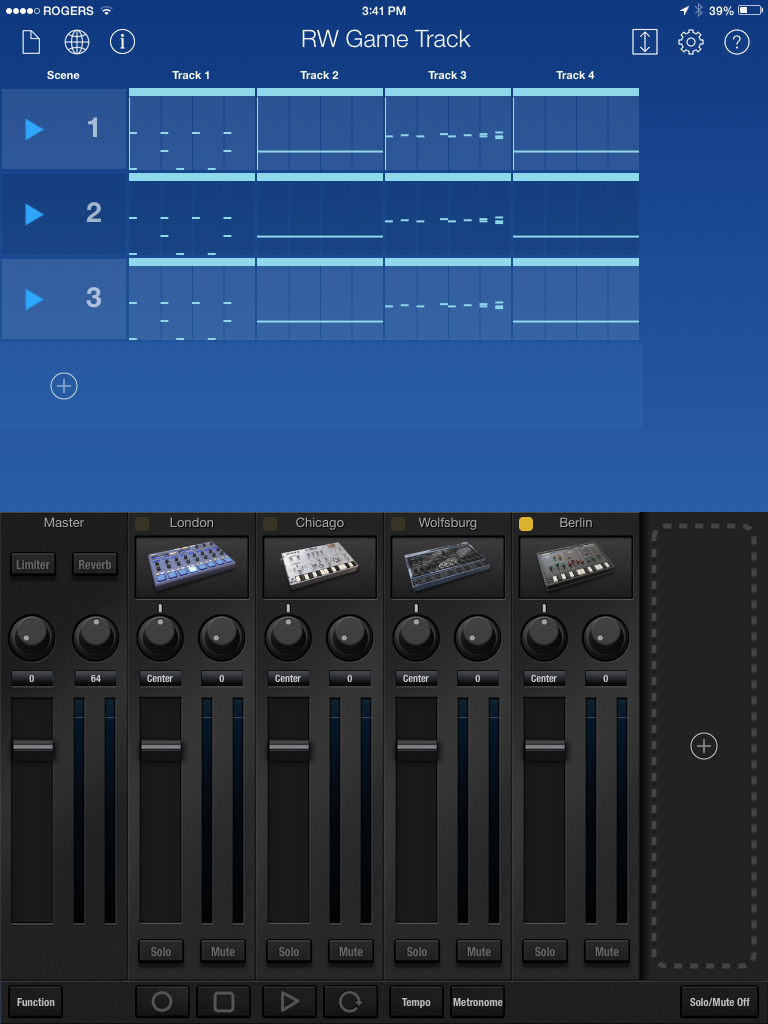
Ensure you’re in the Mixer view and tap the Function button in the lower left corner of the app. This overlays several commands on your screen. If the overlay looks different than the screenshot above, you may still be in the track’s Edit View.
In the top bar, tap Duplicate twice to create two copies of your scene as shown below:

Tap Function to exit this function.
You should now see three identical scenes labelled 1, 2 and 3 as shown below:
First, disable looping by tapping on the green loop icon in the bottom bar so that it turns gray. Then tap the play icon to play the song.
Your job now is to strip away some of the elements of your song near the beginning and end to make it sound more dynamic.
Tap the Function button to bring up the edit overlay. In Scene 1, tap Clear on Track 4 to clear the drone as shown below:

Tap Sure to confirm your action. Clear the drone from Scene 2 in the same way.
Tap Function again and you’ll see that the drone has been removed from both Scene 1 and 2 and only starts playing in Scene 3.
Press Play to hear how your song sounds now. Here’s my version up to this point:
You’re now going to modify your song so that it starts with the drum and arpeggio loops on their own in Scene 1 and adds the melody in Scene 2.
Tap Function to enter song edit mode again. Tap Clear on Track 3 of Scene 1 to clear the melody.
Press Play to hear how your song builds up now. My version is below:
You can definitely hear how it builds, but the scenes change much too quickly. You’ll fix that next.
Before moving on, now would be a great time time to Save your work.
Changing the Bar Count of a Scene
Each instrument in a Scene can be any number of bars long. Currently, each track in your song is only one bar in length — by adding more bars you can stretch out each scene and make the song build more slowly.
Tap Track 4 of Scene 1 to enter the track editor. The current length of the Scene is displayed at the top of the screen — 1 bar.
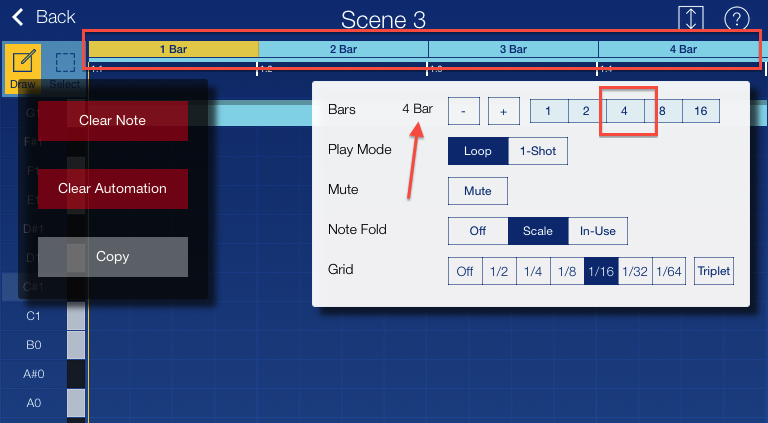
Tap the Function button and select 4 in the Bars segmented control to change the track length to four bars, like so:
Tap Function to exit.
Tap Back to return to the Mixer View; you’ll see that Track 4 is now divided into 16 sections. Tap the loop button then tap Play to hear the changes.
Repeat the steps above to make each Scene four bars.
When you return to the Mixer view you’ll notice that the drone is only a quarter of the length of the bar as shown below:
You want the drone to play over all four bars; you can use the Copy functionality to fix that.
Tap Track 4 in Scene 3; it opens to Bar 1 by default. Tap along the top of the bars to view the contents of Bars 2, 3 and 4. Press Function then press the grey Copy button on the overlay. Press 1 Bar to copy the notes from the first bar and the display will change to Select Destination as shown below:

Tap 2 Bar to copy the contents of Bar 1 into Bar 2. Repeat the above steps to copy the contents of Bar 1 into Bars 3 and 4.
Tap Back to return to the Mixer view, hit Play and you’ll hear the drone play through all four bars, like so:
Here’s my version of the song up to this point:
The song now builds more slowly, which sounds much better. Now you’ll need to mix things up a little in the song to keep it from feeling too monotonic.
Press Function in the main Mixer view and press Duplicate twice on Scene 3, and tap Function again to finish.
Then tap Track 4 on Scene 4 to edit the sequence, then drag the drone note from G1 up to A#1. This changes the pitch of the drone to set off this section a little bit. Repeat this for the second bar as well (or copy it over).
Tap Function then tap 2 to shorten the scene to two bars. Tap Back to return to the Mixer view. Repeat that step to shorten Scene 5 to two bars.
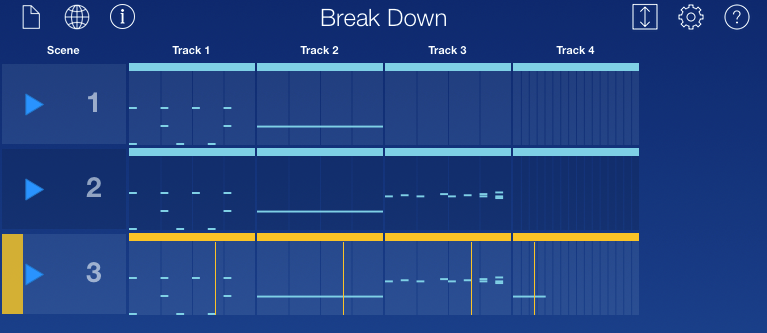
The overlay should now look like the following screenshot:
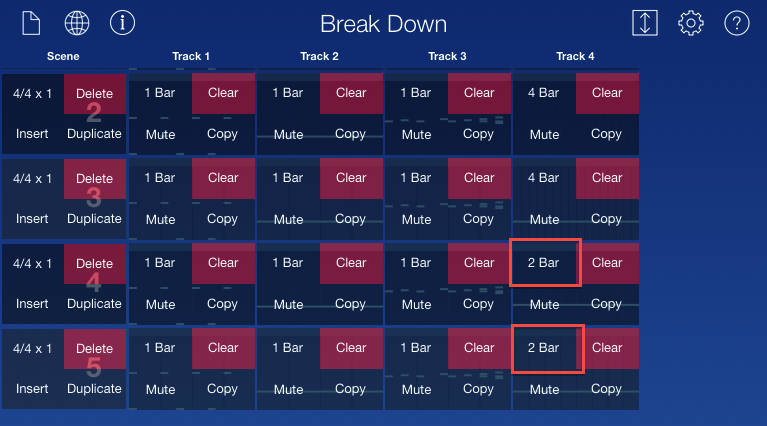
Press Play to hear your composition. You might need to tap the green loop icon to turn off scene looping.
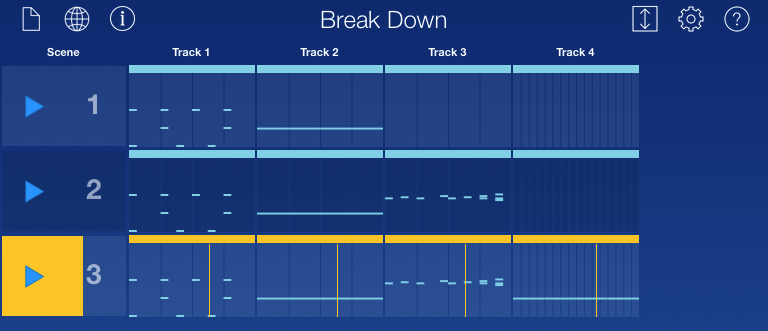
Here’s my version of the song for comparison purposes:
Now that the track builds nicely, you can break down the ending to make it sound good when it loops.