How to Make Game Music for Beginners
Learn how to make your own game music even if you’re a complete beginner, using the Korg Gadget app for iPad! By Tim Mitra.
Sign up/Sign in
With a free Kodeco account you can download source code, track your progress, bookmark, personalise your learner profile and more!
Create accountAlready a member of Kodeco? Sign in
Sign up/Sign in
With a free Kodeco account you can download source code, track your progress, bookmark, personalise your learner profile and more!
Create accountAlready a member of Kodeco? Sign in
Contents
How to Make Game Music for Beginners
25 mins
- Getting Started
- Adding a Simple Drone
- Adding a Melody to your Song
- Adding Another Low Drone
- Stripping Down Your Song
- Changing the Bar Count of a Scene
- Breaking Down Your Song
- Exporting to an Audio File
- Trimming Your Song in QuickTime Player
- Adding Your Song to a Sprite Kit App
- Where To Go From Here?
Update 12/8/14: Updated for Xcode 6.1.1.
So you’ve built a great game with awesome graphics, rock-solid gameplay, and a creative storyline. What more could you ask for?
Even with all that awesomeness, you’ll find the game lacking without some great in-game music.
Hiring a musician is the best bet of course, but if you don’t have the funds for that, that’s OK too. You can easily make your own game music, using some amazing iPad apps!
One such app I really like and personally use is Korg Gadget for iPad. It collects 15 mobile synthesizers and drum machines into a single app and wraps them all with an easy-to-use sequencer.
The only skills you need to compose music in this app are tapping and dragging. You can easily export a finished song from Korg Gadget and add it to your app.
In this tutorial I’ll take you through creating a simple track in Korg Gadget using multiple instruments, exporting the file, and finally including the finished song in your app.
Ready to discover the inner musician you never knew existed? Read on! :]
Getting Started
Download Korg Gadget on the App Store. Korg Gadget isn’t cheap; the current U.S. price on the App Store is $38.99, but occasionally you can find it on sale.
Open the Korg Gadet app on your iPad and tap the document icon in the upper left corner to create a new project, as shown below:
Tap New, enter RW Game Track as the name, and tap OK.
The app then presents you with a list of sequencers, or Gadgets as they are called in the app. Choose the London drum machine as shown below:
The app then takes you to the Mixer view where you will build your song. By default, the top half of the screen displays list of tracks, like so:
Tap the Track 1 to enter Edit view:
At the top left of the screen you’ll see a Draw icon and a Select icon. Tapping these icons toggles you between “drawing” mode and “selecting” mode.
Tap any of the eight blue pads at the bottom of the screen and you’ll hear the London synthesizer drum sounds in real time. Note that the row names in your grid correspond to the names of each drum “voice”. Alternatively, you can tap on the row headings to hear the drum voices.
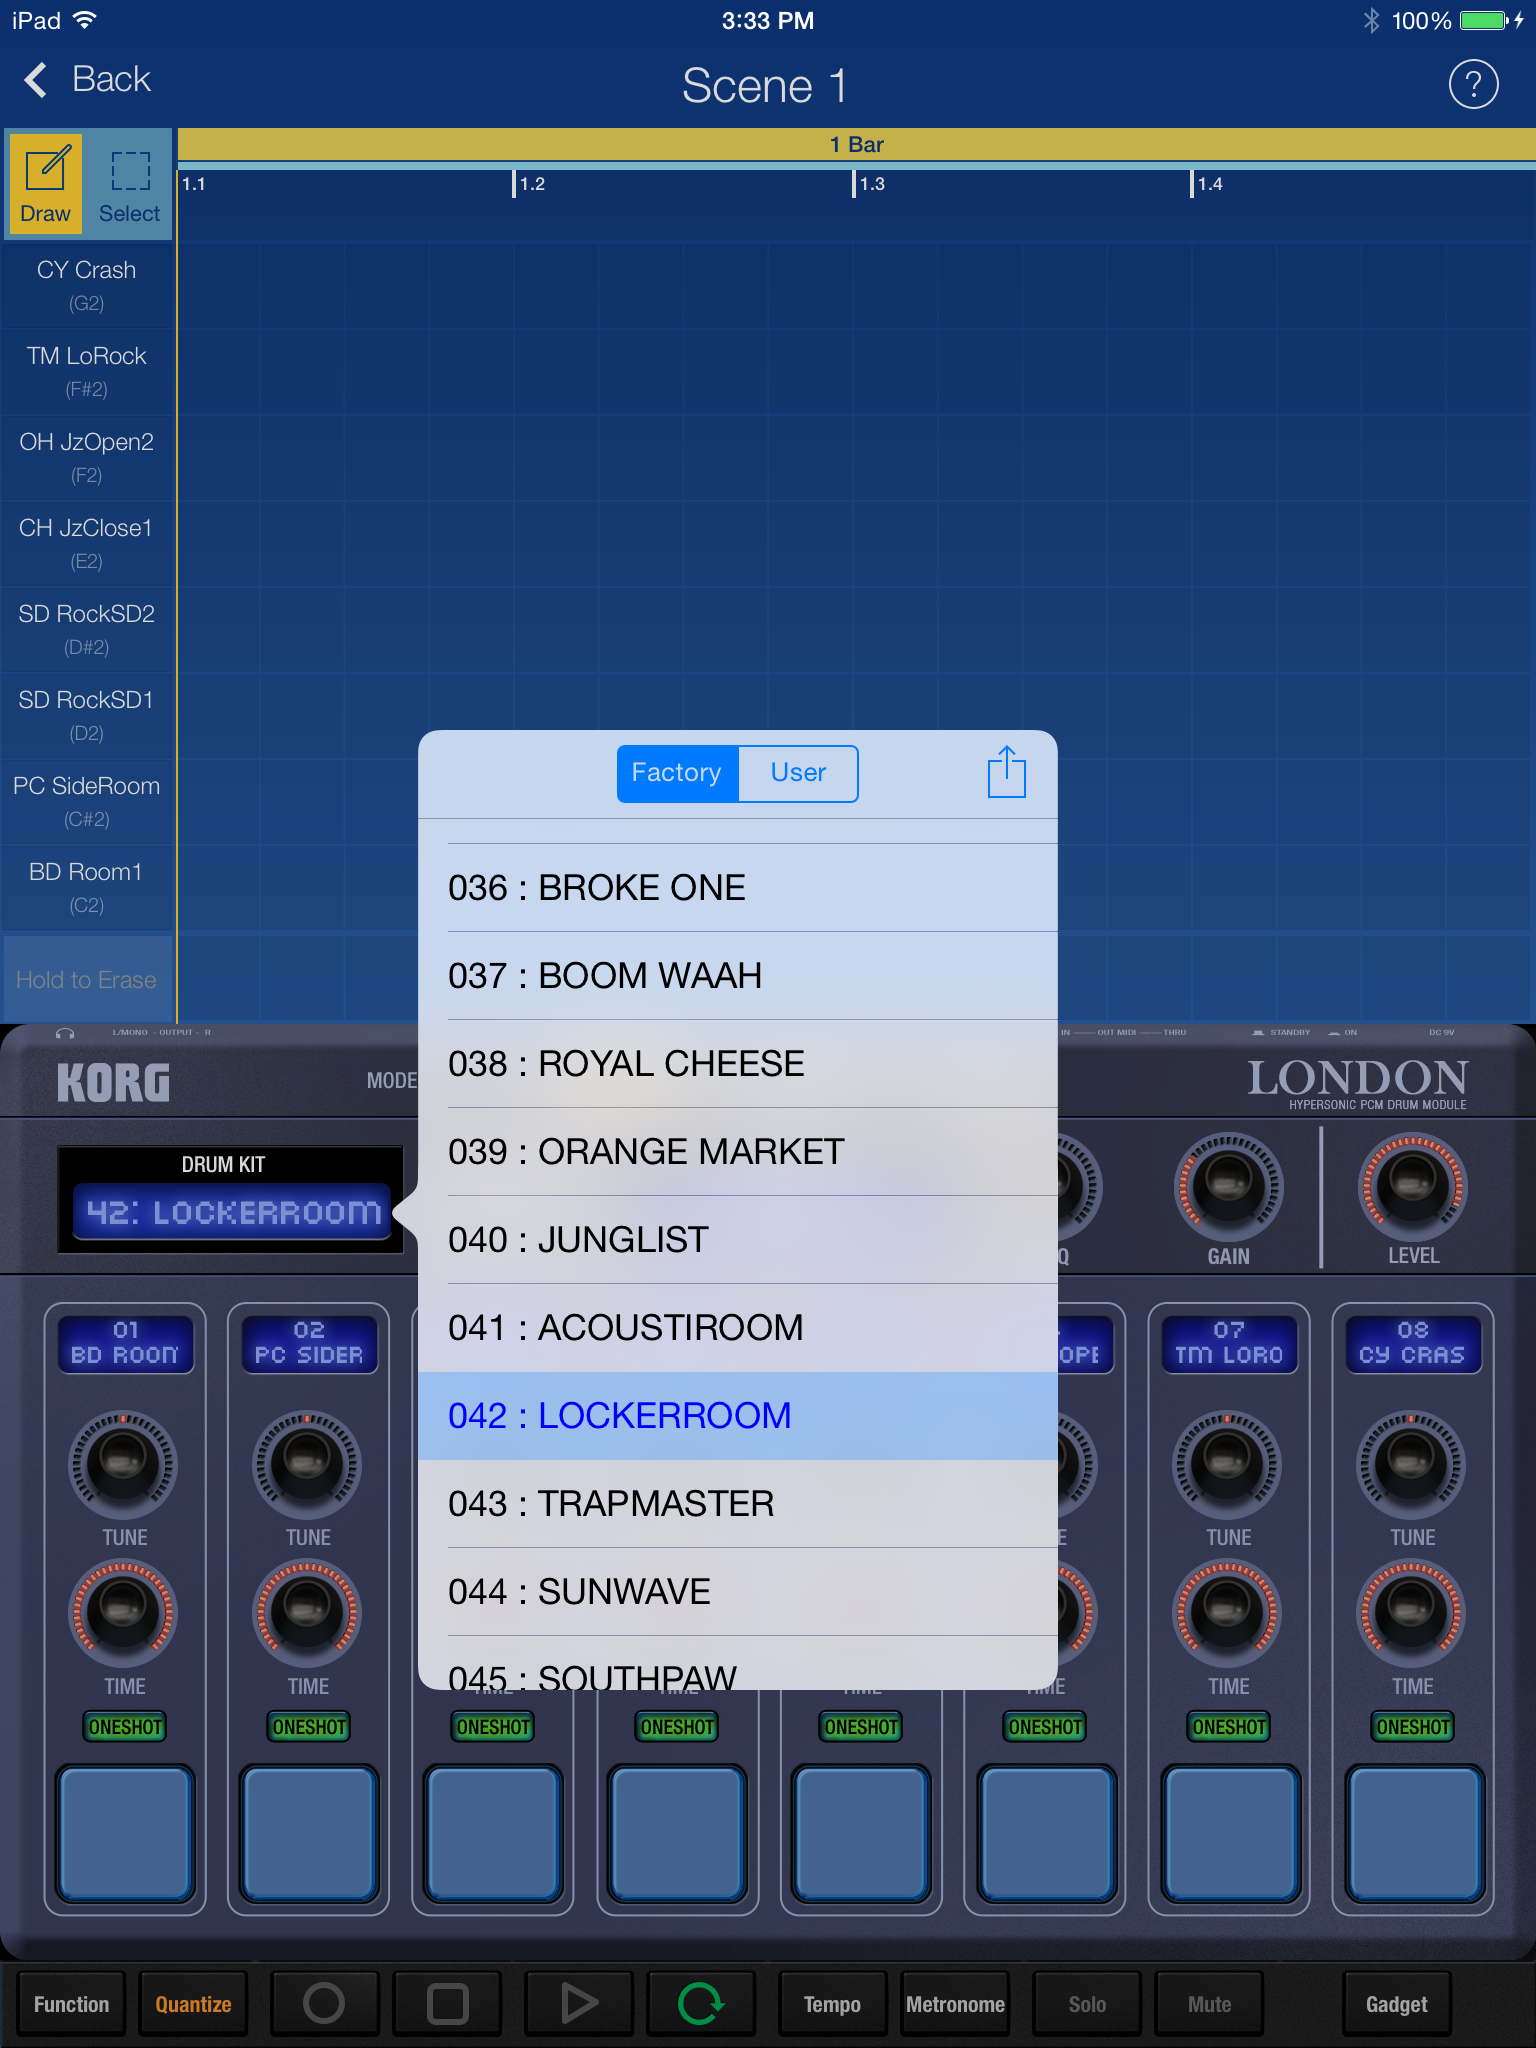
Tap the Drum Kit display on the left side of the console to open a popover showing the available drum sets. Scroll down and select 042 Lockeroom from the list.
To add a note to your song, simply tap the screen where you’d like to add the note. For your first attempt, recreate the pattern shown in the image below:
If you’ve placed a note in the wrong spot, just tap the note again to remove it.
Press the Play icon in the bottom toolbar to play your song; each note is played as the yellow cursor scrolls by.
By default the green loop icon is selected, so the song repeats until you tap the pause icon. If you turn off loop mode, the song stops when it reaches the end of the track.
If you want to clear your notes from the screen, press Hold to erase to wipe the notes as the cursor scrolls by.
I uploaded my example to SoundCloud so you can compare your results to mine:
Next, save your work in progress. To do this, tap Back to return to the Mixer View, tap the Document icon, then tap Save.
The basic drum groove is in place; next you’ll add a low drone sound to your track a la Blade Runner or Miami Vice.
Adding a Simple Drone
At this point you should be back in the Mixer View. Tap the circled + in the second grey box to create a new gadget, as shown below:
Choose the Chicago Gadget from the list, then tap the Chicago icon to enter Edit view.
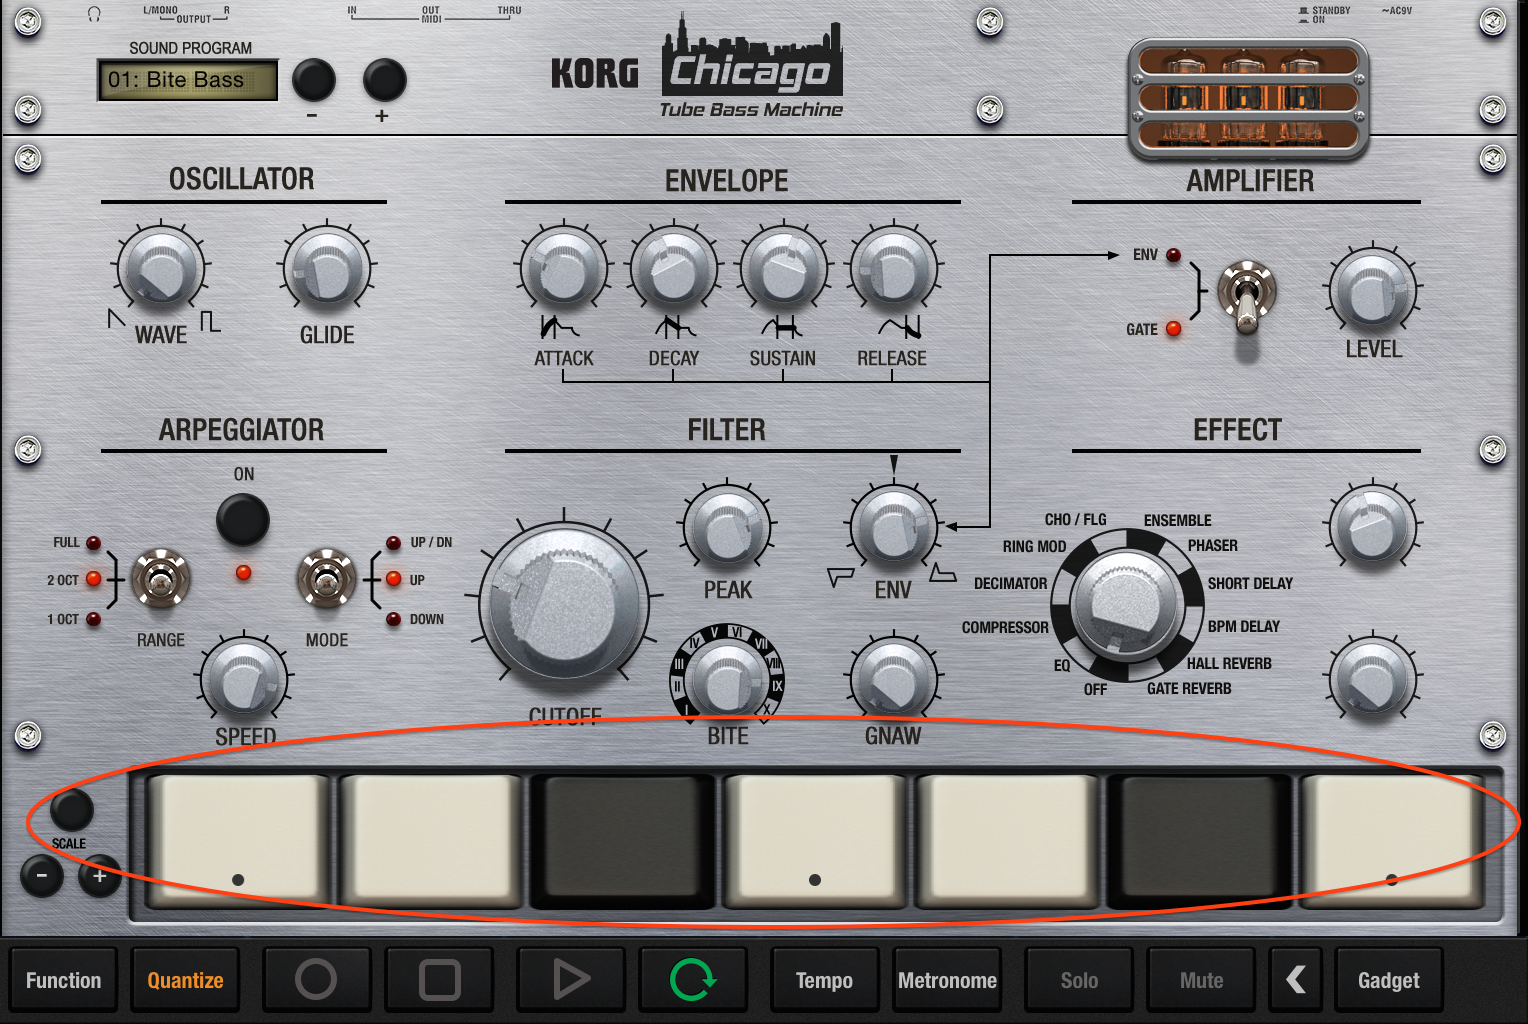
You’ll note that this sequencer has fewer pads than the London synthesizer (7 versus the London synthesizer’s 8). The pads on this sequencer control the pitch of the note being played instead of the instrument voice. The black dots on the first, fourth, and seventh pads indicate an octave change.
Note: An octave normally spans eight whole notes in Western music — you probably know them as Do, Re, Mi, Fa, So, La, Ti and Do. The Chicago gadget provides a subset of those notes — the first, third and fifth notes, or Do, Mi, and So. The pattern then repeats, just an octave higher.
The first key is middle C, which is the center key on an 88 key piano. This pitch is too high for your low drone. To lower the pitch of the notes, scrub the left column downward until you reach G1.
This time, instead of tapping the screen to place a note, tap and drag to the right as shown below — this creates a a note that plays for the entire bar:
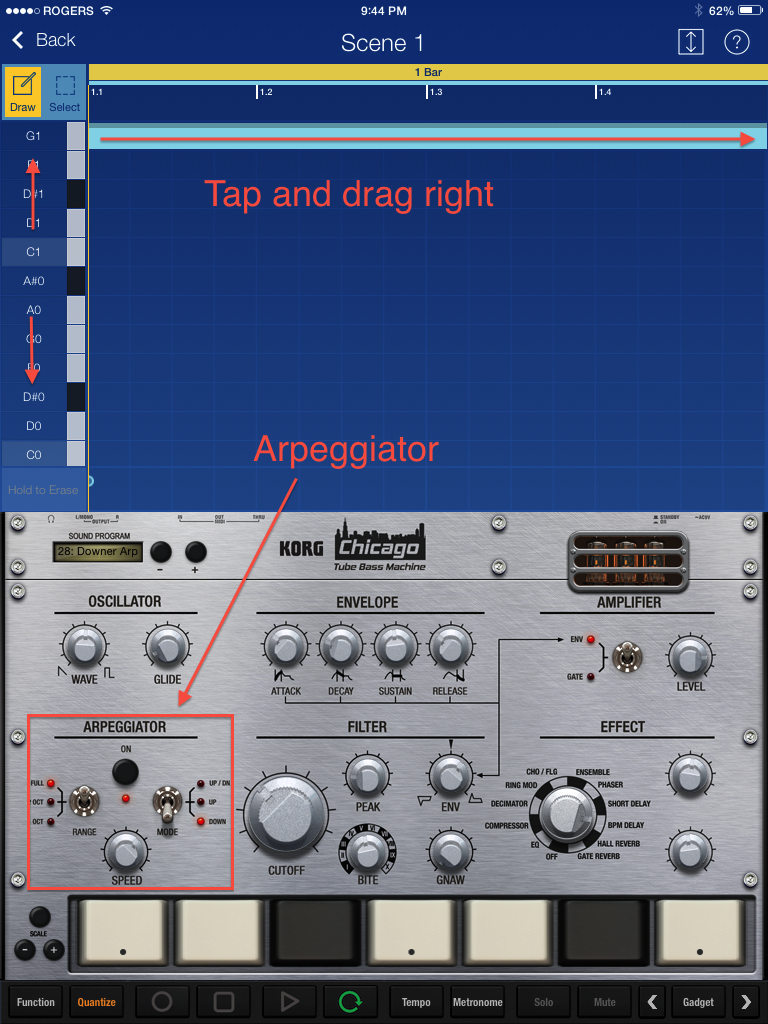
Tap on Sound Program and choose 028 Downer Arp — this changes the voice of the note played. This preset gives you a sound like a Roland Arp synthesizer with some modulation using the “arpeggiator” effect settings from the lower right:
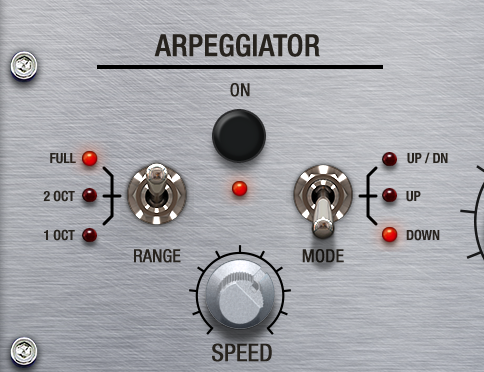
Note: Playing the notes of a chord one at a time — in this case, the first, third, and fifth intervals — creates an arpeggio. A “downward” arpeggio starts with the highest note and plays the notes in descending order, while an “upward” arpeggio starts with the lowest note and plays the notes in ascending order.
Feel free to experiment with switches in the Arpeggiator section: try the Up, Up/Down, 2 Oct and 1 Oct settings to see how they change the songs. You can turn off the effect by hitting the On button in the Arpeggiator section of the console.
When you are finished experimenting, return the toggle switches to the Full and Down positions.
You can hear my version here for comparison purposes:
That takes care of the foundation tracks for your song — but most songs need a melody to carry them forward.
If that sounds complicated, consider this: most popular songs only have four to six notes total in the main melody, or “hook”! :]
Adding a Melody to your Song
Tap Back to return the Mixer view and tap the + button to add a third Gadget. Choose the Wolfburg Gadget and tap the gadget to switch to Edit view.
Select the 020 Syn. Trumpet instrument using the arrow keys at the top of the console. You’ll create a pattern with this synthesizer much in the same way you created a pattern with the London synthesizer.
Replicate the pattern you see in the image below:
Each row in your grid now represents a different note, whereas with the London synthesizer each row represented a different instrument voice.
The A#3 note is played on the beat like the bass drum. I threw in a few C4 and D4 notes, some on the beat and some off the beat. On the fourth beat I add a little flare by playing F4, A#3 and G3 at the same time.
Here’s what I have so far:
Your song is quickly taking shape, but it still needs another element to pull everything together. To do this, you’ll add another low frequency drone to help fill in the bottom end.
Adding Another Low Drone
Tap Back to return to the Mixer view, and add another Gadget to your track by tapping the + button. Select the Berlin synthesizer, then enter the Edit view and set the Sound Program display to 005 Natural Lead using the + and – buttons.
Tap and drag a note across the entire measure at G1, much like you did with the other arpeggiated drone, as shown below:
Here’s the song up to this point:
You’ve covered the basics and created your first four-count bar of your song. Now it’s time to flesh this out and create a full song.
Stripping Down Your Song
When creating a song, I usually put together scenes that have a basic beat. I build the scene up as it progresses, then simplify it towards the end. Since I know the song will loop when I add it to my app, I’ll make the loop sound as smooth as possible by ending the track using the same beat with which I started.
So far, you have a single scene in your song. To flesh out your song and make it a little longer, you’ll duplicate the track you’ve already built, build the song up in the middle and then break it down towards the end. To accomplish this, you’ll use the Function button to copy, duplicate and delete the various elements of your song.
Have you been saving your work as you go along? If not, go back to the Mixer view, tap the document item and select Save to save your work in progress.
Ensure you’re in the Mixer view and tap the Function button in the lower left corner of the app. This overlays several commands on your screen. If the overlay looks different than the screenshot above, you may still be in the track’s Edit View.
In the top bar, tap Duplicate twice to create two copies of your scene as shown below:
Tap Function to exit this function.
You should now see three identical scenes labelled 1, 2 and 3 as shown below:
First, disable looping by tapping on the green loop icon in the bottom bar so that it turns gray. Then tap the play icon to play the song.
Your job now is to strip away some of the elements of your song near the beginning and end to make it sound more dynamic.
Tap the Function button to bring up the edit overlay. In Scene 1, tap Clear on Track 4 to clear the drone as shown below:
Tap Sure to confirm your action. Clear the drone from Scene 2 in the same way.
Tap Function again and you’ll see that the drone has been removed from both Scene 1 and 2 and only starts playing in Scene 3.
Press Play to hear how your song sounds now. Here’s my version up to this point:
You’re now going to modify your song so that it starts with the drum and arpeggio loops on their own in Scene 1 and adds the melody in Scene 2.
Tap Function to enter song edit mode again. Tap Clear on Track 3 of Scene 1 to clear the melody.
Press Play to hear how your song builds up now. My version is below:
You can definitely hear how it builds, but the scenes change much too quickly. You’ll fix that next.
Before moving on, now would be a great time time to Save your work.
Changing the Bar Count of a Scene
Each instrument in a Scene can be any number of bars long. Currently, each track in your song is only one bar in length — by adding more bars you can stretch out each scene and make the song build more slowly.
Tap Track 4 of Scene 1 to enter the track editor. The current length of the Scene is displayed at the top of the screen — 1 bar.
Tap the Function button and select 4 in the Bars segmented control to change the track length to four bars, like so:
Tap Function to exit.
Tap Back to return to the Mixer View; you’ll see that Track 4 is now divided into 16 sections. Tap the loop button then tap Play to hear the changes.
Repeat the steps above to make each Scene four bars.
When you return to the Mixer view you’ll notice that the drone is only a quarter of the length of the bar as shown below:
You want the drone to play over all four bars; you can use the Copy functionality to fix that.
Tap Track 4 in Scene 3; it opens to Bar 1 by default. Tap along the top of the bars to view the contents of Bars 2, 3 and 4. Press Function then press the grey Copy button on the overlay. Press 1 Bar to copy the notes from the first bar and the display will change to Select Destination as shown below:
Tap 2 Bar to copy the contents of Bar 1 into Bar 2. Repeat the above steps to copy the contents of Bar 1 into Bars 3 and 4.
Tap Back to return to the Mixer view, hit Play and you’ll hear the drone play through all four bars, like so:
Here’s my version of the song up to this point:
The song now builds more slowly, which sounds much better. Now you’ll need to mix things up a little in the song to keep it from feeling too monotonic.
Press Function in the main Mixer view and press Duplicate twice on Scene 3, and tap Function again to finish.
Then tap Track 4 on Scene 4 to edit the sequence, then drag the drone note from G1 up to A#1. This changes the pitch of the drone to set off this section a little bit. Repeat this for the second bar as well (or copy it over).
Tap Function then tap 2 to shorten the scene to two bars. Tap Back to return to the Mixer view. Repeat that step to shorten Scene 5 to two bars.
The overlay should now look like the following screenshot:
Press Play to hear your composition. You might need to tap the green loop icon to turn off scene looping.
Here’s my version of the song for comparison purposes:
Now that the track builds nicely, you can break down the ending to make it sound good when it loops.
Breaking Down Your Song
Duplicate Scene 5 twice using the same steps as before. If things are getting a little tight and you need more space on the screen, tap the Expand icon to hide the instrument mixer:
Use Function to clear the drone on Track 4 in Scenes 6 and 7. Clear the melody track in Scene 7 as well. Try to see if you can figure it out yourself without looking at the spoiler below!
[spoiler title=”Solution”]Press Function to open the edit overlay. Then press Clear on Track 4 in Scene 6 and 7. Finally, press Clear on Track 3 of Scene 7.[/spoiler]
Duplicate Scene 7 to create Scene 8. Delete everything from Scene 8 except for the drum track. While you’re at it, modify Scene 6 and 7 to be four bars in length. Your finished piece should look like the following screenshot:
Play your finished masterpiece all the way through; it sounds like you’re done!
Now that you have a great-sounding track, all you need to do is export it to an audio file and include it in your app.
Exporting to an Audio File
To export your song to file, press the Document icon and tap Export. You can export your song to GadgetCloud which is hosted on SoundCloud. Alternately, you can export your song as an Audio File using iTunes export, DropBox or AudioCopy, which lets you paste your composition into a compatible app.
Export the file to the destination of your choice. Now that you have a physical file you can work with, you can clean it up a little before using it in your game.
Trimming Your Song in QuickTime Player
You’ll likely need to trim your audio file a little as the export process adds a few seconds of dead air to the end of the file — this won’t sound very good when it loops!
Fortunately, it’s easy to trim your song in QuickTime player.
Open the file in QuickTime Player and set it to Loop under the View menu. Then select Trim from the Edit menu and adjust the length of your song. Listen carefully as the song loops; try to trim your song so that there isn’t a break or a choppy transition when the song loops.
Once you’re satisfied, you can Export the trimmed file. Choose Export from the File menu, then select Audio Only as the Format and save it as an m4a file.
If you’d like to see how I trimmed my file, you can check it out here: RW Game Track
All that’s left is to add the song to your app!
Adding Your Song to a Sprite Kit App
Download the completed SpriteKit Space Invaders app; if you’d like some background on the app you can read about it in this tutorial by Joel Shapiro.
Open GameScene.m in Xcode and add the following import to the top of the file:
@import AVFoundation;
Next add a private instance variable to store the music player as shown below:
@interface GameScene () {
AVAudioPlayer *_backgroundMusicPlayer;
}
Add the following helper method to play the background music:
- (void)playBackgroundMusic:(NSString *)filename{
NSError *error;
NSURL *backgroundMusicURL = [[NSBundle mainBundle] URLForResource:filename withExtension:nil];
_backgroundMusicPlayer = [[AVAudioPlayer alloc]
initWithContentsOfURL:backgroundMusicURL error:&error];
_backgroundMusicPlayer.numberOfLoops = -1;
[_backgroundMusicPlayer prepareToPlay];
[_backgroundMusicPlayer play];
}
Finally, add the following to createContent
in GameScene.m, immediately after the call to setupHud (change the filename to whatever you called yours):
[self playBackgroundMusic:@"RW Game Track.m4a"];
Note: In an app built with a standard Sprite Kit template, you could call the method in initWithSize:
instead.
Build and run the app; you’ll hear the music playing as you play the game. Satisfying, isn’t it? :]
Once the game is over, the music will stop playing as the Sprite Kit scene is replaced.
Where To Go From Here?
Here is the finished RW Game Track.gdproj. You can add it to your own Korg Gadget app with iTunes sharing.
To further refine your tune, you can tweak the notes in each scene to simplify or enhance your tracks. Experiment with adding notes and drones in different places. Try the Amsterdam gadget to add some interesting sounds and effects. Most of all, have fun and get creative!
If you have any questions or comments, or would like to share your creations with us, feel free to join the discussion below!