Improving Game Visuals with Unity’s HDRP
Improve your game visuals and take them up by several notches using the High Definition Render Pipeline from Unity. By Wilmer Lin.
Debugging the Render Pipeline
Changes to your lighting may be hard to troubleshoot. Thus, HDRP includes a debugging tool to help you dissect the rendered frame.
Go to Window ▸ Render Pipeline ▸ Render Pipeline Debug.
Select the Lighting tab. Locate Debug Mode.

Watch the Game view as you toggle modes in the dropdown.

Some terms may be useful here:
- Diffuse light contacts a rough material and scatters. This forms the basis of a surface’s color.
- Specular light hits a smooth or shiny material. The light rays form highlights as they reflect back toward the camera.
- Direct light travels from the light source to the surface.
- Indirect light is bounced light. Global illumination calculates how light rays physically react to the surfaces along their path.
The effect of indirect light can be subtle. It’s essential, however, for that extra touch of realism.
Sometimes it’s hard to tell the source of a lighting issue. Is it the result of global illumination? Is it just a reflection? The answer may not be obvious. The Debug Pipeline tool can help you investigate. Keep it handy in your bag of tricks!
Set your Debug Mode back to None. Then, close this dialog for now.
Adding Volumetric Fog
To make the scene slightly more dramatic, add fog, which makes the atmosphere visible and dense.
Understanding Volume Settings
To begin, in Sky and Fog Volume, locate the Fog Override.

Check Enable. Set the starting Base Height at 0 and fade the fog off at a Maximum Height of 3.
Set the Fog Attenuation Distance to 20 units. Smaller values make it dense and thick. Larger values make it dissipate more gradually.
Check Volumetric Fog. This creates the illusion of light shafts or “god rays.”
Override the Denoising Mode to Both. This will produce high quality results when removing noise from the fog, but will be more resource intensive.
Understanding Light Settings

Select Sun_DirectionalLight. The Light component has a group of parameters called Volumetrics. To exaggerate the effect, override the Multiplier. Then, drag the slider to 16. The volumetric fog appears much stronger.
Enter Play mode to check how the level feels in first-person. Turn right to face the windows, and strafe side-to-side. Light shafts stream through the windows.

The Shadow Dimmer controls the strength of the volumetric shadows. A value of 0 makes the shadow invisible and fills the entire room with conventional fog. Use a value of 1 to cut out a volume based on the window openings. This just leaves the light shafts themselves. An in-between value blends how strongly the volumetric shadow affects the cutout.

Experiment with the Multiplier and Shadow Dimmer until you achieve your desired look. This example shows values of 2 and 0.95, respectively.

You can also select Sky and Fog Volume to adjust the volumetric fog.
Adding Lights
You may need to add lighting to accentuate the forms of the mesh. For example, you can throw a spotlight onto the steps to separate them from the shadowed back wall.

Create a new Spot Light using right-click ▸ Light ▸ Spotlight. Rename it StairsFill_SpotLight and parent it to Lighting.
Set Mode to Baked. This light won’t cast shadows.
Use these values for the Transform:
Position (X: 1.3, Y: 1.5, Z: -0.38)
Rotation (X: 24.2, Y:-95, Z: 0)
Set Shape to Pyramid. In HDRP, you can use shapes other than a cone. In this case, the pyramid shape helps you accent the stairs without catching the wall.
Dial Spot Angle to 29 and Aspect Ratio to 0.4.
Keep the falloff Radius small at 0.1.
Push the color Temperature toward the blue end of the spectrum. Try 13000 Kelvin.
Dial the Intensity to about 20000 Lumen. Because key light is over 100,000 lux, this spotlight will need to be brighter than an average interior light.
Set the Range to about 6.

The effect is subtle, but this pops the stairs from the darkness.

What are lumen, lux and candela?
HDRP uses physical light units to match the intensities of real light sources:
Measuring illuminance varies by context. You can read lux with a handheld light meter. Lumens requires a more sophisticated goniophotometer.
When trying to recreate an actual light fixture, use the exact specifications from the manufacturer. HDRP will match its real-world intensity. With a factory IES profile, you can also match how a light spreads in real life.
- Lumen is a “unit of luminous flux.” This is the total amount of light emitted from a source. This is more accurate than wattage when judging a bulb’s brightness.
- Lux is a measure of illuminance. This is the total amount of light falling on a surface.
- Candela represents the intensity of one common wax candle.
With the layered effects and lighting settings in place, your level should be taking shape nicely now.

Exploring a More Complex Scene
This scene, of course, represents a simple lighting example. Try another set of lights with the same environment.
Open the Start scene, and save it as Night, like before. Disable the Lighting object to turn off the existing lights.
From the RW/Prefabs folder, find and drag the Lighting Night prefab into the Hierarchy. Rather than relying on a single directional light for the key light, this setup uses spotlights and area lights.

The Sky and Fog Volume located in the Lighting Night prefab will use the Night Settings Profile in the RW/Settings folder.
The Game view suddenly appears bright and foggy. Disregard how the scene looks for the moment. Baking lightmaps will fix it.
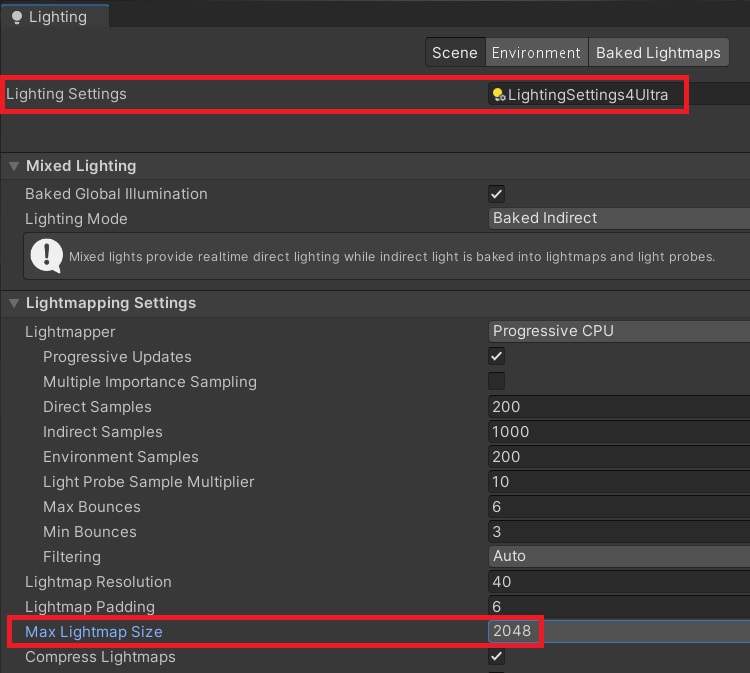
Open the Lighting window. Swap the Lighting Settings to use LightingSettings4Ultra. Otherwise, the lightmapping may appear too blotchy. You might also want to flip the Max Lightmap Size to 2048 if not already set. This increases the Lightmap texture size for higher resolution.
Then, click Generate Lighting.
Wait for the scene to bake. Lightmapping takes longer since the scene has more lights. Once complete, it’s literally the difference between night and day!

Understanding the Light Explorer
Open Window ▸ Rendering ▸ Light Explorer. This dialogue helps manage large sets of lights.

For example, you can easily highlight the four CeilingLight_Spot_1600lm spotlights. Shift-select multiple lights to edit them at once. Then, adjust their color and temperature to your liking.
Walk the room with the FPS controller. Note these differences with the Daylight scene:
- Area lights spill from the top and bottom staircase. They also form long, thin accents near the windows.
- Blue and gold colors compliment one another. This borrows from traditional cinematic lighting.
- The four spotlights on the ceiling cast volumetric shadows. Adjust their angles and multipliers to enhance their conical light shafts.

Use the Light Explorer to tweak and rebalance light values. Don’t be afraid to experiment! Different settings can create a completely different mood and atmosphere.