Resolver for iOS Dependency Injection: Getting Started
Learn how to use Resolver to implement dependency injection in your SwiftUI iOS apps to achieve easily readable and maintainable codebases. By Mina Ashna.
Unit Testing and the Dependency Inversion Principle
Unit testing is an important step in building a clean and maintainable codebase. To ease the process of unit testing, you’ll follow the Dependency Inversion Principle, or DIP.
DIP is one of the SOLID principles popularized by Robert Martin, also known as Uncle Bob. It declares that high-level modules shouldn’t depend on low-level modules. Instead, both should depend on abstractions.
For example, AssetService, a high-level module, should be dependent on an abstraction of NetworkService, a low-level module. You implement abstractions in Swift with Protocols.
The following steps show how to implement DIP:
- First, create a protocol for the low-level module.
- Second, update the low-level module to conform to the protocol.
- Third, update the high-level module to be dependent on the low-level module protocol.
To apply DIP to your project, you need to go through the steps one by one.
First, create a protocol for the low-level module. In this case, NetworkService is the low-level module. So, open NetworkService.swift and add NetworkServiceProtocol right below // MARK: - NetworkServiceProtocol:
protocol NetworkServiceProtocol {
  func fetch(
    with urlRequest: URLRequest,
    completion: @escaping (Result<Data, AppError>) -> Void
  )
}
Second, update the low-level module to conform to the protocol. Since NetworkService is the low-level module, it has to conform to the protocol. Find the line of code that reads:
extension NetworkService {
And replace it with:
extension NetworkService: NetworkServiceProtocol {
Third, update the high-level module dependency to the protocol. AssetService is the high-level module. So, in AssetService.swift, change networkService to be of type NetworkServiceProtocol. Replace:
@Injected private var networkService: NetworkService
with:
@Injected private var networkService: NetworkServiceProtocol
Good job! Soon, you’ll find out in practice why this is important.
You can’t build the app now because your NetworkService registration doesn’t reflect the protocol. You’ll fix that next.
Registering Protocols
When resolving instances, Resolver infers the registration type based on the type of object the factory returns. Thus, if your instances are of type protocol like this:
@Injected private var networkService: NetworkServiceProtocol
You need to make sure your registration in the factory returns the protocol type as well.
Open App+Injection.swift. Then, update register { NetworkService() } to address the protocol:
register { NetworkService() }.implements(NetworkServiceProtocol.self)
Here you create an object of type NetworkService. But, it’s returned as a type of NetworkServiceProtocol, thus confirming to the requirement of NetworkService.
Now build and run. Enjoy the beauty you created even though you can’t see it. :]
With the Dependency Inversion Principle in place, you’ve now made it easier to test your code. You’ll do this next.

Generating Mock Data
Mocking is an essential technique when writing unit tests. By mocking dependencies, you create fake versions of them, so your tests can focus solely on the class at hand rather than its collaborators.
For a better understanding, open AssetServiceTests.swift. Here, you test if AssetService handles the success and failure responses of NetworkService as expected.
In cases like this, mocking is an excellent approach because you’re in control of how you challenge your Subject Under Test, or SUT, based on different response types.
Now go to MockNetworkService.swift and add:
// 1
class MockNetworkService: NetworkServiceProtocol {
  // 2
  var result: Result<Data, AppError>?

  // 3
  func fetch(
    with urlRequest: URLRequest,
    completion: @escaping (Result<Data, AppError>) -> Void
  ) {
    guard let result = result else {
      fatalError("Result is nil")
    }
    return completion(result)
  }
}
Here you:
- Create a mock class that conforms to
NetworkServiceProtocol. You’ll use this class in your Test target instead ofNetworkService. That’s the beauty of abstractions. - Then create the result property. The default value is
nil. You’ll assignsuccessandfailureto it based on your test case. - As a result of conforming to
NetworkServiceProtocol, you need to implementfetch(with:completion:). You can modify the result as you want because it’s a mock class.
Next, you’ll register these mock classes in Resolver, so you can resolve them when testing.
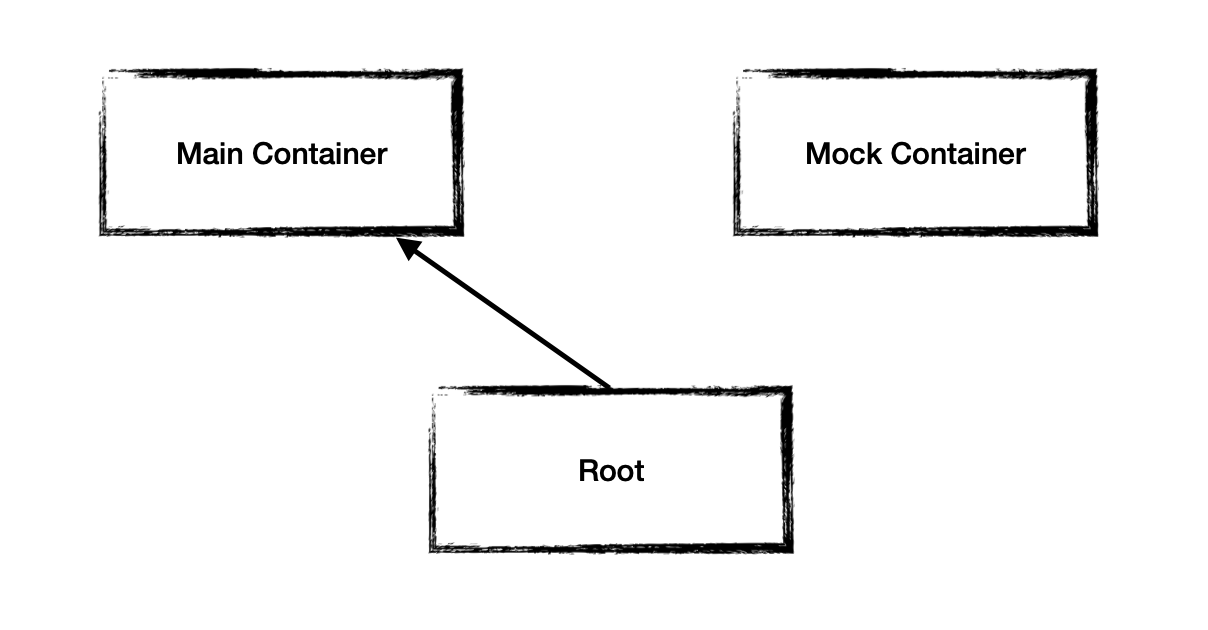
Using Resolver’s Containers
In a DI system, a container contains all the service registrations. By using Resolver, you can create different containers based on what your project needs. In this tutorial, you’ll create a Mock container for your Test target.
By default, Resolver creates a main container for all static registrations. It also defines a root container. If you inspected Resolver’s code you’d see:
public final class Resolver {
  public static let main: Resolver = Resolver()
  public static var root: Resolver = main
}
You can create different containers and decide when to use them to resolve instances by pointing at them using the root container.
In this project, you use the default main container in the App target and a mock container in the Test target, as shown in the diagram below.
App Target
Test Target

Registering Services in a Mock Container
Now, you’ll register your MockNetworkService in a mock container. Go to Resolver+XCTest.swift. Right below // MARK: - Mock Container create a mock container by adding:
static var mock = Resolver(parent: .main)
Now, still in Resolver+XCTest.swift, change the default root value in registerMockServices(). It must point to your new mock container:
root = Resolver.mock
You’ll use the Application scope instead of Graph in your test target. In registerMockServices(), add:
defaultScope = .application
Then, register your mock service in the mock container. In registerMockServices(), right after defaultscope, add:
Resolver.mock.register { MockNetworkService() }
  .implements(NetworkServiceProtocol.self)
Now that your registration is complete, it’s time to use it.
Dependency Injection in Unit Tests
Open AssetServiceTests.swift. Then, call registerMockServices at the bottom of setUp():
Resolver.registerMockServices()
This call ensures all dependencies are registered before use.
Finally, add NetworkService to AssetServiceTests. Right below // MARK: - Properties, add:
@LazyInjected var networkService: MockNetworkService
You might be thinking, “What the heck is @LazyInjected?” Calm down! It’s not a big deal.
Well, actually, it is. :]
By using Lazy Injection you ask Resolver to lazy load dependencies. Thus, Resolver won’t resolve this dependency before the first time it’s used.
You need to use @LazyInjected here because the dependencies aren’t available when the class is initiated as you registered them in setup().
Now everything is ready for you to write your first unit test.