Introduction to TextMesh Pro in Unity
Learn about TextMesh Pro in Unity by creating a spooky text-based adventure game where the style of the text changes based on what happens in the story. By Johnny Thompson.
Adding Color to Inline Sprites
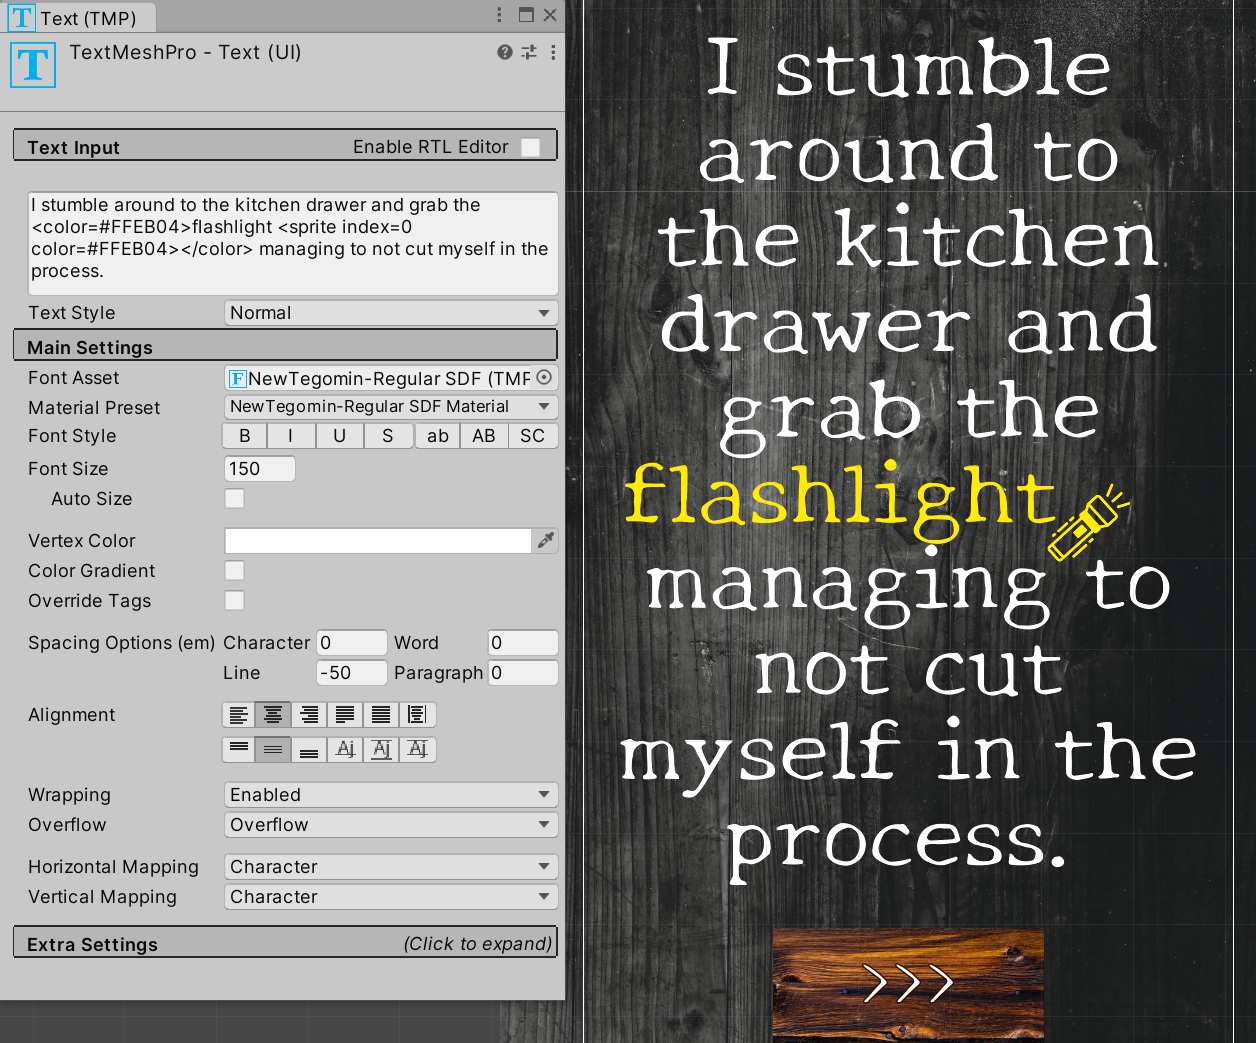
To make this stand out a bit more, you’ll color the word “flashlight” and the flashlight icon yellow using Rich Text tags. Place the <color=#FFEB04> tag before the word flashlight and the </color> tag after the flashlight icon tag.
You’ll see that the word flashlight is yellow, but the icon is still white. That’s because the Rich Text color and Vertex Color properties don’t affect sprite assets.
Luckily, the sprite has its own color property, which you can set in the Rich Text tag. Update the sprite tag to <sprite index=0 color=#FFEB04>. The sprite now displays a yellow color.
Using Additional Rich Text Tags
The next few dialog screens use some handy Rich Text tags.
On screen 14-Knock, use the align tag to align each line left, center, and right. Each new tag overrides the previous one, so you don’t need any closing tags.

On screen 15-WhosThere, use the <s> tag to strike through and <u> tag to underline the text.

On screen 17-Investigate, use the <uppercase> tag to make all the letters uppercase. Also, use the <smallcaps> tag to make everything uppercase, but the letters that were previously in lowercase will be a bit smaller.

On screen 19-Climb, use the <voffset> tag to set a vertical offset. The numerical value you set is in font units and the closing tag ends all vertical offset.

These are just a few of the Rich Text tags you can use with TextMesh Pro. Be sure to check out the TextMesh Pro documentation for the full list of over 30 available Rich Text tags.
There’s one question the documentation can’t answer, though:
What. Is in. The attic?
TextMesh Pro Font Assets
Up to this point, you’ve only used the Font Asset bundled with the starter project. Remember, Font Assets are generated from a standard font file and control the font your text uses.
The starter project also includes the Dela Gothic One font, which has a large face to best display your font customizations. In the next section, you’ll learn how to turn this into a Font Asset.
Creating Font Assets
Create a new Font Asset at Window ▸ TextMeshPro ▸ Font Asset Creator. Set the Source Font File to DelaGothicOne-Regular.
To get the best results from your Font Asset, pay attention to these properties:
- Padding: The spacing between each character in the Font Atlas Texture. A value of 5 will give you great results for most text in your project. Here, though, you need large and detailed title text, so set Padding to 7.
- Atlas Resolution: The pixel size of the Font Atlas Texture that you’re generating. For most English character sets, a size of 512×512 is plenty, but you can increase it for higher resolution results. Set the Atlas Resolution to 1024×1024 for this font.
- Character Set: Set to ASCII, unless you’re using another character set.
- Redner Mode: For most applications, the default of SDFAA (Signed Distance Field Anti-Aliasing) will give you the best results.

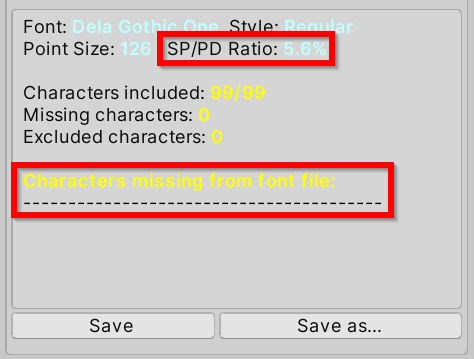
Once you’ve set these properties, click Generate Font Atlas and you’ll see a preview of the Font Atlas. You can expand the window for a larger preview.

Before saving, look in the output box. The generator displays any errors or characters missing from the font file here.
Also, note the SP/PD ratio. The generator calculates this by dividing the Sampling Point Size by the Padding Value. For best results, this value should be under 10%. If it’s above 10%, either increase the Atlas Resolution or decrease the Padding value, then regenerate the font until the value is below 10%.
Now, it’s time to use your new font asset. Click Save as… and save the Font Asset to Assets/RW/Fonts/Font Assets. Activate screen 21-UpHere, select Text (TMP) and set Font Asset to DelaGothicOne-Regular SDF.

Customizing TextMesh Pro Font Assets
By now, you can see how much power you have to create beautiful fonts by creating Font Assets and using Rich Text tags in TextMesh Pro. However, using TextMesh Pro Material lets you customize your text even more.
Customizing the TextMesh Pro Material gives you granular control over the text face, outline, shadow, bevel, texture and lighting properties. With these effects, you can make your text look more professional — or even go in-depth to turn your text into a piece of art.
Set screen 22-Crawl as the active screen in the sample project.
On this screen are two separate text objects that will demonstrate an important characteristic of TextMesh Pro Materials. Select Text (TMP) Top and Text (TMP) Bottom and set Font Asset to DelaGothicOne-Regular SDF.
Now, select only Text (TMP) Top and scroll down to its Material settings.
Go to the Outline section and use the slider to increase the Thickness. You’ll see that a black outline begins to form around the text. But something else interesting is happening.

Did you notice it? Although you only modified the Material Properties for Text (TMP) Top, the effect also applies to Text (TMP) Bottom.
That’s because both objects reference the Default Material. When you change the Default Material, the changes occur on all other objects that reference it. Go all the way back to screen 21-UpHere and you’ll see that the same outline applies to the text.
Because of that, it’s not a good idea to modify the Default Material. Instead, you’ll create separate Material Presets for each of the text effects you want.
Now, reset the Default Material to its original settings. You’ll learn how to create Material Presets in the next section.
Creating Material Presets
Material Presets store settings for a TextMesh Pro Material. They’re associated with one font, and you can easily swap between any Material Presets you create for that font.
To create a Material Preset, select the TextMesh Pro object you want to apply the Material Preset to. In this case, select Text (TMP) Top.
Click the three vertical dots icon on the Material, then select Create Material Preset to create a new Material Preset in the directory of the current Font Asset. It automatically applies to the selected TextMesh Pro object.
Set the Outline Thickness to 0.25 for a subtle outline that makes the text stand out from the background.

The final important step to take is to name the new Material Preset properly. Not only do descriptive names help you identify Material Presets, but incorrectly named Material Presets won’t appear in the list of available Material Presets for that font.
When you create a Material Preset, it has the same name as the Font Asset it applies to. You must keep the full Font Asset name as the prefix for the Material Preset name. You can append any details to the name after that prefix.
Name this Material Preset DelaGothicOne-Regular SDF — Black Outline because it’s a simple black outline for the Dela Gothic One font.
Now, select Text (TMP) Bottom and create a new Material Preset for it. Set the Face Color to brown and the Outline Color to light gray with a Thickness of 0.25 to make the text look like dusty boxes.
Name the Material Preset DelaGothicOne-Regular SDF — Dusty Boxes.

Now that you’ve created two Material Presets, you can toggle between them and the Default Material using the Material Preset drop-down on the TextMeshProUGUI component. Remember, if the Material Preset’s name doesn’t have the Font Asset as a prefix, it won’t show up in this list.
