Introduction to TextMesh Pro in Unity
Learn about TextMesh Pro in Unity by creating a spooky text-based adventure game where the style of the text changes based on what happens in the story. By Johnny Thompson.
Have you ever looked at the UI in your Unity project and thought to yourself, “Why does this look so plain?” Many games have a great-looking UI but still use the default Unity text. BORING!
If you want a solution to bland-looking text, look no further than TextMesh Pro. In this tutorial, you’ll create a spooky text-based adventure game where the text style and format change based on what’s happening in the story. As you go on this adventure, you’ll learn about:
- TextMesh Pro’s basic use and styling options.
- Using Rich Text tags.
- How to create Font Assets.
- How to customize Material Presets.
By the time you’re done, you’ll see how TextMesh Pro gives your project the best-looking text, no matter what style you’re aiming for.

Getting Started
Download the starter project by clicking the Download Materials button at the top or bottom of the tutorial. Open the project in Unity 2020.3 or later.
Browse Assets/RW to find the assets used in this project. The subfolders contain the following:
- Fonts: Standard font files, TextMesh Pro Font Assets and Font Presets.
- Scenes: Starter scene for the text-based adventure game.
- Scripts: Helper script to advance the screens in the text-based adventure game.
- Sprites: Images and an icon used in the text-based adventure game.
- Textures: A cardboard texture you’ll apply to a font in the tutorial.
Now that you’ve had a look at the project, it’s time to get started with TextMesh Pro.
Installing TextMesh Pro
When Unity acquired TextMesh Pro in 2017, they bundled it right into their game engine, so you don’t need to download or install any extra files to use it.
If you don’t see the TextMesh Pro tools and components, try enabling the package in the Package Manager. To do this, navigate to Window ▸ Package Manager and follow these steps:
- On the Packages drop-down, select Unity Registry.
- Scroll down to TextMeshPro and select it.
- With the package selected, click Install to install the package to your project.

Next, import the TextMesh Pro Essential Resources into your project by selecting Window ▸ TextMeshPro ▸ Import TMP Essential Resources. Finally, import all the files in the Unity Package into your project. You’ll now see a subfolder called TextMesh Pro under Assets.
What Is TextMesh Pro?
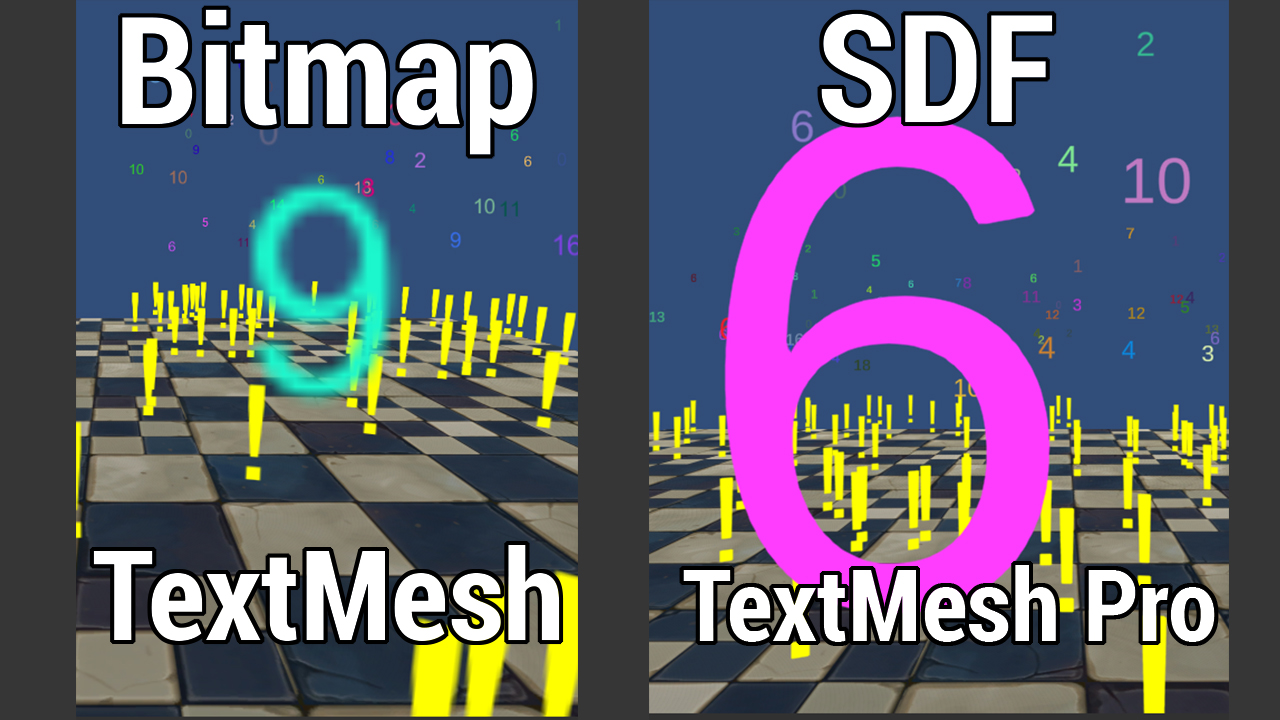
In the early days of the Unity game engine, one method of adding text to your game was to use TextMesh. TextMesh, which came prepackaged with Unity, used bitmap fonts to display text on the screen.
TextMesh offered some basic styling and configuration options, but you were very limited regarding what you could create with it. Because the text was rendered using bitmaps, it began to appear fuzzy when enlarged. Also, the game’s frame rate dropped when you had many TextMesh objects on the screen at once.
To make up for the lack of styling options in TextMesh, Stephan Bouchard created a tool called TextMesh Pro, which he sold in the Unity Asset Store.
TextMesh Pro contained powerful styling tools that ran efficiently in Unity. This tool was so useful that, in 2017, Unity acquired TextMesh Pro and hired Stephan Bouchard. Ever since, they’ve included TextMesh Pro in all versions of Unity.
There are many reasons to use TextMesh Pro. The top three are:
- It looks great: The text looks good at any size.
- It’s infinitely configurable: You can make your text look exactly how you want it to.
- It’s easy to use: TextMesh Pro is built right into the Unity game engine. The styling options are intuitive, so you can learn them quickly.
How Does TextMesh Pro Work?
Throughout this tutorial, you’ll see how to set up and configure each of TextMesh Pro’s parts. But first, here’s a high-level overview to help you piece things together as you move along.
At the core of TextMesh Pro is the Font Asset. You create a Font Asset from a standard font file. All TextMesh Pro objects using that font will reference that Font Asset.
Each Font Asset generates a Texture Atlas that contains all the characters in each font. Material Presets you create and text you draw to the screen both reference the single Texture Atlas.

TextMesh Pro uses a Signed Distance Field to render text on the screen. How this feature works is out of the scope of this tutorial, but the result is that text appears sharp regardless of its relative size and distance from the camera. Traditional bitmap textures appear blurry at close draw distances and large sizes.
One last thing to note before you get started with TextMesh Pro is that there are two types of TextMesh Pro components, TextMeshPro and TextMeshProUGUI. TextMeshPro works with the MeshRenderer. It’s best used with text that should exist in world space, like an in-game sign that could be added to a scene.

TextMeshProUGUI works with the CanvasRenderer and the Canvas system, and is best for text that exists in screen space. It replaces the built-in Unity UI.Text component.
Other than their intended uses, there are no differences between the two types of components — they share the same configuration options.
In this tutorial, you’ll learn how to create and work with the TextMeshProUGUI component. You can find information about using the TextMeshPro component in Unity’s TextMesh Pro User Guide.
Setting up the Starter Project
Open the starter scene at Assets/RW/Scenes/IntoTheAttic-Starter.
This game runs in portrait mode, so change the aspect ratio of the Game View to 9:16. To do this, click the existing resolution or aspect ratio drop-down in the Game View, then click the + icon to add a new aspect ratio preset. Change the type to Aspect Ratio and enter a width of 9 and height of 16. Finally, click OK. Now, the game window will display in portrait mode.

The sample project, Into the Attic, is a text-based adventure game where you’ll change the styling of the text based on what’s happening in the story. Each screen of dialog has a TextMeshProUGUI component to display the text and a button to advance to the next screen.
These screens are child objects of the Screens GameObject in the scene. The screens’ names have incrementing numbers indicating the order they appear in the story.
On each screen, you’ll learn a new way to style text. To edit another screen, disable the current one then enable the desired screen. Make sure you leave both ScreenFader and Background active.
