Firebase Dynamic Links: Getting Started
Learn how to use Firebase Dynamic Links to implement deep linking on iOS. By Danijela Vrzan.
Sign up/Sign in
With a free Kodeco account you can download source code, track your progress, bookmark, personalise your learner profile and more!
Create accountAlready a member of Kodeco? Sign in
Sign up/Sign in
With a free Kodeco account you can download source code, track your progress, bookmark, personalise your learner profile and more!
Create accountAlready a member of Kodeco? Sign in
Sign up/Sign in
With a free Kodeco account you can download source code, track your progress, bookmark, personalise your learner profile and more!
Create accountAlready a member of Kodeco? Sign in
Contents
Firebase Dynamic Links: Getting Started
35 mins
- Getting Started
- Deep Linking
- Firebase Dynamic Links
- Setting Up Firebase
- Configuring Firebase Project Settings
- Setting Up the App Store ID
- Adding Your Team ID
- Setting Up a Domain for Hosting
- Setting Up Firebase Hosting
- Creating a Firebase-Hosted Subdomain
- Creating a Free Firebase Domain
- Adding Associated Domains in Xcode
- Testing Your Deep Link in Terminal
- Building Firebase Dynamic Links
- Defining the URL
- Using Dynamic Link Builder API
- Shortening the URL
- Seeing Your App in Action
- Interpreting Your Dynamic Link
- Handling the Incoming URL
- Parsing the URL Components
- Using Environment Values
- Handling the Incoming Dynamic Link
- Handling Navigation in Your App
- Where to Go From Here?
Users consume content faster every day and any time they have to spend navigating to your app is time wasted. With Deep links, a single URL can send users directly to your app or even to a specific view within your app.
But what if they don’t have the app installed? That’s covered, too! The link prompts them to install the app from the App Store before continuing with the process.
In this tutorial, you’ll build Raycipe, a simple master-detail view recipe app. During the process, you’ll learn about:
- Deep links and Universal links.
- Creating and testing deep links with Firebase Dynamic Links.
- Handling deep links when users don’t have the app installed.
- Programmatic navigation to a specific view with SwiftUI.
Getting Started
Download the starter project by clicking Download Materials at the top or bottom of the tutorial.
Inside starter, open Raycipe.xcodeproj. Build and run. You’ll see something like this:
In Xcode, take a look at the main files:
- recipe.json contains the app’s data.
- AppMain.swift is the app’s entry point. All the life-cycle methods go here. It’s also where you’ll initialize Firebase.
- HomeView.swift is the app’s main view and displays a list of recipes.
- RecipeDetailView.swift shows detailed information about a selected recipe.
- DeepLinkHandler.swift is a helper class you’ll use to parse your URL.
Before you start, take a moment to learn about deep linking.
Deep Linking
Developers use Deep links to send users directly to an app instead of a website or store. More importantly, they can send users to a specific in-app view, saving them time they’d otherwise spend locating the content themselves. It improves the user experience and can increase the likelihood of someone installing your app.
Firebase Dynamic Links work on top of Universal Links. They’re specific to the Apple platform introduced with iOS 9 and provide greater security while improving performance.
Using Firebase to set up dynamic links makes implementing deep linking easier.
Next, you’ll learn more about Firebase Dynamic Links.
Firebase Dynamic Links
Firebase Dynamic Links work on Android and iOS regardless of whether the user has your app installed. When you set up a new dynamic link, you can also decide if you want to open a dynamic link only in the browser for a specific platform.
Additionally, dynamic links survive the installation process. In the diagram below, you’ll see the process of opening a dynamic link depending on the platform. If a user doesn’t have the app, they’ll see a prompt to install it from the App Store. Then after installation, the app can open and navigate to the linked content.
Setting Up Firebase
Before you implement Firebase Dynamic Links in your app, you need to set up a new Firebase project.
If you already know how to set up a Firebase project and initialize Firebase, do so now. Then skip to Configuring Firebase Project Settings.
To set up your Firebase project, follow the standard set of instructions documented in Firebase Analytics: Getting Started. Start with Setting Up Firebase. Continue with Adding Firebase to Xcode until you reach Editing Build Settings.
When you finish, come back here and continue reading below.
Configuring Firebase Project Settings
At this point, you’ve set up your Firebase project. But, you’re not ready to use dynamic links yet. You need to add your App Store ID and Team ID to the project settings.
Ideally, you want your dynamic link to point to your app in the App Store so new users can install the app and then continue with the navigation.
If you have an app in the App Store, use your app’s App Store ID. If you don’t have an app already, you’ll use the official raywenderlich.com app. However, you won’t be able to see how links survive the installation process as you’re not navigating to your own app.
If you don’t know how to set them up, continue reading below.
Setting Up the App Store ID
Before you can use the raywenderlich.com app’s App Store ID, you need to find it. Copy and paste raywenderlich.com app store into your search engine. You’ll see a search result from apps.apple.com:
With this approach, you can find the App Store ID for any app on the App Store.
Click the search result and look for the id parameter in the URL:
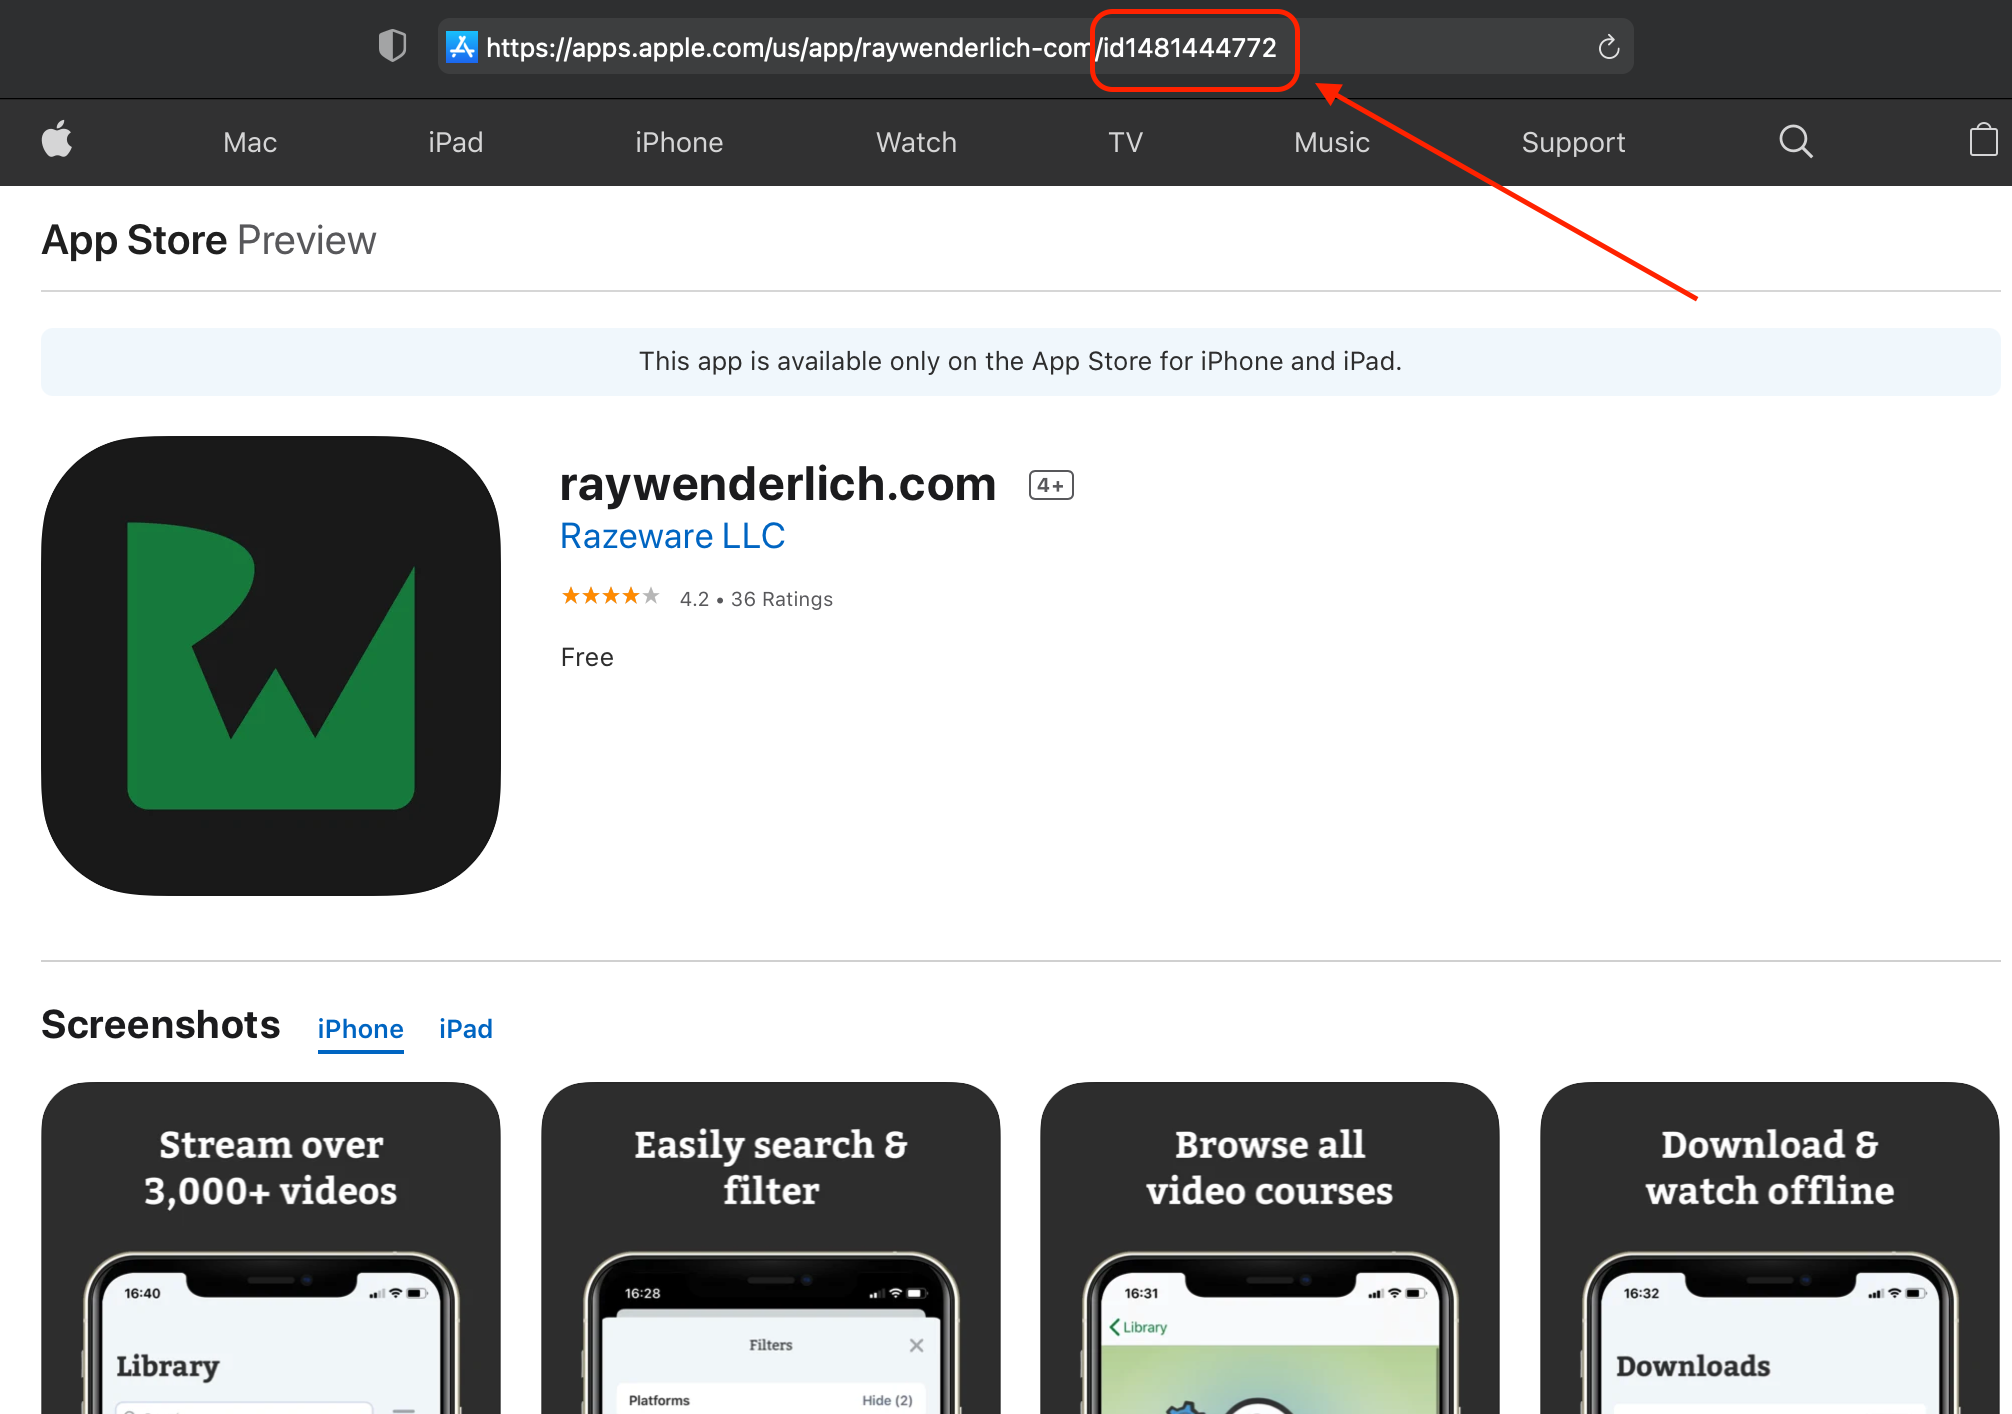
The App Store ID for the raywenderlich.com app is 1481444772.
Next, open Firebase console and go to Project Settings. Copy and paste 1481444772 into the App Store ID field:
Next, you’ll add your Team ID.
Adding Your Team ID
Dynamic links require your Team ID to work. You can find it under Membership Details on the Apple Developer website:
Copy and paste it to the Firebase project settings below your App Store ID.
Next, you’ll set up a domain for hosting.
Setting Up a Domain for Hosting
Before you can use Firebase Dynamic Links, you need to create a custom domain for it.
Setting Up Firebase Hosting
Before you use a custom domain for dynamic links, you need to ensure the domain points to Firebase Hosting. If you have a domain you want to use with dynamic links and the domain points to a different host, you have to move it to Firebase Hosting. If you don’t want to do that, you can create a subdomain hosted by Firebase, which you can use for dynamic links.
Open Firebase console. Under Hosting, click Get started.
You’ll see a set of instructions to set up Firebase Hosting.
You don’t have to complete the indicated steps at this time as they guide you through setting up your domain. Click Next a couple of times and then Continue to console.
You’ll see a Firebase Hosting dashboard with two custom Firebase-provisioned domains:
You could use these domains to host your content. But, you’ll learn how to set up your own custom subdomain and use it for dynamic links next.
Creating a Firebase-Hosted Subdomain
In the left panel, select Dynamic Links, then click Get started. First, create a custom subdomain:
Choose something that is unique to your domain.
Click Continue to add an optional path prefix:
Click Continue to deploy your subdomain to Firebase Hosting.
You have to verify ownership of the domain you want to use. To do this, add a TXT record in your DNS settings with a unique string value:
This step is required. Your subdomain won’t go live before you complete it.
It can take up to 24 hours to propagate these changes on your domain. Once Firebase successfully verifies your domain ownership, you can continue with the set-up.
With the domain verified, repeat the set-up from the beginning for your subdomain. Click Verify. Then continue with the set-up.
Finally, add the A record to your domain by visiting your DNS provider or registrar:
You can add the A record in the same way you added the TXT record.
Your DNS records will look like this:
Different providers use different naming conventions, so yours might be different. If you’re not sure, check with your DNS provider or read their official documentation.
It can take up to 24 hours to propagate these changes on your domain.
To see if the process was successful, open Firebase Hosting for your project. You’ll see your custom subdomain in the list and Connected next to it:
There’s an additional step in the set-up if you want to use a custom domain or subdomain for Firebase dynamic links on iOS apps.
Open Xcode. In Info.plist, create a key called FirebaseDynamicLinksCustomDomains. Set it to your app’s Dynamic Links URL prefix:
Alternatively, you can use a free custom Firebase domain.
Creating a Free Firebase Domain
What’s great about Firebase is you don’t have to own a domain. Firebase provides a free custom domain that’s already associated with your app, which you can use for your dynamic links.
You can create your own Firebase custom domain by giving it any name you like and appending page.link to the end. This is the custom domain for your dynamic links.
Open Firebase console. Under Dynamic Links, click Get started.
Domains are globally unique, so you can’t use the same domain shown in the picture. However, you should see a Google-provided domain ending in page.link in a drop-down that you can use.
Once you’ve specified a domain, click Continue and then Finish. You’ll see your domain listed in the Firebase console.
Make sure to write it down because you’ll need it later.
To finish this configuration, you’ll add Associated Domains to your Xcode project.
Adding Associated Domains in Xcode
Associated Domains provide the foundation for universal links.
When you want to use deep links in your apps, you have to host a file named apple-app-site-association on your hosting site. It’s a required step that establishes an association between your domain and your app.
If you’re using Firebase dynamic links for your deep links, apple-app-site-association is already set up for you when you successfully create a domain hosted on Firebase.
In Xcode, under Signing & Capabilities, click + Capability. Add Associated Domains:
Click + and copy and paste your domain in this format: applinks:[your domain].
Now that you’ve added associated domains, it’s time to test your deep link in Terminal.
Testing Your Deep Link in Terminal
To test your deep link without using a physical device, you need both Simulator and Terminal.
Build and run your app in Simulator. Once it’s running, close it inside your Simulator so you can see the home screen. Then, open Terminal and place it somewhere you can see both Terminal and Simulator side by side.
Copy and paste the following command into the terminal window, replacing [your domain] with the domain you created in Firebase for your dynamic link:
xcrun simctl openurl booted [your domain]
Press return and your app will open instantly!
Now it’s time to build the Firebase dynamic link.
Building Firebase Dynamic Links
There are four ways you can create Firebase dynamic links:
- In the Firebase console
- Programmatically, using the Dynamic Link Builder API
- Using the REST API
- Manually
Creating dynamic links using the Firebase console is useful if you’re creating promo links to share on social media and you only need one link. The process is simple and Firebase guides you through it step by step:
Creating links programmatically, using the Builder API on iOS and Android, is most useful for user-to-user sharing or in any situation that requires a dynamic link.
On the other hand, if you’re creating a link on a platform that doesn’t have a Builder API, then using the REST API is the better option.
Finally, if you don’t need to track click data and you don’t mind long links, you can construct the link manually using URL parameters. The only advantage here is avoiding an extra network round trip.
In this tutorial, you’ll use the Dynamic Link Builder API to create your dynamic link.
You’ll start by creating the URL.
Defining the URL
As mentioned before, you don’t need to build a website for this tutorial. Instead, you’ll use the official raywenderlich.com website. If you’ve built a website and have a custom domain, feel free to use it for the rest of the tutorial.
In Xcode, open RecipeDetailView.swift. Add the following to the top of the file:
import Firebase
Next, scroll down to the end of the file. Inside createDynamicLink()
, replace // TODO 1
with:
var components = URLComponents()
components.scheme = "https"
components.host = "www.raywenderlich.com"
components.path = "/about"
URLComponents
constructs and parses URLs from their constituent parts. It’s part of the Foundation
framework.
Here, you’re using the /about
path to show raywenderlich.com’s “About” page as an example. Ideally, with this app, the page would show recipes, so if you’re using your own website, feel free to use the path to the page where you host your recipes.
Next, replace // TODO 2
with:
let itemIDQueryItem = URLQueryItem(name: "recipeID", value: recipe.recipeID)
components.queryItems = [itemIDQueryItem]
To find a specific recipe on a website or in the app, you need to specify it with the required recipeID.
Now, replace // TODO 3
with:
guard let linkParameter = components.url else { return }
print("I am sharing \(linkParameter.absoluteString)")
Here, you use the URLComponents
object to create the URL.
Build and run. Tap a recipe card and click Share. Now, in your Xcode console, look for the print statement:
Next, you’ll create a dynamic link.
Using Dynamic Link Builder API
You’ll be using the Dynamic Link Builder API to create Dynamic Links.
Still in RecipeDetailView.swift, replace // TODO 4
with:
let domain = "https://rayciperw.page.link"
guard let linkBuilder = DynamicLinkComponents
.init(link: linkParameter, domainURIPrefix: domain) else {
return
}
This defines a dynamic link component object with the URL you defined previously and the URI prefix, which is what you defined in the Firebase console under dynamic links: https://[your domain]
.
Don’t forget to replace https://rayciperw.page.link
with your own URL.
Next, replace // TODO 5
with:
// 1
if let myBundleId = Bundle.main.bundleIdentifier {
linkBuilder.iOSParameters = DynamicLinkIOSParameters(bundleID: myBundleId)
}
// 2
linkBuilder.iOSParameters?.appStoreID = "1481444772"
// 3
linkBuilder.socialMetaTagParameters = DynamicLinkSocialMetaTagParameters()
linkBuilder.socialMetaTagParameters?.title = "\(recipe.name) from Raycipe"
linkBuilder.socialMetaTagParameters?.descriptionText = recipe.description
linkBuilder.socialMetaTagParameters?.imageURL = URL(string: """
https://pbs.twimg.com/profile_images/\
1381909139345969153/tkgxJB3i_400x400.jpg
""")!
Here’s a breakdown:
- You define a
DynamicLinkIOSParameters
object and assign it a value of your app’s bundle ID programmatically. - The link needs to know where to send users who don’t have the app installed. For that, you use
appStoreID
. If you have your own app on the App Store, change it to match your app’s ID. - Then you use
socialMetaTagParameters
to define how your link will look when shared in a social media post. You can add a title, description and an image from a URL. If you had a website with the recipes, you could assign a proper image URL for every recipe. In this case, you’re using a raywenderlich.com logo.
There are several optional parameters you can add to your dynamic link. To learn more about these parameters, see the Firebase Documentation.
Finally, replace // TODO 6
with:
guard let longURL = linkBuilder.url else { return }
print("The long dynamic link is \(longURL.absoluteString)")
Here, you retrieve your required dynamic link!
Build and run. Tap a recipe card, then tap Share. Check your Xcode console output and look for the output:
You could use this link as-is because it’s a functional dynamic link. However, it’s long and doesn’t look good when you share it.
Firebase gives you a way to shorten it and make it look more appealing.
However, to shorten it, you need to make another network call to Firebase. You need to send your long dynamic link to the network service, which will take that long link and return a shortened version.
If your user had poor network conditions, the shortening service might take too long. At this point, your user might give up and completely uninstall your app. Remember, the whole point of dynamic links is to save your users time, not to make them more frustrated.
It’s up to you to decide if you like the long dynamic link or if you want to shorten it.
You’ll learn how to shorten it next.
Shortening the URL
To shorten a long dynamic link, pass it to .shorten(completion:)
.
Still in RecipeDetailView.swift, add the following below the last code you added:
linkBuilder.shorten { url, warnings, error in
if let error = error {
print("Oh no! Got an error! \(error)")
return
}
if let warnings = warnings {
for warning in warnings {
print("Warning: \(warning)")
}
}
guard let url = url else { return }
print("I have a short url to share! \(url.absoluteString)")
shareItem(with: url)
}
The closure is straightforward. You need to check for any errors or warnings and make sure you get the URL. Print the final URL so you can test your app in the simulator.
At the end of the closure, you call shareItem(with:)
, a helper method that’s already defined. It opens a standard share sheet.
Your app now has all the functionality to share dynamic links and redirect users if they don’t have the app.
Build and run. Tap Share and you’ll see a share sheet.
You can see how your shareable link looks in the share sheet, with all the optional parameters you defined:
In your Xcode console, look for the print statement to see how your final shortened dynamic link looks:
Now it’s time to see your app in action.
Seeing Your App in Action
To see the whole workflow, place your Simulator and Terminal side by side. Make sure your Simulator is showing the home screen and not running your app.
Copy and paste the following command to your terminal window, replacing [your shortened dynamic link] with the short dynamic link from the Xcode console:
xcrun simctl openurl booted [your shortened dynamic link]
Press return and see the app open:
To see what happens when you don’t have the app installed, remove Raycipe from your Simulator. Long-press Raycipe and choose Delete App.
Follow the same instructions and use the same short dynamic link to run the command in your terminal window again:
You’ll see the web page the dynamic link uses to guide the user to install your app. If you click OPEN, it’ll take you to the App Store. Unfortunately, that functionality isn’t available on the Simulator but you could try it on a real device instead.
If you don’t have a paid Apple Developer account or are unable to run your app on a physical device, here’s an example of how your link would look when you share it or receive it in Messages:
Next, you’ll interpret your dynamic link.
Interpreting Your Dynamic Link
Now comes the fun part! You’re going to direct your users to a specific screen within your app. When a user shares a link with a recipe, whoever receives it will see the detailed view of that same recipe if they have the app installed on their phone.
It sounds like magic, but it’s not. You simply need to know all the secret ingredients.
You’ll start by handling the URL in your app.
Handling the Incoming URL
With the new app life cycle in SwiftUI, incoming URLs are handled by calling .onOpenURL(perform:)
on your scene. Since you have a single scene, you attach it to that. But, if you had more scenes, you’d use the top-most scene since that’s where the navigation starts.
Open AppMain.swift. Below // Call onOpenURL
, add:
// 1
.onOpenURL { url in
print("Incoming URL parameter is: \(url)")
// 2
let linkHandled = DynamicLinks.dynamicLinks()
.handleUniversalLink(url) { dynamicLink, error in
guard error == nil else {
fatalError("Error handling the incoming dynamic link.")
}
// 3
if let dynamicLink = dynamicLink {
// Handle Dynamic Link
self.handleDynamicLink(dynamicLink)
}
}
// 4
if linkHandled {
print("Link Handled")
} else {
print("No Link Handled")
}
}
Here’s what’s happening:
-
.onOpenURL(perform:)
receives the incoming URL. -
handleUniversalLink(_:completion:)
parses the URL into aDynamicLink
. It makes a network call to convert the short dynamic link into a full dynamic link and extracts the URL parameter. It returns anError
if this fails. - You handle any dynamic link retrieved by calling a method that isn’t yet defined, which you’ll write next.
- Finally, you report on whether or not you handled the link. If you’re working with other universal links, this is where you’d handle those.
To resolve the compiler error, add the following under // Handle incoming dynamic link
:
func handleDynamicLink(_ dynamicLink: DynamicLink) {
}
You’ll flesh this out further in a later section.
Build and run. Select a recipe and tap Share.
Copy the short URL from your Xcode console and run the following command in the terminal window:
xcrun simctl openurl booted [your short URL]
Go back to Xcode and look at the console output:
The incoming URL and your shared dynamic link URL are the same.
Next, you’ll parse the URL parameter and extract the recipeID
.
Parsing the URL Components
Open DeepLinkHandler.swift. Add the following below // Parse url
:
func parseComponents(from url: URL) -> DeepLink? {
// 1
guard url.scheme == "https" else {
return nil
}
// 2
guard url.pathComponents.contains("about") else {
return .home
}
// 3
guard let query = url.query else {
return nil
}
// 4
let components = query.split(separator: ",").flatMap {
$0.split(separator: "=")
}
// 5
guard let idIndex = components.firstIndex(of: Substring("recipeID")) else {
return nil
}
// 6
guard idIndex + 1 < components.count else {
return nil
}
// 7
return .details(recipeID: String(components[idIndex + 1]))
}
Here, you:
- Make sure the URL has the right scheme. It's the same one you defined at the start.
- Check to see if the URL contains the about path component, or if you have your own website, the path you're using for the dynamic link. If it doesn't, it'll only open the app and show the home view, so it returns
.home
. - Make sure the incoming URL has a query string — the part saying recipeID=002.
- Now, you split the query string into its components. Using
flatMap(_:)
, you split each component separated by = and create a single array of elements. It looks like this:["recipeID", "002"]
. - Because the URL can have more query parameters, you need to find the
index
of recipeID and assign it toidIndex
. - The
components
array has two elements so theindex
of yourrecipeID
is1
. Check if it exists by making sure theidIndex + 1
is less than the number of components, which is two. - Finally, assign the
recipeID
value to.details(recipeID:)
and return it.
You've parsed your URL parameter and extracted the value of the recipeID
, but your app still doesn't know what to do with it. That's because you need to make sure the view that needs this value receives it.
You'll do that next using environment values.
Using Environment Values
It's often helpful to know your app's state. For example, perhaps you want to fetch new data when your app becomes active or remove any cached data once the app transitions to the background.
SwiftUI tracks a scene's state in the environment. You can make it available everywhere in your app by using the @Environment
property wrapper.
You'll use this approach and create your own EnvironmentKey
for deep links. If you want to learn more about Environment Values, check out Apple's Documentation on the topic.
Inside the Helpers folder, create a new Swift file called DeepLinkKey.swift.
Replace import Foundation
with:
import SwiftUI
Then add:
struct DeepLinkKey: EnvironmentKey {
static var defaultValue: DeepLinkHandler.DeepLink? {
return nil
}
}
Here, you declare a new environment key type and specify its required defaultValue
property as having a type of DeepLink?
.
Next, add the following extension to the bottom of the file:
// MARK: - Define a new environment value property
extension EnvironmentValues {
var deepLink: DeepLinkHandler.DeepLink? {
get {
self[DeepLinkKey]
}
set {
self[DeepLinkKey] = newValue
}
}
}
Here you create a custom environment value by extending EnvironmentValues
with the new property.
Now, open AppMain.swift and, below // Define deepLink
add:
@State var deepLink: DeepLinkHandler.DeepLink?
Then below // Add environment modifier
, add:
.environment(\.deepLink, deepLink)
Here, you've set the environment value for a view and all its subviews by calling .environment(_:_:)
on your HomeView()
.
Now that you defined your custom environment key, you can finish off handling the dynamic link.
Handling the Incoming Dynamic Link
Open AppMain.swift and, inside handleDynamicLink(_:)
, add the following:
guard let url = dynamicLink.url else { return }
print("Your incoming link parameter is \(url.absoluteString)")
// 1
guard
dynamicLink.matchType == .unique ||
dynamicLink.matchType == .default
else {
return
}
// 2
let deepLinkHandler = DeepLinkHandler()
guard let deepLink = deepLinkHandler.parseComponents(from: url) else {
return
}
self.deepLink = deepLink
print("Deep link: \(deepLink)")
// 3
DispatchQueue.main.asyncAfter(deadline: .now() + 0.2) {
self.deepLink = nil
}
Here's a code breakdown:
- Every dynamic link has a
matchType
that shows how confident the library is you've retrieved the dynamic link the user clicked. It has four types:unique
,default
,weak
andnone
. If the data you're sharing within the link is personal in nature, you'd want to make sure the match type isunique
. Otherwise, it's recommended that you don't show any personal information you can extract from the link as the link may have been used before. - You call
parseComponents(from:)
and pass the URL as an argument. If parsing was successful, you assign the returned value to yourdeepLink
environment value. - Since they remain available in your app's memory, you need to reset environment values. If the user clicks the same link again, nothing happens because the environment value hasn't changed.
Build and run. Select a recipe, then tap Share.
Copy the short URL from the Xcode console and run the following command in the terminal window:
xcrun simctl openurl booted [your short URL]
Go back to Xcode and look at the console output:
The deepLink
environment property's value is details(recipeID: "002")
.
The only thing left to do is use this value to navigate to a specific detailed view in your app.
Handling Navigation in Your App
Open HomeView.swift. Below // Define environment property
add:
@Environment(\.deepLink) var deepLink
To read the environment value from inside your HomeView()
or any of its children, you define the environment property wrapper.
Next, add the following below // Define navigation
:
// 1
.onChange(of: deepLink) { deepLink in
guard let deepLink = deepLink else { return }
switch deepLink {
case .details(let recipeID):
// 2
if let index = recipes.firstIndex(where: {
$0.recipeID == recipeID
}) {
// 3
proxy.scrollTo(index, anchor: .bottom)
// 4
cellSelected = index
}
case .home:
break
}
}
Here's a code breakdown:
- You add
onChange(of:perform:)
to the view. It triggers an action every time adeepLink
environment value changes. - Next, you find the
index
of a recipe with the specifiedrecipeID
. -
ScrollViewReader
is a view that provides programmatic scrolling by working with a proxy. You use the proxy'sscrollTo(_:anchor:)
to perform scrolling. It scans the scroll view until it finds the first child view with the specified index. - Finally, you assign the
index
value tocellSelected
. When it receives a new index value it automatically triggers navigation to the specific detailed view with the help of aNavigationLink
.
Build and run. Select a recipe, tap Share and, using both Simulator and Terminal, open your dynamic link.
Now your app can lead the user to a specific recipe detailed view:
Where to Go From Here?
Congratulations! Now that you know how to work with dynamic links, you can build on what you've learned in this tutorial by adding custom dynamic links to your apps.
You can download the completed version of the project using the Download Materials button at the top or bottom of this tutorial.
You can make the links you share richer and friendlier by using the LinkPresentation framework. If you'd like to learn how, check out this Visually Rich Links Tutorial for iOS: Image Thumbnails.
Be sure to check out Firebase Tutorial: Getting Started to learn how Firebase can supercharge your app. If you don't know where to begin, the Firebase Official Documentation is a good starting point.
I hope you enjoyed this tutorial. If you have any questions or comments, please join the forum discussion below.
All videos. All books.
One low price.
A Kodeco subscription is the best way to learn and master mobile development — plans start at just $19.99/month! Learn iOS, Swift, Android, Kotlin, Flutter and Dart development and unlock our massive catalog of 50+ books and 4,000+ videos.
Learn more