Apple Pay Tutorial: Getting Started
Enter the world of mobile payments on iOS in this Apple Pay tutorial! You’ll learn how to implement Apple Pay in your iOS apps to collect payment for physical goods and services. By Erik Kerber.
Learn how to integrate Apple Pay into your application!
Learn how to integrate Apple Pay into your application!
Update April 21, 2015: Updated for Xcode 6.3 / Swift 1.2.
Apple took a big step into the world of mobile payments with the introduction of the iPhone 6 and Apple Pay. There are two ways you can use Apple Pay to purchase items: at the point of sale using Near Field Communication (NFC), or within an iOS app.
Since creating your own NFC payment system wouldn’t go over too well with Apple, this tutorial will instead look at how to integrate Apple Pay into your own iOS apps. This is different from in-app purchases for digital content — Apple Pay lets you sell goods to your users from within an app.
In this Apple Pay tutorial, you’ll learn how to write an app that lets users buy really cool RayWenderlich.com tutorials and gear using nothing but the convenience of their fingerprints!
Just in case you’re worried, you won’t incur any real charges on your account by working through the project in this tutorial — so feel free to go on a virtual shopping spree! :]
Getting Started
Download the starter project for this tutorial; it’s named ApplePaySwag.
Build and run to make sure the project works out of the box. You should see the startup screen as follows:
![]()
The app as it stands is a simple Master/Detail application that shows a list of RayWenderlich.com “swag” in the master view. Tap on any piece of swag to navigate to a detail view which shows a bigger picture of the swag as well as a more detailed description.
Here’s a quick overview of the classes and objects contained in the starter project:
- SwagListViewController: The master view controller that lists the swag available to purchase.
- BuySwagViewController: The detail view controller that shows details of the swag and lets you purchase the item.
- Swag: The primary swag model object.
-
SwagCell: A
UITableViewCellsubclass that displays the list of swag inSwagListViewController. - Main.storyboard: The sole storyboard in the app that contains both scenes.
Feel free to browse through the swag for a moment, but soon you’ll have to tear yourself away and hook this mini-store up to Apple Pay to allow your users to grab some cool gear. Before you jump into the code, there’s a bit of Apple Developer Portal setup work you’ll need to complete first.
Setting Up Your App for Apple Pay
Head over to http://developer.apple.com and log in to your developer account. Go to Member Center and click on Certificates, Identifiers & Profiles\Identifiers\App IDs.
Click on the + button to create a new App ID, name it Apple PaySwag and give it a Bundle ID of the format com.YOURDOMAIN.ApplePaySwag. Make sure that Explicit App ID is selected, as wildcard App IDs aren’t able to make payments with Apple Pay. Finally, check the Apple Pay checkbox under App Services, click Continue and then click Submit to complete the creation of your new App ID.
Next, click on Merchant IDs under Identifiers in the left navigation pane:

Click + to create a new merchant ID; use whatever description and merchant identifier you’d like. Generally, it’s recommended to create merchant identifiers in the reverse domain style that start with merchant, similar to bundle IDs. Click Continue and then click Register to create your new merchant ID.
Now that your App ID and merchant ID are set up, head back to Xcode to get your project ready for Apple Pay.
Select the ApplePaySwag project in the left navigation bar, then select the ApplePaySwag target and change the Bundle Identifier to match the one you created above. Ensure that the Team selection box is pointing to the development team under which you created your App ID and merchant ID.
Next, click the Capabilities tab. Expand the Apple Pay section and ensure that the switch on the right is set to ON. Then push the refresh button below the merchant ID list; you should see the list populate with the merchant ID you added on the developer portal, if it wasn’t there already.
Finally, check the checkbox next to your merchant ID; your screen should look like the image below:
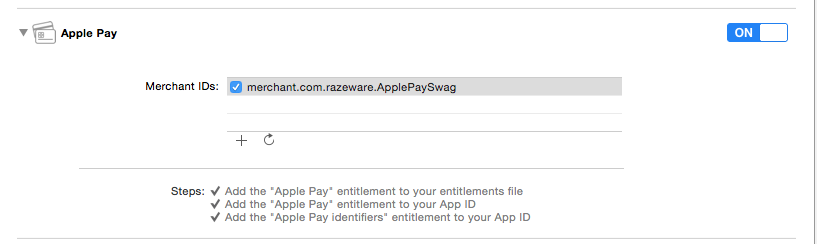
The three items in the Steps section should all have checkmarks next to them to indicate that you’ve satisfied all of the requirements for using Apply Pay in your app. If one isn’t checked, retrace your steps to make sure you’ve taken care of all the details.
You now have Apple Pay enabled in your app. Time to get to the fun part — the coding! :]
Adding the Apple Pay Button
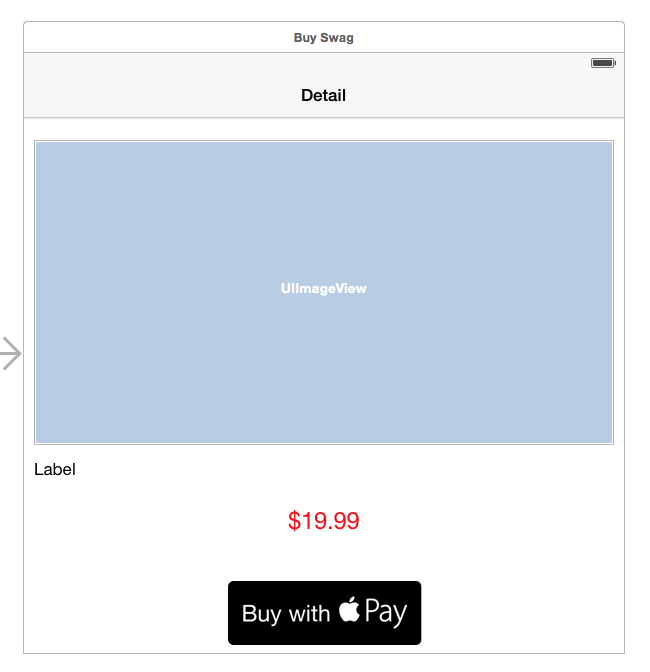
Open Main.storyboard and take a look at the the Buy Swag scene:

This view has a larger and more prominent picture of the swag, the price, a detailed description of the swag and a basic button to buy the swag. This is where you’ll hook in the magic of Apple Pay!
You’ll want something more interesting than a simple out-of-the-box button to entice your users to buy. Apple has a very specific set of Apple Pay guidelines to adhere to, which extends to the buttons in your app. Take a few minutes to review these guidelines at the Apple Pay developer site https://developer.apple.com/apple-pay/.
Note: The Apple Pay Buttons and Resources link at the Apple Pay developer site above provides you with a zip file containing an extensive collection of approved button resources for Apple Pay.
The Apple Pay Guidelines provide explanations of the allowable modifications you can make to the provided buttons, as well as guidelines on what colors you may choose to provide the best amount of contrast between the button and your view’s background. In general, you are not allowed to create your own button artwork, but can “stretch” the provided artwork to be wider if necessary.
Since the purpose of this tutorial is not to test your Photoshop skills, you’ll find a set of Apple Pay images ready for use in the starter project’s Image.xcassets.
Head back to the Buy Swag scene in Interface Builder, select the Apple Pay button and change the image to ApplePaySwagButton. Give your button an empty title instead of the default “button” title. Your scene should now look as follows:
Now that you have an Apple Pay button hooked up to an action method, it’s time to invoke the Apple Pay APIs!