Reactive Programming with RxAndroid in Kotlin: An Introduction

Learn about how Reactive programming is a whole new paradigm using RxJava and RxAndroid in Android with Kotlin. By Kyle Jablonski.

Leave a rating/review
Download materials
Save for later
Share

Update note: This tutorial has been updated to Kotlin 1.3, Android 28 (Pie), and Android Studio 3.3.2 by Kyle Jablonski. This tutorial has previously been updated to Kotlin, Android 26 (Oreo), and Android Studio 3.0 Beta 5 by Irina Galata. The original tutorial was written by Artem Kholodnyi.

Reactive programming is not just another API. It’s a whole new programming paradigm concerned with data streams and the propagation of change. You can read the full definition of reactive programming, but you will learn more about being reactive, below.

RxJava is a reactive implementation to bring this concept to the Android platform. Android applications are a perfect place to start your exploration of the reactive world. It’s even easier with RxAndroid, a library that wraps asynchronous UI events to be more RxJava like.

Don’t be scared — I’ll bet you already know the basic concepts of reactive programming, even if you are not aware of it yet!

Note: This tutorial requires good knowledge of Android and Kotlin. To get up to speed, check out our Android Development Tutorials first and return to this tutorial when you’re ready.

In this RxAndroid tutorial for reactive programming, you will learn how to do the following:

  • Grasp the concepts of Reactive Programming.
  • Define an Observable.
  • Turn asynchronous events like button taps and text field context changes into observable constructs.
  • Transform and filter observable items.
  • Leverage Rx threading in code execution.
  • Combine several observables into one stream.
  • Turn all your observables into Flowable constructs.
  • Use RxJava’s Maybe to add a favorite feature to the app.

I hope you are not lactose intolerant — because you’re going to build a cheese-finding app as you learn how to use RxJava! :]

Getting Started

Download cheesefinder-starter and open it in Android Studio 3.3.2 or above.

You’ll be working in both CheeseActivity.kt and CheeseAdapter.kt. The CheeseActivity class extends BaseSearchActivity; take some time to explore BaseSearchActivity and check out the following features ready for your use:

  • showProgress(): A function to show a progress bar…
  • hideProgress(): … and a function to hide it.
  • showResult(result: List): A function to display a list of cheeses.
  • cheeseSearchEngine: A field which is an instance of CheeseSearchEngine. It has a search function which you call when you want to search for cheeses. It accepts a text search query and returns a list of matching cheeses.

Build and run the project on your Android device or emulator. You should see a gloriously empty search screen:

Of course, it’s not going to stay like that forever, you’ll soon begin adding reactive functionality to the app. Before creating your first observable, indulge yourself with a bit of theory first.

What is Reactive Programming?

In imperative programming, an expression is evaluated once and the value is assigned to a variable:

var x = 2
var y = 3
var z = x * y // z is 6

x = 10
// z is still 6

On the other hand, reactive programming is all about responding to value changes.

You have probably done some reactive programming — even if you didn’t realize it at the time.

  • Defining cell values in spreadsheets is similar to defining variables in imperative programming.
  • Defining cell expressions in spreadsheets is similar to defining and operating on observables in reactive programming.

Take the following spreadsheet that implements the example from above:

The spreadsheet assigns cell B1 with a value of 2, cell B2 with a value of 3 and a third cell, B3, with an expression that multiplies the value of B1 by the value of B2. When the value of either of the components referenced in the expression changes, the change is observed and the expression is re-evaluated automagically in B3:

The idea of reactive programming, to put it simply, is to have components which form a larger picture – which can be observed. And have your program listen to, and consume the changes whenever they happen.

Difference Between RxJava and RxKotlin

As you probably know, it’s possible to use Java libraries in Kotlin projects thanks to Kotlin’s language compatibility with Java. If that’s the case, then why was RxKotlin created in the first place? RxKotlin is a Kotlin wrapper around RxJava, which also provides plenty of useful extension functions for reactive programming. Effectively, RxKotlin makes working with RxJava no less reactive, but much more Kotlin-y.

In this article, we’ll focus on using RxJava, since it’s critical to understand the core concepts of this approach. However, everything you will learn applies to RxKotlin as well.

Note: Take a look at the build.gradle file and the project dependencies especially. Except for the UI libraries, it contains RxKotlin and RxAndroid packages. We don’t need to specify RxJava here explicitly since RxKotlin already contains it.

RxJava Observable Contract

RxJava makes use of the Observer pattern.

Note: To refresh your memory about the Observer pattern you can visit Common Design Patterns for Android with Kotlin.

In the Observer pattern, you have objects that implement two key RxJava interfaces: Observable and Observer. When an Observable changes state, all Observer objects subscribed to it are notified.

Among the methods in the Observable interface is subscribe(), which an Observer will call to begin the subscription.

From that point, the Observer interface has three methods which the Observable calls as needed:

  • onNext(T value) provides a new item of type T to the Observer.
  • onComplete() notifies the Observer that the Observable has finished sending items.
  • onError(Throwable e) notifies the Observer that the Observable has experienced an error.

As a rule, a well-behaved Observable emits zero or more items that could be followed by either completion or error.

That sounds complicated, but some marble diagrams may clear things up.

network-request

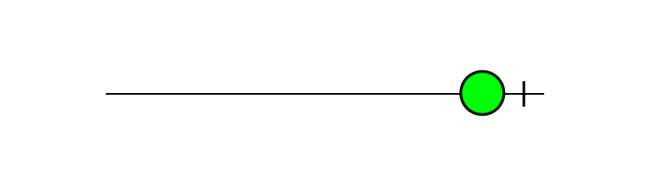
The circle represents an item that has been emitted from the observable and the black block represents a completion or error. Take, for example, a network request observable. The request usually emits a single item (response) and immediately completes.

A mouse movement observable would emit mouse coordinates but will never complete:

mouse-coords

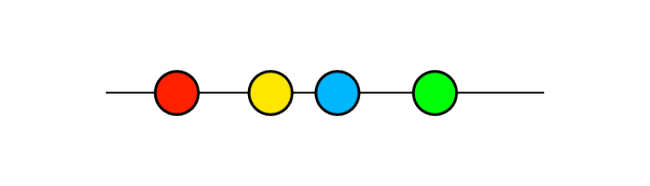
Here you can see multiple items that have been emitted but no block showing the mouse has completed or raised an error.

No more items can be emitted after an observable has completed. Here’s an example of a misbehaving observable that violates the Observable contract:

misbehaving-stream

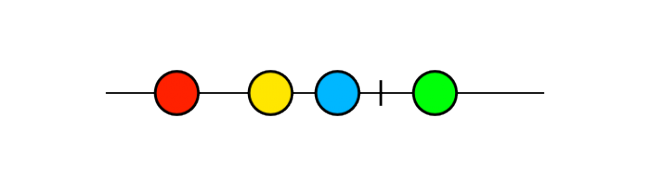
That’s a bad, bad observable because it violates the Observable contract by emitting an item after it signaled completion.

How to Create an Observable

There are many libraries to help you create observables from almost any type of event. However, sometimes you just need to roll your own. Besides, it’s a great way to learn about the Observable pattern and reactive programming!

You’ll create an Observable using Observable.create(). Here is its signature:

Observable<T> create(ObservableOnSubscribe<T> source)

That’s nice and concise, but what does it mean? What is the “source?” To understand that signature, you need to know what an ObservableOnSubscribe is. It’s an interface, with this contract:

public interface ObservableOnSubscribe<T> {
  void subscribe(ObservableEmitter<T> e) throws Exception;
}

Like an episode of a J.J. Abrams show like “Lost” or “Westworld,” that answers some questions while inevitably asking more. So the “source” you need to create your Observable will need to expose subscribe(), which in turn requires whatever’s calling it to provide an “emitter” as a parameter. What, then, is an emitter?

RxJava’s Emitter interface is similar to the Observer one:

public interface Emitter<T> {
  void onNext(T value);
  void onError(Throwable error);
  void onComplete();
}

An ObservableEmitter, specifically, also provides a means to cancel the subscription.

To visualize this whole situation, think of a water faucet regulating the flow of water. The water pipes are like an Observable, willing to deliver a flow of water if you have a means of tapping into it. You construct a faucet that can turn on and off, which is like an ObservableEmitter, and connect it to the water pipes in Observable.create(). The outcome is a nice fancy faucet. And of course, the faucet is reactive, since once you close it, the stream of water – data – is no longer active. :]

An example will make the situation less abstract and more clear. It’s time to create your first observable!

Observe Button Clicks

Add the following code inside the CheeseActivity class:

// 1
private fun createButtonClickObservable(): Observable<String> {
  // 2
  return Observable.create { emitter ->
    // 3
    searchButton.setOnClickListener {
      // 4
      emitter.onNext(queryEditText.text.toString())
    }

    // 5
    emitter.setCancellable {
      // 6
      searchButton.setOnClickListener(null)
    }
  }
}

Your imports should look as follows after entering the above code:

import io.reactivex.Observable
import kotlinx.android.synthetic.main.activity_cheeses.*

You’ve imported the correct Observable class and you’re using the Kotlin Android Extensions to get references to view objects.

Here’s what’s going on in the code above:

  1. You declare a function that returns an observable that will emit strings.
  2. You create an observable with Observable.create(), and supply it with a new ObservableOnSubscribe.
  3. Set up an OnClickListener on searchButton.
  4. When the click event happens, call onNext on the emitter and pass it the current text value of queryEditText.
  5. Keeping references can cause memory leaks in Java or Kotlin. It’s a useful habit to remove listeners as soon as they are no longer needed. But what do you call when you are creating your own Observable? For that very reason, ObservableEmitter has setCancellable(). Override cancel(), and your implementation will be called when the Observable is disposed, such as when the Observable is completed or all Observers have unsubscribed from it.
  6. For OnClickListener, the code that removes the listener is setOnClickListener(null).

Now that you’ve defined your Observable, you need to set up the subscription to it. Before you do, you need to learn about one more interface, Consumer. It’s a simple way to accept values coming in from an emitter.

public interface Consumer<T> {
  void accept(T t) throws Exception;
}

This interface is handy when you want to set up a simple subscription to an Observable.

The Observable interface requires several versions of subscribe(), all with different parameters. For example, you could pass a full Observer if you like, but then you’d need to implement all the necessary methods.

If all you need out of your subscription is for the observer to respond to values sent to onNext(), you can use the version of subscribe() that takes in a single Consumer (the parameter is even named onNext, to make the connection clear).

You’ll do exactly that when you subscribe in your activity’s onStart(). Add the following code to CheeseActivity.kt:

override fun onStart() {
  super.onStart()
  // 1
  val searchTextObservable = createButtonClickObservable()

  searchTextObservable
      // 2
      .subscribe { query ->
        // 3
        showResult(cheeseSearchEngine.search(query))
      }
}

Here’s an explanation of each step:

  1. First, create an observable by calling the method you just wrote.
  2. Subscribe to the observable with subscribe(), and supply a simple Consumer.
  3. Finally, perform the search and show the results.

Build and run the app. Enter some letters and tap the Search button. After a simulated delay (see CheeseSearchEngine), you should see a list of cheeses that match your request:

Sounds yummy! :]

RxJava Threading Model

You’ve had your first taste of reactive programming. There is one problem though: the UI freezes up for a few seconds when the search button is tapped.

You might also notice the following line in Android Monitor:

> 08-24 14:36:34.554 3500-3500/com.raywenderlich.cheesefinder I/Choreographer: Skipped 119 frames!  The application may be doing too much work on its main thread.

This happens because search is executed on the main thread. If search were to perform a network request, Android will crash the app with a NetworkOnMainThreadException exception. It’s time to fix that.

One popular myth about RxJava is that it is multi-threaded by default, similar to AsyncTask. However, if not otherwise specified, RxJava does all the work in the same thread it was called from.

You can change this behavior with the subscribeOn and observeOn operators.

subscribeOn is supposed to be called only once in the chain of operators. If it’s not, the first call wins. subscribeOn specifies the thread on which the observable will be subscribed (i.e. created). If you use observables that emit events from an Android View, you need to make sure subscription is done on the Android UI thread.

On the other hand, it’s okay to call observeOn as many times as you want in the chain. observeOn specifies the thread on which the next operators in the chain will be executed. For example:

myObservable // observable will be subscribed on i/o thread
      .subscribeOn(Schedulers.io())
      .observeOn(AndroidSchedulers.mainThread())
      .map { /* this will be called on main thread... */ }
      .doOnNext{ /* ...and everything below until next observeOn */ }
      .observeOn(Schedulers.io())
      .subscribe { /* this will be called on i/o thread */ }

The most useful schedulers are:

  • Schedulers.io(): Suitable for I/O-bound work such as network requests or disk operations.
  • Schedulers.computation(): Works best with computational tasks like event-loops and processing callbacks.
  • AndroidSchedulers.mainThread() executes the next operators on the UI thread.

The Map Operator

The map operator applies a function to each item emitted by an observable and returns another observable that emits results of those function calls. You’ll need this to fix the threading issue as well.

If you have an observable called numbers that emits the following:

map-0

And if you apply map as follows:

numbers.map { number -> number * number }

The result would be the following:

map-1

That’s a handy way to iterate over multiple items with little code. Let’s put it to use!

Modify onStart() in CheeseActivity class to look like the following:

override fun onStart() {
  super.onStart()

  val searchTextObservable = createButtonClickObservable()

  searchTextObservable
      // 1
      .subscribeOn(AndroidSchedulers.mainThread())
      // 2
      .observeOn(Schedulers.io())
      // 3
      .map { cheeseSearchEngine.search(it) }
      // 4
      .observeOn(AndroidSchedulers.mainThread())
      .subscribe {
        showResult(it)
      }
}

Going over the code above:

  1. First, specify that code down the chain should start on the main thread instead of on the I/O thread. In Android, all code that works with View should execute on the main thread.
  2. Specify that the next operator should be called on the I/O thread.
  3. For each search query, you return a list of results.
  4. Finally, make sure that the results are passed to the list on the main thread.

Build and run your project. Now the UI should be responsive even when a search is in progress.

Show Progress Bar with doOnNext

It’s time to display the progress bar!

For that you’ll need a doOnNext operator. doOnNext takes a Consumer and allows you to do something each time an item is emitted by observable.

In the same CheeseActivity class modify onStart() to the following:

override fun onStart() {
  super.onStart()

  val searchTextObservable = createButtonClickObservable()

  searchTextObservable
      // 1
      .observeOn(AndroidSchedulers.mainThread())
      // 2
      .doOnNext { showProgress() }
      .observeOn(Schedulers.io())
      .map { cheeseSearchEngine.search(it) }
      .observeOn(AndroidSchedulers.mainThread())
      .subscribe {
        // 3
        hideProgress()
        showResult(it)
      }
}

Taking each numbered comment in turn:

  1. Ensure that the next operator in chain will be run on the main thread.
  2. Add the doOnNext operator so that showProgress() will be called every time a new item is emitted.
  3. Don’t forget to call hideProgress() when you are just about to display a result.

Build and run your project. You should see the progress bar appear when you initiate the search:

Observe Text Changes

What if you want to perform search automatically when the user types some text, just like Google?

First, you need to subscribe to TextView text changes. Add the following function to the CheeseActivity class:

// 1
private fun createTextChangeObservable(): Observable<String> {
  // 2
  val textChangeObservable = Observable.create<String> { emitter ->
    // 3
    val textWatcher = object : TextWatcher {

      override fun afterTextChanged(s: Editable?) = Unit

      override fun beforeTextChanged(s: CharSequence?, start: Int, count: Int, after: Int) = Unit

      // 4
      override fun onTextChanged(s: CharSequence?, start: Int, count: Int, after: Int) {
        s?.toString()?.let { emitter.onNext(it) }
      }
    }

    // 5
    queryEditText.addTextChangedListener(textWatcher)

    // 6
    emitter.setCancellable {
      queryEditText.removeTextChangedListener(textWatcher)
    }
  }

  // 7
  return textChangeObservable
}

Here’s the play-by-play of each step above:

  1. Declare a function that will return an observable for text changes.
  2. Create textChangeObservable with create(), which takes an ObservableOnSubscribe.
  3. When an observer makes a subscription, the first thing to do is to create a TextWatcher.
  4. You aren’t interested in beforeTextChanged() and afterTextChanged(). When the user types and onTextChanged() triggers, you pass the new text value to an observer.
  5. Add the watcher to your TextView by calling addTextChangedListener().
  6. Don’t forget to remove your watcher. To do this, call emitter.setCancellable() and overwrite cancel() to call removeTextChangedListener()
  7. Finally, return the created observable.

To see this observable in action, replace the declaration of searchTextObservable in onStart() of CheeseActivity as follows:

val searchTextObservable = createTextChangeObservable()

Build and run your app. You should see the search kick off when you start typing text in the TextView:

Filter Queries by Length

It doesn’t make sense to search for queries as short as a single letter. To fix this, let’s introduce the powerful filter operator.

filter passes only those items which satisfy a particular condition. filter takes in a Predicate, which is an interface that defines the test that input of a given type needs to pass, with a boolean result. In this case, the Predicate takes a String and returns true if the string’s length is two or more characters.

Replace return textChangeObservable in createTextChangeObservable() with the following code:

return textChangeObservable.filter { it.length >= 2 }

Everything will work exactly the same, except that text queries with length less than 2 won’t get sent down the chain.

Run the app; you should see the search kick off only when you type the second character:


Debounce Operator

You don’t want to send a new request to the server every time the query is changed by one symbol.

debounce is one of those operators that shows the real power of reactive paradigm. Much like the filter operator, debounce, filters items emitted by the observable. But the decision on whether the item should be filtered out is made not based on what the item is, but based on when the item was emitted.

debounce waits for a specified amount of time after each item emission for another item. If no item happens to be emitted during this wait, the last item is finally emitted:

719f0e58_1472502674

In createTextChangeObservable(), add the debounce operator just below the filter so that the return statement will look like the following code:

return textChangeObservable
      .filter { it.length >= 2 }
      .debounce(1000, TimeUnit.MILLISECONDS) // add this line

Run the app. You’ll notice that the search begins only when you stop making quick changes:

debounce waits for 1000 milliseconds before emitting the latest query text.

Merge Operator

You started by creating an observable that reacted to button clicks and then implemented an observable that reacts to text field changes. But how do you react to both?

There are a lot of operators to combine observables. The most simple and useful one is merge.

merge takes items from two or more observables and puts them into a single observable:

ae08759b_1472502259

Change the beginning of onStart() to the following:

val buttonClickStream = createButtonClickObservable()
val textChangeStream = createTextChangeObservable()

val searchTextObservable = Observable.merge<String>(buttonClickStream, textChangeStream)

Run your app. Play with the text field and the search button; the search will kick off either when you finish typing two or more symbols or when you simply press the Search button.

Flowable

With the release of RxJava2, the framework has been totally redesigned from the ground up to solve some problems that were not addressed in the original library. One really important topic addressed in the update is the idea of backpressure.

Backpressure is the concept that an observable is emitting items faster than the consumer can handle them. Consider the example of the Twitter firehose, which is constantly emitting tweets as they are added to the twitter platform. If you were to use observables, which buffer items until there is no more memory available, your app would crash and consuming the firehose API would not be possible using them. Flowables take this into consideration and let you specify a BackPressureStrategy to tell the flowable how you want the consumer to handle items emitted faster than can be consumed.

Backpressure strategies:

  • BUFFER– Handles items the same way as RxJava 1 but you can also add a buffer size.
  • DROP– Drops any items that the consumer can’t handle.
  • ERROR– Throws an error when the downstream can’t keep up.
  • LATEST– Keeps only the latest item emitted by onNext overwriting the previous value.
  • MISSING– No buffering or dropping during onNext events.

Turning Observables into Flowables

Time to turn the observables above into flowables using this new knowledge of backpressure strategy. First consider the observables you added to your app. You have one observable that emits items when a button is clicked and another from keyboard input. With these two in mind, you can imagine in the first case you can use the LATEST strategy and in the second you can use the BUFFER.

Open CheeseActivity.kt and modify your observables to the following:

val buttonClickStream = createButtonClickObservable()
    .toFlowable(BackpressureStrategy.LATEST) // 1

val textChangeStream = createTextChangeObservable()
    .toFlowable(BackpressureStrategy.BUFFER) // 2
  1. Convert the button click stream into a flowable using LATEST BackpressureStrategy.
  2. Convert the text input change stream into a flowable using BUFFER BackpressureStrategy.

Finally, change the merge operator to use Flowable as well:

val searchTextFlowable = Flowable.merge<String>(buttonClickStream, textChangeStream)

Now, change the call to use the new searchTextFlowable value, instead of the previous Observable:

searchTextFlowable
    // 1
    .observeOn(AndroidSchedulers.mainThread())
    // 2
    .doOnNext { showProgress() }
    .observeOn(Schedulers.io())
    .map { cheeseSearchEngine.search(it) }
    .observeOn(AndroidSchedulers.mainThread())
    .subscribe {
      // 3
      hideProgress()
      showResult(it)
    }

Re-run the applicaton and you should see a working app with none of the pitfalls of observables.

Maybe

A Maybe is a computation that emits either a single value, no value or an error. They are good for things such as database updates and deletes. Here you will add a new feature using a Maybe to favorite a type of cheese from the app and use Maybe to emit no value.

Open the CheeseAdapter class and add the following code in onBindView:

   // 1
Maybe.create<Boolean> { emitter ->
  emitter.setCancellable {
      holder.itemView.imageFavorite.setOnClickListener(null)
  }

  holder.itemView.imageFavorite.setOnClickListener {
    emitter.onSuccess((it as CheckableImageView).isChecked) // 2
  }
}.toFlowable().onBackpressureLatest() // 3
         .observeOn(Schedulers.io())
         .map { isChecked ->
           cheese.favorite = if (!isChecked) 1 else 0
           val database = CheeseDatabase.getInstance(holder.itemView.context).cheeseDao()
           database.favoriteCheese(cheese) // 4
           cheese.favorite // 5
         }
         .subscribeOn(AndroidSchedulers.mainThread())
         .subscribe {
           holder.itemView.imageFavorite.isChecked = it == 1 // 6
         }
  1. Create the Maybe from an action.
  2. Emit the checked state on success.
  3. Turn the Maybe into a flowable.
  4. Perform the update on the Cheeses table.
  5. Return the result of the operation.
  6. Use the result from the emission to change the outline to a filled in heart.

Note: It would probably be better to use Maybe in context with a delete operation but for example purpose here you can favorite a cheese.

RxJava2 & Null

Null is no longer supported in RxJava2. Supplying null will result in a NullPointerException immediately or in a downstream signal. You can read all about this change here.

RxJava and Activity/Fragment lifecycle

Remember those setCancellable methods you set up? They won’t fire until the observable is unsubscribed.

The Observable.subscribe() call returns a Disposable. Disposable is an interface that has two methods:

public interface Disposable {
  void dispose();  // ends a subscription
  boolean isDisposed(); // returns true if resource is disposed (unsubscribed)
}

Add the following property to CheeseActivity:

private lateinit var disposable: Disposable

In onStart(), set the returned value of subscribe() to disposable with the following code (only the first line changes):

disposable = searchTextObservable // change this line
      .observeOn(AndroidSchedulers.mainThread())
      .doOnNext { showProgress() }
      .observeOn(Schedulers.io())
      .map { cheeseSearchEngine.search(it) }
      .observeOn(AndroidSchedulers.mainThread())
      .subscribe {
        hideProgress()
        showResult(it)
      }

Since you subscribed to the observable in onStart(), onStop() would be a perfect place to unsubscribe.

Add the following code to CheeseActivity.kt:

@Override
override fun onStop() {
  super.onStop()
  if (!disposable.isDisposed) {
    disposable.dispose()
  }
}

And that’s it! Build and run the app. You won’t “observe” any changes yourself, but now the app is successfully avoiding RxJava memory leaks. :]

Where to Go From Here?

You can download the final project from this tutorial here. If you want to challenge yourself a bit more you can swap out this implementation of RxJava and replace it with Room’s RxJava support which you can find more about here.

You’ve learned a lot in this tutorial. But that’s only a glimpse of the RxJava world. For example, there is RxBinding, a library that includes most of the Android View APIs. Using this library, you can create a click observable by just calling RxView.clicks(viewVariable).

To learn more about RxJava refer to the ReactiveX documentation.

If you have any comments or questions, don’t hesitate to join the discussion below!