Flutter Navigator 2.0 and Deep Links
With Flutter’s Navigator 2.0, learn how to handle deep links in Flutter and gain the ultimate navigation control for your app. By Kevin D Moore.
Sign up/Sign in
With a free Kodeco account you can download source code, track your progress, bookmark, personalise your learner profile and more!
Create accountAlready a member of Kodeco? Sign in
Sign up/Sign in
With a free Kodeco account you can download source code, track your progress, bookmark, personalise your learner profile and more!
Create accountAlready a member of Kodeco? Sign in
Contents
Flutter Navigator 2.0 and Deep Links
40 mins
- Getting Started
- Navigator 1.0
- Navigator 2.0
- Pages Overview
- Login Page
- Create Account Page
- Shopping List Page
- Details Page
- Cart Page
- Checkout Page
- Settings Page
- Pages Setup
- AppState
- RouterDelegate
- Implementing build
- Removing Pages
- Creating and Adding a Page
- Modifying the Contents
- RouteInformationParser
- Root Widget and Router
- Navigating Between Pages
- Splash Page Navigation
- BackButtonDispatcher
- Deep Linking
- Parse Deep Link URI
- Testing Android URIs
- Where to Go From Here?
Flutter’s first stable release was in December 2018, and it has grown rapidly since then. As is the case with any software, the developers who built it or use it are constantly refining it with each new version.
Initially, navigation between pages in Flutter was possible with Navigator 1.0 only, which could push
and pop
pages. Most use cases required basic navigation that wasn’t a problem for Navigator 1.0. But with the introduction of more complex navigation use cases — especially after Flutter for Web came out — developers wanted the ability to add multiple pages in one go or remove any offscreen page(s) on the onscreen page. To cover these use cases, the Flutter team introduced Navigator 2.0.
In this tutorial, you’ll learn how to use Navigator 2.0 by building pages of a shopping app brilliantly called, Navigation App :]. You’ll also learn how it can provide much more granular control for your app’s navigation and deep linking. To do so, you’ll learn how to implement:
- RouterDelegate
- RouteInformationParser
- BackButtonDispatcher
This tutorial uses Android Studio, but Visual Studio Code or IntelliJ IDEA will work fine as well.
Getting Started
Download the starter project by clicking the Download Materials button at the top or bottom of the page.
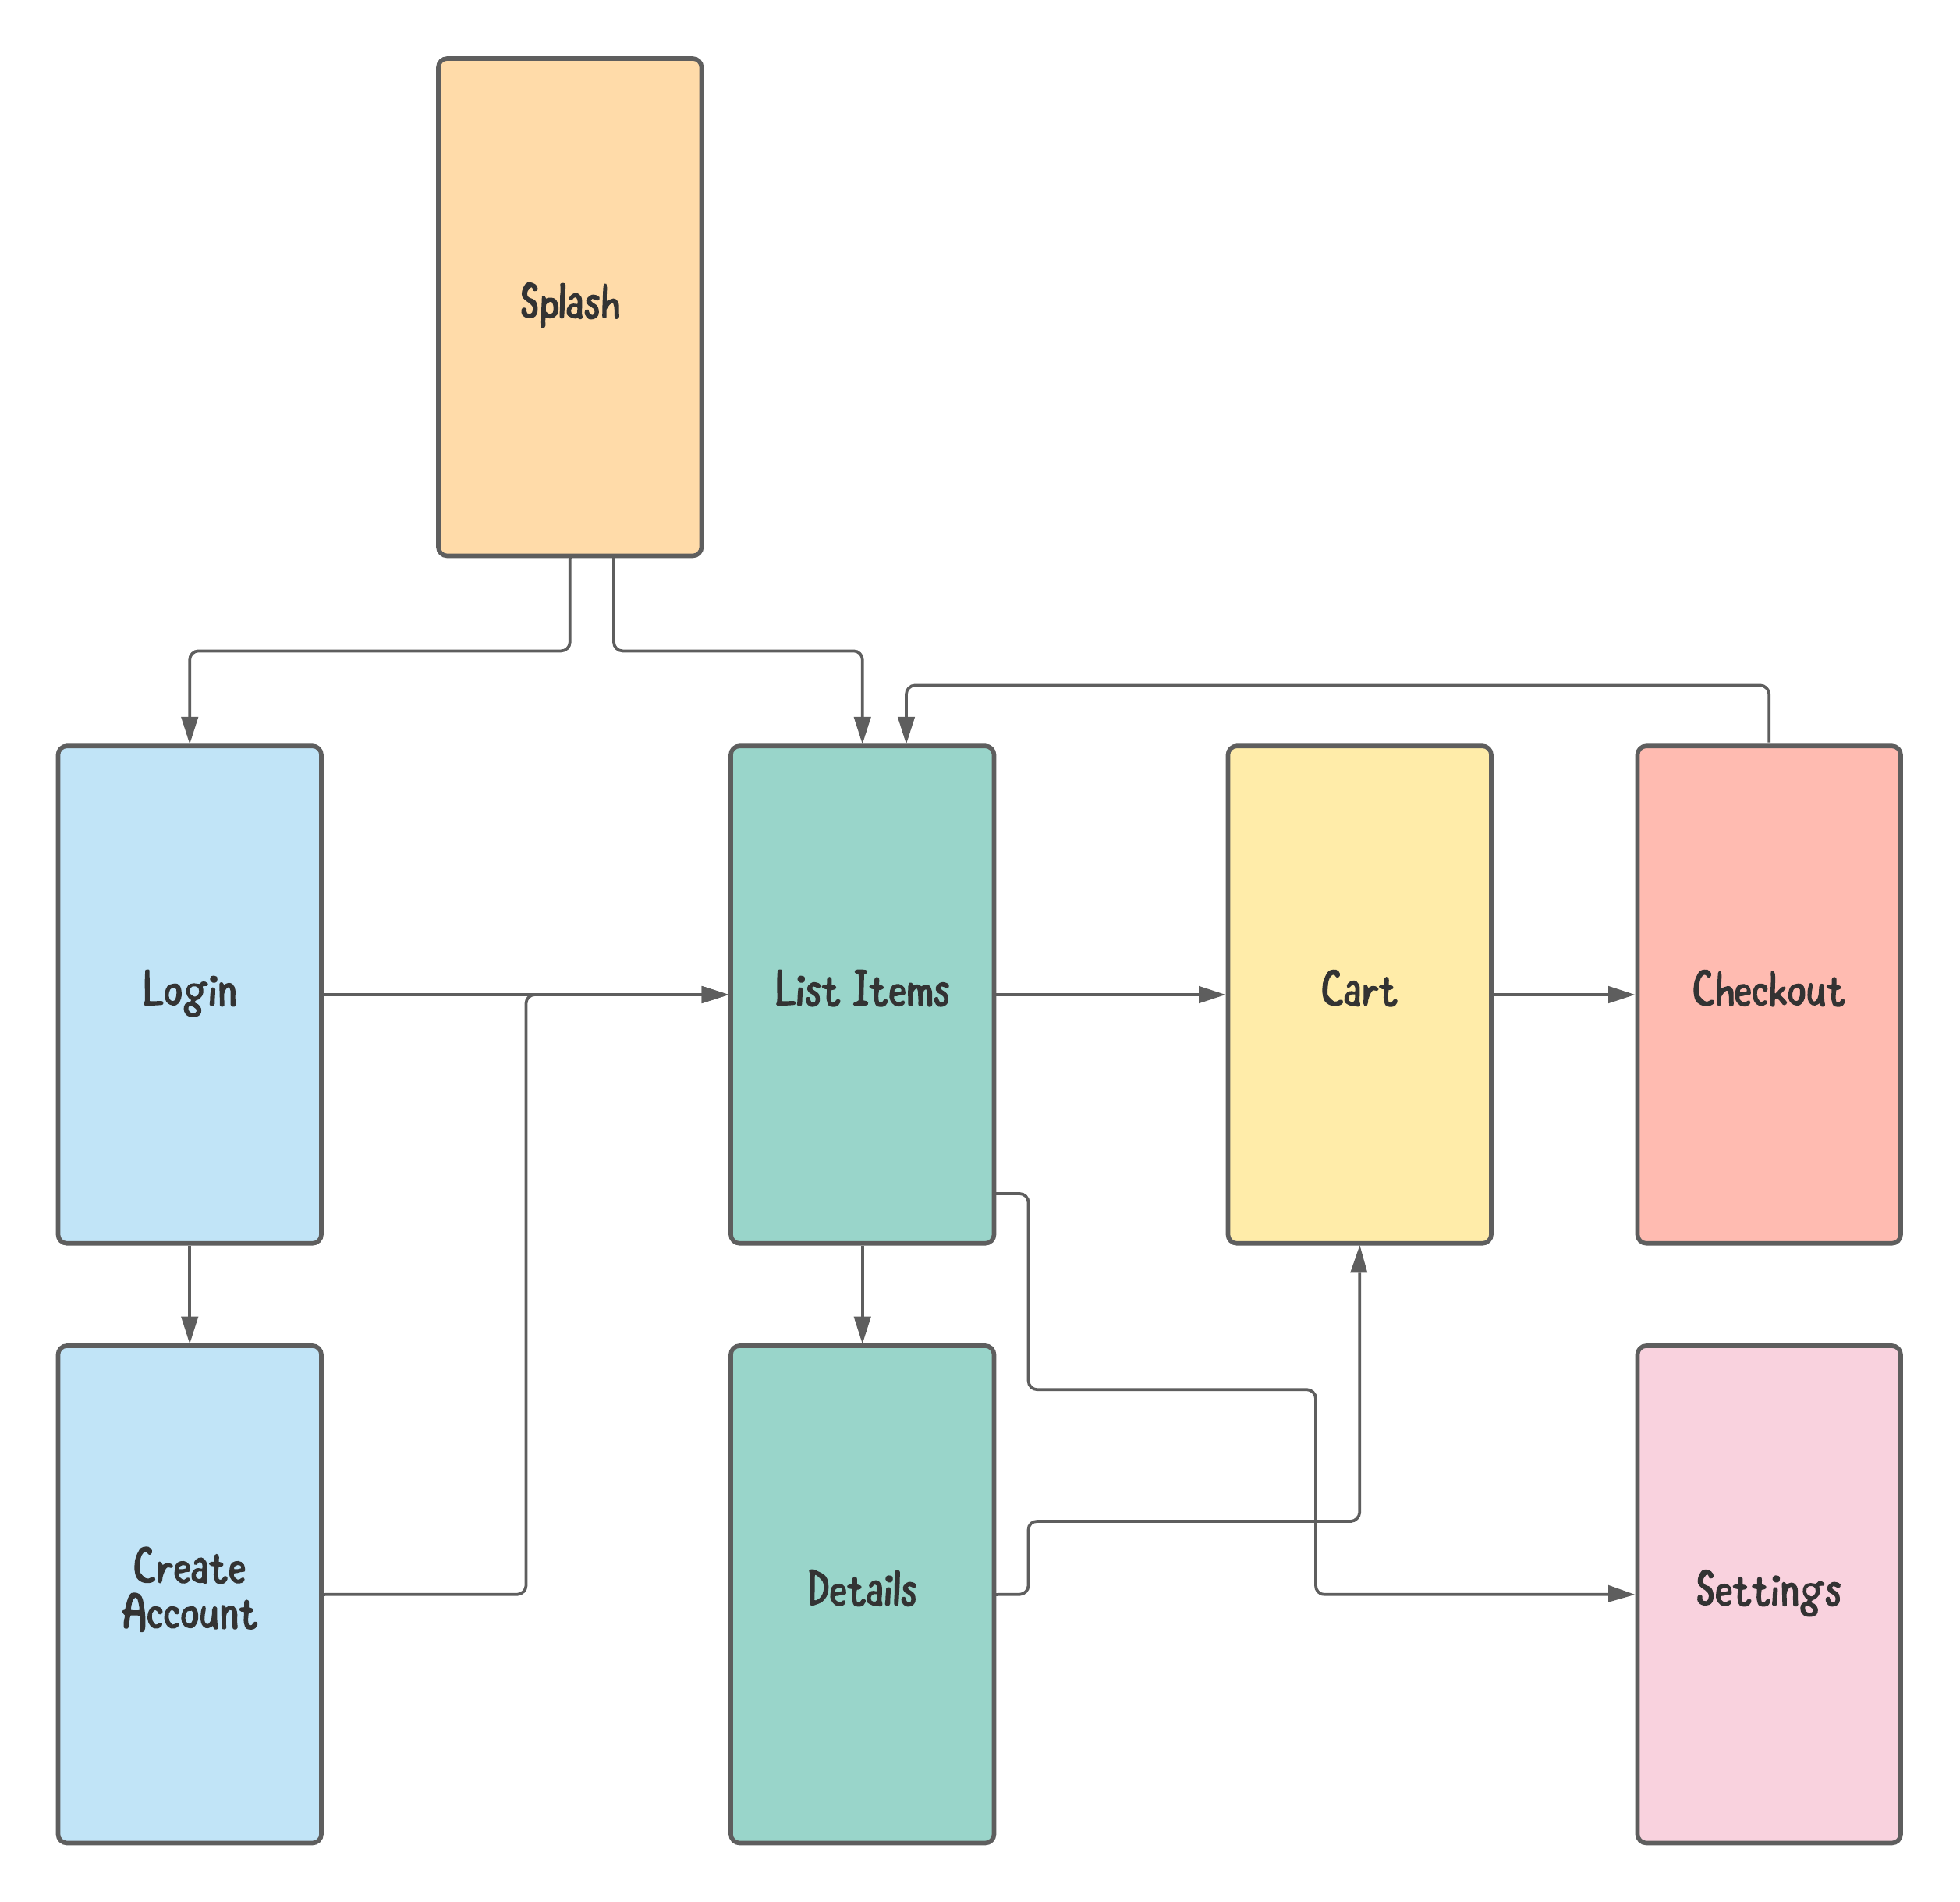
The starter app is a set of screens for the shopping app. The UI doesn’t do much, but it shows how to navigate between pages. This set of pages — represented as screens — is in the image below:
The app starts with the Splash page, which shows an image:
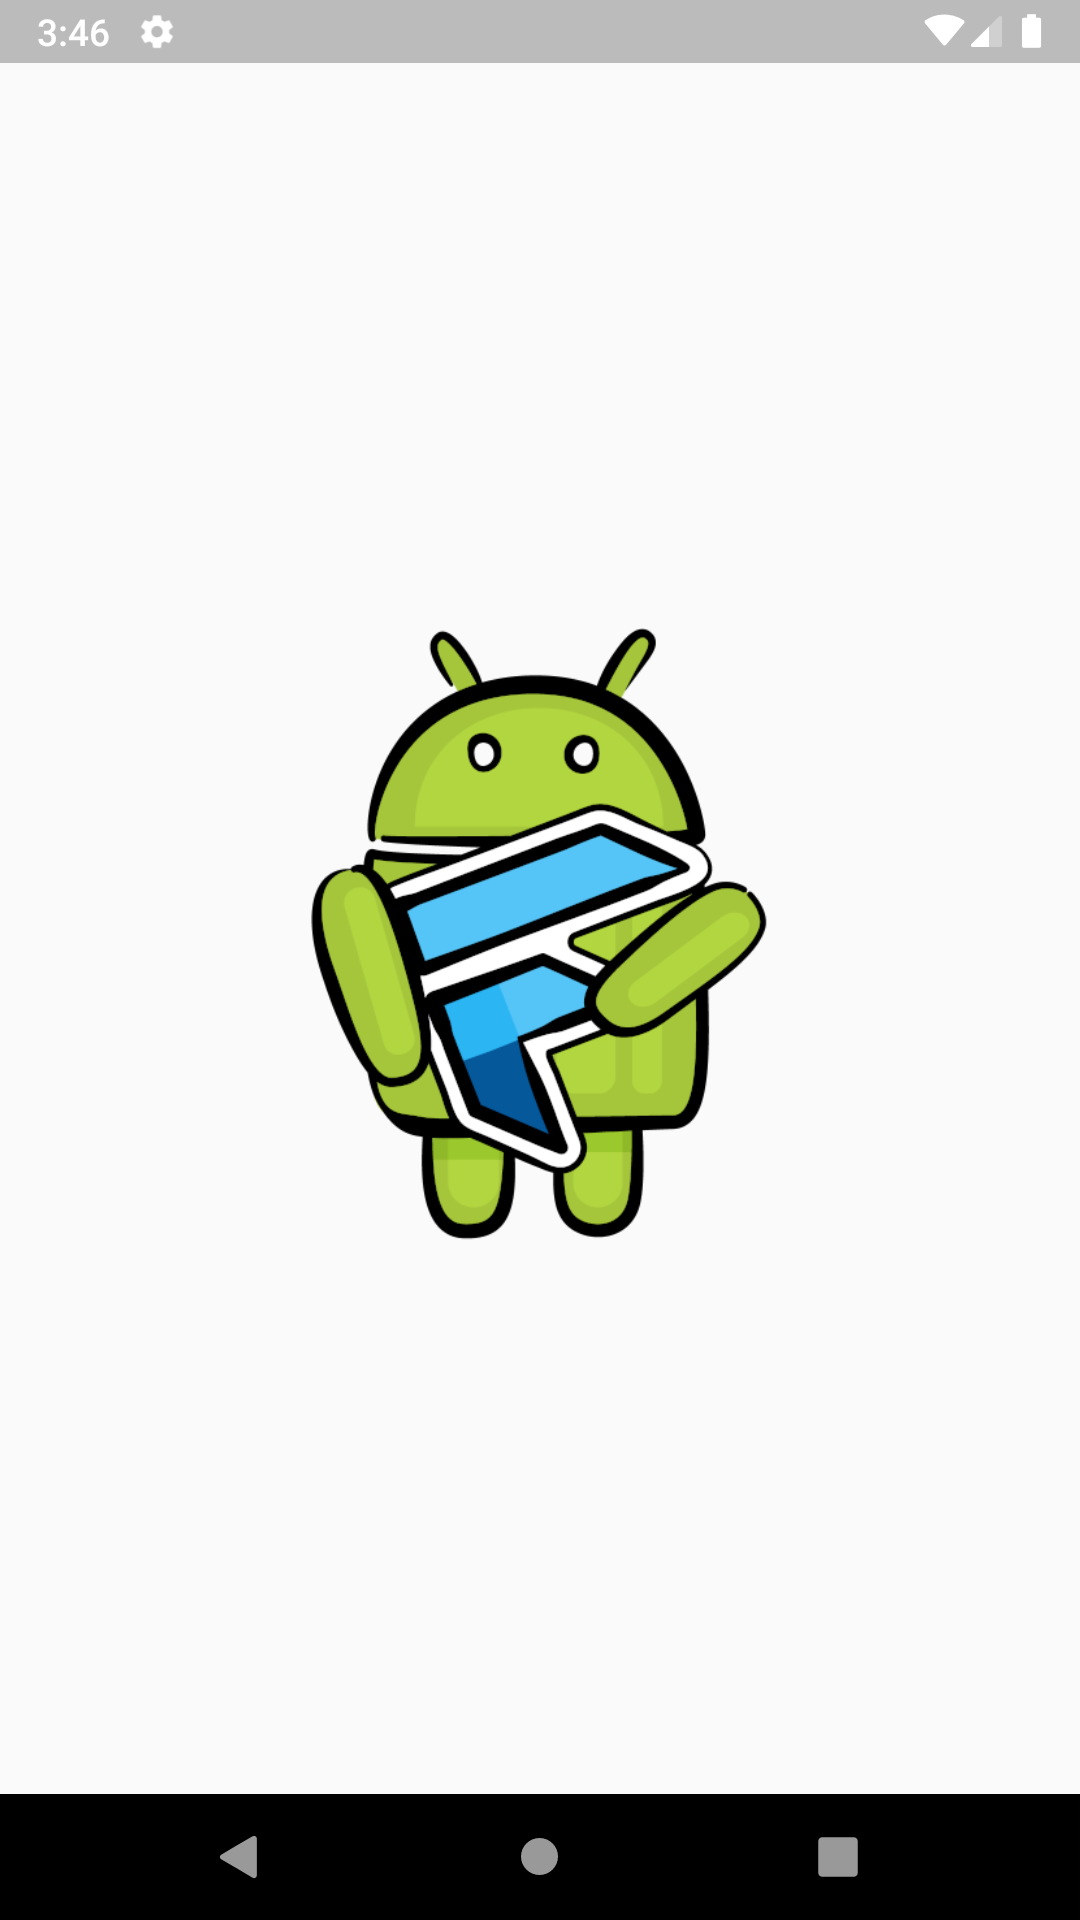
Run your app and verify it opens to this page. The app will stay on this page since the navigation system isn’t yet implemented. Gradually, you’ll add code to navigate between all screens.
Once you implement the navigation, the app should display the Splash page for a short duration and then show the Login page if the user isn’t logged in. If they are, they’ll see the Shopping List page instead. This logged-in state is saved as a Boolean
value in the app’s local storage using the shared_preferences package.
The user can go to the Create Account page for signing up or stay on the Login page, where they can log in and then navigate to the Shopping List page.
Note that this tutorial won’t cover the implementation of a functional login system or any real-world shopping app features. The screens and their corresponding code mimic their UI to explain the navigation concept.
Navigator 1.0
Navigator 1.0 uses the Navigator
and Route
classes to navigate between pages. If you want to add, or push
, a page, use:
Navigator.push(
context,
MaterialPageRoute(builder: (context) {
return MyNewScreen();
}),
);
Here, MaterialPageRoute
returns an instance of your new screen, i.e. MyNewScreen
.
To remove, or pop
, the current page, use:
Navigator.pop(context);
These operations are straightforward, but things get interesting if you have a use case that requires recreating a set of pages, such as for deep linking.
In the context of mobile apps, deep linking consists of using a uniform resource identifier (URI) that links to a specific location within a mobile app rather than launching the app.
For example, while building an e-commerce app, you may want the user to go to a product page when they tap the “Product X is now on Sale!” notification. To handle this, the app needs to clear the current navigation stack of the app, add the home screen that displays products in a list and then add the product page to this stack of pages. With Navigator 1.0, this is difficult.
Luckily, Navigator 2.0 provides a lot more flexibility for such a use case.
Navigator 2.0
Unlike Navigator 1.0, which uses an imperative style of programming, Navigator 2.0 uses a declarative style. As a result, it feels more “Flutter-like”. Understanding Navigator 2.0 involves understanding a few of its concepts such as:
- Page: An abstract class that describes the configuration of a route
- Router: A class that manages opening and closing pages of an application
-
RouteInformationParser: An abstract class used by the
Router
‘s widget to parse route information into a configuration -
RouteInformationProvider: An abstract class that provides route information for the
Router
‘s widget -
RouterDelegate: An abstract class used by the
Router
‘s widget to build and configure a navigating widget -
BackButtonDispatcher: Reports to a
Router
when the user taps the back button on platforms that support back buttons (such as Android) - TransitionDelegate: The delegate that decides how pages transition in or out of the screen when it’s added or removed.
This article doesn’t cover TransitionDelegate
, as in most use cases, DefaultTransitionDelegate
does a good job with transitions. If you need to handle transitions between pages in a unique way, you can create your own delegate by extending TransitionDelegate
.
Here’s a visual representation of the concepts mentioned above:
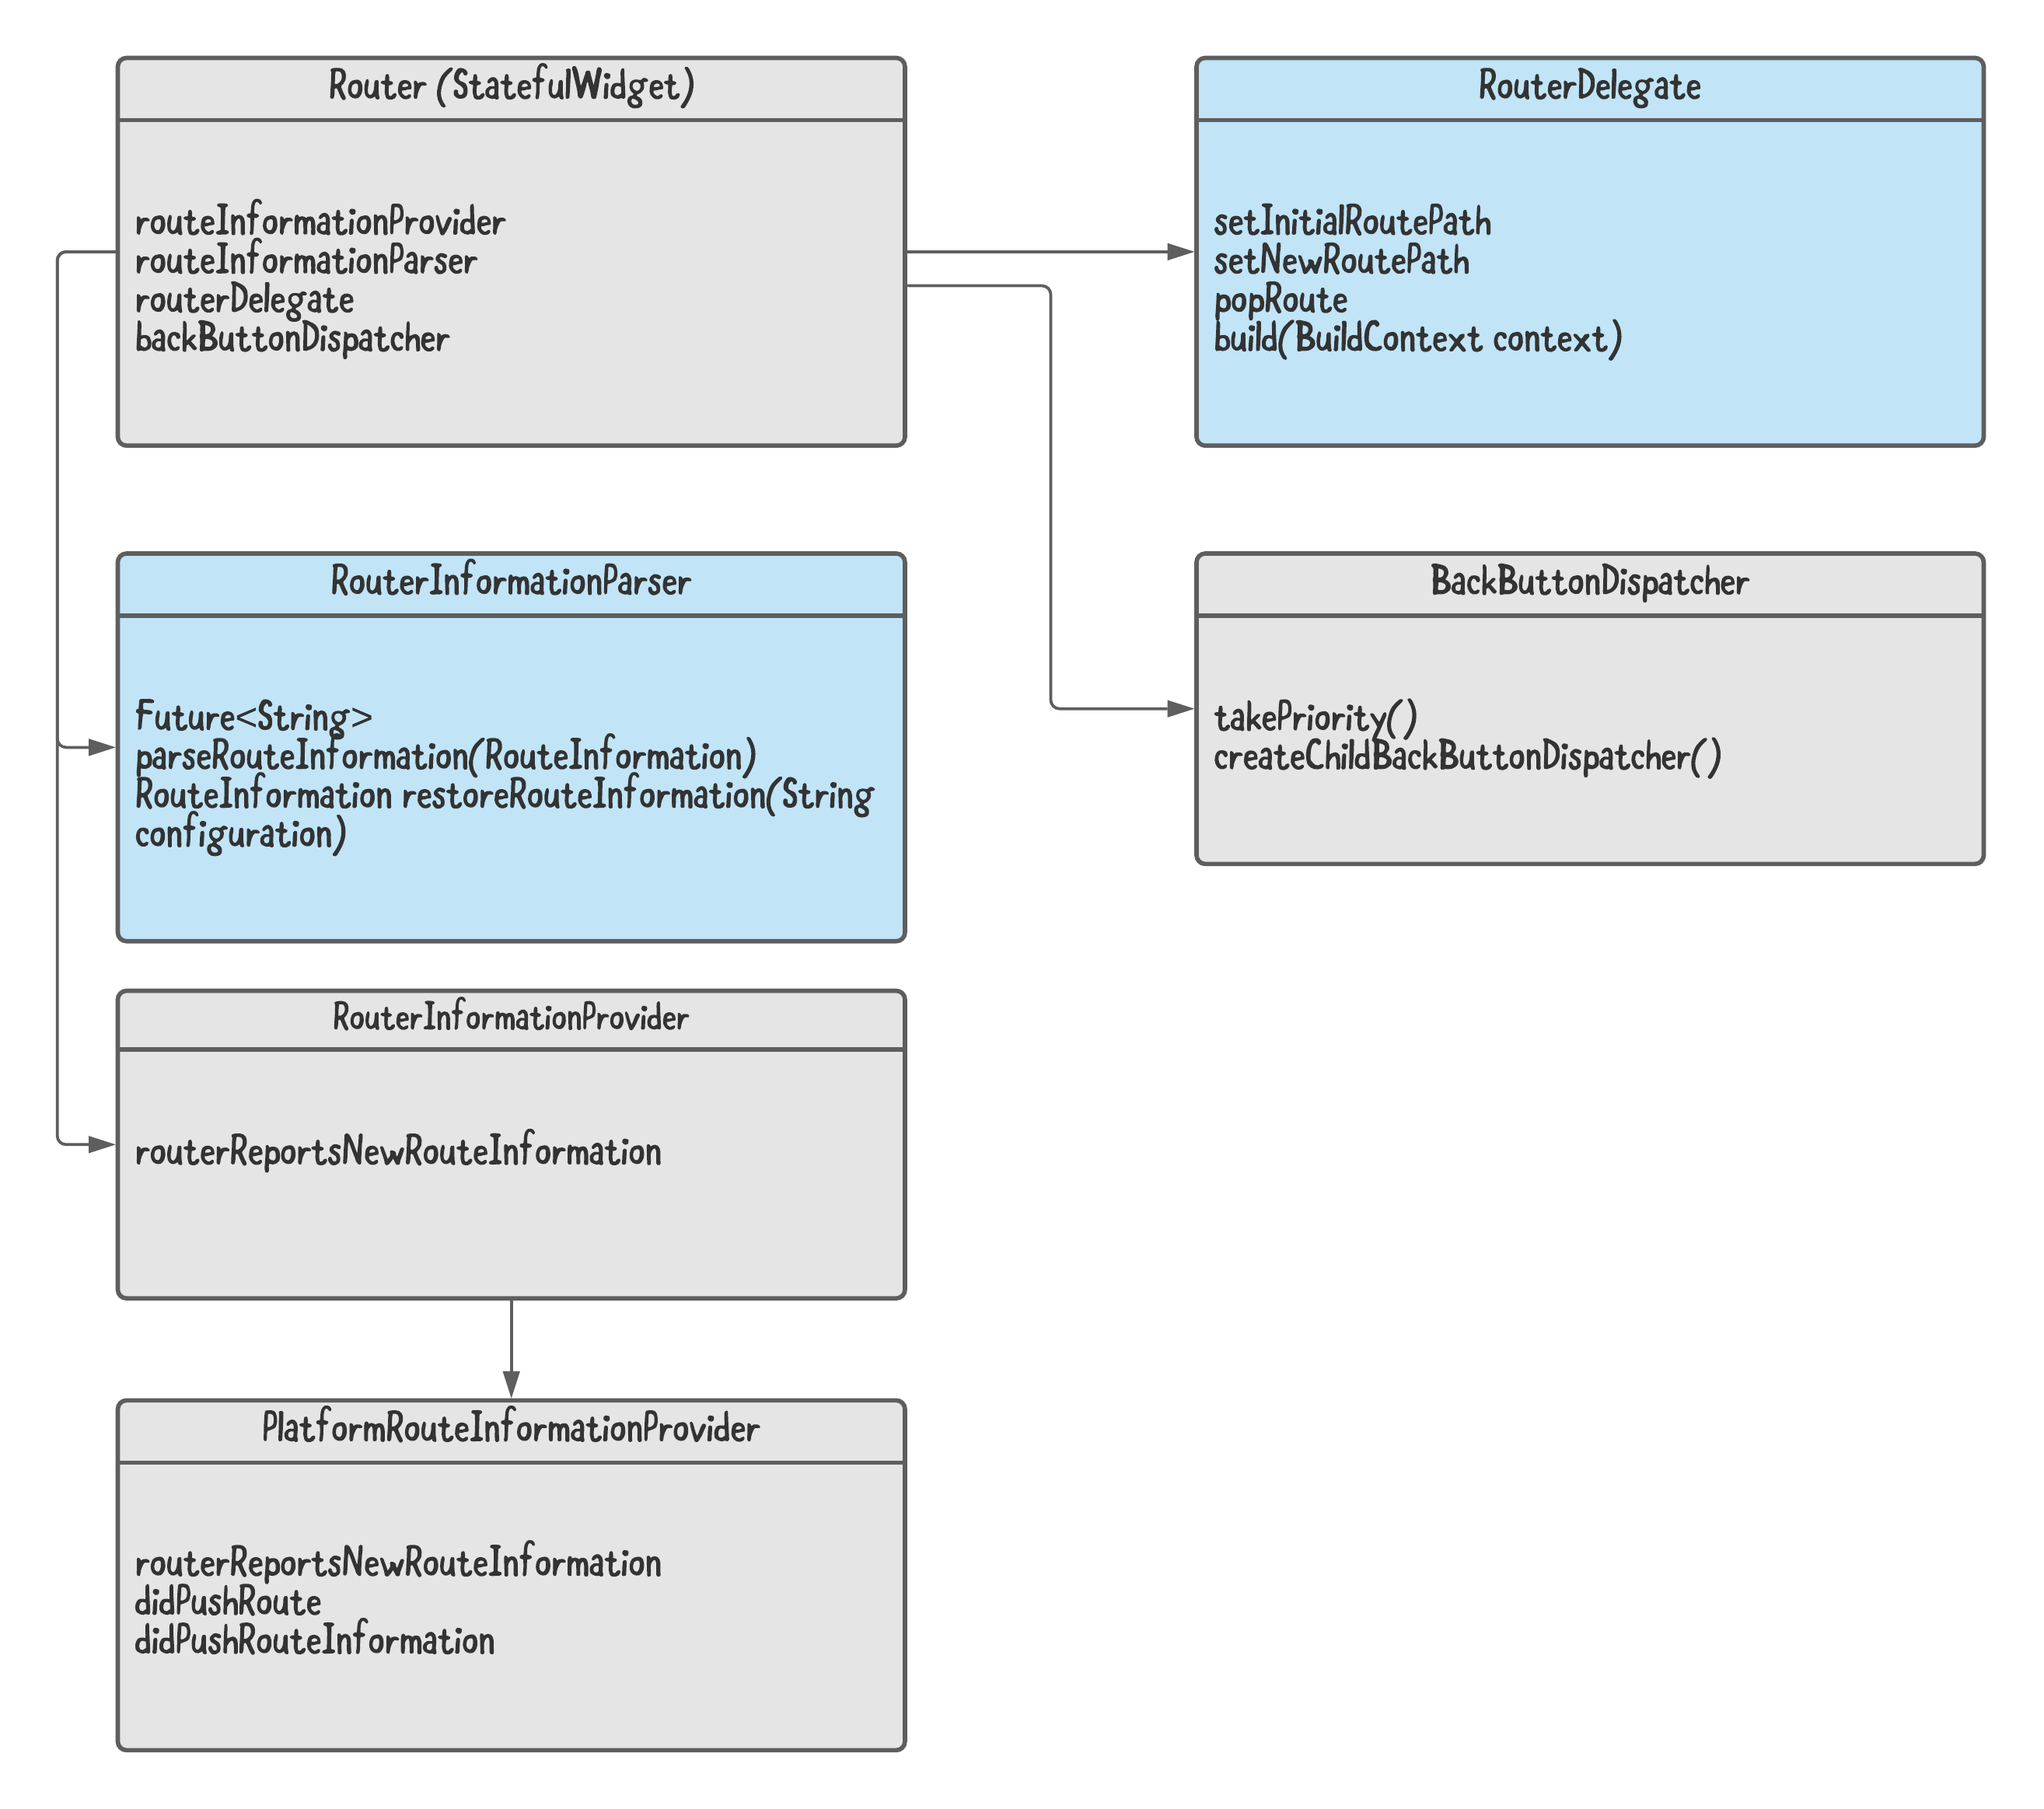
The classes in gray are optional to implement when using Navigator 2.0. However, the ones in blue, i.e. RouteInformationParser
and RouterDelegate
, must be implemented to use Navigator 2.0. You’ll learn about both of these, and the optional BackButtonDispatcher
, in the sections below.
Pages Overview
Before you begin to implement any navigation, the next sections will provide an overview of the pages in your starter app.
Login Page
The Login page is the first page to appear after the Splash page if the user hasn’t already logged in:
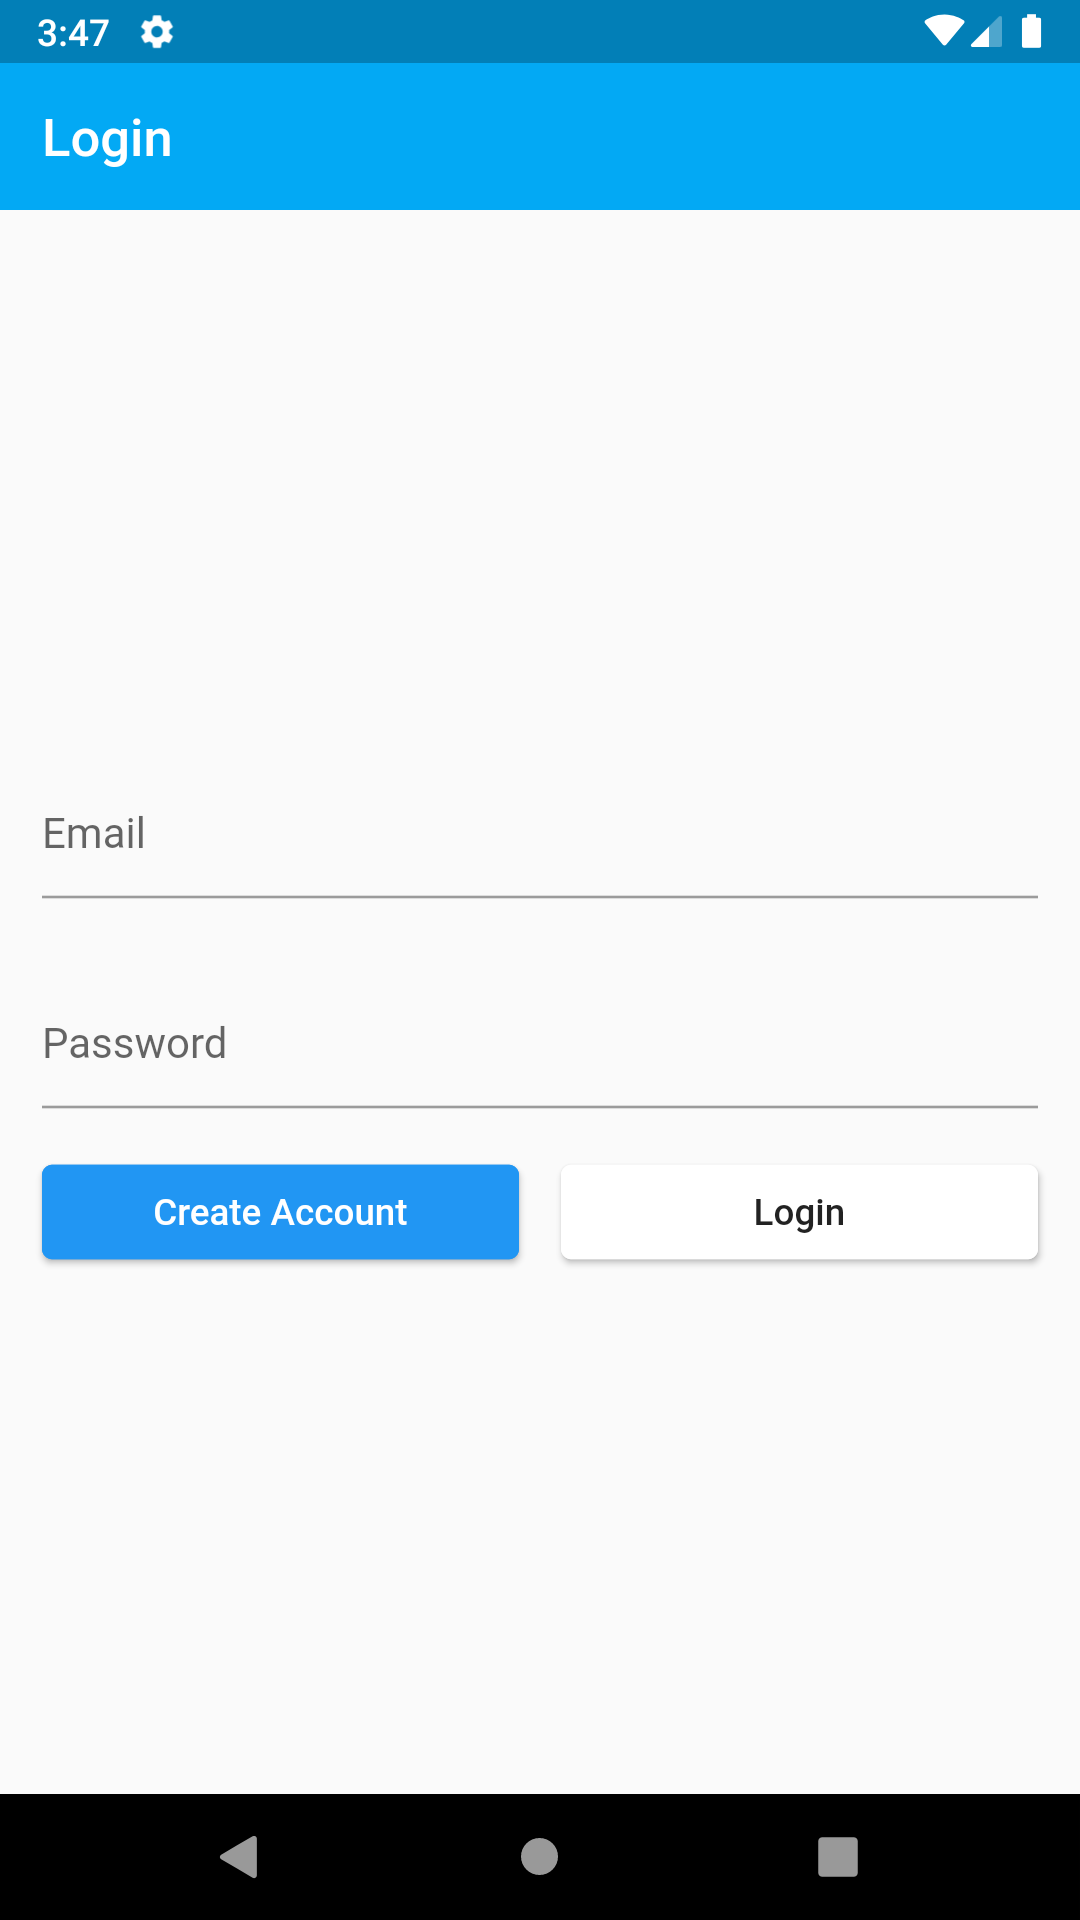
Clicking on the Create Account button takes the user to the Create Account page, and pressing the Login button takes the user to the Shopping List page. When pressing the Login button, set the logged-in
flag using Shared Preferences to true
so that the next time the user logs in, they go straight to the Shopping List page after the Splash page.
Create Account Page
The Create Account page looks almost the same as the Login page:
The only difference here is the user can use the Cancel button, tap the back arrow icon or press the device back button to go back to the Login page.
Shopping List Page
This page displays a list of items which is a hardcoded list of dummy data to simulate a shopping list:
When the user taps an item in this list, it takes them to the Details page. The item number clicked is passed to the Details page as a constructor argument.
This page also supports two actions in the AppBar, which denote Settings and Cart. Tapping these will take the user to the respective pages.
Details Page
The Details page shows item details:
This screen shows the buttons Add to Cart and Cart. The Add to Cart button will add the item to an internal list that mimics a cart, and will take the user back to the Shopping List page. The Cart button will take the user to the Cart page.
Cart Page
This page shows the items in the cart:
It has an AppBar action for navigating to the Checkout page.
Checkout Page
The Checkout page shows the items in the cart:
It has two buttons: one to go back to the Shopping List page, and another to clear the cart.
Settings Page
This page allows the user to log out:
Afterward, they’ll return to the Login page. This will also reset the logged-in
flag to false
to preserve this state.
Pages Setup
Now that you’re aware of all the pages the app displays, you’ll need some information about the pages to represent them in the app. This information shall be captured in a class named PageConfiguration
.
In the router directory, open up the Dart file named ui_pages.dart. Here you have some constants for the different paths:
const String SplashPath = '/splash';
const String LoginPath = '/login';
const String CreateAccountPath = '/createAccount';
const String ListItemsPath = '/listItems';
const String DetailsPath = '/details';
const String CartPath = '/cart';
const String CheckoutPath = '/checkout';
const String SettingsPath = '/settings';
The constants above define the paths or routes of each screen. It’s important to represent the UI for each page. This is done with an enum
:
enum Pages {
Splash,
Login,
CreateAccount,
List,
Details,
Cart,
Checkout,
Settings
}
Finally, the PageConfiguration
class mentioned earlier combines all the information about each page you defined above:
class PageConfiguration {
final String key;
final String path;
final Pages uiPage;
PageAction currentPageAction;
PageConfiguration(
{@required this.key, @required this.path, @required this.uiPage, this.currentPageAction});
}
PageConfiguration
holds two Strings, which represent the page’s key
and path
. And then a third parameter which represents the UI associated with that page using the Pages
enum you added earlier. The fourth item remembers the current page action that was used for this page.
Next is the PageConfiguration
s constants to hold information about each of the pages of the app, as shown below.
PageConfiguration SplashPageConfig =
PageConfiguration(key: 'Splash', path: SplashPath, uiPage: Pages.Splash, currentPageAction: null);
PageConfiguration LoginPageConfig =
PageConfiguration(key: 'Login', path: LoginPath, uiPage: Pages.Login, currentPageAction: null);
PageConfiguration CreateAccountPageConfig = PageConfiguration(
key: 'CreateAccount', path: CreateAccountPath, uiPage: Pages.CreateAccount, currentPageAction: null);
PageConfiguration ListItemsPageConfig = PageConfiguration(
key: 'ListItems', path: ListItemsPath, uiPage: Pages.List);
PageConfiguration DetailsPageConfig =
PageConfiguration(key: 'Details', path: DetailsPath, uiPage: Pages.Details, currentPageAction: null);
PageConfiguration CartPageConfig =
PageConfiguration(key: 'Cart', path: CartPath, uiPage: Pages.Cart, currentPageAction: null);
PageConfiguration CheckoutPageConfig = PageConfiguration(
key: 'Checkout', path: CheckoutPath, uiPage: Pages.Checkout, currentPageAction: null);
PageConfiguration SettingsPageConfig = PageConfiguration(
key: 'Settings', path: SettingsPath, uiPage: Pages.Settings, currentPageAction: null);
For the Splash page, a constant named SplashPageConfig
represents the page’s PageConfiguration
. The first parameter of PageConfiguration
represents the key 'Splash'
. The second argument represents the Splash page’s path, SplashPath
. Finally, the third argument represents the UI associated with the Splash page, i.e. Pages.Splash
.
The same is done for the other pages.
AppState
Every app needs to keep track of what state it is in. Is the user logged in? Does the user have any items in their cart? What page are they on? All of this information is stored in the AppState class. Open up app_state.dart in the lib directory. The first item is an enum for the page:
enum PageState {
none,
addPage,
addAll,
addWidget,
pop,
replace,
replaceAll
}
This defines what types of page states the app can be in. If the app is in the none
state, nothing needs to be done. If it is in the addPage
state, then a page needs to be added. To pop a page, set the page state to pop
.
Next is the page action:
class PageAction {
PageState state;
PageConfiguration page;
List<PageConfiguration> pages;
Widget widget;
PageAction({this.state = PageState.none, this.page = null, this.pages = null, this.widget = null});
}
This wraps several items that allow the router to handle a page action. If the state is addPage
, the page field will have the new page to add. The page, pages and widget are all optional fields and each are used differently depending on the page state.
The last class is AppState. This class holds the logged-in flag, shopping cart items and current page action. Look over the other fields and methods.
class AppState extends ChangeNotifier {
bool _loggedIn = false;
bool get loggedIn => _loggedIn;
bool _splashFinished = false;
bool get splashFinished => _splashFinished;
final cartItems = [];
String emailAddress;
String password;
PageAction _currentAction = PageAction();
PageAction get currentAction => _currentAction;
set currentAction(PageAction action) {
_currentAction = action;
notifyListeners();
}
AppState() {
getLoggedInState();
}
void resetCurrentAction() {
_currentAction = PageAction();
}
void addToCart(String item) {
cartItems.add(item);
notifyListeners();
}
void removeFromCart(String item) {
cartItems.add(item);
notifyListeners();
}
void clearCart() {
cartItems.clear();
notifyListeners();
}
void setSplashFinished() {
_splashFinished = true;
if (_loggedIn) {
_currentAction = PageAction(state: PageState.replaceAll, page: ListItemsPageConfig);
} else {
_currentAction = PageAction(state: PageState.replaceAll, page: LoginPageConfig);
}
notifyListeners();
}
void login() {
_loggedIn = true;
saveLoginState(loggedIn);
_currentAction = PageAction(state: PageState.replaceAll, page: ListItemsPageConfig);
notifyListeners();
}
void logout() {
_loggedIn = false;
saveLoginState(loggedIn);
_currentAction = PageAction(state: PageState.replaceAll, page: LoginPageConfig);
notifyListeners();
}
void saveLoginState(bool loggedIn) async {
final prefs = await SharedPreferences.getInstance();
prefs.setBool(LoggedInKey, loggedIn);
}
void getLoggedInState() async {
final prefs = await SharedPreferences.getInstance();
_loggedIn = prefs.getBool(LoggedInKey);
if (_loggedIn == null) {
_loggedIn = false;
}
}
}
RouterDelegate
RouterDelegate contains the core logic for Navigator 2.0. This includes controlling the navigation between pages. This class is an abstract class that requires classes that extend RouterDelegate
to implement all of its unimplemented methods.
Begin by creating a new Dart file in the router directory called router_delegate.dart. You will name the RouterDelegate
for this app ShoppingRouterDelegate
. Add the following import statements:
import 'package:flutter/cupertino.dart';
import 'package:flutter/foundation.dart';
import 'package:flutter/material.dart';
import '../app_state.dart';
import '../ui/details.dart';
import '../ui/cart.dart';
import '../ui/checkout.dart';
import '../ui/create_account.dart';
import '../ui/list_items.dart';
import '../ui/login.dart';
import '../ui/settings.dart';
import '../ui/splash.dart';
import 'ui_pages.dart';
This includes imports for all the UI pages. Next, add the code representing the basic structure of this app’s RouterDelegate
, i.e. ShoppingRouterDelegate
:
// 1
class ShoppingRouterDelegate extends RouterDelegate<PageConfiguration>
// 2
with ChangeNotifier, PopNavigatorRouterDelegateMixin<PageConfiguration> {
// 3
final List<Page> _pages = [];
// 4
@override
final GlobalKey<NavigatorState> navigatorKey;
// 5
final AppState appState;
// 6
ShoppingRouterDelegate(this.appState) : navigatorKey = GlobalKey() {
appState.addListener(() {
notifyListeners();
});
}
// 7
/// Getter for a list that cannot be changed
List<MaterialPage> get pages => List.unmodifiable(_pages);
/// Number of pages function
int numPages() => _pages.length;
// 8
@override
PageConfiguration get currentConfiguration =>
_pages.last.arguments as PageConfiguration;
}
Ignore the errors for now, you will resolve them soon. Here’s what’s happening in the code above:
- This represents the app’s
RouterDelegate
,ShoppingRouterDelegate
. It extends the abstractRouterDelegate
, which produces a configuration for eachRoute
. This configuration isPageConfiguration
. -
ShoppingRouterDelegate
uses theChangeNotifier
mixin, which helps notify any listeners of this delegate to update themselves whenevernotifyListeners()
is invoked. This class also usesPopNavigatorRouterDelegateMixin
, which lets you remove pages. It’ll also be useful later when you implementBackButtonDispatcher
. - This list of
Page
s is the core of the app’s navigation, and it denotes the current list of pages in the navigation stack. It’s private so that it can’t be modified directly, as that could lead to errors and unwanted states. You’ll see later how to handle modifying the navigation stack without writing to this list directly from anywhere outsideShoppingRouterDelegate
. -
PopNavigatorRouterDelegateMixin
requires anavigatorKey
used for retrieving the current navigator of theRouter
. - Declare a final
AppState
variable. - Define the constructor. This constructor takes in the current app state and creates a global navigator key. It’s important that you only create this key once.
- Define public getter functions.
-
currentConfiguration
gets called byRouter
when it detects route information may have changed. “current” means the topmost page of the app i.e._pages.last
. This getter returns configuration of typePageConfiguration
as defined on line 1 while creatingRouterDelegate<PageConfiguration>
. ThecurrentConfiguration
for thislast
page can be accessed as_pages.last.arguments
.
Next, you’ll implement build.
Implementing build
One of the methods from RouterDelegate
that you’ll implement is build
. It gets called by RouterDelegate
to obtain the widget tree that represents the current state. In this scenario, the current state is the navigation history of the app. As such, use Navigator
to implement build
by adding the code below:
@override
Widget build(BuildContext context) {
return Navigator(
key: navigatorKey,
onPopPage: _onPopPage,
pages: buildPages(),
);
}
Navigator
uses the previously defined navigatorKey
as its key. Navigator
needs to know what to do when the app requests the removal or popping of a page via a back button press and calls _onPopPage
.
pages calls buildPages
to return the current list of pages, which represents the app’s navigation stack.
Removing Pages
To remove pages, define a private _onPopPage
method:
bool _onPopPage(Route<dynamic> route, result) {
// 1
final didPop = route.didPop(result);
if (!didPop) {
return false;
}
// 2
if (canPop()) {
pop();
return true;
} else {
return false;
}
}
This method will be called when pop
is invoked, but the current Route corresponds to a Page found in the pages
list.
The result
argument is the value with which the route completed. An example of this is the value returned from a dialog when it’s popped.
In the code above:
- There’s a request to pop the route. If the route can’t handle it internally, it returns
false
. - Otherwise, check to see if we can remove the top page and remove the page from the list of pages.
Note that route.settings
extends RouteSettings
.
It’s possible you’ll want to remove a page from the navigation stack. To do this, create a private method _removePage
. This modifies the internal _pages
field:
void _removePage(MaterialPage page) {
if (page != null) {
_pages.remove(page);
}
}
_removePage
is a private method, so to access it from anywhere in the app, use RouterDelegate‘s popRoute
method. Now add pop methods:
void pop() {
if (canPop()) {
_removePage(_pages.last);
}
}
bool canPop() {
return _pages.length > 1;
}
@override
Future<bool> popRoute() {
if (canPop()) {
_removePage(_pages.last);
return Future.value(true);
}
return Future.value(false);
}
These methods ensure there are at least two pages in the list. Both pop
and popRoute
will call _removePage
to remove a page and return true
if it can pop, ottherwise, return false
to close the app. If you didn’t add the check here and called _removePage
on the last page of the app, you would see a blank screen.
Creating and Adding a Page
Now that you know how to remove a page, you’ll write code to create and add a page. You’ll use MaterialPage, which is a Page
subclass provided by the Flutter SDK:
MaterialPage _createPage(Widget child, PageConfiguration pageConfig) {
return MaterialPage(
child: child,
key: Key(pageConfig.key),
name: pageConfig.path,
arguments: pageConfig
);
}
The first argument for this method is a Widget. This widget will be the UI displayed to the user when they’re on this page. The second argument is an object of type PageConfiguration
, which holds the configuration of the page this method creates.
The first three parameters of MaterialPage
are straightforward. The fourth parameter is arguments
, and the pageConfig
is passed to it. This lets you easily access the configuration of the page if needed.
Now that there’s a method to create a page, create another method to add this page to the navigation stack, i.e. to the _pages
list:
void _addPageData(Widget child, PageConfiguration pageConfig) {
_pages.add(
_createPage(child, pageConfig),
);
}
The public method for adding a page is addPage
. You’ll implement it using the Pages
enum:
void addPage(PageConfiguration pageConfig) {
// 1
final shouldAddPage = _pages.isEmpty ||
(_pages.last.arguments as PageConfiguration).uiPage !=
pageConfig.uiPage;
if (shouldAddPage) {
// 2
switch (pageConfig.uiPage) {
case Pages.Splash:
// 3
_addPageData(Splash(), SplashPageConfig);
break;
case Pages.Login:
_addPageData(Login(), LoginPageConfig);
break;
case Pages.CreateAccount:
_addPageData(CreateAccount(), CreateAccountPageConfig);
break;
case Pages.List:
_addPageData(ListItems(), ListItemsPageConfig);
break;
case Pages.Cart:
_addPageData(Cart(), CartPageConfig);
break;
case Pages.Checkout:
_addPageData(Checkout(), CheckoutPageConfig);
break;
case Pages.Settings:
_addPageData(Settings(), SettingsPageConfig);
break;
case Pages.Details:
if (pageConfig.currentPageAction != null) {
_addPageData(pageConfig.currentPageAction.widget, pageConfig);
}
break;
default:
break;
}
}
}
The code above does the following:
- Decides whether to add a new page. The second condition ensures the same page isn’t added twice by mistake. Example: You wouldn’t want to add a Login page immediately on top of another Login page.
- Uses a
switch
case on thepageConfig
‘sUI_PAGE
so you know which page to add. - Uses the recently created private
addPageData
to add the widget andPageConfiguration
associated with the correspondingUI_PAGE
from theswitch
case.
You’ll notice switch
doesn’t handle the Details page case. That’s because adding that page requires another argument, which you’ll read about later.
Modifying the Contents
Now comes the fun part. Create some methods that allow you to modify the contents of the _pages
list. To cover all use cases of the app, you’ll need methods to add, delete and replace the _pages
list:
// 1
void replace(PageConfiguration newRoute) {
if (_pages.isNotEmpty) {
_pages.removeLast();
}
addPage(newRoute);
}
// 2
void setPath(List<MaterialPage> path) {
_pages.clear();
_pages.addAll(path);
}
// 3
void replaceAll(PageConfiguration newRoute) {
setNewRoutePath(newRoute);
}
// 4
void push(PageConfiguration newRoute) {
addPage(newRoute);
}
// 5
void pushWidget(Widget child, PageConfiguration newRoute) {
_addPageData(child, newRoute);
}
// 6
void addAll(List<PageConfiguration> routes) {
_pages.clear();
routes.forEach((route) {
addPage(route);
});
}
Here’s a breakdown of the code above:
-
replace
method: Removes the last page, i.e the top-most page of the app, and replaces it with the new page using the add method -
setPath
method: Clears the entire navigation stack, i.e. the_pages
list, and adds all the new pages provided as the argument -
replaceAll
method: CallssetNewRoutePath
. You’ll see what this method does in a moment. -
push
method: This is like theaddPage
method, but with a different name to be in sync with Flutter’spush
andpop
naming. -
pushWidget
method: Allows adding a new widget using the argument of typeWidget
. This is what you’ll use for navigating to the Details page. -
addAll
method: Adds a list of pages.
The last overridden method of the RouterDelegate
is setNewRoutePath
, which is also the method called by replaceAll
above. This method clears the list and adds a new page, thereby replacing all the pages that were there before:
@override
Future<void> setNewRoutePath(PageConfiguration configuration) {
final shouldAddPage = _pages.isEmpty ||
(_pages.last.arguments as PageConfiguration).uiPage !=
configuration.uiPage;
if (shouldAddPage) {
_pages.clear();
addPage(configuration);
}
return SynchronousFuture(null);
}
When an page action is requested, you want to record the action associated with the page. The _setPageAction method will do that. Add:
void _setPageAction(PageAction action) {
switch (action.page.uiPage) {
case Pages.Splash:
SplashPageConfig.currentPageAction = action;
break;
case Pages.Login:
LoginPageConfig.currentPageAction = action;
break;
case Pages.CreateAccount:
CreateAccountPageConfig.currentPageAction = action;
break;
case Pages.List:
ListItemsPageConfig.currentPageAction = action;
break;
case Pages.Cart:
CartPageConfig.currentPageAction = action;
break;
case Pages.Checkout:
CheckoutPageConfig.currentPageAction = action;
break;
case Pages.Settings:
SettingsPageConfig.currentPageAction = action;
break;
case Pages.Details:
DetailsPageConfig.currentPageAction = action;
break;
default:
break;
}
}
Now comes the most important method, buildPages
. This method will return a list of pages based on the current app state:
List<Page> buildPages() {
// 1
if (!appState.splashFinished) {
replaceAll(SplashPageConfig);
} else {
// 2
switch (appState.currentAction.state) {
// 3
case PageState.none:
break;
case PageState.addPage:
// 4
_setPageAction(appState.currentAction);
addPage(appState.currentAction.page);
break;
case PageState.pop:
// 5
pop();
break;
case PageState.replace:
// 6
_setPageAction(appState.currentAction);
replace(appState.currentAction.page);
break;
case PageState.replaceAll:
// 7
_setPageAction(appState.currentAction);
replaceAll(appState.currentAction.page);
break;
case PageState.addWidget:
// 8
_setPageAction(appState.currentAction);
pushWidget(appState.currentAction.widget, appState.currentAction.page);
break;
case PageState.addAll:
// 9
addAll(appState.currentAction.pages);
break;
}
}
// 10
appState.resetCurrentAction();
return List.of(_pages);
}
- If the splash screen hasn’t finished, just show the splash screen.
- Switch on the current action state.
- If there is no action, do nothing.
- Add a new page, given by the action’s page variable.
- Pop the top-most page.
- Replace the current page.
- Replace all of the pages with this page.
- Push a widget onto the stack (Details page)
- Add a list of pages.
- Reset the page state to none.
RouterDelegate
is a lot to take in. Take a break to digest what you just learned. :]
RouteInformationParser
A RouteInformationParser
is a delegate used by Router
to parse a route’s information into a configuration of any type T
which in your case would be PageConfiguration
.
This app’s RouteInformationParser
is also known as ShoppingParser
. Make this class extend from RouteInformationParser
. To begin, create a new Dart file, shopping_parser.dart, in the router directory and add the following code to this file:
import 'package:flutter/material.dart';
import 'ui_pages.dart';
class ShoppingParser extends RouteInformationParser<PageConfiguration> {
}
RouterInformationParser
requires that its subclasses override parseRouteInformation
and restoreRouteInformation
.
parseRouteInformation
converts the given route information into parsed data — PageConfiguration
in this case — to pass to RouterDelegate
:
@override
Future<PageConfiguration> parseRouteInformation(
RouteInformation routeInformation) async {
// 1
final uri = Uri.parse(routeInformation.location);
// 2
if (uri.pathSegments.isEmpty) {
return SplashPageConfig;
}
// 3
final path = uri.pathSegments[0];
// 4
switch (path) {
case SplashPath:
return SplashPageConfig;
case LoginPath:
return LoginPageConfig;
case CreateAccountPath:
return CreateAccountPageConfig;
case ListItemsPath:
return ListItemsPageConfig;
case DetailsPath:
return DetailsPageConfig;
case CartPath:
return CartPageConfig;
case CheckoutPath:
return CheckoutPageConfig;
case SettingsPath:
return SettingsPageConfig;
default:
return SplashPageConfig;
}
}
Here’s what’s happening in the code above:
-
location
fromrouteInformation
is a String that represents the location of the application. The string is usually in the format of multiple string identifiers with slashes between — for example: `/`, `/path` or `/path/to/the/app`. It’s equivalent to the URL in a web application. Useparse
fromUri
to create aUri
from this String. - If there are no paths, which is most likely the case when the user is launching the app, return
SplashPage
. - Otherwise, get the first path segment from the
pathSegements
list of theuri.
- Then return the
PageConfiguration
corresponding to this first path segment.
restoreRouteInformation
isn't required if you don't opt for the route information reporting, which is mainly used for updating browser history for web applications. If you decide to opt in, you must also override this method to return RouteInformation
based on the provided PageConfiguration
.
So, override restoreRouteInformation
. In a way, this method does the exact opposite of the previously defined parseRouteInformation
by taking in a PageDate
and returning an object of type RouteInformation
:
@override
RouteInformation restoreRouteInformation(PageConfiguration configuration) {
switch (configuration.uiPage) {
case Pages.Splash:
return const RouteInformation(location: SplashPath);
case Pages.Login:
return const RouteInformation(location: LoginPath);
case Pages.CreateAccount:
return const RouteInformation(location: CreateAccountPath);
case Pages.List:
return const RouteInformation(location: ListItemsPath);
case Pages.Details:
return const RouteInformation(location: DetailsPath);
case Pages.Cart:
return const RouteInformation(location: CartPath);
case Pages.Checkout:
return const RouteInformation(location: CheckoutPath);
case Pages.Settings:
return const RouteInformation(location: SettingsPath);
default:
return const RouteInformation(location: SplashPath);
}
}
This method uses uiPage
from Page
to return a RouteInformation
with its location
set to the given path. Notice that there's a RouteInformation
with the location of SplashPath
in case there are no matches for uiPage
.
Root Widget and Router
Now that you have all the required Router
classes, hook them up with the root widget of your app in the main.dart file. Open main.dart and find:
// TODO Create Delegate, Parser and Back button Dispatcher
Define instances of ShoppingRouterDelegate
and ShoppingParser
.
ShoppingRouterDelegate delegate;
final parser = ShoppingParser();
Then, replace // TODO Setup Router & dispatcher
with the following:
// 1
delegate = ShoppingRouterDelegate(appState);
// 2
delegate.setNewRoutePath(SplashPageConfig);
In the code above, you:
- Create the delegate with the appState field.
- Set up the initial route of this app to be the Splash page using
setNewRoutePath
.
Add any needed imports. For most Flutter apps, you might have MaterialApp
or CupertinoApp
as the root widget. Both of these use WidgetsApp
internally. WidgetsApp
creates a Router
or a Navigator
internally. In case of a Router
, the Navigator
is configured via the provided routerDelegate
. Navigator
then manages the pages list that updates the app's navigation whenever this list of pages changes.
Since Navigator 2.0 is backward-compatible with Navigator 1.0, the easiest way to start with Navigator 2.0 is to use MaterialApp
's MaterialApp.router(...)
constructor. This requires you to provide instances of a RouterDelegate
and a RouteInformationParser
as the ones discussed above.
Hence, in the root widget's build
method, replace MaterialApp
with:
child: MaterialApp.router(
title: 'Navigation App',
debugShowCheckedModeBanner: false,
theme: ThemeData(
primarySwatch: Colors.blue,
visualDensity: VisualDensity.adaptivePlatformDensity,
),
routerDelegate: delegate,
routeInformationParser: parser,
),);
Notice that you're passing in the created routerDelegate
and routeInformationParser
. Run the app to make sure it still works.
Navigating Between Pages
Now you'll cover how to navigate between the various pages.
Splash Page Navigation
Open splash.dart from the ui folder and find appState.setSplashFinished()
. If you go to setSplashFinished()
you will see:
void setSplashFinished() {
// 1
_splashFinished = true;
if (_loggedIn) {
// 2
_currentAction = PageAction(state: PageState.replaceAll, page: ListItemsPageConfig);
} else {
// 3
_currentAction = PageAction(state: PageState.replaceAll, page: LoginPageConfig);
}
notifyListeners();
}
- Set the splash state to be finished.
- If the user is logged in, show the list page.
- Otherwise show the login page.
By setting the current action and calling notifyListeners
, you will trigger a state change and the router will update its list of pages based on the current app state.
BackButtonDispatcher
Navigator 2.0 also uses a BackButtonDispatcher
class to handle system back button presses. If you want to create a custom dispatcher, you can create a subclass of RootBackButtonDispatcher
.
This app's BackButtonDispatcher
is also known as ShoppingBackButtonDispatcher
. Create this class by creating a new Dart file named back_dispatcher.dart in the router directory and adding the following code:
import 'package:flutter/material.dart';
import 'router_delegate.dart';
// 1
class ShoppingBackButtonDispatcher extends RootBackButtonDispatcher {
// 2
final ShoppingRouterDelegate _routerDelegate;
ShoppingBackButtonDispatcher(this._routerDelegate)
: super();
// 3
Future<bool> didPopRoute() {
return _routerDelegate.popRoute();
}
}
In the code above:
- Make
ShoppingBackButtonDispatcher
extendRootBackButtonDispatcher
. - Declare a
final
instance ofShoppingRouterDelegate
. This helps you link the dispatcher to the app'sRouterDelegate
, i.e.ShoppingRouterDelegate
. - Delegate
didPopRoute
to_routerDelegate
.
Note that this class doesn't do any complex back button handling here. Rather, it's just an example of subclassing RootBackButtonDispatcher
to create a custom Back Button Dispatcher. If you need to do some custom back button handling, add your code to didPopRoute()
.
To use this class open main.dart, add the import statement and add the initializing code after final parser = ShoppingParser();
:
ShoppingBackButtonDispatcher backButtonDispatcher;
Then initialize backButtonDispatcher
in _MyAppState
after delegate.setNewRoutePath(SplashPage);
:
backButtonDispatcher = ShoppingBackButtonDispatcher(delegate);
Finally, use this dispatcher in your router in the build
method by adding it before the routerDelegate: delegate,
statement:
backButtonDispatcher: backButtonDispatcher,
This time, use Hot Restart instead of Hot Reload to restart the app. Then, observe there aren't changes to the flow of navigation because, as mentioned earlier, the didPopRoute
in ShoppingBackButtonDispatcher
does nothing special.
Deep Linking
To implement deep links, this tutorial uses the uni_links package.
This package helps with deep links on Android, as well as Universal Links and Custom URL Schemes on iOS. To handle deep links on Android, modify the AndroidManifest.xml file in the android/app/src/main directory. For Android, add an <intent-filter>
tag inside the MainActivity
's <activity>
tag as follows:
<intent-filter>
<action android:name="android.intent.action.VIEW" />
<category android:name="android.intent.category.DEFAULT" />
<category android:name="android.intent.category.BROWSABLE" />
<data
android:scheme="navapp"
android:host="deeplinks" />
</intent-filter>
For iOS, modify ios/Runner/Info.plist by adding:
<key>CFBundleURLTypes</key>
<array>
<dict>
<key>CFBundleTypeRole</key>
<string>Editor</string>
<key>CFBundleURLName</key>
<string>deeplinks</string>
<key>CFBundleURLSchemes</key>
<array>
<string>navapp</string>
</array>
</dict>
</array>
Both of these changes add a scheme named navapp to the app where navapp means Navigation App. In terms of deep links, this means this app can open URLs that look like navapp://deeplinks
Now that you know how to make deep links open your app, follow the steps below to understand how to consume the link the user clicked on.
Parse Deep Link URI
Open the router_delegate.dart file and add parseRoute
, which takes a Uri
as an argument, parses the path and sets the page(s):
void parseRoute(Uri uri) {
// 1
if (uri.pathSegments.isEmpty) {
setNewRoutePath(SplashPageConfig);
return;
}
// 2
// Handle navapp://deeplinks/details/#
if (uri.pathSegments.length == 2) {
if (uri.pathSegments[0] == 'details') {
// 3
pushWidget(Details(int.parse(uri.pathSegments[1])), DetailsPageConfig);
}
} else if (uri.pathSegments.length == 1) {
final path = uri.pathSegments[0];
// 4
switch (path) {
case 'splash':
replaceAll(SplashPageConfig);
break;
case 'login':
replaceAll(LoginPageConfig);
break;
case 'createAccount':
// 5
setPath([
_createPage(Login(), LoginPageConfig),
_createPage(CreateAccount(), CreateAccountPageConfig)
]);
break;
case 'listItems':
replaceAll(ListItemsPageConfig);
break;
case 'cart':
setPath([
_createPage(ListItems(), ListItemsPageConfig),
_createPage(Cart(), CartPageConfig)
]);
break;
case 'checkout':
setPath([
_createPage(ListItems(), ListItemsPageConfig),
_createPage(Checkout(), CheckoutPageConfig)
]);
break;
case 'settings':
setPath([
_createPage(ListItems(), ListItemsPageConfig),
_createPage(Settings(), SettingsPageConfig)
]);
break;
}
}
}
In the code above:
- Check if there are no
pathSegments
in the URI. If there are, navigate to the Splash page. - Handle the special case for the Details page, as the
path
will have twopathSegments
. - Parse the item number and push a Details page with the item number. In a real app, this item number could be a product's unique ID.
- Use
path
as an input for theswitch
case. - In this case and other cases, push the pages necessary to navigate to the destination using
setPath
.
Next, to link parseRoute
to the root widget's router
, open main.dart.
Add the following code after ShoppingBackButtonDispatcher backButtonDispatcher;
:
StreamSubscription _linkSubscription;
_linkSubscription
is a StreamSubscription
for listening to incoming links. Call .cancel()
on it to dispose of the stream.
To do so, add:
_linkSubscription?.cancel();
before super.dispose();
. Now add the missing initPlatformState
, which is responsible for setting up the listener for the deep links:
// Platform messages are asynchronous, so declare them with the async keyword.
Future<void> initPlatformState() async {
// Attach a listener to the Uri links stream
// 1
_linkSubscription = getUriLinksStream().listen((Uri uri) {
if (!mounted) return;
setState(() {
// 2
delegate.parseRoute(uri);
});
}, onError: (Object err) {
print('Got error $err');
});
}
Here's what you do in the code above:
- Initialize
StreamSubcription
by listening for any deep link events. - Have the app's
delegate
parse theuri
and then navigate using the previously definedparseRoute
.
At this point, you've implemented deep links, so stop the running instance of your app and re-run it to include these changes. Don't use hot restart or hot reload because there were changes on the native Android and native iOS side of the project and they aren't considered by these two tools.
Testing Android URIs
To test your deep links on Android, the easiest way is from the command line.
Open Terminal on macOS or Linux or CMD on Windows and verify that the app navigates to the Settings page using the following adb shell command:
adb shell 'am start -W -a android.intent.action.VIEW -c android.intent.category.BROWSABLE -d "navapp://deeplinks/settings"'
Notice that this adb command includes the app's deep link scheme
navapp
and host
deeplinks
from Android Manifest.xml.
To navigate to the Details page with the index of the item as 1
, try the following command:
adb shell 'am start -W -a android.intent.action.VIEW -c android.intent.category.BROWSABLE -d "navapp://deeplinks/details/1"'
To navigate to the Cart page, try the following command:
adb shell 'am start -W -a android.intent.action.VIEW -c android.intent.category.BROWSABLE -d "navapp://deeplinks/cart"'
You'll see your app navigates to the target page. If that's not the case, check the logs to see if there are any errors.
Where to Go From Here?
Download the final version of this project using the Download Materials button at the top or bottom of this tutorial.
Congratulations! That was a lot of code, but it should help you whenever you plan to implement your own RouterDelegate with Navigator 2.0.
Check out the following links to learn more about some of the concepts in this tutorial:
- Navigator 2.0: Navigator Refactoring.
- Github Issue: Navigator 2.0 Refactoring
- Navigator 2.0 Design Doc: Navigator 2.0 and Router
- Get: Counter app using Get example
- uni_links
We hope you enjoyed this tutorial, and if you have any questions or comments, please join the forum discussion below!