Creating and Publishing a Flutter Package
In this tutorial, you’ll learn how to create and publish your own Dart packages to be used in Flutter apps. By Edson Bueno.
Specifying the Example’s Dependencies
Open your example project’s pubspec.yaml and replace the entire dependencies section with:
dependencies:
  flutter:
    sdk: flutter
  focus_detector:
    path: ../
  logger: ^0.9.4
Look at how you specified the focus_detector dependency. Instead of linking to a specific version like you usually do, you’re specifying the local parent path, where the package code is located. That way, all changes on the package are automatically reflected in your example.
The second dependency is a fancier logger the app will use to print to the console every time FocusDetector fires a callback.
Don’t forget to click Pub get at the top of your screen to download your dependencies.
Filling the Example
You’re here to learn how to create and publish a package, not how to use FocusDetector. So to spare you unnecessary details, replace your example project’s main.dart with the one in starter/auxiliary in your downloaded materials. Also, take the opportunity to delete the test folder from the root of your example.
Close the focus_detector project on Android Studio and then reopen it. This will cause Android Studio to locate your example app’s main.dart and let you run it without the need to open the project separately.
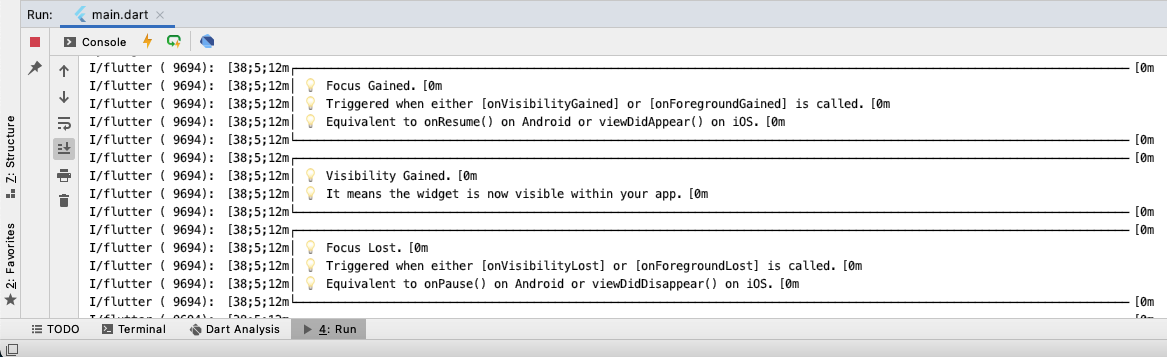
Make sure it all works by building and running your package’s project as you usually do with your apps. If everything went OK, you should see something like this:

You’ll also see logger messages in the console like this:
Hacking the Example Tab
Every package with an example project gets an Example tab on pub.dev:
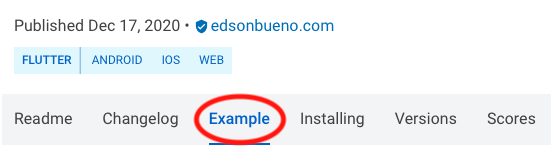
Pub.dev automatically shows the contents of the example/lib/main.dart file if it can find one. That’s one reason why it’s essential to follow the convention of placing your example project in an example folder. Two other good reasons are:
- So users know exactly where to look when they need it
- So Android Studio locates it by itself and enables the Run button for your package’s project
But what if you feel like you can’t do justice to your package displaying only your example’s main.dart file in the Example tab? Tell no one, but there’s a way. If pub.dev finds an example.md file in the example folder, it’ll display that file rather than the main.dart. You can leverage this to create a cookbook for your package, like this.
Your package is already fully functional but still isn’t publishable. For that, you first need to work on three essential files: the README.md, the CHANGELOG.md and the LICENSE.
Crafting an Effective README
Code is not the only thing package creators need to know how to write. Your most valuable lines won’t be in a Dart file but a plain-text file: the README.md. The README.md is a Markdown file that uses a lightweight markup language to create formatted text output for viewing. Markdown supports HTML tags, so you can use a mixture of both. If you’re unfamiliar with Markdown, check out Markdown Tutorial.
Your README is your business card. It’s the first, and in the worst case, the only thing users will see when they find you on GitHub or pub.dev. The quality of your README can make or break your package as easily as the quality of your code can.
Fortunately, writing an effective README is not rocket science. It all boils down to selecting some of the following resources:
- Logo.
- Short description of what the package does.
- Screenshot of the example app — suitable for visual packages only.
- Code snippet showcasing the most common usage.
- Feature list.
- Link for a tutorial.
- Table of all properties along with their type and a brief description.
- Quick fixes to the most common problems users face. This section is usually called Troubleshooting.
- Badges — more on these in a second.
Keep the most relevant information at the top, and remember that your goals are to:
- Make users trust you — package fatigue is a real thing.
- Keep users away from needing your example project — as much as possible.
Displaying Badges
Badges are the little rectangles you find at the top of some READMEs:

Badges signal credibility, mostly because some of them require you to do some work to earn the right — and the image URL — to carry them in your README. Good examples of this are creating a chat room on Gitter or setting up a build workflow with GitHub Actions.
Adding a README File
Your README is ready and waiting for you in the downloaded materials. Replace the README.md under your project’s root, focus_detector/README.md, with the one in the starter/auxiliary folder.
Licensing
Another prerequisite for publishing a package is having an open-source license file. This license allows people to use, modify and/or share your code under defined terms and conditions. What terms and conditions? That depends on the license you choose.
For Focus Detector, you’re going with the MIT license. When choosing a license for your next project, consult the Choose a License website.
Go ahead and replace the empty LICENSE in your project’s root with the one in the starter/auxiliary from the downloaded materials.
Understanding CHANGELOGs
You’ve probably been in the situation of knowing there’s a new version of a package you use, but you:
- Don’t know what the benefits of the upgrade are.
- Don’t know what’s the effort for the upgrade.
- Decided to upgrade but are having trouble with some missed property or function.
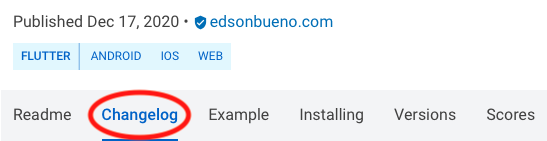
When you run into this situation, look at the ChangeLog tab:
But today, you’re the creator, not the user. It’s your job to ensure your users won’t be helpless when going through this same situation. You do that by creating a thoughtful CHANGELOG.md file.
Unlike the freestyle of the README, this one follows a specific format:
- One heading for each published version. The headings can be level 1 or level 2.
- The heading text contains nothing but the version number, optionally prefixed with “v”.
Here’s an example of a typical raw CHANGELOG and here’s what your users will see.
Adding a CHANGELOG File
Replace the empty CHANGELOG.md under your project’s root with the one in the starter/auxiliary folder from the downloaded materials.
Notice that your CHANGELOG contains a single entry: 1.0.0. One concern you can expect to have in your next ventures is knowing how to name your subsequent versions: 1.0.0+1? 1.0.1? 1.1.0? 2.0.0? Technically, you can do whatever you want, but it’s good pub.dev citizenship to follow this standard:

When you increase a number, the others to the right should be zeroed. For example, if you both add a feature and fix a bug, you increase the middle number and set the next to 0.
You’re finally ready to claim your piece of real estate on pub.dev. :]