Core Graphics Tutorial: Patterns and Playgrounds
Learn how to draw a repeatable pattern and use Playgrounds to prototype drawing a complex image. By Andrew Kharchyshyn.
@IBDesignable Attributes
Go to Main.storyboard and select the background view. In the Attributes inspector, change the @IBInspectable values to the following:
- Light Color: RGB(255, 255, 242)
- Dark Color: RGB(223, 255, 247)
- Pattern Size: 30

Experiment a little more with drawing background patterns. See if you can get a polka dot pattern as a background instead of the triangles.
And of course, you can substitute your own non-vector images as repeating patterns.
Drawing Images
In the final stretch of this tutorial, you’ll make a medal to reward users for drinking enough water. This medal will appear when the counter reaches the target of eight glasses.
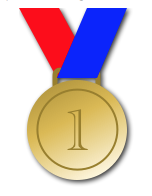
That’s certainly not a museum-worthy piece of art. You can improve it yourself or even take it to the next level by drawing a trophy instead.
In this particular case, you only need to draw the image once when the user drinks eight glasses of water. If the user never reaches the target, there’s no need to make a medal.
Once drawn, it also doesn’t need to be redrawn with draw(_:) and setNeedsDisplay().
Time to put the brush to the canvas. Instead of using @IBDesignable, you’ll build up the medal view using a Swift playground and copy the code into the Flo project when you’re finished.
Xcode Playground
Go to File ▸ New ▸ File ▸ Playground, select Blank Playground, and click Next. Name the playground MedalDrawing, and then click Create.
In the new playground window, replace the playground code with:
import UIKit

let size = CGSize(width: 120, height: 200)

UIGraphicsBeginImageContextWithOptions(size, false, 0.0)

guard let context = UIGraphicsGetCurrentContext() else {
  fatalError("\(#function):\(#line) Failed to get current context.")
}

// This code must always be at the end of the playground
let image = UIGraphicsGetImageFromCurrentImageContext()
UIGraphicsEndImageContext()
This creates a drawing context, just as you did for the patterned image.
You always need these two last lines at the bottom of the playground so you can preview the image in the playground.
Next, click the square in the gray results column to the right of this code:
let image = UIGraphicsGetImageFromCurrentImageContext()

This places a preview image under the code, which will update with every change you make to the code.
Drawing Theory
It’s often best to do a sketch to wrap your head around the order you’ll need to draw the elements. For example, look at the following “masterpiece” drawn for this tutorial:
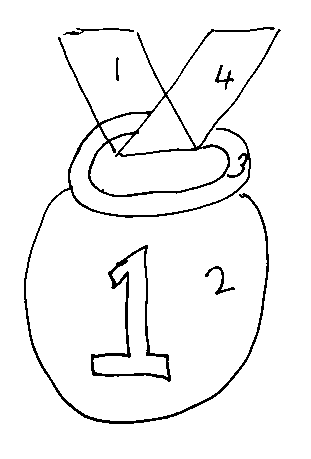
As shown, you’ll draw the medal in the following order:
- The back ribbon (red)
- The medallion (gold gradient)
- The clasp (dark gold)
- The front ribbon (blue)
- The number 1 (dark gold)
Remember to keep the last two lines of the playground (where you extract the image from the context) at the very end and add the following drawing code to the playground before those lines.
First, set up the non-standard colors you need:
// Gold colors
let darkGoldColor = UIColor(red: 0.6, green: 0.5, blue: 0.15, alpha: 1.0)
let midGoldColor = UIColor(red: 0.86, green: 0.73, blue: 0.3, alpha: 1.0)
let lightGoldColor = UIColor(red: 1.0, green: 0.98, blue: 0.9, alpha: 1.0)
This should all look familiar by now. Notice that the colors appear in the right margin of the playground as you declare them.
Lower Ribbon
Add the drawing code for the red part of the ribbon:
// Lower ribbon
let lowerRibbonPath = UIBezierPath()
lowerRibbonPath.move(to: CGPoint(x: 0, y: 0))
lowerRibbonPath.addLine(to: CGPoint(x: 40, y: 0))
lowerRibbonPath.addLine(to: CGPoint(x: 78, y: 70))
lowerRibbonPath.addLine(to: CGPoint(x: 38, y: 70))
lowerRibbonPath.close()
UIColor.red.setFill()
lowerRibbonPath.fill()
This doesn’t really do anything new, just creating a path and filling it. You should see the red path appear in the image preview section.
Clasp
Next, add the following code for drawing the clasp:
// Clasp
let claspPath = UIBezierPath(
  roundedRect: CGRect(x: 36, y: 62, width: 43, height: 20),
  cornerRadius: 5)
claspPath.lineWidth = 5
darkGoldColor.setStroke()
claspPath.stroke()
Here, you make use of UIBezierPath(roundedRect:cornerRadius:) to create the desired curves. The clasp should draw in the image preview.
Medallion
Now, it’s time to draw the medallion. Use the following code to draw the medallion:
// Medallion
let medallionPath = UIBezierPath(
  ovalIn: CGRect(x: 8, y: 72, width: 100, height: 100))
//context.saveGState()
//medallionPath.addClip()

let colors = [
  darkGoldColor.cgColor,
  midGoldColor.cgColor,
  lightGoldColor.cgColor
] as CFArray
guard let gradient = CGGradient(
  colorsSpace: CGColorSpaceCreateDeviceRGB(),
  colors: colors,
  locations: [0, 0.51, 1])
else {
  fatalError("""
    Failed to instantiate an instance \
    of \(String(describing: CGGradient.self))
    """)
}
context.drawLinearGradient(
  gradient,
  start: CGPoint(x: 40, y: 40),
  end: CGPoint(x: 40, y: 162),
  options: [])
//context.restoreGState()
Notice the commented out lines. These are here to temporarily show how the gradient is drawn:

To put the gradient on an angle, so it goes from top-left to bottom-right, change the end x coordinate of the gradient. Alter the drawLinearGradient(_:start:end:options:) code to:
context.drawLinearGradient(
  gradient,
  start: CGPoint(x: 40, y: 40),
  end: CGPoint(x: 100, y: 160),
  options: [])

Now, uncomment those three lines in the medallion drawing code to create a clipping path to constrain the gradient within the medallion’s circle.
Just as you did when drawing the graph in Core Graphics Tutorial: Gradients and Contexts, you save the context’s drawing state before adding the clipping path and restore it after the gradient is drawn so the context is no longer clipped.

To draw the solid internal line of the medal, use the medallion’s circle path, but scale it before drawing. Instead of transforming the whole context, you’ll just apply the transform to one path.
Add this code after the medallion drawing code:
// Create a transform
// Scale it, and translate it right and down
var transform = CGAffineTransform(scaleX: 0.8, y: 0.8)
transform = transform.translatedBy(x: 15, y: 30)
medallionPath.lineWidth = 2.0

// Apply the transform to the path
medallionPath.apply(transform)
medallionPath.stroke()

This scales the path down to 80 percent of its original size and then translates the path to keep it centered within the gradient view.
Upper Ribbon
Add the upper ribbon drawing code at the end of the drawing code:
// Upper ribbon
let upperRibbonPath = UIBezierPath()
upperRibbonPath.move(to: CGPoint(x: 68, y: 0))
upperRibbonPath.addLine(to: CGPoint(x: 108, y: 0))
upperRibbonPath.addLine(to: CGPoint(x: 78, y: 70))
upperRibbonPath.addLine(to: CGPoint(x: 38, y: 70))
upperRibbonPath.close()

UIColor.blue.setFill()
upperRibbonPath.fill()
This is similar to the code you added for the lower ribbon: making a Bezier path and filling it.
