What’s New in Unity 5: Unity 2D Deep Dive
Learn about the new features introduced for Unity 2D games in Unity 5, such as effectors, audio mixers, and more! By Brian Moakley.
None Shall Pass the Invisible Wall
Invisible walls are necessary to keep the player in the game, but at the same time they can also affect the gameplay. Which leads to a laundry list of questions about how they should behave:
- Should the wall stop all momentum?
- Should it be flexible like a rubber wall that bounces the player back into play?
- Or, should flying to the left bring the player out on the right?
For the sake of this tutorial, you’ll implement the middle option as it has a side effect of increasing the challenge.
Before Unity 5, walls required a whole lot of code to make the bounce both fluid and natural. With Unity 5, all you need to do is add a new component called an effector.
Right-click in the Hierarchy and from the drop-down, select Create Empty. Do this twice more so that you have three empty GameObjects.

The purpose of these walls will bounce the player back into the play field. You will create three of them. One is for the top and the other two are for the sides. This will keep they player in the play area. You could put one for the bottom of the screen, but the buildings will ultimately stop the player. A problem does occur when the player has destroyed all the building. In which case, they will fly through the ground. To fix this, you can add a box collider that can explode the player. Feel free to add it once you have completed the tutorial.
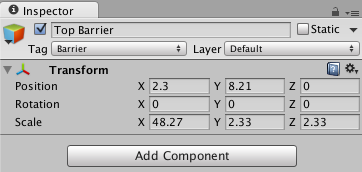
Select the first empty GameObject you created. Single-click its name in the Hierarchy and rename it Top Barrier. In the Inspector, set its Position to the following: X: 2.3 Y: 8.21 Z:0. For its Scale, assign the following values: X: 48.27 Y: 2.33 Z: 2.33.
These are the base units used by Unity. In 3D space, a single unit in Unity corresponds to one meter in reality. With Unity 2D, you can correspond units to actual pixels. To learn more about this, check out Chris LaPallo’s tutorial, Unity 4.3 2D Tutorial: Getting Started under the section, Fix Your Camera’s Projection.
In this case, you are setting the position and scale of the area that will bounce the user back out.
Next, in the Tag dropdown, select Add Tag.

The Tags and Layers dialog should appear with the Tags section expanded. Click the plus sign, then add the name: Barrier. This will be important later in the tutorial when you work with collisions.

Once you’ve added the new tag, select Top Barrier in the Hierarchy and from the Tag dropdown, select Barrier. It should look like the following:
In the Hierarchy, select the second empty GameObject you created, probably named GameObject 1. Change its name to Left Barrier.
In the Inspector, set its Position to X: -14.68 Y: 1.23 Z: 0. and set its Scale to X: 2.33 Y: 30.17 Z: 2.33. From the Tag dropdown, select Barrier.
Select the third empty GameObject you created, most likely called GameObject 2, and rename it Right Barrier. In the Inspector, set its Position to X: 15.6 Y: 1.23 Z: 0 and its Scale to X: 2.33 Y: 30.17 Z: 2.33. From the Tag dropdown, select Barrier.
Congratulations! You’ve just erected barriers. Except, well, they don’t do much of anything. To bounce the player back, you’ll use an effector.
Effecting Things With Effectors
In Unity 5, an effector is a way to apply force to Sprites. You have four kinds of effectors available to you.
- Surface Effector: Applies a force along the surface of a collider, allowing you to create things like moving surfaces.
- Point Effector: Defines a point that can either attract or repel by using a force.
- Area Effector: Applies directional forces within a specific area.
- Platform Effector: Helps you create platformer-style platforms, complete with options for one-way collisions and settings to control the friction and bounciness of the platform’s edges.
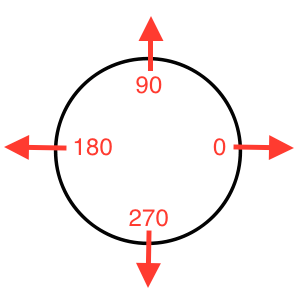
Unity has provided an image that nicely highlights everything you can do with the effectors:
Here are the various effectors available to you.

For your barriers, you’ll use an area effector, so that when the ship flies into the effector it’ll essentially push the ship back out.
In order for the effector to work, the corresponding GameObject needs to have a collider attached to it. The collider must be a trigger, and the collider must be marked to be Used By Effector. If those conditions aren’t met the effector won’t work, but at least Unity will let you know.
![]()
To do this, select Top Barrier in the Hierarchy, and first add a Box Collider 2D component to it. In the Inspector, check the collider’s Is Trigger and Used By Effector options. Next, add an Area Effector 2D to it. Your Top Barrier should look like the following:

Note: You’ll notice that the area effector has a whole bunch of options, and I bet you’d like to learn about them briefly.
Collider Mask determines what layers will be affected when objects enter the area. For now, keep Everything selected.
Force Direction determines the degree direction of the force. The value ranges from -359.99 to 359.99, which really just defines a circle moving in either a clockwise or counter-clockwise direction. As the image below shows, zero points to the right and positive values move counter-clockwise along the circle; negative values move clockwise.
Force Magnitude allows you to set the strength of this area’s force, while Force Variation lets you define a range to provide some randomization to the force for each collision.
The Drag and Angular Drag options allow you to further customize the area’s effects. In fact, you could use only drag values and no force values to create an area that slows any objects that enter.
Force Target determines at what point on the object the force gets applied. When set to RigidBody, forces apply to the object’s center of mass, whereas setting it to Collider applies forces at the point of collision.
Now back to creating this game.
With Top Barrier selected, set its Force Direction to be 270. This means the force will push downwards. Next, set the Force Magnitude to 45. This will push the ship down, but not so hard that the player loses control.
Run the scene and fly up. You’ll find you are knocked back down when you hit the ceiling.
Now do the same for both the Left Barrier and the Right Barrier. If you need a hint, check the following spoiler.
[spoiler]First, select the Left Barrier. Add a Box Collider 2D component to it and an Area Effector 2D component. For the Box Collider 2D, check both Is Trigger and Used By Effector. Next, in the Area Effector 2D component, set the Force Direction to 0 and the Force Magnitude to 45.
Next, select the Right Barrier. Add a Box Collider 2D component to it and an Area Effector 2D component. For the Box Collider 2D, check both Is Trigger and Used By Effector. Next, in the Area Effector 2D component, set the Force Direction to 180 and the Force Magnitude to 45.[/spoiler]
Now run the scene. Your ship is now unable to leave the frame. Time to blow some stuff up.
