Complications for watchOS With SwiftUI
Learn how to create complications in SwiftUI that will accelerate your development productivity, provide delightful glanceable displays and give your users a single-tap entry point to launch your watchOS app. By Warren Burton.
Data of Future Past
The third question the data source answers is What’s going to happen in the future? in getTimelineEntries(for:after:limit:withHandler).
Replace the code inside getTimelineEntries(for:after:limit:withHandler) with:
// 1
let timeline = dataController.appointments(after: date)
guard !timeline.isEmpty else {
  handler(nil)
  return
}

// 2
var entries: [CLKComplicationTimelineEntry] = []
var current = date
let endDate = (timeline.last?.date ?? date)
  .addingTimeInterval(Appointment.oneHour)

// 3
while (current.compare(endDate) == .orderedAscending) &&
  (entries.count < limit) {
  // 4
  if let next = dataController.nextAppointment(from: current),
    let template = makeTemplate(for: next, complication: complication) {
    let entry = CLKComplicationTimelineEntry(
      date: current,
      complicationTemplate: template)
    entries.append(entry)
  }
  // 5
  current = current.addingTimeInterval(5.0 * 60.0)
}

// 6
handler(entries)
Here's what that code does:
- Obtain the timeline of upcoming appointments from the data controller.
- You're going to create an array of timeline entries spaced at five minute intervals. So create an array to put them in and also set up some variables that will be useful shortly.
- Iterate over no more than one hour's entries, limited by what watchOS requests.
- Obtain the next appointment, make a complication template for it and add it to the list of entries.
- Skip forward 5 minutes.
- Finally, hand the entries to the watchOS handler.
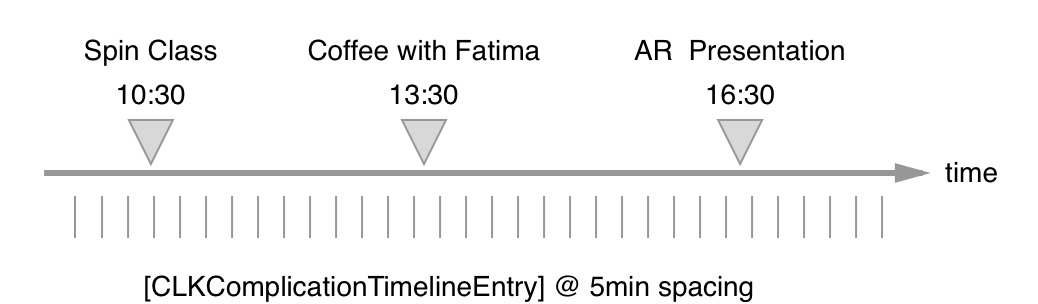
The reason for creating an entry spaced at each five minute interval is that it allows you to tell watchOS you want the complication updated automatically every five minutes. If you don't need the periodic update for your complication, then you can return one CLKComplicationTimelineEntry for each event in your timeline.
The following diagram shows how there are entries every five minutes, where each entry will show the next upcoming event. So all entries before "Spin Class" would show the data for "Spin Class" but would, of course, have a different time remaining.
By implementing these three CLKComplicationDataSource methods, you've done the minimum you need to get your complication running.
Now, it's time to get your complication running on the simulator and see it in action!
Running Complications on the Simulator
Build and run the WhatsNextWatch target on Apple Watch Series 6 44mm. Then click the Digital Crown. Click and hold the Home screen to show the edit mode.
If Meridian isn't the face shown then swipe by clicking and dragging across the face to change faces:
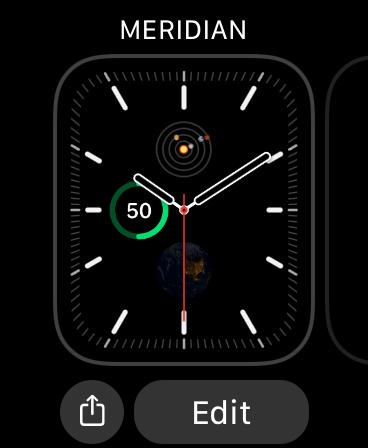
Now click edit to show the face editor. Then swipe across on the face until the complication editor for the face appears:

Next click one of the slots to show the complication picker. Click WhatsNext to select it:

Now click the Digital Crown twice to return to the Home screen. Your complication will appear showing the time until next appointment in your list:

Click the complication to show the running Watch app. Neat! :]
You've seen a couple of different complication types. Now it's time to learn about some more.
Making More Complications
So far, you've learned how to preview your complications and use them in a real watchOS app. Now it's time to play with larger complications that provide more space.
Reacting to a Rectangle
The first template you'll create in this section is CLKComplicationTemplateGraphicRectangularFullView.
Open ComplicationViews.swift and add this above ComplicationViews_Previews:
struct ComplicationViewRectangular: View {
  @State var appointment: Appointment

  var body: some View {
    HStack(spacing: 10) {
      ComplicationViewCircular(appointment: appointment)
      VStack(alignment: .leading) {
        Text(appointment.name)
          .font(.title)
          // 1
          .minimumScaleFactor(0.4)
          .lineLimit(2)
          .multilineTextAlignment(.leading)
        HStack(spacing: 4.0) {
          Spacer()
          Text("at")
          // 2
          Text(appointment.date, style: .time)
        }
        .font(.footnote)
        // 3
        .complicationForeground()
      }
    }
    .padding()
    .background(
      RoundedRectangle(cornerRadius: 10.0)
        .stroke(lineWidth: 1.5)
        .foregroundColor(appointment.tag.color.color)
        .complicationForeground())
  }
}
This View is a composition of ComplicationViewCircular and some text. There are a few interesting things to note:
- You use
minimumScaleFactorandlineLimitto control how the title text shrinks to fit content. - Notice the
Text(appointment.date, style: .time). Here you use one of the built-in time formatter types to display the time at which the appointment occurs. You'll explore other formatter types soon. - You use
.complicationForeground()to provide display hints that you learned about earlier.
Now add these two previews to the Group in ComplicationViews_Previews:
CLKComplicationTemplateGraphicRectangularFullView(
  ComplicationViewRectangular(
    appointment: Appointment.dummyData()[2])
).previewContext()
CLKComplicationTemplateGraphicRectangularFullView(
  ComplicationViewRectangular(
    appointment: Appointment.oneDummy(offset: Appointment.oneHour * 0.25))
).previewContext(faceColor: .orange)
This adds previews for the tinted and full color versions at the same time:
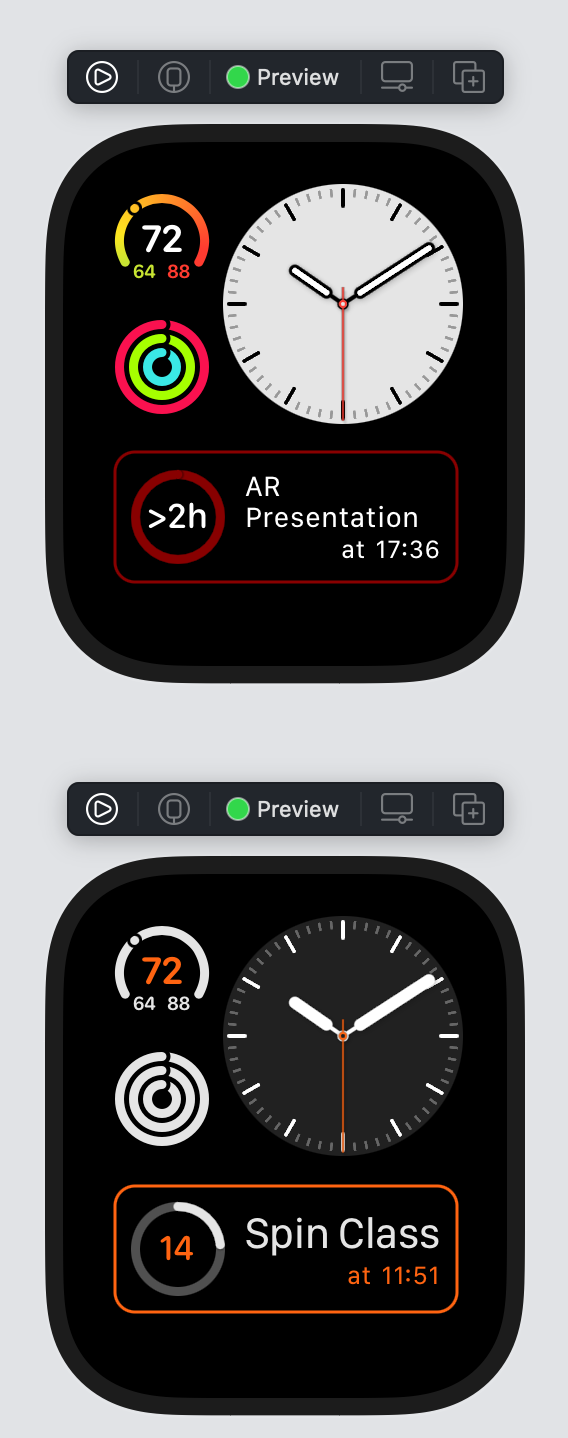
That was pretty quick, right? Once again, you can see the power of SwiftUI.
Circling a Problem
Are you thinking how easy this is? What's the catch?
The catch is that there are things you shouldn't put in a SwiftUI based complication. You'll explore the topic of forbidden items as you build your final SwiftUI based complication for CLKComplicationTemplateGraphicExtraLargeCircularView.
First, inside ComplicationViews.swift, add the following above ComplicationViewCircular:
// 1
struct CircularProgressArc: Shape {
  @State var progress: Double = 0.5

  func path(in rect: CGRect) -> Path {
    var path = Path()
    let limit = 0.99
    let halfarc: Double = max(0.01, min(progress, limit)) * 180.0
    path.addArc(
      center: CGPoint(x: rect.midX, y: rect.midY),
      radius: rect.width / 2,
      startAngle: .degrees(90 - halfarc),
      endAngle: .degrees(90 + halfarc),
      clockwise: true)
    return path
  }
}

// 2
struct ProgressArc<S>: ProgressViewStyle where S: ShapeStyle {
  // 3
  var strokeContent: S
  var strokeStyle: StrokeStyle

  init(
    _ strokeContent: S,
    strokeStyle style: StrokeStyle =
      StrokeStyle(lineWidth: 10.0, lineCap: .round)
  ) {
    self.strokeContent = strokeContent
    self.strokeStyle = style
  }

  // 4
  func makeBody(configuration: Configuration) -> some View {
    CircularProgressArc(progress: configuration.fractionCompleted ?? 0.0)
      .stroke(strokeContent, style: strokeStyle)
      .shadow(radius: 5.0)
  }
}
Here's what this code does:
- Create a
Shapeobject which can be used to draw an arc retreating from both sides of the bottom of a circle. - Create a custom
ProgressViewStylewhich can be applied to aProgressViewinstance to style it however you wish. - There are two properties on this object. The
strokeContentis anyShapeStyleand will be used to stroke the progress. This could be aColorfor example. ThestokeStyleindicates the style of stroke, e.g. the width of the line. - The
makeBody(configuration:)call returns an instance ofCircularProgressArcyou created above to tell theProgressViewhow to draw itself.
Next, add this code above ComplicationViews_Previews:
struct ComplicationViewExtraLargeCircular: View {
  // 1
  @State var appointment: Appointment

  var body: some View {
    // 2
    ZStack(alignment: .center) {
      // 3
      Circle()
        .foregroundColor(appointment.tag.color.color)
      ProgressView(
        value: appointment.rationalizedFractionCompleted())
        .progressViewStyle(ProgressArc(Color.white))
        .complicationForeground()

      // 4
      ScrollView {
        VStack(alignment: .center, spacing: 3.0) {
          // 5
          Text("In \(Text(appointment.date, style: .relative))")
            .font(.footnote)
            .minimumScaleFactor(0.4)
            .lineLimit(2)
          Text(appointment.name)
            .font(.headline)
            .minimumScaleFactor(0.4)
            .lineLimit(2)
          Text("at \(Text(appointment.date, style: .time))")
            .font(.footnote)
        }
        .multilineTextAlignment(.center)
        .foregroundColor(.black)
        .complicationForeground()
      }
    }
    .padding([.leading, .trailing], 5)
  }
}
This code adds another view to the collection you're growing. In this one:
- Once again the
Appointmentis state for the view. - There is a
ZStackagain to arrange all the items in a stack, containing: - A
Circleand aProgressView. TheProgressViewhas the style applied to it which you created just now. - A
ScrollViewwhich has in it aVStackwith the information about the appointment
Almost done. Add these two views to the Group in ComplicationViews_Previews:
CLKComplicationTemplateGraphicExtraLargeCircularView(
  ComplicationViewExtraLargeCircular(
    appointment: Appointment.oneDummy(offset: Appointment.oneHour * 0.2))
).previewContext()
CLKComplicationTemplateGraphicExtraLargeCircularView(
  ComplicationViewExtraLargeCircular(
    appointment: Appointment.dummyData()[2])
).previewContext(faceColor: .blue)
Resume your canvas. Notice that you can't see the complication even though you can see the two new faces, and the code builds without error. Curious! You'll find out why next.
