Complications for watchOS With SwiftUI
Learn how to create complications in SwiftUI that will accelerate your development productivity, provide delightful glanceable displays and give your users a single-tap entry point to launch your watchOS app. By Warren Burton.
Previewing the complication
Now, ensure the Scheme is still set to use a Watch simulator. If you’ve it set to a phone simulator the canvas, won’t load:

Display and resume the SwiftUI canvas to see some minor magic courtesy of Xcode 12. This might take a while on the first build.
You can see a yellow-tinted progress view with 29 minutes until the next appointment. The progress is calculated against a value of 60 minutes.
Now, in ComplicationViews_Previews locate:
Appointment.oneDummy(offset: Appointment.oneHour * 0.5)
Change the declaration to:
Appointment.oneDummy(offset: Appointment.oneHour * 2)
You’ll see the preview change to this:

This is the power of the SwiftUI canvas brought to watchOS development. You get instant results for your changes.
The next step in your tour of complications is to take a look at another family of complications, one that you actually saw earlier in the tutorial.
Corner Circular Complications
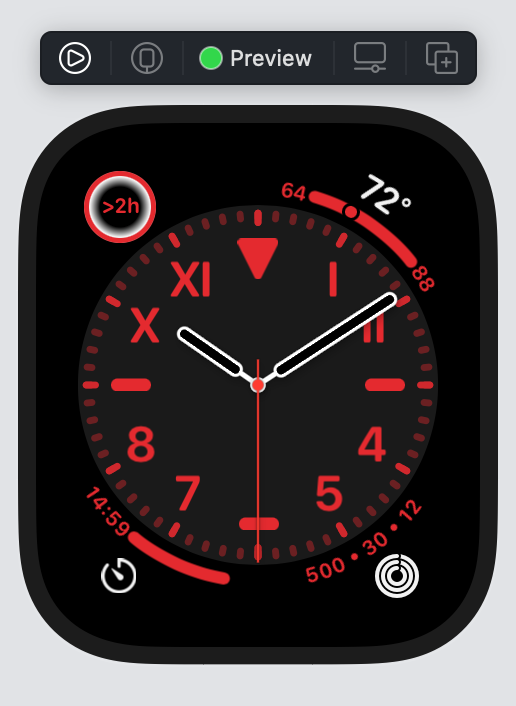
Now you’re going to look at the CLKComplicationTemplateGraphicCornerCircularView template. This template is used for the four corners of the watch face that you saw earlier, i.e. this one:

The interesting thing about this one is that they can be a tinted with a color. In this section, you’ll learn how to adjust your views to cope with this tinted rendering environment.
In ComplicationViews.swift, add this code underneath the ComplicationViewCircular struct:
// 1
struct ComplicationViewCornerCircular: View {
  // 2
  @State var appointment: Appointment

  var body: some View {
    // 3
    ZStack {
      Circle()
        .fill(Color.white)
      Text("\(appointment.rationalizedTimeUntil())")
        .foregroundColor(Color.black)
      Circle()
        .stroke(appointment.tag.color.color, lineWidth: 5)
    }
  }
}
Here’s what that code does:
- Create a new view specifically for this type of complication.
- Again, you will need the appointment to be passed in.
- The view is a
ZStackwith a circle that’s filled white at the bottom, followed by text showing the time until the appointment is due, followed by a circle which is stroked with the appointment’s color.
Next, add this code inside the Group of ComplicationViews_Previews:
CLKComplicationTemplateGraphicCornerCircularView(
  ComplicationViewCornerCircular(
    appointment: Appointment.dummyData()[1])
).previewContext(faceColor: .red)
You now have a Group with two template declarations inside.
You’ve instantiated CLKComplicationTemplateGraphicCornerCircularView. Again, this template takes one View as an argument. Now the previewContext has a faceColor.
Resume the canvas if needed. Now you have two different watch faces on display. The lower one is a red tinted face with your complication at top left:

Huh. You set the color of the stroked circle to be the appointment’s color! But here it’s showing as gray! What’s going on?! We need that color back.
Bringing the Color Back
In this complication family, watchOS takes the grayscale value of any colors to represent them in a tinted environment. You can see your complication has a washed-out quality. How can you add some pop back into the view?
When the system tints the image, you need to distinguish the foreground and background. You can provide a tint as a SwiftUI view-modifier.
Find the body property in ComplicationViewCornerCircular and replace the ZStack with:
ZStack {
  Circle()
    .fill(Color.white)
  Text("\(appointment.rationalizedTimeUntil())")
    .foregroundColor(Color.black)
    .complicationForeground()
  Circle()
    .stroke(appointment.tag.color.color, lineWidth: 5)
    .complicationForeground()
}
You have added complicationForeground() view-modifier to the Text and second Circle instances. This makes watchOS consider these views as foreground elements and, therefore, tint them with the face color. Resume the canvas and you’ll see the result:

Now that you know about tinting a complication based on the watch face’s tint color, it’s time to learn a bit about how you can handle complications when they might be used in both a tinted environment and a full-color environment.
Using the Runtime Rendering State
What happens when you want to render your complication different ways for a tinted face and a full-color face. Well, you can ask EnvironmentValues for the current state.
Add this code to ComplicationViewCornerCircular below @State var appointment: Appointment:
@Environment(\.complicationRenderingMode) var renderingMode
ClockKit declares ComplicationRenderingMode and has two values: .tinted and .fullColor. You can use these values to choose a rendering style.
In ComplicationViewCornerCircular locate the first Circle in the ZStack:
Circle()
  .fill(Color.white)
Then replace that code with this switch statement:
switch renderingMode {
case .fullColor:
  Circle()
    .fill(Color.white)
case .tinted:
  Circle()
    .fill(
      RadialGradient(
        gradient: Gradient(colors: [.clear, .white]),
        center: .center,
        startRadius: 10,
        endRadius: 15))
@unknown default:
  Circle()
    .fill(Color.white)
}
Finally, add this code to the Group in ComplicationViews_Previews:
CLKComplicationTemplateGraphicCornerCircularView(
  ComplicationViewCornerCircular(
    appointment: Appointment.oneDummy(offset: Appointment.oneHour * 3.0))
).previewContext()
Now you have a third face in your canvas previews that displays the full-color version of the complication.
Resume the canvas. You’ll see that .tinted uses a RadialGradient:
While for .fullColor you see the original white fill:
Now you know the basics of creating SwiftUI based complications. To summarize:
- Create a SwiftUI
View. - Place that
Viewin aCLKComplicationTemplate. - Profit?
You’ve learned how to show a preview of your complication in the canvas. You’ll create more complications later, but now it’s time to find out how to use your complications in a running app.
Working With the Complication Data Source
Open ComplicationController.swift. This is a CLKComplicationDataSource, which vends instances of CLKComplicationTemplate to watchOS on demand.
Like most data source patterns, there are questions asked of the data source:
- What’s the time of the last known event?
- What’s happening right now?
- And what’s going to happen in the future?
It’s your job to answer those questions!
You answer the first question, What’s the time of the last known event?, in getTimelineEndDate(for:withHandler:).
First, add this property at the top of ComplicationController:
let dataController = AppointmentData(appointments: Appointment.dummyData())
AppointmentData acts as a manager for your list of Appointment objects.
Then, replace everything inside getTimelineEndDate(for:withHandler:) with:
handler(dataController.orderedAppointments.last?.date)
You supply the date of the last Appointment on your list.
Next, you answer the question What’s happening right now? in getCurrentTimelineEntry(for:withHandler:). But first, you need to set up a little help.
Add this import to the top of ComplicationController.swift:
import SwiftUI
Then add this extension to the end of the file:
extension ComplicationController {
  func makeTemplate(
    for appointment: Appointment,
    complication: CLKComplication
  ) -> CLKComplicationTemplate? {
    switch complication.family {
    case .graphicCircular:
      return CLKComplicationTemplateGraphicCircularView(
        ComplicationViewCircular(appointment: appointment))
    case .graphicCorner:
      return CLKComplicationTemplateGraphicCornerCircularView(
        ComplicationViewCornerCircular(appointment: appointment))
    default:
      return nil
    }
  }
}
In this method, you supply the correct template based on the CLKComplicationFamily of the CLKComplication requesting a template. For now, there’s only the two you created earlier, but you’ll add more to this method later.
Now, head to getCurrentTimelineEntry(for:withHandler:). Replace the supplied code inside with:
if let next = dataController.nextAppointment(from: Date()),
  let template = makeTemplate(for: next, complication: complication) {
  let entry = CLKComplicationTimelineEntry(
    date: next.date,
    complicationTemplate: template)
  handler(entry)
} else {
  handler(nil)
}
Here you construct a CLKComplicationTimelineEntry for the current event which represents a single moment along the timeline of things happening in your app.
Each event in your app may have a corresponding CLKComplicationTimelineEntry object with a template.