Complications for watchOS With SwiftUI
Learn how to create complications in SwiftUI that will accelerate your development productivity, provide delightful glanceable displays and give your users a single-tap entry point to launch your watchOS app. By Warren Burton.
Users can interact with an Apple Watch in many ways. Some of these interactions are haptic signals, like using a short tap on the wrist to signal an event. Other interactions are more complex involving a few taps from the wearer.
Say you start a run, get 100 feet down the road and then remember to start a workout. Without a paired phone to power Siri, you need to click the Digital Crown, find the Workout app, choose the Outdoor Run workout and then start a workout. Although that’s only a few seconds of effort, it can feel cumbersome.
That’s where complications come in. With complications, you can give watch wearers a shortcut to their most-used apps.
In this tutorial, you’ll learn about:
- What watchOS complications are.
- Complications that use SwiftUI.
- Using SwiftUI previews to quickly iterate on complications.
- Controlling complications that are tinted by the watch face’s tint color.
- Providing real data to complications.
- Complications that use providers.
Getting Started
Use the Download Materials link at the top or bottom of the tutorial to get the starter project. WhatsNext is a scheduling app that tells you how much time you have left until your next event.
The app already has an associated Watch app. In this tutorial, you’ll add some complications to the Watch app.
Unzip the archive and open the starter folder. Then open the Xcode project WhatsNext.xcodeproj:

The starter project has a data model which consists of the struct Appointment and a manager class AppointmentData. Appointment supplies a list of dummy data in dummyData(). Feel free to change the data or add new items.
First, select the iOS Simulator you want to use. Choose iPhone 12 Pro Max from the target selector:
![]()
In the Project navigator, locate WhatsNext ▸ Views. You’ll find the beginnings of the UI for the app. There’s not much here except a simple ListView in AppointmentList but that’s enough to work with for now.
Open ContentView.swift. Then open the SwiftUI canvas with the control on the top-right or the key combination Command-Option-Return:
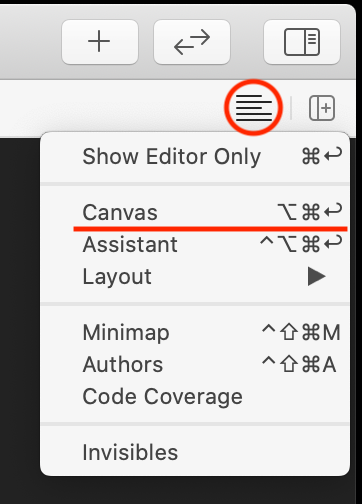
Your canvas is paused. Click Resume at the top of the canvas to tell the preview to reload. Alternatively, you can use the key combination Command-Option-P:

In a short amount of time, the preview appears:

Now select the simulator you’ll use for the Watch app. Use the scheme WhatsNextWatch and Apple Watch Series 6 – 44mm simulator.

In the Project navigator, locate WhatsNextWatch Extension and select ContentView.swift. Like you did just now for the main app, resume the canvas and you’ll see the preview:
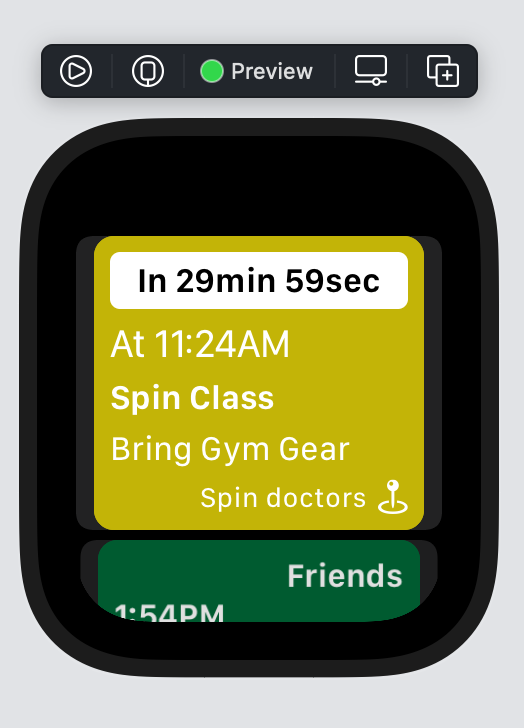
The two apps look similar on both iOS and watchOS. They both use the same View code with a small tweak to font size between the two platforms. SwiftUI lets you easily unify your UI design across platforms.
Creating Complications
Before Xcode 12, creating a complication involved enduring a long Change/Build/Test cycle. Now you can use the SwiftUI canvas to preview your complications.
In this section, you’ll create some complications using SwiftUI. But first, there’s a little background to cover.
What is a Complication
A complication lives on your watch’s home screen, displays a small amount of information and provides direct access to your Watch app with a tap.
For example, on the Solar Dial face below there are four complications. Clockwise from top left:
- Timer: You don’t want to melt the coffee machine again.
- Date: What day is it really? Who can tell?
- Dawn Patrol: So you know the best time for a surf.
- Temperature: The cats aren’t kidding when they ask you to put the fire on.

When you create a watch app, you need to think about what interactions you want your customers to have with their watches. What does your app do and how does it apply to the concepts of state change or the flow of time?
There are different types of complications, grouped into families. Take a look at those now.
Complication Families
Complications are arranged into families. There is an enumeration called CLKComplicationFamily which collates these families. A family describes where on the Home screen, and how big, a complication appears. It’s your job, or your designer’s job, to create complications that use the available space well.
You might decide to have a complication for multiple different families. For example, observe the Dawn Patrol complication in a Graphic Corner context at bottom right:
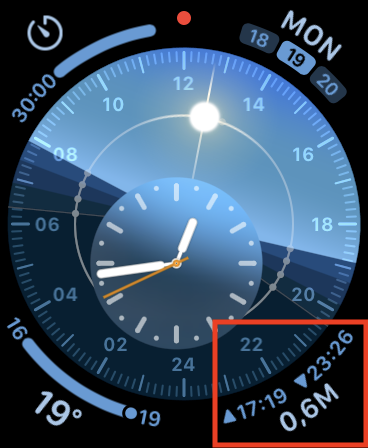
That’s an effective use of space. It shows high/low tide times and current tide. Now observe the same app in a Modular Large position:

There’s a lot more space to use, which gives you some graphic freedom. In this case, you get a graph!
Theory done, time to complicate things with some coding!
Creating a SwiftUI Complication
To make iteration quick and easy, you’ll use the SwiftUI preview canvas to represent the Appointment data from the app as complications. You’ll already be familiar with this process if you’ve written iOS or macOS apps using SwiftUI.
In the Project navigator, select and expand WhatsNextWatch Extension. Use the key combination Command-N to create a new file in that group. Select SwiftUI View from the template window and then click Next:

Name the file ComplicationViews and ensure it’s added to the WhatsNextWatch Extension target. Then click Create to complete adding the file:

In ComplicationViews.swift, add this module import below import SwiftUI:
import ClockKit
You need both of these modules to build complications and display them as a preview.
Then insert this code below the definition of ComplicationViews:
// 1
struct ComplicationViewCircular: View {
  // 2
  @State var appointment: Appointment

  var body: some View {
    // 3
    ZStack {
      ProgressView(
        "\(appointment.rationalizedTimeUntil())",
        value: (1.0 - appointment.rationalizedFractionCompleted()),
        total: 1.0)
        .progressViewStyle(
          CircularProgressViewStyle(tint: appointment.tag.color.color))
    }
  }
}
Here’s what that code does:
- Define a new struct which will be your circular complication.
- Pass in an
Appointmentinstance, which is state for the view, since the view will display information about the appointment. - The body of the complication is simple a
ZStackwith aProgressViewwhich uses the appointment values to set it up.
Now, locate ComplicationViews_Previews at the bottom of the file. Replace the body of var previews with:
// 1
Group {
  // 2
  CLKComplicationTemplateGraphicCircularView(
    ComplicationViewCircular(
      appointment: Appointment.oneDummy(offset: Appointment.oneHour * 0.5)
    )
  // 3
  ).previewContext()
}
While this is only a few lines of code, it does lot of heavy lifting:
- You construct a
Groupso you can present many previews at once later. - Then, you instantiate a
CLKComplicationTemplateGraphicCircularView. Templates are a declarative way of specifying the complication’s view. This template takes one argument which is aView. In your case, an instance ofComplicationViewCircularwhich you just added, created with a dummy appointment. - Most importantly, you ask the template for a
previewContext. This displays the watch face that’s appropriate to the template.
That is the complicated part (pun intended), now it’s time to preview it.