Physics Joints in Unity 2D
In this tutorial, you will learn about various physics joints available to you in Unity 2D. By Pedro Pereira & Orlando Pereira.
Slider Joint 2D
Slider joints restrict an object’s movement along a line in space. In this section, you will use the hinge joint you just created to start another object moving along a slider joint.
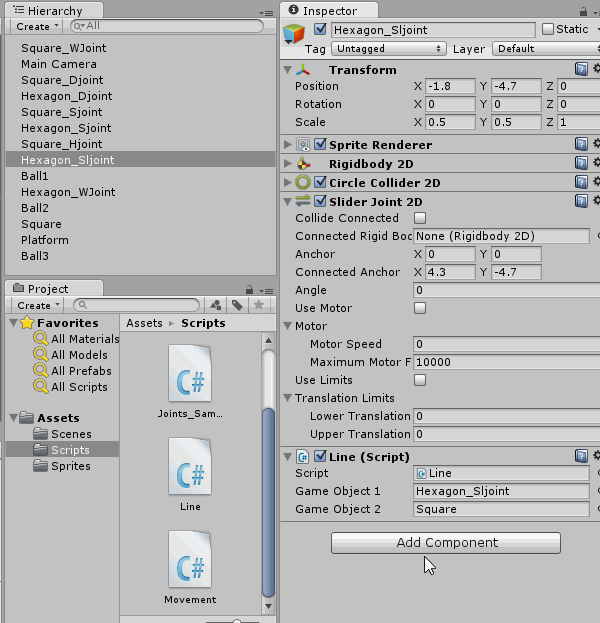
Select Hexagon_Sljoint in the Hierarchy and add a Slider Joint 2D component to it:
The fields available in the Slider Joint 2D component are similar to those you saw in the hinge joint, but with a few semantic changes. Because slider joints deal in linear, rather than angular, motion, Motor Speed is measured in units per second. Likewise, instead of angle limits, you can specify translation limits. Translation limits work the same way as angle limits, except they specify the distance the Rigidbody can be from the Connected Anchor point:

Leave Connected Rigidbody empty and set Connected Anchor‘s X value to 4.3 and its Y value to -4.7:

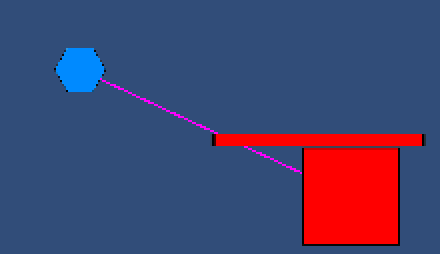
You can see the path described by the joint in the Scene view as shown below:

The one completely new field you see is Angle; this sets the angle between the Anchor point and the Connected Anchor point. The GameObject with the slider joint will reposition itself at runtime to match this angle.
Set the Angle to -45. You’ll notice a small green line in the scene view will replicate that angle.

Now, run your game. You’ll see that instead the joint is now positioned at a forty five degree angle.
Since you want Hexagon_Sljoint to move to the right of where it starts in the scene, set the Angle back to 0.
In order to see the joint’s path at runtime, add the Line script to Hexagon_Sljoint, set its Game Object 1 field to Hexagon_Sljoint and its Game Object 2 field to Square:

Play your scene; drop some balls on the hinged platform from the previous section. The platform should spin and bump into Hexagon_Sljoint, which will then slide along the path defined by the joint. The hexagon will move at different speeds depending on how fast you make the platform spin:
While you can make rotating objects with hinge joints, you’ll want to use a wheel joint to simulate things such as the wheels on a car.
Wheel Joint 2D
Wheel Joint 2d is the final joint you’ll explore in this tutorial; it simulates a rolling wheel you can connect to another object, complete with a suspension spring to provide some “give” between the wheel and its other anchor point.
This joint exists primarily to simulate the wheels of vehicles. However, in this example you’ll keep it simple and just use it to create a rotating platform.
Add a Wheel Joint 2D component to the Square_WJoint:
Most of this component’s fields should look familiar. One difference is that you shouldn’t leave Connected Rigid Body unset; Unity won’t complain if you do, but the wheel joint won’t do anything in that case.

To anchor your platform in the scene, set Connected Rigid Body to Hexagon_WJoint:

The Suspension section is unique to wheel joints. It includes three fields: Damping Ratio, Frequency and Angle. The first two work just like they did in Spring Joint 2D, while Angle works as it did in Slider Joint 2D.
These three properties work together to describe a spring that keeps the wheel separate from its anchor vehicle and oriented in a specific direction.
Play the scene; drop one of the balls over Square_Wjoint, near the center of the platform. You should see the platform move down and bounce back up along with its spinning motion — the end result of the Suspension settings:

To see the Wheel Joint really in action, create a new Scene by selecting File \ New Scene.
From the Sprites folder, drag a square into the Scene view. Set the Transform position to: (-3.6, -7.72, 0). Set the Scale to (14.43, 6.50, 1).
Click the Add Component button and give it a Box Collider 2D component. Set the Size to X: 2.29, Y: 2.31

Give it the name: Ground. It should look like the following:

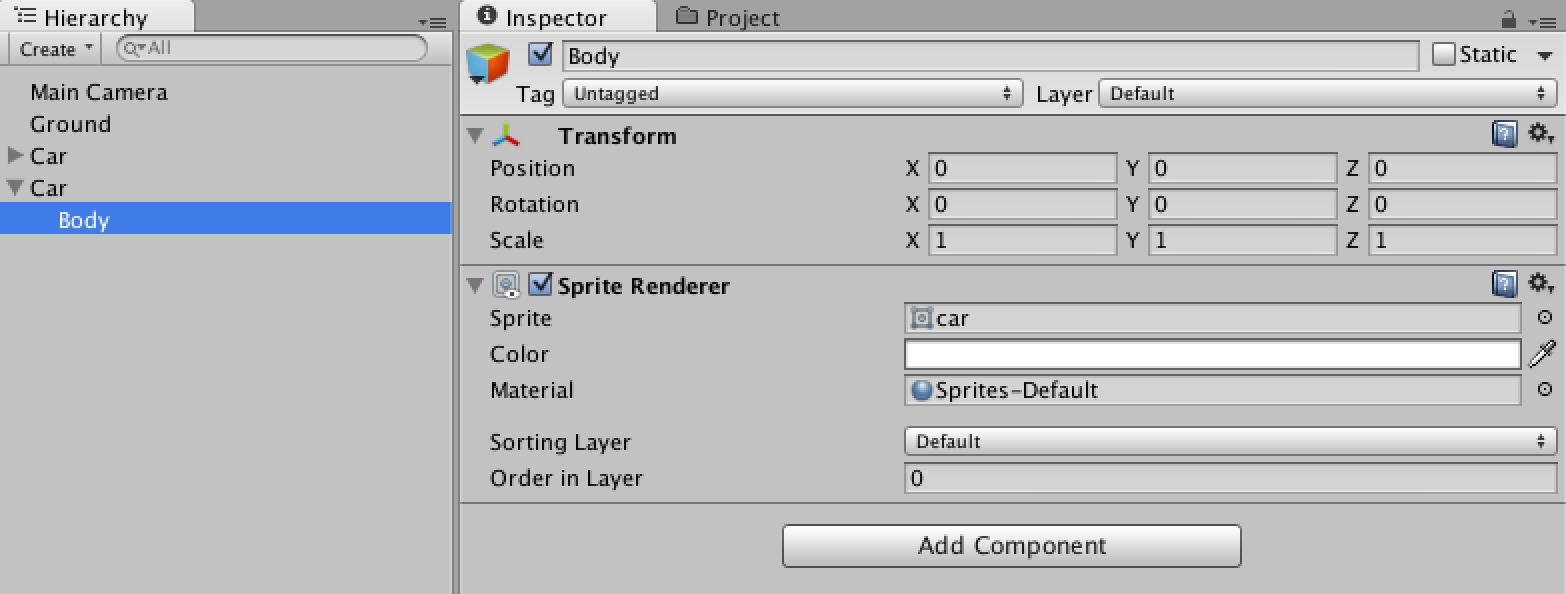
Create a new Empty GameObject. Call it Car. Set the position to: (6.4,1.13,0).

From the Sprite folder, drag the Car sprite from the Sprites folder and into the Car GameObject. Give it the name: Body. Set the transform to be: (0, 0, 0)
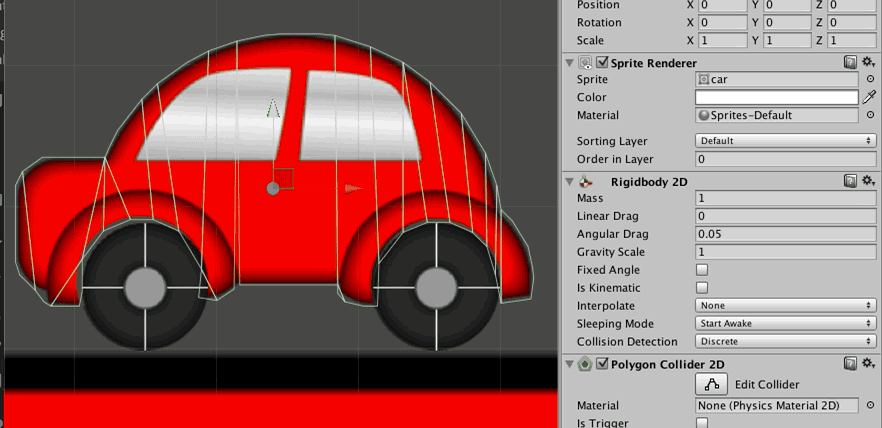
From the Sprite folder, drag the Wheel sprite from the Sprites folder and into the Car GameObject.Do the same for both the wheels, positioning them in the empty wheel wells. Call them: FrontWheel and BackWheel.

Next, add Rigidbody 2D components on the Body, Front Wheel, and BackWheel. With your Rigidbodies in place, add a Circle Collider 2D to the FrontWheel and BackWheel. Add a Polygon Collider 2D to the Body.
When you select the Car GameObject, your colliders will look like the following:

Next, select the Body in the Inspector, and click the Edit Collider button.

Drag the polygon collider around the wheel wells so that the wheels won’t collider with them.
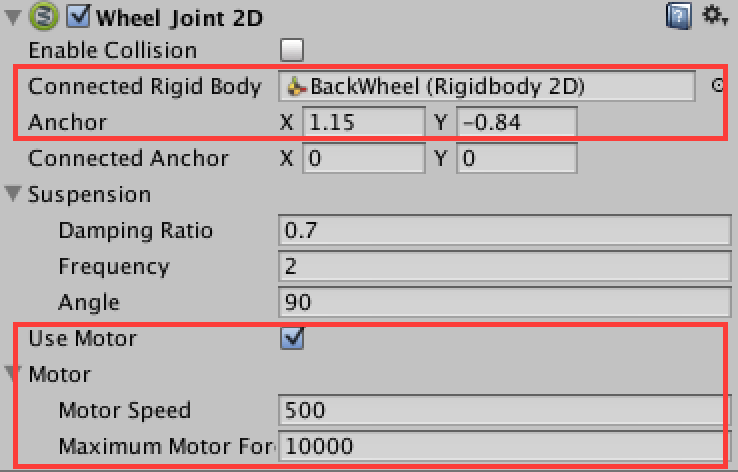
Select the Body in the Inspector. Add a Wheel Joint 2D to it. In the Connected Rigid Body property, add the FrontWheel. In the Anchor property, set X:-0.98 Y:-0.78. Check the Use Motor checkbox and set the Motor Speed to 500.

With the Body still selected. Add another Wheel Joint 2D to it. In the Connected Rigid Body property, add the BackWheel. In the Anchor property, set X:1.15 Y:-0.84. Check the Use Motor checkbox and set the Motor Speed to 500.
With your engine ready to go, play your scene. You’ll see your car take a ride!

Where to Go From Here?
You can download a copy of the completed project here.
We hope you enjoyed this tutorial about 2D joints! If you’d like to learn more about Unity’s 2D joints, we suggest you check out the following resources:
- The 2D Physics Reference in the Unity Manual.
- The 2D section of Unity’s tutorial section, which includes video tutorials on some of the 2D joints covered in this tutorial.
If you have any comments or questions on this tutorial, feel free to join the discussion in the forums below!