Physics Joints in Unity 2D
In this tutorial, you will learn about various physics joints available to you in Unity 2D. By Pedro Pereira & Orlando Pereira.
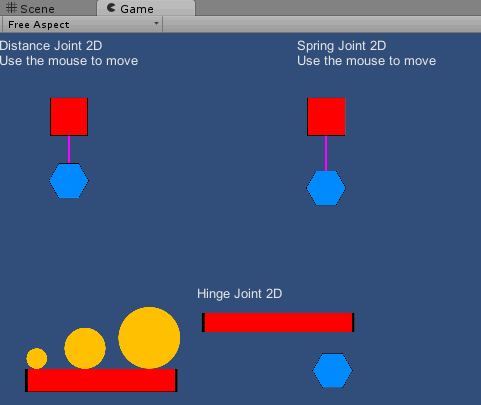
Spring Joint 2D
The Spring Joint 2D works in a similar way to distance joints. However, while distance joints enforce a fixed distance, spring joints apply tension to a connection, causing objects to bounce as if connected by, well, a spring! :]
To see how they work, select Hexagon_Sjoint in the Hierarchy and add a Spring Joint 2D component to it like so:
As you can see, this new component has several parameters that you can adjust:

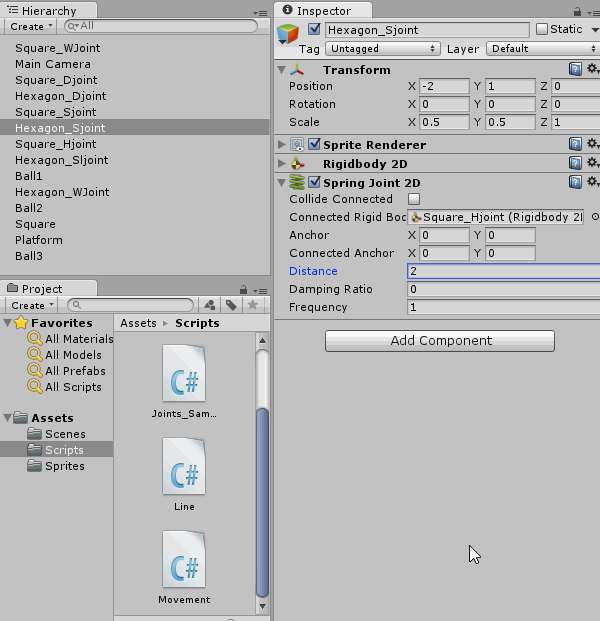
Spring Joint 2D has several fields in common with Distance Joint 2D: Enable Collision, Connected Rigid Body, Anchor and Connected Anchor all work exactly the same way for springs as they do for distance joints, so there’s no need to re-explain these.
Before covering the other fields, first connect Square_Sjoint to the spring by dragging it from the Hierarchy tab and dropping it over the Connected Rigid Body field:

Just like Distance Joint 2D, Spring Joint 2D contains a Distance field that specifies the distance the spring should try to maintain between the two objects. However, while distance joints strictly enforce this distance, spring joints bounce back and forth around this distance, gradually coming to a stop at the specified value.
Set Distance to 2:

The Damping Ratio specifies the degree of suppression for the spring oscillation. In other words, it determines how quickly the objects connected by the spring will come to a rest. Its value ranges from 0 to 1, with 0 being the slowest and 1 being the fastest. You’ll want to play around with this value to get the best result in your games, but for now, leave it at 0 to get a very bouncy spring.
Frequency indicates the frequency at which the spring oscillates in cycles per second; in other words, the number of times the spring bounces each second. This value should be higher than zero, where zero means the spring starts out at rest. Lower values produce stretchier springs and higher values produce tighter ones.
Frequency and Damping Ratio work together to produce the spring’s final behavior. You’ll usually need to tweak each of these quite a bit to get the perfect result for your game.
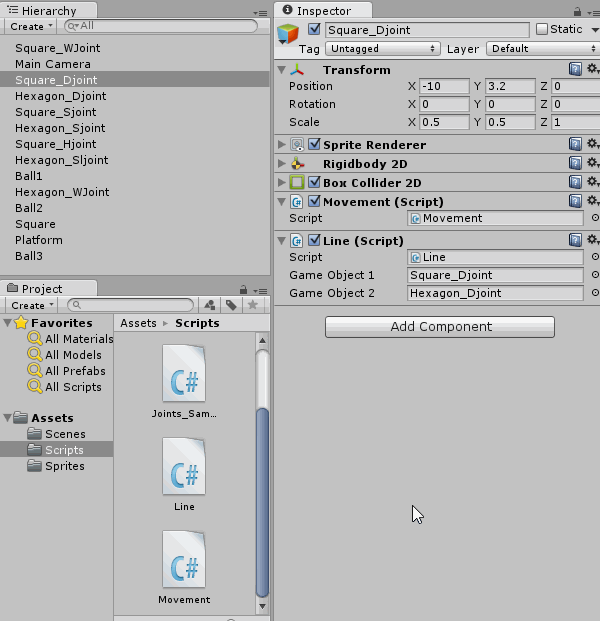
Once again, you’ll add mouse interaction and a line renderer to help see how this joint works. Add the Movement and Line scripts to Square_Sjoint. Make sure to set Game Object 1 and Game Object 2 references on the Line (Script) component to Square_Sjoint and Hexagon_Sjoint:
Play your scene; drag Square_Sjoint around the scene and give your spring a good workout:

Play around with the different values in both the Frequency and the Dampening values to get an idea of how the spring moves.
While the distance and spring joints are similar to each other, the next one — Hinge Joint — is quite different.
Hinge Joint 2D
The Hinge Joint 2D is slightly different from the last two. This specific joint lets a GameObject with a Rigidbody rotate around a fixed point. The joint calculates the correct rotation for the object when a force affects the object’s Rigidbody, meaning no additional script or code is needed. As you’ll soon see, hinge joints provide several configuration options so you can create various moving bodies such as doors, weight-triggered trap doors, water wheels and more.
In this example, you’ll make Square_Hjoint (which is actually a rectangle) rotate when you put some weight on it.
Select the Square_Hjoint and add a Hinge Joint 2D component to it:

This component contains quite a few new fields, along with some old favorites:

Once again, there’s Collide Connected, Connected Rigidbody, Anchor and Connected Anchor. These fields all work the same way as before.
This time, leave the Connected Ridigbody field empty to connect the joint to a point in space. Recall that when Connected Rigidbody is empty, the Connected Anchor coordinates are in the scene’s coordinate system. That means the default coordinates (0, 0) aren’t correct in this case.
Instead, place the anchor on the center of the rectangle by changing the Connected Anchor‘s X and Y values to -3.5 and -3.2, respectively:

The next parameters are specific to Hinge Joint 2D. Checking Use Motor makes the physics engine apply a constant force to rotate the joint in an effort to reach the specified speed. I say “in an effort”, because the Rigidbody might have other forces acting on it that speed up or slow down the rotation.
You specify the motor’s target speed in the Motor Speed field as a value in degrees per second. The motor will try to maintain this speed by applying torque to the joint. You can specify the maximum torque the motor may apply using the Maximum Motor Force field. The higher this value, the more the motor will resist external forces that might try to stop the rotation.
The Use Limits enables or disables rotation limits, which restricts the joint’s rotation between the specified Lower Angle and Upper Angle values.
In this example, you don’t want the platform to spin around in circles, so enable Use Limits and set Lower Angle to -245 and Upper Angle to 0.5:

The Scene view shows the extents of the joint’s rotation:

The balls in the scene already respond to gravity and re-spawn at their original position when they fall from the scene, as demonstrated below:
Play your scene; drag one of the balls and drop it over the Square_Hjoint to see how the platform rotates:

Try the same thing with the different balls in the scene; notice how bigger balls increase the speed of rotation. That’s because the three balls in the scene were each created with a different mass — this demonstrates how the hinge rotates differently based on the force applied.
To see the motor in action, select the Square_Hjoint in the Hierarchy and in the Inspector, check the
Run your game. Now you’ll get movement without needing to anything. Congratulations! You defied physics and created a perpetual motion machine!

Uncheck Use Motor and check Use Limits for the rest of this tutorial.
Now that your platform spins, you’ll add a slider joint to create some more physics-based interaction.