Pathfinding With NavMesh: Getting Started
Characters in a game often need to navigate around obstacles in the level. Because this is such a common situation in games, Unity provides a built-in pathfinding solution, called NavMesh. In this tutorial, you’ll implement point-and-click movement using NavMesh. By Joseph Hocking.
Sign up/Sign in
With a free Kodeco account you can download source code, track your progress, bookmark, personalise your learner profile and more!
Create accountAlready a member of Kodeco? Sign in
Sign up/Sign in
With a free Kodeco account you can download source code, track your progress, bookmark, personalise your learner profile and more!
Create accountAlready a member of Kodeco? Sign in
Sign up/Sign in
With a free Kodeco account you can download source code, track your progress, bookmark, personalise your learner profile and more!
Create accountAlready a member of Kodeco? Sign in
Contents
Pathfinding With NavMesh: Getting Started
15 mins
- Pathfinding in Games
- A* (or A-star)
- Navigation Meshes
- Getting Started
- Generating the NavMesh
- Understanding NavMeshSurface
- Tuning the NavMesh with Layers
- Removing an Object from the NavMesh
- Moving a Character
- Setting Up the NavMeshAgent Component
- Setting the NavMeshAgent’s Destination
- Refining the Navigation Mesh
- Assigning Navigation Areas
- Where to Go From Here?
Characters in a game often must find their way around obstacles. Think about baddies trying to follow the player in a maze. The technical term for this problem is pathfinding. This is where the computer needs to calculate a path for the characters to move along. Because this situation arises often in games, Unity provides a built-in pathfinding solution, called NavMesh.
In this tutorial, you’ll learn:
-
- Pathfinding approaches that games use
- How to use NavMesh, Unity’s pathfinding tech
- Ways to tweak or customize NavMesh navigation
To get some hands-on practice, you’ll implement point-and-click movement using Unity’s NavMesh pathfinding. Download the project files at the top or bottom of this tutorial by clicking the Download Materials button. The sample project uses Unity 2020.1.17 and provides a sample scene, so you can concentrate on the pathfinding functionality.
Pathfinding in Games
AI characters in games often must find the best path to take to reach their destination. You can choose from several algorithms for pathfinding, but A* is a great choice in all but a few specialized situations.
A* (or A-star)
The A* algorithm is commonly employed for pathfinding in all sorts of computing environments — it’s not specific to Unity. There’s even an A* article on this site, which discusses the algorithm in the context of iOS development. For a deeper look, this article offers an illustrated, interactive guide to the algorithm. This one explains the steps independent of any particular tech stack.
This tutorial won’t explain A* in detail right here because, well, you can read those excellent explanations. Instead, it’s right on to Unity’s pathfinding approach!
Navigation Meshes
The A* articles mentioned earlier discuss pathfinding on a grid of squares, but the algorithm does not require a map like that. A* can work with other shapes, too! All the algorithm needs is a graph of connected nodes, and a grid of squares is merely one such graph. You can even use A* with maps of the real world: The intersections of roads are nodes, and roads are the connections between nodes.
Games often represent the pathfinding graph with a mesh. That is, just like a 3D model, the graph used for pathfinding can be represented with vertices connected by edges. A mesh like this is called a Navigation Mesh, so Unity’s tech for this has the abbreviated name NavMesh.
Unity has basic NavMesh functionality built-in, but it provides more robust mesh generation and pathfinding through an open-source project called NavMesh Components. When you set up your own projects, you can download these components from that GitHub repository. But they are already included in the starter project. Now, it’s time to go over how to use these components!
Getting Started
To get the hang of using NavMesh components, you’ll develop a simple demo of point-and-click movement. The character will move to the spot clicked on, just like a point-and-click adventure game. With the power of NavMesh, the character will even know how to get around obstacles.
Your character needs a scene to run around in and some obstacles to navigate around. Fortunately, the starter project provides these. Navigate to Assets/RW/Scenes and open SampleScene. This scene simply has a bunch of blocks for the walls and floor, along with a capsule to represent the player.
With the level set up to navigate around, you already have what you need to build the navigation mesh!
Generating the NavMesh
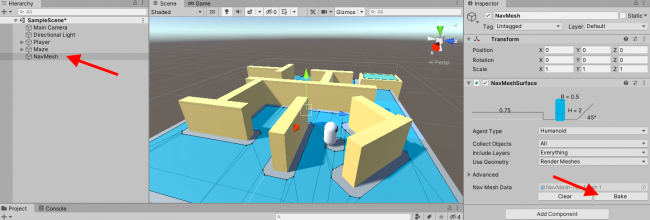
First, create an empty GameObject and name it NavMesh. The navigation mesh will be generated from and attached to this object. Now, add a NavMeshSurface component to this object. In the Inspector, there are now a bunch of navigation settings, as well as a couple of buttons for managing the mesh generation.
That’s it — you’re ready to create your first mesh! Click Bake, and Unity generates a navigation mesh using the default settings.

Your first baked mesh!
Understanding NavMeshSurface
What happened? The underlying code is quite complex, but the broad steps aren’t hard to understand. NavMeshSurface first decides which way is up, using its own GameObject’s rotation. It then identifies the surfaces in the scene facing that direction. (In this case, they’re all flat, but NavMeshSurface also works with terrain and other irregular meshes.)
The NavMesh system then must determine what parts of each surface are walkable. Game characters come in all shapes and sizes. The areas that are walkable by a little cat character, for example, would be different from those walkable by a human or a giant robot. This is where the diagram at the top of NavMeshSurface comes in.

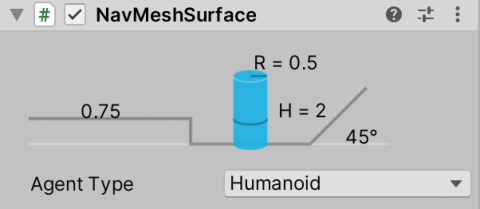
It might look like notes from math class, but these are your NavMesh agent settings.
The diagram illustrates the properties of the particular kind of agent that will walk on this mesh, such as its radius and height. (You can access these settings in the Agent Type dropdown if you like, but they are not needed for this tutorial.)
The NavMesh system uses these settings to identify where this agent could go. When the system finds an area that is flat, wide and tall enough for this kind of agent, it marks that area as walkable. Then, it generates a flat navigation mesh — the blue areas that just appeared in the scene.
Now that you’ve baked a mesh, it’s time to look more closely at the result. The default settings work pretty well, but there are always things to tweak.
Tuning the NavMesh with Layers
First of all, there’s a hole in the mesh surrounding the player. By default, everything in the scene is considered a potential obstacle to navigate around. You need to explicitly tell NavMeshSurface not to include the player as an obstacle.
NavMeshSurface has a dropdown menu called Include Layers. If you de-select a layer in that dropdown, the mesh generation system ignores the objects on that layer. Follow these steps to put the player on a new layer and then exclude that layer from the mesh:
- Select the Player GameObject in the Hierarchy.
- In the Layer dropdown, select Add Layer.
- In the layer management view that appears, type the name Player in the first available row.
- Select the player again. Using the Layer dropdown, change its layer to the newly created Player layer. (For an additional challenge, say “player layer” to yourself five times fast.)
- A popup appears, asking whether to assign child objects to that layer as well. Choose Yes, change children.
- Select NavMesh.
- In the Inspector, open the Include Layers dropdown and click Player to de-select it.

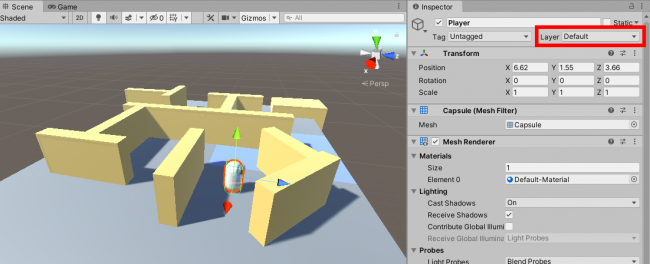
Create and then assign a layer for the player from this dropdown.
Now, Unity will understand that the player isn’t part of the scenery. Click Bake to regenerate the navigation mesh. No more hole!
Removing an Object from the NavMesh
But there’s another issue. With NavMesh still selected, look at the large corner block. The blue square on top means the navigation system sees it as part of the floor — that is to say, a surface that can be part of a valid path. The player should be able to walk only on the floor, not on top of the walls! But you can’t ignore that block as you did with the player. It still needs to be an obstacle so that NavMesh won’t generate paths through it.
Luckily, you can handle this with another component, called NavMeshModifier. Here are the steps to set it up:
- Look in the children of Maze and select Corner.
- Add a NavMeshModifier component.
- On the component, click to enable Override Area.
- Change Area Type to Not Walkable.

Override Area setting in NavMeshModifier component
Now, Unity understands that Corner is an obstacle rather than a walkable surface. Click NavMesh and bake the navigation mesh again. Problem solved!

Just a regular wall again.
With those tweaks, you’ve set the navigation up correctly. You’re ready to get your player running around in the maze!
Moving a Character
Moving an object around on a navigation mesh is the job of the NavMeshAgent component. It calculates a path along the mesh from its current position to whatever destination you give it (or the closest point, if it’s not on the mesh).
Setting Up the NavMeshAgent Component
To begin, select the player and add a NavMeshAgent component.
The default settings for the agent’s movement are a little sluggish, but you can tweak them to be snappier. On NavMeshAgent, increase Speed to 5, Angular Speed to 360, and Acceleration to 10.

Steering settings in NavMeshAgent component
Now, you just need a script to set the NavMeshAgent‘s destination, and NavMesh will take care of the rest!
Setting the NavMeshAgent’s Destination
Create a new C# script called PlayerMovement.cs in the Assets/RW/Scripts directory. Add this requirement at the very top of the class, above the class definition:
using UnityEngine.AI;
This library makes the NavMesh classes available.
Next, declare these two variables at the top of the class:
private Camera cam;
private NavMeshAgent agent;
Add these lines to Start
:
cam = Camera.main;
agent = GetComponent<NavMeshAgent>();
The Camera
class has a convenient method that translates the mouse’s location on the screen to a position in the game world. Pass that position to agent
as its destination.
Add the following to Update
:
if (Input.GetMouseButtonDown(0))
{
Ray ray = cam.ScreenPointToRay(Input.mousePosition);
}
This code checks each frame to see if the mouse button is pressed. If so, it constructs a Ray
from the camera to the mouse’s position. You’ll use the ray in the next step.
Next, add these lines inside the if
statement, after creating the ray:
if (Physics.Raycast(ray, out RaycastHit hit))
{
agent.SetDestination(hit.point);
}
This code sends the ray out into the game world and checks whether it hits anything. (Note that the ray will only hit objects that have colliders.) If the ray does hit something, it will store the location of the hit in hit.point
. Then, you can simply give that location to agent
as its destination.
Drag this script onto the player object and press Play. Click anywhere on the maze, and the player moves where you clicked! The player navigates around the mazelike walls to reach the destination.
Refining the Navigation Mesh
Now that the character is successfully moving around the maze, you can make the navigation mesh a bit more interesting by specifying navigation areas and costs. You’ve actually already adjusted one navigation area, when you set the corner block to Not Walkable. But you can do much more than just turn areas on and off.
To represent a more complex environment, you can designate different areas that have costs — weights defining how difficult (or undesirable) that area is to move through. NavMesh agents will tend to avoid high-cost areas even if a path crossing that area is technically shorter. Think of military units moving over varied terrain: The path might be shorter if they cut through the mountains, but they prefer to go around the mountain through open fields. It is simple to represent this situation using areas of varied cost in the navigation mesh.
In the sample scene, notice that one chunk of the floor is blue. You can assign a separate navigation area there to simulate an area of water that the navigation agent will avoid.
Assigning Navigation Areas
First, add a new area to the navigation system. Select Window ▸ AI ▸ Navigation to open the project navigation settings. Then, select the Areas tab to see all the navigation areas defined in this project. Type the name Water in the first available row and set its cost to 5.

List of areas and costs in the Areas tab of the Navigation window
Go back to the Scene view. Look in the children of Maze and select Water. (You may need to select the Inspector tab to see it again if it is behind Navigation.) Add a NavMeshModifier component, turn on Override Area and change Area Type to Water. Then bake the mesh once more.

Navigation mesh with Water area shown in purple
Press Play and click around on the mesh to see how the player’s pathfinding changed. For example, try putting the player in the top-right corner, and click just below the corner block. The shortest path to this destination would cut through the water. Instead, the player navigates the long way around.

Position the player at the top right, then click where the X is.
Where to Go From Here?
Download the completed project files by clicking the Download Materials button at the top or bottom of this tutorial.
You now know the basics of pathfinding with NavMesh in Unity! Remember the three main components: NavMeshSurface, NavMeshModifier and NavMeshAgent.
There’s a lot more you can do with the NavMesh system. You might define different kinds of agents using the NavMeshAgent settings, create characters who walk on walls or ceilings, or explore linking multiple meshes together. Or you might try out runtime generation next. “Runtime generation” refers to creating a navigation mesh while the game is running, rather than baking one ahead of time as you did in this tutorial.
Although NavMesh is free and works well, many developers prefer A* Pathfinding Project. If you require pathfinding for your game, check that out, too.
I hope you enjoyed this tutorial! If you have any questions, comments or suggestions, feel free to leave them in the comments below or to visit our forums.
All videos. All books.
One low price.
A Kodeco subscription is the best way to learn and master mobile development — plans start at just $19.99/month! Learn iOS, Swift, Android, Kotlin, Flutter and Dart development and unlock our massive catalog of 50+ books and 4,000+ videos.
Learn more