Beginning tvOS Development with TVML Tutorial
Learn how to create your first tvOS app for the Apple TV in this TVML tutorial for complete beginners! By Kelvin Lau.
Building the Catalog Template
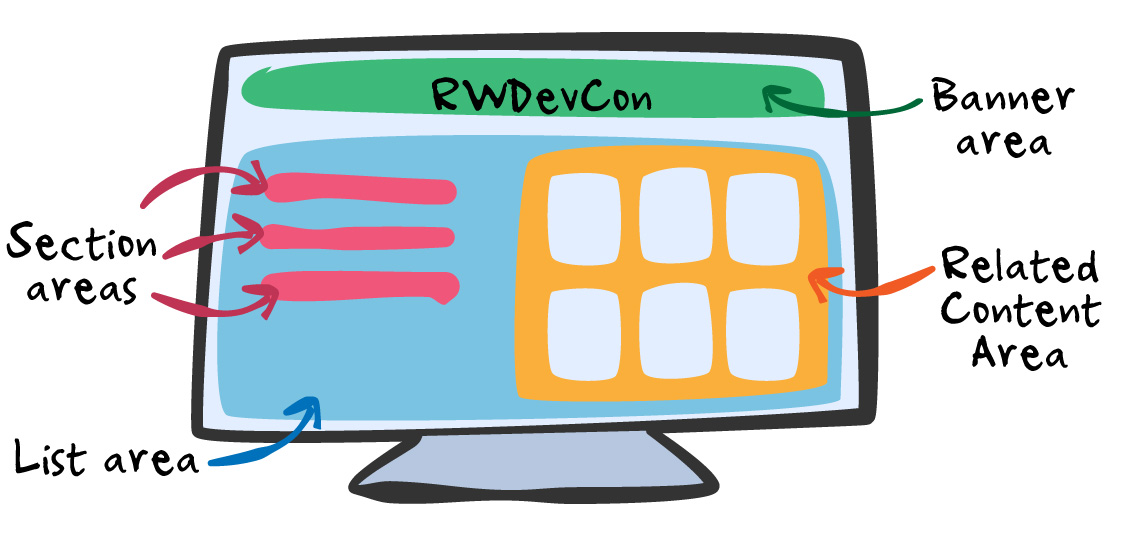
The catalogTemplate is another one of the 18 templates that are available for developers to use. The purpose of the template is to display information about groups of like products, which is perfect for showcasing your favorite RWDevCon videos! The catalogTemplate has many elements of interest:
Compound and Simple Elements
The banner element is used to display information along the top of the template app page. It itself is a Compound Element, meaning it is composed of several Simple Elements.
For instance, the obvious use case for the banner is to add a title element, but it can also have a background element. For the purposes of our tutorial, we’ll keep the customizations as little as possible. At the end of the tutorial, there will be a link for further reading regarding other elements.
Let’s try this out. Navigate to your client directory, and create 2 new folders as siblings to the js folder, and name them images and templates respectively. Your client folder should now look like this:

You’ll need images to populate the cells in our template. I’ve prepared the images for you: download them, unzip the file, and move the images to the images folder you’ve just created.
Now, you’re going to display the images on screen! Create a new JavaScript file, name it RWDevConTemplate.xml.js, and save it in the templates folder.
Add the following to RWDevConTemplate.xml.js:
var Template = function() { return `<?xml version="1.0" encoding="UTF-8" ?>
  <document>
    <catalogTemplate>
      <banner>
        <title>RWDevConHighlights</title>
      </banner>
    </catalogTemplate>
  </document>`
}
For now, we’ll attempt to display the banner of the template. Before we can use this code, since this isn’t currently exposed to the other JavaScript files, we need a way to let the other files know of its existence. A great time to create our last JavaScript file: ResourceLoader.js!
ResourceLoader
Create a new JavaScript file, name it ResourceLoader.js, and save it in the js folder, along with your application.js and Presenter.js files. Add the following to the file:
function ResourceLoader(baseurl) {
  this.BASEURL = baseurl;
}

ResourceLoader.prototype.loadResource = function(resource, callback) {
  var self = this;
  evaluateScripts([resource], function(success) {
    if(success) {
      var resource = Template.call(self);
      callback.call(self, resource);
    } else {
      var title = "Resource Loader Error",
          description = `Error loading resource '${resource}'. \n\n Try again later.`,
          alert = createAlert(title, description);
      navigationDocument.presentModal(alert);
    }
  });
}
Don’t worry too much about how this works; just know you can use this to load other template files.
Try it out by replacing your “Hello World” alert with our newly created RWDevConTemplate as the main screen. Open application.js and make the following changes to the file:
// 1
var resourceLoader;

App.onLaunch = function(options) {
  // 2
  var javascriptFiles = [
    `${options.BASEURL}js/ResourceLoader.js`,
    `${options.BASEURL}js/Presenter.js`
  ];

  evaluateScripts(javascriptFiles, function(success) {
    if(success) {
      // 3
      resourceLoader = new ResourceLoader(options.BASEURL);
      resourceLoader.loadResource(`${options.BASEURL}templates/RWDevConTemplate.xml.js`, function(resource) {
        var doc = Presenter.makeDocument(resource);
        Presenter.pushDocument(doc);
      });
    } else {
      var errorDoc = createAlert("Evaluate Scripts Error", "Error attempting to evaluate external JavaScript files.");
      navigationDocument.presentModal(errorDoc);
    }
  });
}

// Leave createAlert alone
You’ve made 3 changes here:
- Declared a
resourceLoadervariable. - Added ResourceLoader.js to the list of files we want to expose.
- Used the
resourceLoaderto load the TVML template, and used thePresenterto present it on screen.
Build and run. You should be greeted with the following screen:

Congratulations, you are now able to load TVML from a file, rather than hard-coding it into your Javascript! Cue the return of my friend:

Craft Some More TVML
Believe it or not, but you’re almost done. One of the most beautiful things about TVML tvOS apps is that it’s very easy to add UI elements. What you’re about to add to your RWDevConTemplate may seem a lot, but it’s really a fraction of what you would have to do using UIKit frameworks.
Modify the RWDevConTemplate.xml.js file with the following:
var Template = function() { return `<?xml version="1.0" encoding="UTF-8" ?>
  <document>
    <catalogTemplate>
      <banner>
        <title>RWDevConHighlights</title>
      </banner>
      //add stuff here
      //1.
      <list>
        <section>
          //2.
	  <listItemLockup>
	    <title>Inspiration Videos</title>
	    <decorationLabel>13</decorationLabel>
	  </listItemLockup>
        </section>
      </list>
    </catalogTemplate>
  </document>`
}
- You’ve defined the list area, which encompasses the rest of the screen’s contents
- The
listItemLockuprepresents a section cell. Each cell is defined by alistItemLockuptag. You’ve declared the title to be “Inspiration Videos”, and added a number next to it, to indicate the number of items you’re going to display for this section.
Build and run. You should see the following screen on the simulator:
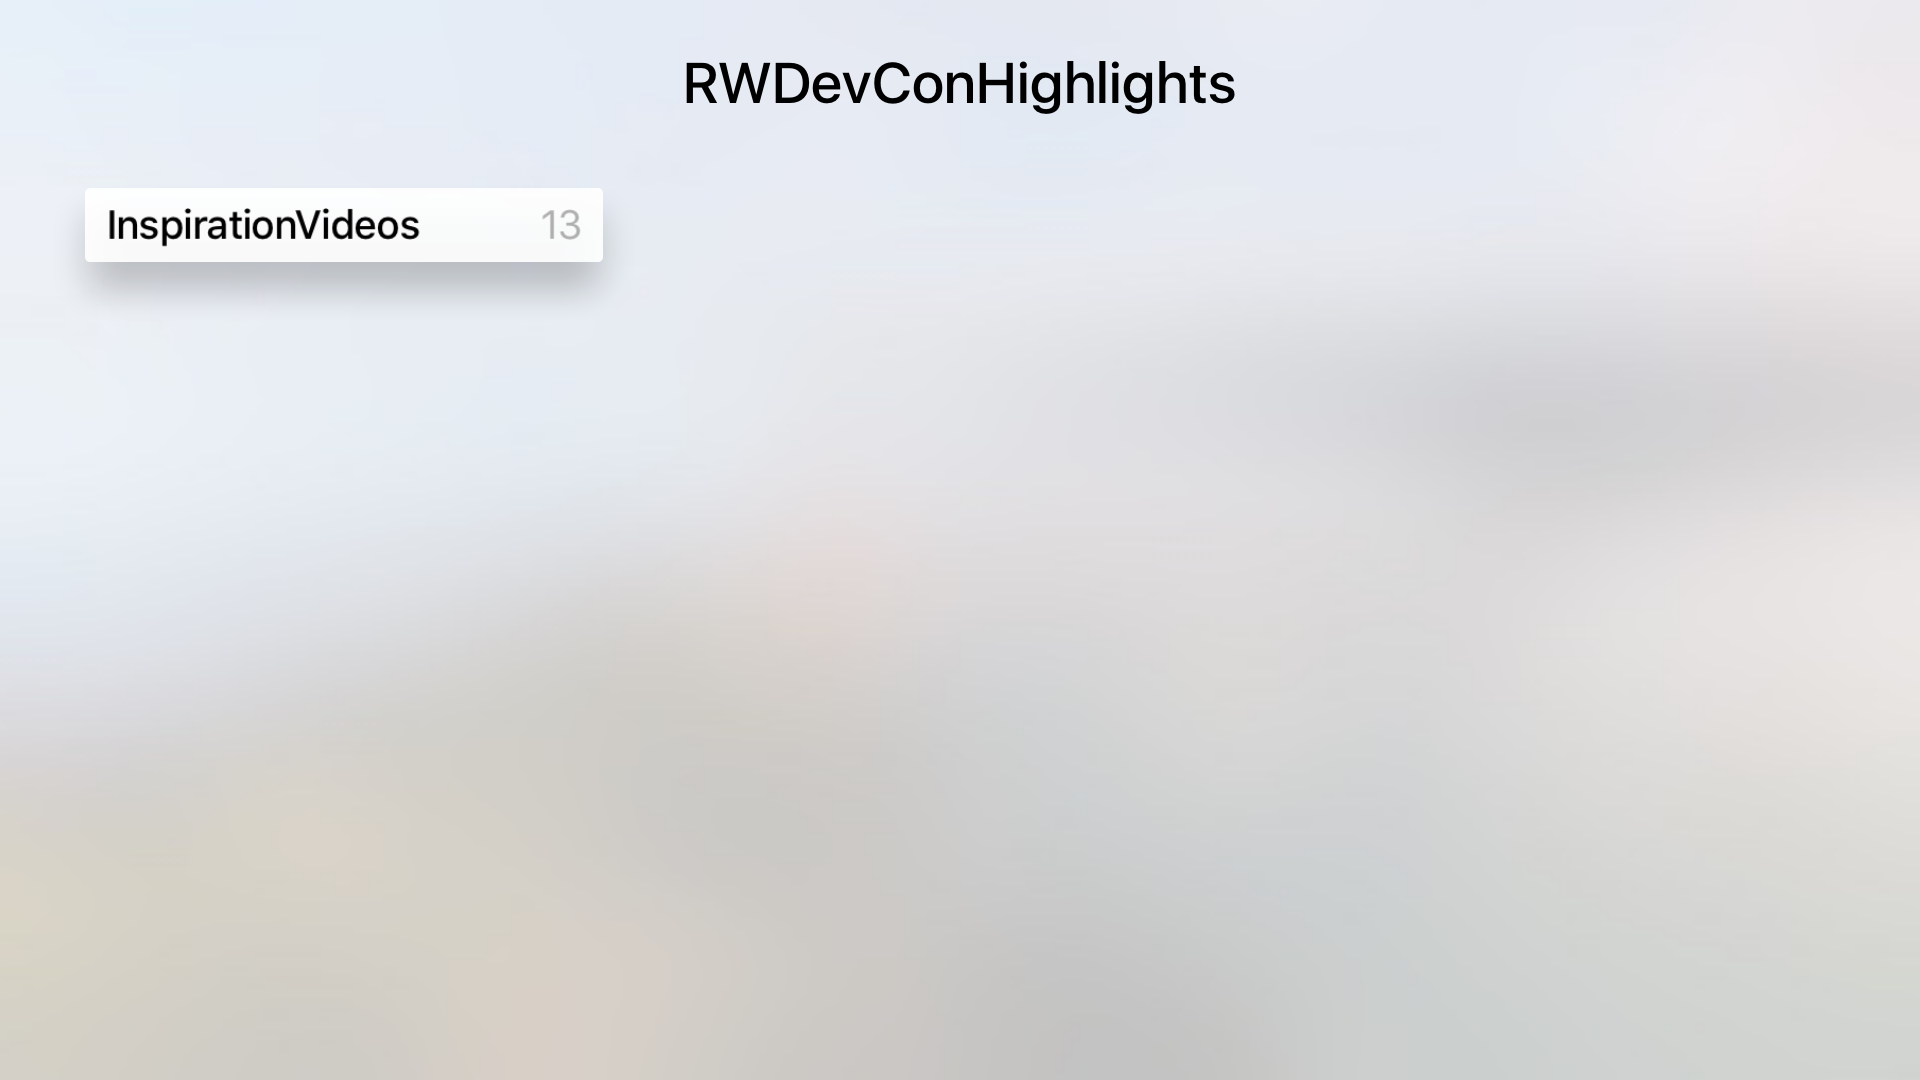
Not bad for just a little markup!
Completing the Template
Finally, we’re ready to create our cells that will represent each video. Add the following to RWDevConTemplate.xml.js:
//This file outlines the catalogTemplate.
var Template = function() { return `<?xml version="1.0" encoding="UTF-8" ?>
  <document>
    <catalogTemplate>
      <banner>
        <title>RWDevConHighlights</title>
      </banner>
      <list>
        <section>
	  <listItemLockup>
	    <title>Inspiration Videos</title>
	    <decorationLabel>13</decorationLabel>
            //1. add from here
	    <relatedContent>
	      <grid>
	        <section>
                  //2
		  <lockup videoURL="http://www.rwdevcon.com/videos/Ray-Wenderlich-Teamwork.mp4">
		    <img src="${this.BASEURL}images/ray.png" width="500" height="308" />
		  </lockup>
		  <lockup videoURL="http://www.rwdevcon.com/videos/Ryan-Nystrom-Contributing.mp4">
		    <img src="${this.BASEURL}images/ryan.png" width="500" height="308" />
		  </lockup>
	          <lockup videoURL="http://www.rwdevcon.com/videos/Matthijs-Hollemans-Math-Isnt-Scary.mp4">
		    <img src="${this.BASEURL}images/matthijs.png" width="500" height="308" />
		  </lockup>
		  <lockup videoURL="http://www.rwdevcon.com/videos/Vicki-Wenderlich-Identity.mp4">
		    <img src="${this.BASEURL}images/vicki.png" width="500" height="308" />
		  </lockup>
	          <lockup videoURL="http://www.rwdevcon.com/videos/Alexis-Gallagher-Identity.mp4">
		    <img src="${this.BASEURL}images/alexis.png" width="500" height="308" />
	          </lockup>
		  <lockup videoURL="http://www.rwdevcon.com/videos/Marin-Todorov-RW-Folklore.mp4">
		    <img src="${this.BASEURL}images/marin.png" width="500" height="308" />
		  </lockup>
		  <lockup videoURL="http://www.rwdevcon.com/videos/Chris-Wagner-Craftsmanship.mp4">
		    <img src="${this.BASEURL}images/chris.png" width="500" height="308" />
	          </lockup>
		  <lockup videoURL="http://www.rwdevcon.com/videos/Cesare-Rocchi-Cognition.mp4">
		    <img src="${this.BASEURL}images/cesare.png" width="500" height="308" />
		  </lockup>
		  <lockup videoURL="http://www.rwdevcon.com/videos/Ellen-Shapiro-Starting-Over.mp4">
		    <img src="${this.BASEURL}images/ellen.png" width="500" height="308" />
		  </lockup>
		  <lockup videoURL="http://www.rwdevcon.com/videos/Jake-Gundersen-Opportunity.mp4">
		    <img src="${this.BASEURL}images/jake.png" width="500" height="308" />
		  </lockup>
		  <lockup videoURL="http://www.rwdevcon.com/videos/Kim-Pedersen-Finishing.mp4">
		    <img src="${this.BASEURL}images/kim.png" width="500" height="308" />
		  </lockup>
	          <lockup videoURL="http://www.rwdevcon.com/videos/Tammy-Coron-Possible.mp4">
		    <img src="${this.BASEURL}images/tammy.png" width="500" height="308" />
		  </lockup>
		  <lockup videoURL="http://www.rwdevcon.com/videos/Saul-Mora-NSBrief.mp4">
		    <img src="${this.BASEURL}images/saul.png" width="500" height="308" />
		  </lockup>
		</section>
	      </grid>
	    </relatedContent>
	  </listItemLockup>
        </section>
      </list>
    </catalogTemplate>
  </document>`
}
- You’ve added the
relatedContenttag. This refers to the following area:

- Each
lockuptag represents a cell in thegridWe’ve included avideoURLproperty for eachlockup. This will be necessary to stream the videos from the RWDevCon website.

Build and run. You’ve brought your app to life!

Now that we’ve got many different cells to play around with, let’s bring out the remote controller in the simulator (if you haven’t already). With the Simulator window active, click Hardware\Show Apple TV Remote. You can move around the cells by simply holding the option key and moving your cursor on the remote window.