Android ListView Tutorial with Kotlin
In this tutorial, you’ll learn how to use Android’s ListView to easily create scrollable lists, by creating a simple recipe list app using Kotlin. By Joe Howard.
User Interaction
Now your list has function and style. What’s it missing now? Try tapping or long pressing it. There’s not much to thrill and delight the user.
What could you add here to make the user experience that much more satisfying? Well, when a user taps on a row, don’t you think it’d be nice to show the full recipe, complete with instructions?
You’ll make use of AdapterView.onItemClickListener and a brand spanking new activity to do this with elegance.
Make a New Activity
This activity will display when the user selects an item in the list.
Right-click on com.raywenderlich.alltherecipes then select New > Activity > EmptyActivity to bring up a dialog. Fill in the Activity Name with RecipeDetailActivity. Leave the automatically populated fields as-is. Check that your settings match these:
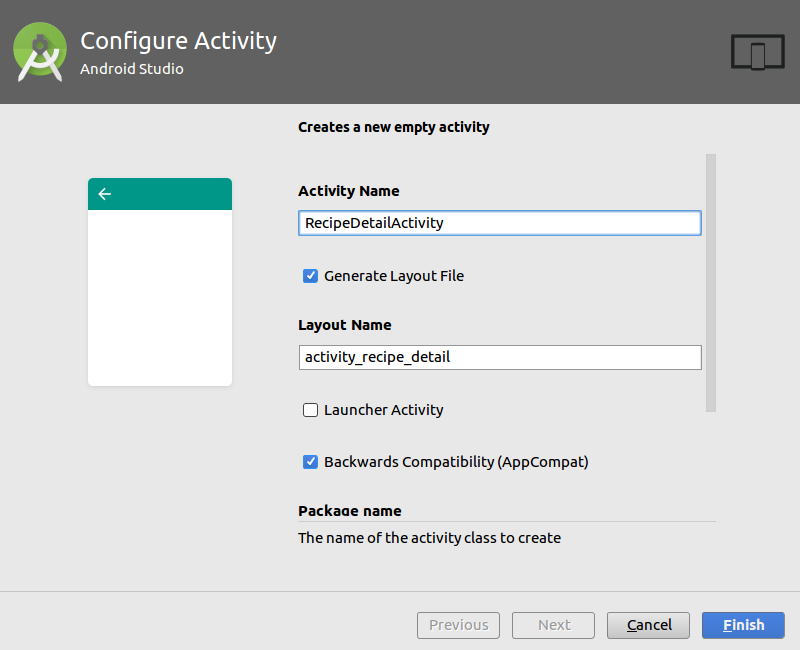
Click Finish.
Open res/layout/activity_recipe_detail.xml and add a WebView by inserting the following snippet inside the ConstraintLayout tag:
<WebView
  android:id="@+id/detail_web_view"
  android:layout_width="0dp"
  android:layout_height="0dp"
  app:layout_constraintBottom_toBottomOf="parent"
  app:layout_constraintEnd_toEndOf="parent"
  app:layout_constraintStart_toStartOf="parent"
  app:layout_constraintTop_toTopOf="parent" />
WebView will be used to load and display a webpage containing the selected recipe’s instructions.
Open up RecipeDetailActivity, and add a WebView reference as a property by adding the following line within the class definition:
private lateinit var webView: WebView
Add the following below the webView property declaration:
companion object {
  const val EXTRA_TITLE = "title"
  const val EXTRA_URL = "url"

  fun newIntent(context: Context, recipe: Recipe): Intent {
    val detailIntent = Intent(context, RecipeDetailActivity::class.java)

    detailIntent.putExtra(EXTRA_TITLE, recipe.title)
    detailIntent.putExtra(EXTRA_URL, recipe.instructionUrl)

    return detailIntent
  }
}
This adds a companion object method to return an Intent for starting the detail activity, and sets up title and url extras in the Intent.
Head back to MainActivity and add the following to the bottom of the onCreate method:
val context = this
listView.setOnItemClickListener { _, _, position, _ ->
  // 1
  val selectedRecipe = recipeList[position]

  // 2
  val detailIntent = RecipeDetailActivity.newIntent(context, selectedRecipe)

  // 3
  startActivity(detailIntent)
}
Note: Before you dive into the explanation, make sure you understand the four arguments that are provided by onItemClick; they work as follows:
- parent: The view where the selection happens — in your case, it’s the ListView
- view: The selected view (row) within the ListView
- position: The position of the row in the adapter
- id: The row id of the selected item
You’re setting the OnItemClickListener object for the ListView, and inside doing the following:
- Get the recipe object for the row that was clicked
- Create an intent to navigate to your
RecipeDetailActivityto display more information - Launch the
RecipeDetailActivityby passing the intent object you just created to thestartActivity()method.
Once again, open RecipeDetailActivity and add the following snippet at the bottom of the onCreate method:
// 1
val title = intent.extras.getString(EXTRA_TITLE)
val url = intent.extras.getString(EXTRA_URL)

// 2
setTitle(title)

// 3
webView = findViewById(R.id.detail_web_view)

// 4
webView.loadUrl(url)
You can see a few things happening here:
- You retrieve the recipe data from the
Intentpassed fromMainActivityby using theextrasproperty. - You set the title on the action bar of this activity to the recipe title.
- You initialize
webViewto the web view defined in the XML layout. - You load the recipe web page by calling
loadUrl()with the corresponding recipe’s URL on the web view object.
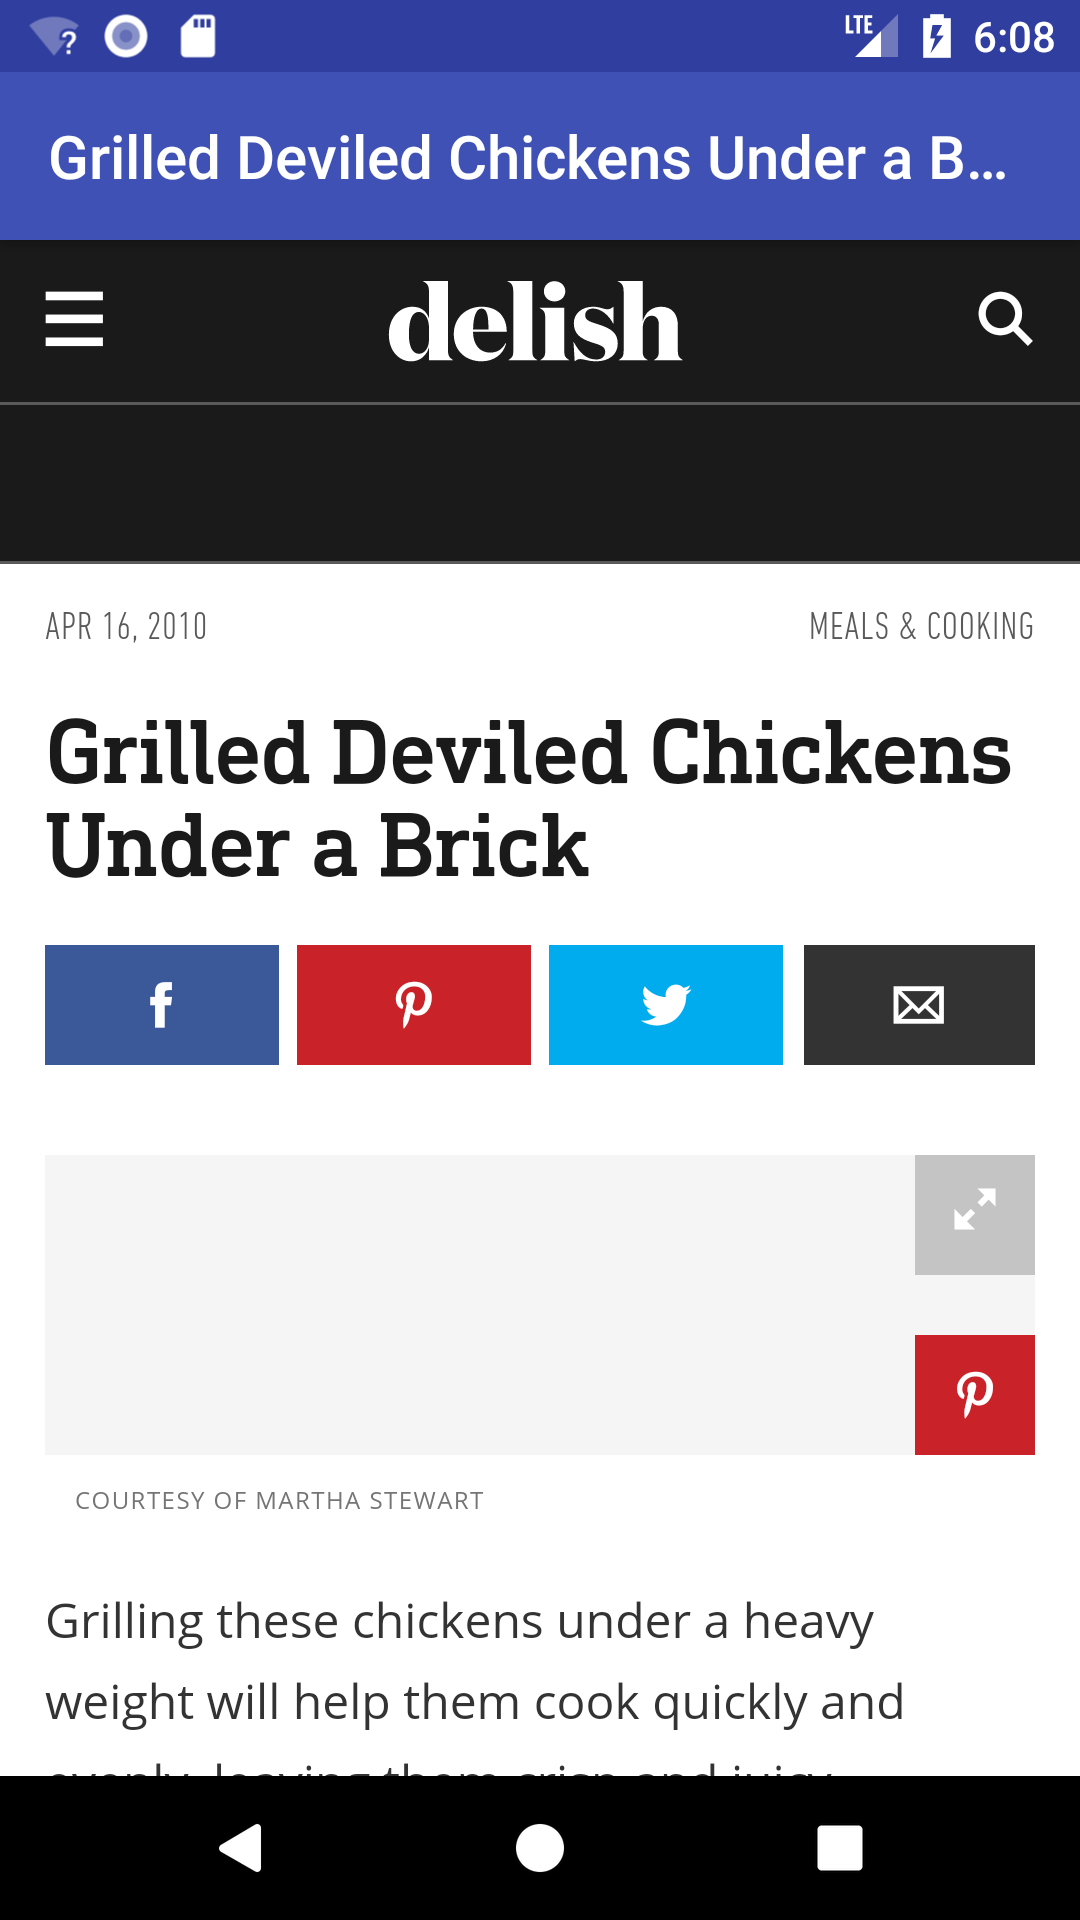
Build and run. When you click on the first item in the list, you should see something like this:
Optimizing Performance
Whenever you scroll the ListView, its adapter’s getView() method is called in order to create a row and display it on screen.
Now, if you look in your getView() method, you’ll notice that each time this method is called, it performs a lookup for each of the row view’s elements by using a call to the findViewById() method.
These repeated calls can seriously harm the ListView’s performance, especially if your app is running on limited resources and/or you have a very large list. You can avoid this problem by using the View Holder Pattern.
Implement a ViewHolder Pattern
To implement the ViewHolder pattern, open RecipeAdapter and add the following after the getView() method definition:
private class ViewHolder {
  lateinit var titleTextView: TextView
  lateinit var subtitleTextView: TextView
  lateinit var detailTextView: TextView
  lateinit var thumbnailImageView: ImageView
}
As you can see, you create a class to hold your exact set of component views for each row view. The ViewHolder class stores each of the row’s subviews, and in turn is stored inside the tag field of the layout.
This means you can immediately access the row’s subviews without the need to look them up repeatedly.
Now, in getView(), replace everything above (but NOT including) this line:
val recipe = getItem(position) as Recipe
With:
val view: View
val holder: ViewHolder

// 1
if (convertView == null) {

  // 2
  view = inflater.inflate(R.layout.list_item_recipe, parent, false)

  // 3
  holder = ViewHolder()
  holder.thumbnailImageView = view.findViewById(R.id.recipe_list_thumbnail) as ImageView
  holder.titleTextView = view.findViewById(R.id.recipe_list_title) as TextView
  holder.subtitleTextView = view.findViewById(R.id.recipe_list_subtitle) as TextView
  holder.detailTextView = view.findViewById(R.id.recipe_list_detail) as TextView

  // 4
  view.tag = holder
} else {
  // 5
  view = convertView
  holder = convertView.tag as ViewHolder
}

// 6
val titleTextView = holder.titleTextView
val subtitleTextView = holder.subtitleTextView
val detailTextView = holder.detailTextView
val thumbnailImageView = holder.thumbnailImageView
Here’s the play-by-play of what’s happening above.
- Check if the view already exists. If it does, there’s no need to inflate from the layout and call
findViewById()again. - If the view doesn’t exist, you inflate the custom row layout from your XML.
- Create a new
ViewHolderwith subviews initialized by usingfindViewById(). - Hang onto this holder for future recycling by using
setTag()to set the tag property of the view that the holder belongs to. - Skip all the expensive inflation steps and just get the holder you already made.
- Get relevant subviews of the row view.
Finally, update the return statement of getView() with the line below.
return view
Build and run. If your app was running a bit slow on the last build, you should see it running smoother now. :]