Dependency Injection Tutorial for iOS: Getting Started
In this tutorial, you’ll learn about Dependency Injection for iOS, as you create the profile page of a social media app in SwiftUI. By Irina Galata.
Adding User Preferences
Want to try a more complicated use case? What if you need to make your provider base its decisions on the user’s privacy preferences?
To solve this problem, you’ll add a new screen where users can decide who can access each part of their profile, save preferences using UserDefaults and reload the profile screen whenever they update a preference. You’ll use the Combine framework to make it work.
First, open PrivacyLevel.swift and add the following property and method to PrivacyLevel:
var title: String {
  switch self {
  case .everyone:
    return "Everyone"
  case .friend:
    return "Friends only"
  case .closeFriend:
    return "Close friends only"
  }
}

static func from(string: String) -> PrivacyLevel? {
  switch string {
  case everyone.title:
    return everyone
  case friend.title:
    return friend
  case closeFriend.title:
    return closeFriend
  default:
    return nil
  }
}
You’ll use title to display the privacy level options on a new preferences screen you’re about to create. from(string:) helps recreate a PrivacyLevel from a saved UserDefaults preference.
Now right-click the Sociobox folder in the Project navigator and select Add Files to “Sociobox”…. Choose PreferencesStore.swift and click Add. Open the file and look through the code.
It’s a class responsible for saving and reading user preferences from UserDefaults.
You have a property for each of the five profile sections and a method to reset the preferences. PreferencesStoreProtocol conforms to the ObservableObject protocol, making your store have a publisher that will emit whenever any of the properties marked with the @Published attribute change.
When there are any changes, any SwiftUI view, or even a regular class, can subscribe to PreferencesStoreProtocol and reload its content.
Next, you’ll add the Preferences Screen.
Adding the Preferences Screen
Now, right-click the Views folder and, once again, select Add Files to “Sociobox”… to add UserPreferencesView.swift. Open it and take a look at the preview:
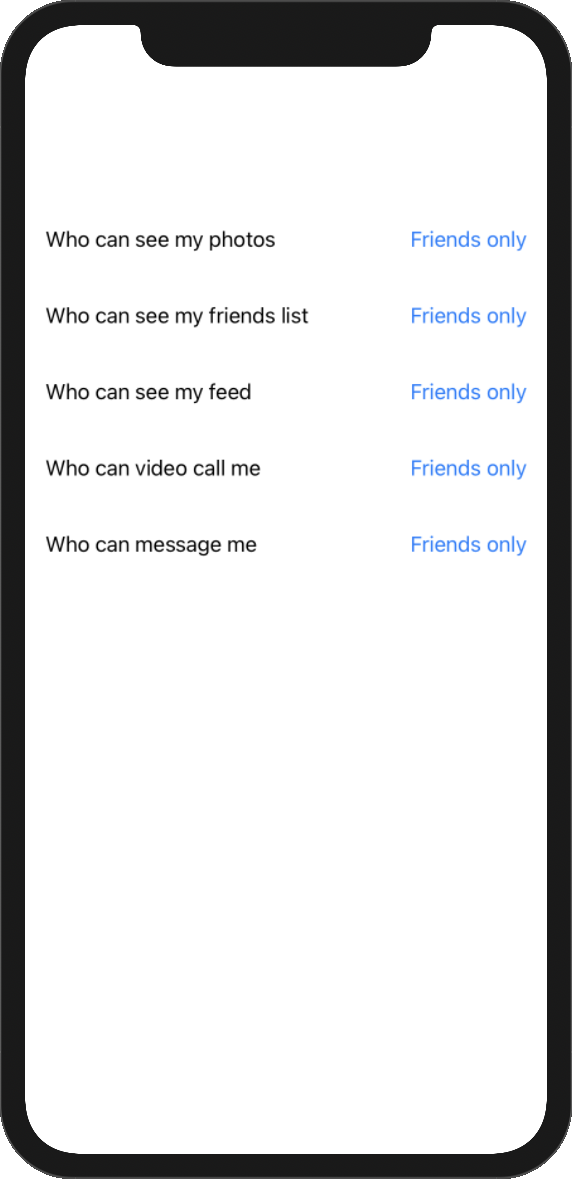
This is what your new screen will look like.
Make the new screen save user preferences by implementing the PreferencesStoreProtocol. Update the declaration of UserPreferencesView to the following:
struct UserPreferencesView<Store>: View where Store: PreferencesStoreProtocol {
Like in every statically typed programming language, types are defined and checked at compile time. And here’s the problem: You don’t know the exact type Store will have at runtime, but don’t panic! What you do know is that Store will conform to PreferencesStoreProtocol. So, you tell the compiler that Store will implement this protocol.
The compiler needs to know which specific type you want to use for your view. Later on, when you create an instance of UserPreferencesView, you’ll need to use a specific type instead of a protocol in the angle brackets, like this:
UserPreferencesView<PreferencesStore>()
This way, the type can be checked at compile time. Now, add the following property and initializer to UserPreferencesView:
private var store: Store

init(store: Store = DIContainer.shared.resolve(type: Store.self)!) {
  self.store = store
}
With the code above, you let your UserPreferencesView receive the needed dependency, instead of creating it on its own.
Update the body property to use the store to access user preferences:
var body: some View {
  NavigationView {
    VStack {
      PreferenceView(title: .photos, value: store.photosPreference) { value in
        store.photosPreference = value
      }
      PreferenceView(
        title: .friends,
        value: store.friendsListPreference
      ) { value in
        store.friendsListPreference = value
      }
      PreferenceView(title: .feed, value: store.feedPreference) { value in
        store.feedPreference = value
      }
      PreferenceView(
        title: .videoCall,
        value: store.videoCallsPreference
      ) { value in
        store.videoCallsPreference = value
      }
      PreferenceView(
        title: .message,
        value: store.messagePreference
      ) { value in
        store.messagePreference = value
      }
      Spacer()
    }
  }.navigationBarTitle("Privacy preferences")
}
Here’s a code breakdown:
- Each
PreferenceViewin the vertical stack represents a different profile section with a drop down menu to select a privacy level. - Read the current value of each preference from the store.
- When the user chooses a privacy option, save the new value to the store.
Update the previews property of UserPreferencesView_Previews, so you can see the preview again:
static var previews: some View {
  UserPreferencesView(store: PreferencesStore())
}
In SceneDelegate.swift, register the store dependency in your container:
container.register(type: PreferencesStore.self, component: PreferencesStore())
Adding Combine
Next, go to ProfileContentProvider.swift and import Combine at the top of the file:
import Combine
Then, update its declaration as you did with UserPreferencesView:
final class ProfileContentProvider<Store>: ProfileContentProviderProtocol
  where Store: PreferencesStoreProtocol {
Now, update the declaration of ProfileContentProviderProtocol:
protocol ProfileContentProviderProtocol: ObservableObject {
This code lets ProfileView subscribe to changes in ProfileContentProvider and update the state immediately when a user selects a new preference.
In ProfileContentProvider, add a property for the store and replace the initializer:
private var store: Store
private var cancellables: Set<AnyCancellable> = []

init(
  privacyLevel: PrivacyLevel =
    DIContainer.shared.resolve(type: PrivacyLevel.self)!,
  user: User = DIContainer.shared.resolve(type: User.self)!,
  // 1
  store: Store = DIContainer.shared.resolve(type: Store.self)!
) {
  self.privacyLevel = privacyLevel
  self.user = user
  self.store = store

  // 2
  store.objectWillChange.sink { _ in
    self.objectWillChange.send()
  }
  .store(in: &cancellables)
}
Here’s what you did:
- The DI Container provides an instance of
PreferencesStore. - You use the
objectWillChangeproperty to subscribe to the publisher ofPreferencesStoreProtocol. - You make the publisher of
ProfileContentProviderProtocolemit as well when a property changes in the store.
Now, update ProfileContentProvider‘s properties to use the properties of the store instead of instances of the PrivacyLevel enum:
var canSendMessage: Bool {
  privacyLevel >= store.messagePreference
}

var canStartVideoChat: Bool {
  privacyLevel >= store.videoCallsPreference
}

var photosView: AnyView {
  privacyLevel >= store.photosPreference ?
    AnyView(PhotosView(photos: user.photos)) :
    AnyView(EmptyView())
}

var feedView: AnyView {
  privacyLevel >= store.feedPreference ?
    AnyView(HistoryFeedView(posts: user.historyFeed)) :
    AnyView(EmptyView())
}

var friendsView: AnyView {
  privacyLevel >= store.friendsListPreference ?
    AnyView(UsersView(title: "Friends", users: user.friends)) :
    AnyView(EmptyView())
}
Everything stayed the same except you no longer use the enum directly.
Bringing It All Together
To subscribe to the changes in the provider, open ProfileView.swift and change the declaration of ProfileView as well:
struct ProfileView<ContentProvider>: View
  where ContentProvider: ProfileContentProviderProtocol {
Update the provider property to use the generic:
@ObservedObject private var provider: ContentProvider
When you use @ObservedObject in your SwiftUI view, you subscribe to its publisher. The view reloads itself when it emits.
Update the initializer as well:
init(
  provider: ContentProvider =
    DIContainer.shared.resolve(type: ContentProvider.self)!,
  user: User = DIContainer.shared.resolve(type: User.self)!
) {
  self.provider = provider
  self.user = user
}
Then add this code right below navigationTitle("Profile") inside body property:
.navigationBarItems(trailing: Button(action: {}) {
  NavigationLink(destination: UserPreferencesView<PreferencesStore>()) {
    Image(systemName: "gear")
  }
})
You added a navigation bar button which will take users to the preferences screen.
Now go back to SceneDelegate.swift to update the dependencies registration. As quite a few of your protocols and classes are generic, using them all together is becoming a bit hard to read.
To make it easier, create a new typealias above scene(_:willConnectTo:options:) for the provider:
typealias Provider = ProfileContentProvider<PreferencesStore>
Use the new typealias by removing:
container.register(
  type: ProfileContentProviderProtocol.self,
  component: ProfileContentProvider())
Now, add the following _after_ the call to register PreferencesStore:
container.register(type: Provider.self, component: Provider())
Provider last because its initializer expects privacy level, user and store to exist already in the DI Container.Add <Provider> to the initialization of profileView:
let profileView = ProfileView<Provider>()
For a usable preview, open ProfileView.swift and add the same setup in ProfileView_Previews:
struct ProfileView_Previews: PreviewProvider {
  static var previews: some View {
    typealias Provider = ProfileContentProvider<PreferencesStore>
    let container = DIContainer.shared
    container.register(type: PrivacyLevel.self, component: PrivacyLevel.friend)
    container.register(type: User.self, component: Mock.user())
    container.register(
      type: PreferencesStore.self,
      component: PreferencesStore())
    container.register(type: Provider.self, component: Provider())
    return ProfileView<Provider>()
  }
}
After your hard work, it’s time to see how it works all together. Run the app to see the result:
