Android Tutorial for GeckoView: Getting Started
In thus tutorial you’ll learn about GeckoView, an open source library that allows you to render web content on Android using the Gecko web engine. By Arturo Mejia.
What if I told you you could load a web page or any web content without using a WebView. Is it that even possible? Yes, it is with GeckoView.
GeckoView is an open source library that allows you to render web content on Android using the Gecko web engine. In this tutorial, you’ll learn more about GeckoView and other Android tools used for web content.
What is GeckoView?
GeckoView is an Android library which brings the Gecko web engine to the Android community. It was created by the community and the developers at Mozilla. The folks at Mozilla have a lot of experience with the web and browsers in general.
Have you heard about FireFox? They’re the people behind it. :]
FireFox and GeckoView both use the web engine Gecko. While GeckoView is a new library, it powers many cool open source apps like FireFox Preview, FireFox Focus and FireFox Reality. You can even contriubte to other awesome projects powered by GeckoView.
WebView and GeckoView are not the same. GeckoView has its own API and is not a drop in replacement. Here are some major differences between them:
- While
WebViewwas not designed to create web browsers GeckoView was. It exposes the entire power of the Web to Android applications. -
WebViewcan be updated, however consistency in API and behavior can vary from device to device. This makes it harder to develop for. In contrast, GeckoView is self-contained. You’ll ship the whole API with your app so you’ll get what you tested with no surprises. - GeckoView complies with web standards. Moreover, it’s backed by Mozilla, an organization with a history of fighting for the open web.
- GeckoView provides access and control over low level web APIs. It also has built-in support for private mode, tracking protection, WebVR and, coming soon, Web Extensions support.
Finally, GeckoView adds additional space to your final APK. For example, you can see a growth up to 30MB to 40MB from the library alone. This is because GeckoView includes the whole web engine with the app.
If you’re considering GeckoView for your app, ask yourself these questions:
- Are you developing a web browser-ish or similar app?
- Do you need guaranteed access to web APIs?
- Are you developing a game that relies on web technologies?
If you answered yes, GeckoView could be a great option for you. In contrast, if you only want to render some web content without API warranties WebView could be your best bet.
Getting Started
While working on the tutorial, you’ll create an app called AwesomeBrowser. It’s a small web browser that showcases the power of GeckoView. It allows normal browsing and includes tracking protection enabled by default.

First, download the AwesomeBrowser project using the Download Materials button at the top or bottom of this tutorial. Then open the project in Android Studio 3.3 or later by selecting Open an existing Android Studio project on the Android Studio welcome screen.

Before continuing with the tutorial, take a look at the project structure.
Exploring the AwesomeBrowser Structure
This is the source code’s structure:

-
MainActivity.kt Here you’ll handle the
geckoViewinstance and toolbar. - activity_main.xml Here you’ll define the main layout.
- Helpers.kt This contains a set of helper functions and constants.
As you can see in the above image, there are more files I didn’t mention for the sake of brevity. You won’t need to worry about them for this tutorial, but feel free to poke around if you’re curious.
Build and run the app. All you’ll see is a blank screen until you add the UI!
Setting Up GeckoView
Begin with the starter project. For the moment, your main goal is to configure GeckoView‘s dependency and then load a page with it.
GeckoView is distributed as a Gradle dependency and its artifacts live in maven.mozilla.org. To include it, in the project level build.gradle add the maven repository to the allprojects block right under jcenter().
build.gradle
maven {
    url "https://maven.mozilla.org/maven2/"
}
This includes all the artifacts in the maven Mozilla repository.
Next, add the following code to the app ‣ build.gradle, after the apply: plugin lines, and before the android block:
ext {
    geckoview_channel = "nightly"
    geckoview_version = "70.0.20190712095934"
}
Similar to FireFox, GeckoView has different channels for different purposes. These include the latest stable release, the beta tested release and the nightly developer build. In this case, you’ve chosen the nightly build because you’ll get the most updated features and bug fixes.
To keep things neat and tidy, you’ve added a variable for the version of Gecko to use and the channel from which to retrieve it.
Next, add the following to app ‣ build.gradle below the buildTypes block, inside the android block:
    compileOptions {
        sourceCompatibility JavaVersion.VERSION_1_8
        targetCompatibility JavaVersion.VERSION_1_8
    }
As GeckoView uses some Java 8 APIs, it requires these compatibility flags.
Finally, for the last Gradle configuration, add the following code inside the dependencies block in the same file.
implementation "org.mozilla.geckoview:geckoview-${geckoview_channel}:${geckoview_version}"
Above you’re adding the dependency for GeckoView dependency to the project.
Sync your project with the gradle files now that you’ve made these changes.
Adding Some UI
To interact with GeckoView you need two main objects: a GeckoView widget and a GeckoSesssion.
GeckoView Widget
This is the UI component you’re going to use for rendering web content. It’s a normal Android view you can create using either XML or code.
GeckoSession
A session represents a tab in a web browser. It contains the URL you want to load and all of its additional configurations.
Imagine that you have a web browser with multiple tabs on it.

Each tab, or GeckoSession, has:
- State linked to it.
- Properties like
isPrivateModeenabled or disabled. -
isDesktopModeenable or disabled. - Its own browsing history.
You want to keep all this information separated by tab and decoupled from the UI, GeckoView widget.
This is a job for GeckoSession. It’s an object that holds all these configurations in one place making it easy and straightforward to work with it.
This powerful concept decouples the view, GeckoView, from the state, GeckoSession. This way you could have one view, GeckoView, in charge of rendering and multiple sessions, GeckoSession, representing the state of each tab.
This would be tricky to achieve using WebView. Because of the lack of sessions, it applies configurations directly to the view. :[
GeckoSessionSettings
A great way to customize how a session should behave is by providing a GeckoSessionSettings object. You can do that by passing the settings object to the GeckoSession constructor.
You create a settings object using its builder GeckoSessionSettings.Builder(). Here’s an example of how you might do this:
  val settings = GeckoSessionSettings.Builder()
       .usePrivateMode(true)
       .useTrackingProtection(true)
       .userAgentMode(USER_AGENT_MODE_MOBILE)
       .userAgentOverride("")
       .suspendMediaWhenInactive(true)
       .allowJavascript(true)
These are some other things you can configure on a session:
- usePrivateMode: Indicates if the session should be private.
- useTrackingProtection: Indicates if tracking protection should be enabled.
-
userAgentMode: Indicates the page layout. You can use these options:
USER_AGENT_MODE_DESKTOP: Enable desktop mode.
USER_AGENT_MODE_MOBILE: Disable desktop mode.
USER_AGENT_MODE_VR: Layouts for a VR experience. - userAgentOverride: Changes the user agent identifier.
- suspendMediaWhenInactive: Indicates whether the media should continue playing when the app is suspended.
- allowJavascript: Indicates if JavaScript should be enabled.
Notice that every GeckoSession holds its own settings object. This allows you to do much customization without creating multiple instances of GeckoView. Remember the multiple tabs example.
Now, that you understand how GeckoView widget and GeckoSession work, you can add them to AwesomeBrowser.
First, open activity_main.xml to add the GeckoView widget. Replace the TextView with the GeckoView widget below.
<org.mozilla.geckoview.GeckoView
  xmlns:android="http://schemas.android.com/apk/res/android"
  xmlns:tools="http://schemas.android.com/tools"
  android:id="@+id/geckoview"
  android:layout_width="match_parent"
  android:layout_height="match_parent"
  tools:context=".MainActivity"/>
Next, wire it in the MainActivity.kt file.
Add two private properties to MainActivity: one called geckoView, the UI widget, and another called geckoSession, your tab:
private lateinit var geckoView: GeckoView
private val geckoSession = GeckoSession()
Here, you declare two properties so you can access them from different functions.
Next, create a function called setupGeckoView(). Remember to import all the new references.
  private fun setupGeckoView() {
    // 1
    geckoView = findViewById(R.id.geckoview)

    // 2
    val runtime = GeckoRuntime.create(this)
    geckoSession.open(runtime)

    // 3
    geckoView.setSession(geckoSession)

    // 4
    geckoSession.loadUri("about:buildconfig")
  }
Here’s what your code above does:
- First you bind the
GeckoViewobject from the XML. - You then create a
GeckoRuntimewhich is responsible for holding all the state for the underlying Gecko engine. - To be able to load an URL you need a
GeckoSession. Here you assign it to theGeckoViewinstance. This way theGeckoViewwill know which info needs to load. - Finally, you use the
GeckoSessioninstance to load a URL. In this case,about:buildconfig, an internal page that shows all the configurations of this GeckoView build. This can be whatever url you like.
As you know, the GeckoView widget has its own API. This code would look very different if you were using a WebView.
To make use of your new method, add a call to setupGeckoView() to the bottom of onCreate():
setupGeckoView()
You’re almost ready to run the app. But first you need to setup a proper build variant according to the device or emulator architecture that you’re going to test on. Open the Build Variants window in Android Studio and select your architecture:

You can see your emulator CPU architecture by going to Tools ▸ AVD Manager. You’ll see it on the grid cell under CPU/ABI.

Most devices out there are based on ARM CPU architecture, but you have to verify yours.
Now, build and run the app. :]
If you have everything set up correctly, then you’ll see this:

Above you loaded an internal page called about:buildconfig. It’s a page that shows all the configurations of this GeckoView build, but you can replace it with whatever url you like.
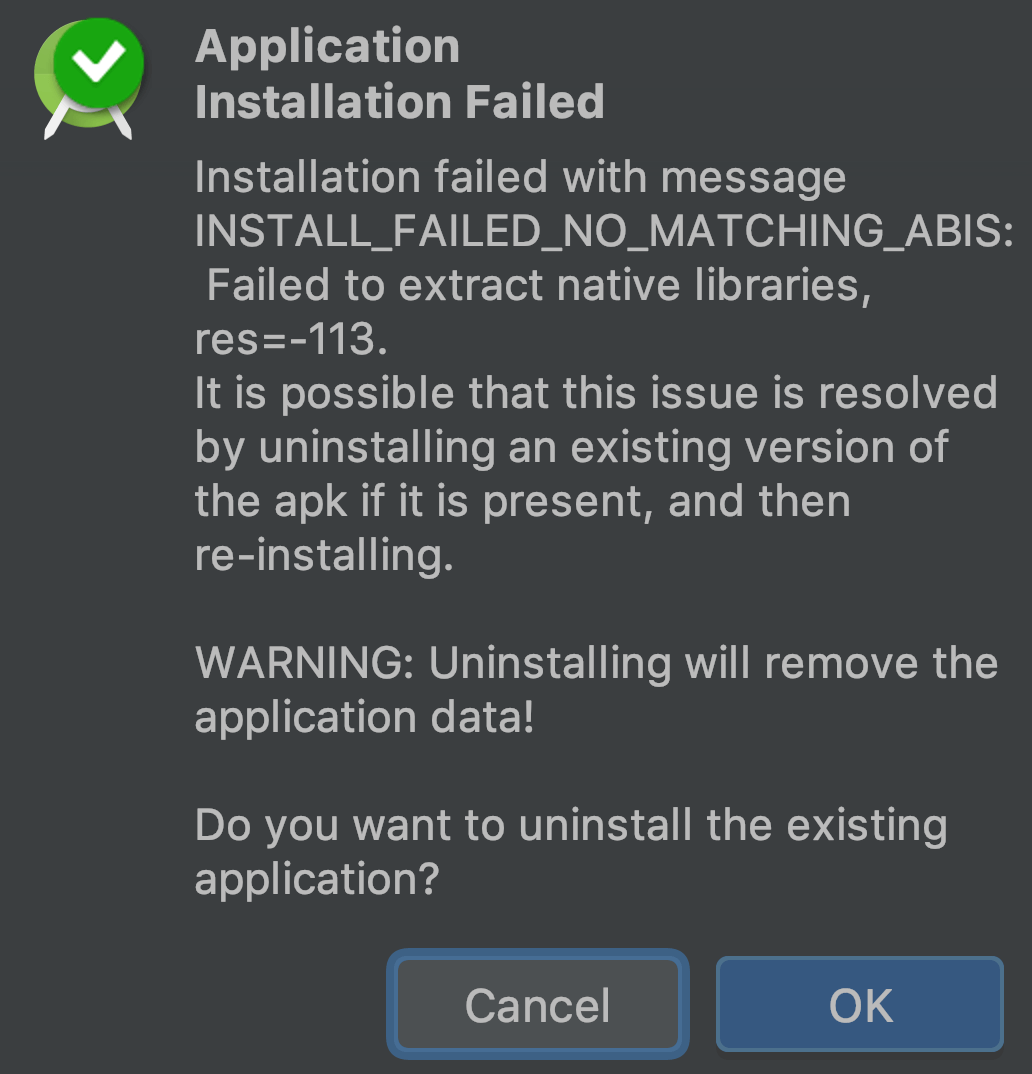
You can fix this by first selecting the correct build variant and then running the app again.