RxJava Combining Operators

In this tutorial, you’ll use RxJava combining operators to merge, filter and transform your data into succinct and reusable streams. By Prashant Barahi.

Leave a rating/review
Download materials
Save for later
Share

RxJava is a ReactiveX port for Java and a programming paradigm that provides a way to put static items into motion. It comes packed with many intuitive APIs to merge, filter, transform or otherwise alter the stream of data.

But what does “putting static items into motion” mean? Think of it this way — as you’re reading this tutorial, your brain works in an RxJava-like fashion. It converts static text into a stream of words, and then it transforms the words into your inner voice. Some information is even discarded, as though your mind is filtering it out. And if you’re listening to music while reading, your brain is combining the streams from both sources, much like RxJava’s combining operators.

You’ll see several of these nifty features explained in this tutorial. You’ll also:

  • Understand RxJava combining operators and their behavior
  • Use combining operators to consolidate multiple streams
  • Convert UI events into streams and then combine them

You’ll implement an app called TouRx. With TouRx, you can find your next vacation, calculate the travel cost and even configure the UI if you’re super picky about how you want your vacations shown to you. :]

TouRx App Tour

So, pack your bags and get ready!

Note: This tutorial assumes you’re familiar with the basics of Android development in Kotlin with RxJava. If you’re new to Kotlin and Android, check out Kotlin For Android: An Introduction and this Beginning Android Development with Kotlin tutorial.

To start learning RxJava, read this Reactive Programming with RxAndroid in Kotlin tutorial.

Getting Started

Download the starter project by clicking the Download Materials button at the top or bottom of the tutorial. Launch Android Studio 4.0 or later and select Open an existing Android Studio project. Then navigate to and open the starter project’s folder.

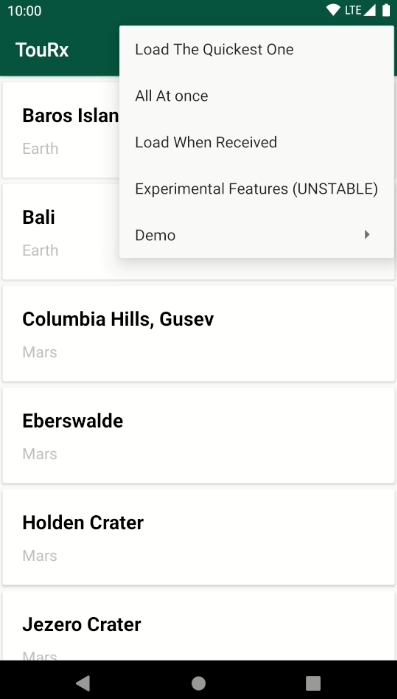
Build and run the app. You’ll see the following screen:

TouRx Main Screen

You’ll see a list of places from Earth and Mars. Tapping on any of them will show the trip details and cost. In the top-right corner, there’s a menu that lets you configure the app behavior. Most of these functions don’t do anything in the starter project yet, as their corresponding PlaceListViewModel functions are blank. You’ll fill each up as you progress through this tutorial.

The important files to note are:

  • BaseViewModel.kt, which contains an abstract ViewModel class that provides RxJava-compatible handlers like onErrorHandler, onDataLoadHandler, onSuccessHandler and onCompleteHandler. These update the UI state and use LiveData for their reactive interface. These handlers must operate on the main thread.
  • BaseActivity.kt, which contains the base activity class that notifies children classes whenever there’s a change in the state.
  • ApiService.kt, which provides the blueprint to handle IO operations. MockApiService is an implementation that simulates “expensive” IO operations using a Room database while also adding some delay in every call. It’s important to note that fetchMarsPlaces() is slower than fetchEarthPlaces().
  • State.kt represents the states of the IO operations.

The app needs to perform multiple IO operations to display the data. You’ll use RxJava’s combining operators in the upcoming sections to accomplish this task. But first, you’ll learn more about what they are.

What Are RxJava Combining Operators?

In the Reactive Programming with RxAndroid in Kotlin: An Introduction tutorial, you learned about RxJava’s Observable and Flowable and how to operate on them. With combining operators, you can combine and consolidate them.

Some of the combining operators provided by RxJava are:

  • merge
  • concat
  • combineLatest
  • zip
  • amb
  • startWith
  • mergeDelayError
  • switchOnNext
  • join
  • groupJoin
Note: RxJava also provides a corresponding instance method (typically ending with _With(), like mergeWith(), concatWith(), zipWith and so on) for most of the static method operators listed above. RxKotlin provides a Kotlin-friendly way of using RxJava by delegating the calls to the corresponding RxJava method.

You’ll learn about the behavior of these operators in the upcoming sections, starting with the ambiguous operator.

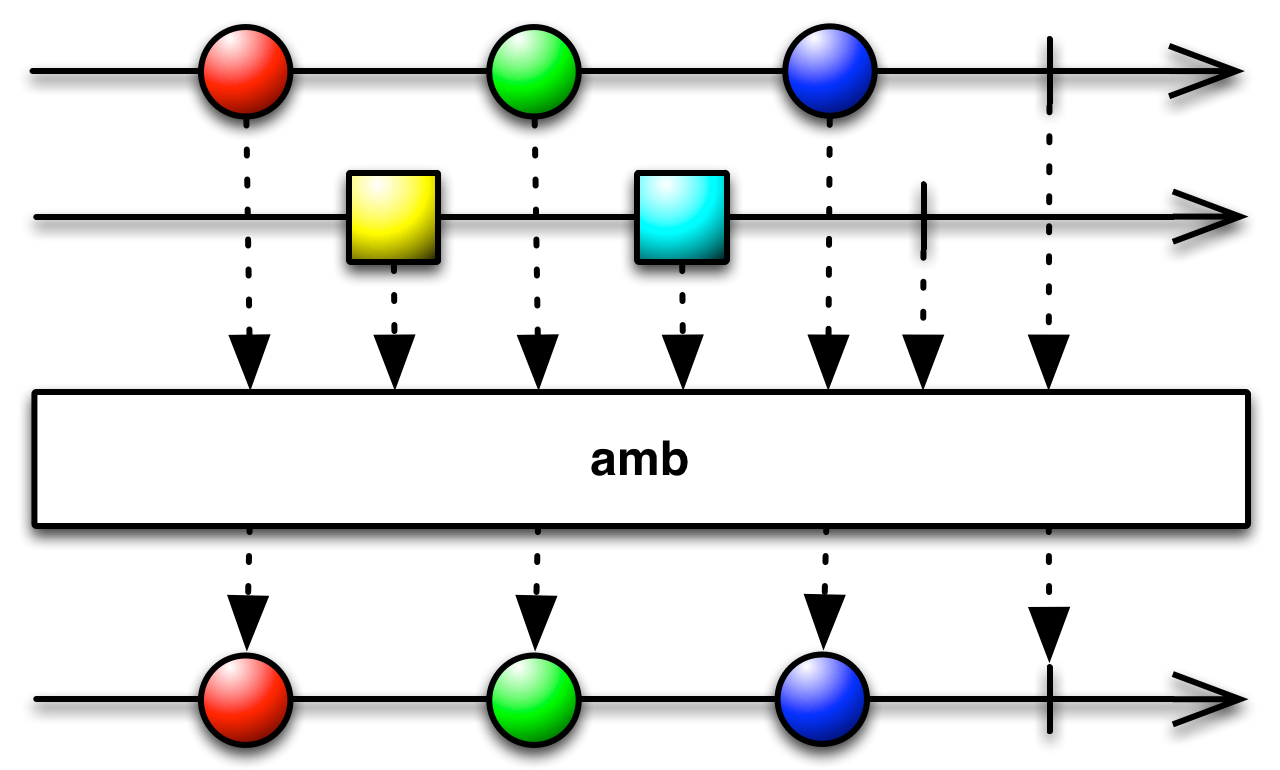
Using the amb Operator to Load the Fastest Source

The Ambiguous operator, better known as amb, makes its sources “compete” against each other. The fastest source to emit a result gets relayed down the chain, while all other sources are disposed. RxJava also provides ambWith() to perform the ambiguous operation using only two sources.

Ambigious Operator

On the listing screen, the fastest source loads using ambWith(). Open PlaceListViewModel.kt and place the following code inside loadTheQuickestOne():

startLoading()
val earthSource = service.fetchEarthPlaces()
val marsSource = service.fetchMarsPlaces()
    .doOnDispose { Log.d(LOG_TAG, "Disposing mars sources") }

earthSource.ambWith(marsSource)
    .subscribeOn(Schedulers.io())
    .doOnSubscribe { recordStartTime() }
    .observeOn(AndroidSchedulers.mainThread())
    .subscribeBy(onSuccess = onSuccessHandler, onError = onErrorHandler)
    .addTo(disposable)

In the code above, earthSource responds (or emits) faster than marsSource. The streams are being combined with ambWith, so the result from earthSource gets displayed while marsSource gets disposed.

Build and run. Tap Load The Quickest One from the menu.

Ambigious Operator Demo

When you have many streams, the static method amb() can take in a collection of Observable, allowing you to specify a large number of sources and only allowing the quickest one to move downstream.

In the next section, you’ll learn about the zip operator and how it can simultaneously accommodate the content of multiple streams.

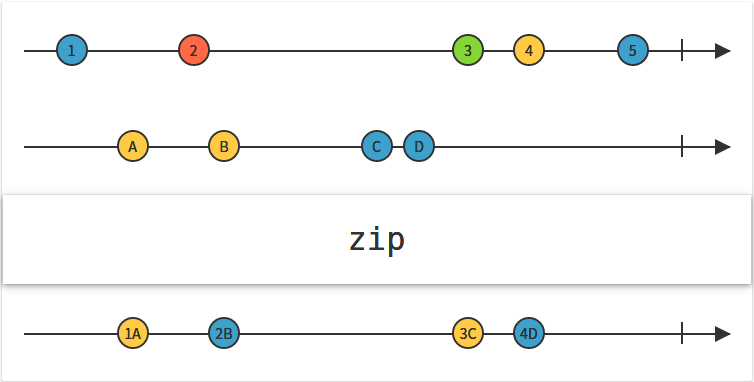
Using the zip Operator to Load All Sources At Once

The zip operator and its instance method flavor, zipWith(), allow you to take an emission from each Observable source and combine them into a single emission. You must pass in a lambda, which defines how they combine, as the last argument.

Zip Operator

RxKotlin provides a simpler zipWith() extension function that combines emission from two sources into a Pair — so you don’t have to supply the lambda as the last argument when using this.

Open PlaceDetailViewModel.kt. You can see that loadPlaceDetails() uses zipWith from RxKotlin to combine two sources into a Pair:

fun loadPlaceDetails(id: Int) {
  startLoading()
  val costSource = service.fetchCostById(id)
  val placeSource = service.fetchPlaceById(id)
  
  costSource.zipWith(placeSource)
      .subscribeOn(Schedulers.io())
      .doOnSubscribe { recordStartTime() }
      .observeOn(AndroidSchedulers.mainThread())
      .map {
        return@map PlaceDetail(cost = it.first, place = it.second)
      }
      .subscribeBy(onSuccess = onSuccessHandler, onError = onErrorHandler)
      .addTo(disposable)
}    

Launch the app and click on any of the places to view its details. costSource and placeSource are IO operations with varying delays, however, the data in PlaceDetailActivity reacts as if they load at the same time. This is because zipWith waits for the emission from both sources to couple them into a Pair and relay them down the chain.

Note: zipWith is an extension from RxKotlin and is different than RxJava’s zipWith in terms of the input argument. RxKotlin’s version takes in one argument only and relays the Pair of the emission down the chain. So, the import statement must look like import io.reactivex.rxkotlin.zipWith.

Zipping multiple Observables is useful when you need results from multiple sources simultaneously. Open PlaceListViewModel.kt and put the following code inside loadAllAtOnce():

startLoading()
service.fetchEarthPlaces()
    .zipWith(service.fetchMarsPlaces())
    .subscribeOn(Schedulers.io())
    .observeOn(AndroidSchedulers.mainThread())
    .doOnSubscribe { recordStartTime() }
    .map {
      return@map listOf(*it.first.toTypedArray(), *it.second.toTypedArray())
    }
    .subscribeBy(onSuccess = onSuccessHandler, onError = onErrorHandler)
    .addTo(disposable)

Build and run, and tap All At Once in the menu.

Zip Operator Demo

You’ll see the data from Mars and Earth sources loads simultaneously, despite the varying delays.

With zip, an emission from one source waits to get paired with the emission of other sources. So if one of the sources calls onComplete(), the emissions from others will drop. This behavior implies that faster sources have to wait on slower sources to provide emissions to couple with.

Now that you know how to use the zip operator, you’ll learn about the merge operator.

Using the merge Operator to Load Data ASAP

The merge operator subscribes to all the passed sources simultaneously and relays their emissions as soon as they’re available. Hence, it doesn’t guarantee the sequential ordering of the emissions, which makes it suitable for handling infinite sources.

Merge Operator

RxJava also provides an instance method, mergeWith(), to merge two sources.

Open SplashViewModel.kt. The class contains populateData(), and the splash screen loads using this method when the app starts:

fun populateData(places: Places, costs: List<Cost>) {
  val insertPlaceSource = database.getPlaceDao().bulkInsert(places)
      .delay(2, TimeUnit.SECONDS)
      .doOnComplete { Log.i(LOG_TAG, "Completed inserting places into database") }
  val insertCostSource = database.getCostDao().bulkInsert(costs)
      .delay(1, TimeUnit.SECONDS)
      .doOnComplete { Log.i(LOG_TAG, "Completed inserting costs into database") }

  insertPlaceSource.mergeWith(insertCostSource)
      .subscribeOn(Schedulers.io())
      .observeOn(AndroidSchedulers.mainThread())
      .subscribeBy(onComplete = onCompleteHandler, onError = onErrorHandler)
      .addTo(disposable)
}

Both insertPlaceSource and insertCostSource bulk insert corresponding items into the database. Below their definitions, the two streams merge, and the resulting Completable invokes onCompleteHandler, signaling that both of them have completed. You can assess the Logcat to see how the merge operator behaves. Enter –> into the Logcat search box to filter out noise from other apps:

2020-08-21 21:35:24.368 I/-->: Completed inserting costs into database
2020-08-21 21:35:25.366 I/-->: Completed inserting places into database
2020-08-21 21:35:25.366 I/-->: completeHandler after: 2s

In PlaceListActivity, mergeWith() can be used to load the result into the RecyclerView adapter as soon as it’s available. Open PlaceListViewModel.kt and confirm that loadOnReceive() is using mergeWith() to do exactly that.

Build and run. In the menu, tap Load When Received.

Merge Operator Demo

You’ll see that Earth’s places load before Mars’ places. Why? Recall the merge operator’s behavior — unlike the zip operator that waits for all sources to emit, the merge operator relays the emissions as soon as they’re available.

It’s important to remember that ordering isn’t guaranteed when using the merge operator. To maintain the order, RxJava provides the concatenation operator. But before getting into that, you’ll learn about converting UI events into streams and another combining operator — startWith.

Using the startWith Operator to Emit an Item Immediately

The startWith operator returns an Observable that emits a specific item before it begins streaming items that are sent by the source.

startWith Operator

The Android SDK provides a callback mechanism to perform actions on UI events like button clicks, scroll changes, etc. Using this allows you to, for example, create an observable source that emits on every UI event callback using Observable.create(), as explained in the Reactive Programming with RxAndroid in Kotlin tutorial.

Open PlaceDetailActivity.kt. Observable.create() is used in conjuntion with extention methods to convert UI events to observable sources:

/**
* Converts the checked change event of [CheckBox] to streams
*/
private fun CheckBox.toObservable(): Observable<Boolean> {
    return Observable.create<Boolean> {
    setOnCheckedChangeListener { _, isChecked ->
        it.onNext(isChecked)
    }
    }.startWith(isChecked)
}

The extension method above returns an Observable which, when subscribed, starts receiving check change events in the form of emissions. Before that, it immediately emits the argument that’s passed to startWith(), which is the isChecked value of the checkbox.

Remember you need to subscribe to the Observable returned by the extension functions to start receiving the events; calling the extension function isn’t enough:

val checkboxSource = checkbox.toObservable()
checkboxSource.subscribe { 
    Log.d(LOG_TAG, "New Checkbox value: $it")    
}

You can subscribe to the stream using the code above.

Now that you’ve learned how to turn UI events into Observables, you’ll learn about the concatenation operator.

Using the concat Operator

The concat operator is similar to the merge operator, with one very important distinction: It fires emission of sources sequentially. It won’t move on to the next source until the current one calls onComplete().

Concat Operator

This behavior makes it unsuitable for handling infinite sources, as it’ll forever emit from the current source and keep the others waiting.

In loadDataInUI inside PlaceDetailActivity.kt, you can see that combineUsingConcat() uses concat() to combine the events of Checkbox and NumberPicker:

private fun combineUsingConcat(
  booleanObservable: Observable<Boolean>,
  integerObservable: Observable<Int>
): Disposable {
    return Observable.concat(booleanObservable, integerObservable)
        .subscribeOn(AndroidSchedulers.mainThread())
        .observeOn(AndroidSchedulers.mainThread())
        .subscribeBy(onNext = { input ->
          Log.i(LOG_TAG, input.toString())
        }).addTo(disposable)
}

These individual Observables are infinite in the sense that they never call onComplete(); they’re disposed only when the activity is destroyed. So, using concat() or concatWith() will only relay items from the fastest source while the other one is “starved”. If you assess the Logcat, you can see that only one of the two (whichever gets to call startWith the earliest) gets printed.

Despite these gotchas, concat is the go-to operator when ordering is crucial.

You can correct the current UI behavior using combineLatest, which you’ll learn about next.

Using the combineLatest Operator to Correct the UI Behavior

The combineLatest() operator immediately couples the latest emissions from every other source for every emission. This behavior makes it perfect for combining UI inputs.

combineLatest Operator

Open PlaceDetailActivity.kt, and in loadDataInUI(), remove combineUsingConcat() and replace it with a call to combineUsingCombineLatest(), as shown below:

val isTwoWayTravelObservable = twoWayTravelCheckbox.toObservable()
val totalPassengerObservable = numberOfPassengerPicker.toObservable()
// combineUsingConcat(isTwoWayTravelObservable, totalPassengerObservable)
combineUsingCombineLatest(this, isTwoWayTravelObservable, totalPassengerObservable)

combineUsingCombineLatest() uses combineLatest() to pair the latest value from NumberPicker with the latest isChecked value of Checkbox. Then it uses them to calculate the total price of the trip, as shown in the code below:

private fun combineUsingCombineLatest(
    data: PlaceDetail, booleanObservable: Observable<Boolean>,
    integerObservable: Observable<Int>
) {
  Observable.combineLatest<Boolean, Int, Pair<Boolean, Int>>(
      booleanObservable,
      integerObservable,
      BiFunction { t1, t2 ->
        return@BiFunction Pair(t1, t2)
      })
      .subscribeOn(AndroidSchedulers.mainThread())
      .observeOn(AndroidSchedulers.mainThread())
      .subscribeBy(onNext = { input ->
        val passengerCount = input.second
        val isTwoWayTravel = input.first
        resultTextView.text =
            viewModel.calculateTravelCost(data.cost, passengerCount, isTwoWayTravel)
                .toString()
      }).addTo(disposable)
}

Build and run. Click on any of the places. Now the UI should work as expected.

CombineLatest Demo

Next, you’ll learn about mergeDelayError.

Using the mergeDelayError Operator

MockApiService.kt has a fetchFromExperimentalApi(), which returns an error as soon as it’s subscribed to. Using the merge operator to join fetchMarsPlaces(), fetchEarthPlaces() and fetchFromExperimentalApi() will immediately call onErrorHandler — with no time for the first two to emit. With mergeDelayError, you can allow an observer to receive all successfully emitted items without being interrupted by an error.

mergeDelayError Operator

To see the behavior of mergeDelayError, open PlaceListViewModel.kt and place the following code inside loadExperimental():

startLoading()
Single.mergeDelayError(
    service.fetchFromExperimentalApi(),
    service.fetchMarsPlaces(),
    service.fetchEarthPlaces()
).subscribeOn(Schedulers.io())
    .doOnSubscribe { recordStartTime() }
    .observeOn(AndroidSchedulers.mainThread(), true)
    .subscribeBy(
        onNext = onDataLoadHandler,
        onComplete = onCompleteHandler,
        onError = onErrorHandler
    )
    .addTo(disposable)

Build and run. Tap the “Experimental Features (UNSTABLE)” item from the menu.

mergeDelayError Operator

You’ll see a toast with an error message only after the two sources, fetchMarsPlaces() and fetchEarthPlaces(), have emitted. Despite occurring before both streams complete, the error is sent only after they do.

Next, you’ll learn about the switch operator.

Assessing the Switch Operator

switchOnNext subscribes to an Observable that emits Observables. It unsubscribes from the previously emitted source when a new Observable is emitted from the source, and it starts emitting items from the new source instead. Any emissions from the previous Observable are dropped.

switchOnNext Operator

Open PlaceListViewModel.kt and put the below snippet inside switchOnNext():

disposeCurrentlyRunningStreams()

// 1
val outerSource = Observable.interval(3, TimeUnit.SECONDS)
    .doOnNext {
      Log.i(LOG_TAG, "Emitted by OuterSource: $it")
    }

// 2
val innerSource = Observable.interval(1, TimeUnit.SECONDS)
    .doOnSubscribe {
      Log.i(LOG_TAG, "Starting InnerSource")
    }

// 3
Observable.switchOnNext(
    outerSource.map { return@map innerSource }
)
    .doOnNext {
      Log.i(LOG_TAG, "Relayed items $it")
    }
    .subscribeOn(Schedulers.single())
    .observeOn(Schedulers.single())
    .subscribe().addTo(disposable)

Here’s what the code above does. It:

  1. Creates a source, outerSource, that emits an item every three seconds
  2. Creates another source, innerSource, that emits an item every second
  3. Uses switchOnNext(), which causes every item emitted by the outer source (i.e. onNext) to create the inner source. When the outer Observable emits another item, the inner one gets discarded and a new one is created, which is then used to emit items.For every item emitted by the outer Observable (i.e. every three seconds), the inner observable manages to emit three items (one item per second). The last item isn’t relayed downstream, as the outer source has already emitted an item (similar to in the marble diagram above).

Build and run, and tap Switch On Next located inside Demo. Note that every feature inside Demo is printed in Logcat and isn’t visible in TouRx’s UI. So open up Logcat to assess the printed logs and input –> to filter out the noise. You’ll get something like this:

2020-08-21 22:02:18.964 I/-->: Emitted by OuterSource: 0
2020-08-21 22:02:18.964 I/-->: Starting InnerSource
2020-08-21 22:02:19.965 I/-->: Relayed items 0
2020-08-21 22:02:20.964 I/-->: Relayed items 1
2020-08-21 22:02:21.964 I/-->: Emitted by OuterSource: 1
2020-08-21 22:02:21.964 I/-->: Starting InnerSource
2020-08-21 22:02:22.964 I/-->: Relayed items 0
2020-08-21 22:02:23.964 I/-->: Relayed items 1
2020-08-21 22:02:24.964 I/-->: Emitted by OuterSource: 2
2020-08-21 22:02:24.964 I/-->: Starting InnerSource
2020-08-21 22:02:25.964 I/-->: Relayed items 0
2020-08-21 22:02:26.964 I/-->: Relayed items 1
2020-08-21 22:02:27.964 I/-->: Emitted by OuterSource: 3

Next, you’ll learn about the join operator.

Assessing the join Operator

The join operator combines the items emitted by two sources whenever an item emitted by one falls under the duration window. In other words, it selects which items to combine based on overlaps between the streams. The windows are implemented as Observables whose lifespans begin with each item emitted by either Observable and end when the window-defining Observable completes emiting. As long as the item’s window is open, it can combine with any item emitted by the other source.

join Operator

To see the join operator in action, open PlaceListViewModel.kt, and inside demonstrateJoinBehavior(), paste the following:

disposeCurrentlyRunningStreams()

// 1
val firstObservable = Observable.interval(1000, TimeUnit.MILLISECONDS)
    .map {
      return@map "SOURCE-1 $it"
    }
// 2
val secondObservable = Observable.interval(3000, TimeUnit.MILLISECONDS)
    .map { return@map "SOURCE-2 $it" }

// 3
val firstWindow = Function<String, Observable<Long>> {
  Observable.timer(0, TimeUnit.SECONDS)
}
val secondWindow = Function<String, Observable<Long>> {
  Observable.timer(0, TimeUnit.SECONDS)
}

// 4
val resultSelector = BiFunction<String, String, String> { t1, t2 ->
  return@BiFunction "$t1, $t2"
}
    

//5
firstObservable.join(secondObservable, firstWindow, secondWindow, resultSelector)
    .doOnNext {
      Log.i(LOG_TAG, it)
    }
    .subscribeOn(Schedulers.single())
    .observeOn(Schedulers.single())
    .subscribe().addTo(disposable)

Now, build and run. Tap Demo from top-right menu, and click Join. This will fire up demonstrateJoinBehavior() in PlaceListViewModel. Open the Logcat to assess the logs. Your logs will look similar to this:

2020-08-21 22:18:20.562 I/-->: SOURCE-1 4, SOURCE-2 1
2020-08-21 22:18:23.562 I/-->: SOURCE-1 7, SOURCE-2 2
2020-08-21 22:18:26.562 I/-->: SOURCE-1 10, SOURCE-2 3
2020-08-21 22:18:29.562 I/-->: SOURCE-1 13, SOURCE-2 4
2020-08-21 22:18:32.562 I/-->: SOURCE-1 16, SOURCE-2 5
2020-08-21 22:18:35.562 I/-->: SOURCE-1 19, SOURCE-2 6
2020-08-21 22:18:38.562 I/-->: SOURCE-1 22, SOURCE-2 7
2020-08-21 22:18:41.562 I/-->: SOURCE-1 25, SOURCE-2 8
2020-08-21 22:18:44.562 I/-->: SOURCE-1 28, SOURCE-2 9

It’s time to break down the reason for this log! The code above:

  1. Creates a source, firstObservable, that emits items every second
  2. Creates a second source, secondObservable, that emits items every three seconds
  3. Initializes two windows — firstWindow and secondWindow — which define the lifespan of the window for firstObservable and secondObservable, respectively
  4. Declares a resultSelector that couples the emitted items into a String
  5. Uses join() to perform a join operation on the Observables created in the first two steps. Since the window duration is zero-seconds wide, both firstWindow and secondWindow must emit at the same time in order for them to be coupled and relayed down. With the specified intervals of sources and the length of the window, the overlaps occur every three seconds.

Try experimenting with different window lengths to learn more about the join operator. Next, you’ll learn about a similar operator to join: groupJoin.

Assessing the groupJoin Operator

The groupJoin operator is similar to the join operator, except the argument that defines how the items should be combined — i.e. resultSelector — pairs individual items emitted from the left source with another source that holds all the values emitted within the window.

GroupJoin Operator

Time to see the GroupJoin operator in action! Open PlaceListViewModel, and in demonstrateGroupJoin(), place the following code:

disposeCurrentlyRunningStreams()
// 1
val leftSource = Observable.interval(1, TimeUnit.SECONDS)
    .map { return@map "SOURCE-1 $it" }

val rightSource = Observable.interval(5, TimeUnit.SECONDS)
    .map { return@map "SOURCE-2 $it" }

// 2
val leftWindow = Function<String, Observable<Long>> {
  Observable.timer(0, TimeUnit.SECONDS)
}

val rightWindow = Function<String, Observable<Long>> {
  Observable.timer(3, TimeUnit.SECONDS)
}

// 3
val resultSelector = BiFunction<String, Observable<String>, Observable<Pair<String, String>>> { t1, t2 ->
  return@BiFunction t2.map {
    return@map Pair(t1, it)
  }
}

leftSource.groupJoin(rightSource, leftWindow, rightWindow, resultSelector)
    .concatMap {
      return@concatMap it
    }
    .subscribeOn(Schedulers.single())
    .observeOn(Schedulers.single())
    .doOnNext {
      Log.i(LOG_TAG, it.toString())
    }
    .subscribe().addTo(disposable)

Finally, build and run. Click on the top-right menu and select Group Join inside Demo. Then, open the Logcat to see the printed logs:

2020-08-21 23:17:17.756 I/-->: (SOURCE-1 4, SOURCE-2 0)
2020-08-21 23:17:18.756 I/-->: (SOURCE-1 5, SOURCE-2 0)
2020-08-21 23:17:19.756 I/-->: (SOURCE-1 6, SOURCE-2 0)
2020-08-21 23:17:20.756 I/-->: (SOURCE-1 7, SOURCE-2 0)
2020-08-21 23:17:22.756 I/-->: (SOURCE-1 9, SOURCE-2 1)
2020-08-21 23:17:23.756 I/-->: (SOURCE-1 10, SOURCE-2 1)
2020-08-21 23:17:24.756 I/-->: (SOURCE-1 11, SOURCE-2 1)
2020-08-21 23:17:25.756 I/-->: (SOURCE-1 12, SOURCE-2 1)
2020-08-21 23:17:27.756 I/-->: (SOURCE-1 14, SOURCE-2 2)
2020-08-21 23:17:28.756 I/-->: (SOURCE-1 15, SOURCE-2 2)
2020-08-21 23:17:29.756 I/-->: (SOURCE-1 16, SOURCE-2 2)
2020-08-21 23:17:30.756 I/-->: (SOURCE-1 17, SOURCE-2 2)
2020-08-21 23:17:32.756 I/-->: (SOURCE-1 19, SOURCE-2 3)
2020-08-21 23:17:33.756 I/-->: (SOURCE-1 20, SOURCE-2 3)
2020-08-21 23:17:34.756 I/-->: (SOURCE-1 21, SOURCE-2 3)
2020-08-21 23:17:35.756 I/-->: (SOURCE-1 22, SOURCE-2 3)

Here’s a breakdown of what the code above is doing:

  1. leftSource emits an item every second, whereas rightSource emits an item every five seconds.
  2. leftWindow and rightWindow are windows for leftSource and rightSource, respectively. Note the difference in the lifespan of these windows.
  3. The signature of resultSelector is an important distinction between the GroupJoin and the Join operators. Since rightWindow has a lifespan of three seconds and leftSource emits every second, the second argument in the lambda collects all the emissions in that three-second window while mapping each into a Pair before sending it downstream.

Experiment with varying window sizes to get more familiar with the GroupJoin operator.

Where to Go From Here?

Download the completed project files by clicking the Download Materials button at the top or bottom of the tutorial.

Congratulations on making it all the way through!

You’ve learned about combining operators, so now you can start leveraging the power of RxJava in your projects. Find out more about other operators by reading the ReactiveX documentation. And RxMarbles is an awesome site that provides interactive diagrams on different RxJava operators, so don’t forget to check it out!

And if you’re interested in learning more, check out the tutorial on filtering with operators, or if you’re interested in taking your RxJava knowledge into Android, check out the book on Reactive Programming.

We hope you enjoyed this tutorial. If you have any questions or comments, please join the forum discussion below!