SMS User Authentication With Vapor and AWS
In this SMS user authentication tutorial, you’ll learn how to use Vapor and AWS SNS to authenticate your users with their phone numbers. By Natan Rolnik.
Sign up/Sign in
With a free Kodeco account you can download source code, track your progress, bookmark, personalise your learner profile and more!
Create accountAlready a member of Kodeco? Sign in
Sign up/Sign in
With a free Kodeco account you can download source code, track your progress, bookmark, personalise your learner profile and more!
Create accountAlready a member of Kodeco? Sign in
Sign up/Sign in
With a free Kodeco account you can download source code, track your progress, bookmark, personalise your learner profile and more!
Create accountAlready a member of Kodeco? Sign in
Contents
SMS User Authentication With Vapor and AWS
25 mins
- Getting Started
- How SMS Auth Works Behind the Curtain
- Interacting With AWS SNS
- Your First API: Sending the SMS
- Your Second API: Authenticating the Received Code
- Validating the Code
- Returning the User and the Session Token
- Testing the APIs With cURL
- Registering the Routes
- Calling the First API
- Calling the Second API
- Where to Go From Here?
There are many reasons why you’d want to verify your app’s users and identify them by phone number. SMS-based authentication is one of the options for a quick login experience that doesn’t require remembering passwords.
Nowadays, there are many services that provide SMS — aka short message service — authentication on your behalf. Using one might save you some time writing backend code, but it adds another dependency to your server and all your clients.
Writing your own solution is simpler than you think. If you already have a Vapor server for your app, or if you want to build a microservice for it, then you’ve come to the right place!
In this tutorial, you’ll learn how to build your own SMS authentication with Vapor and Amazon Web Services’ SNS. SNS, or Simple Notification Service, is the AWS service for sending messages of various types: push, email and of course, SMS. It requires an AWS account and basic knowledge of Vapor and Swift.
By the end of this tutorial, you’ll have two HTTP APIs that will allow you to create a user for your app.
Getting Started
Download the materials for this tutorial using the Download Materials button at the top or bottom of this page. Navigate to the materials’ Starter directory in your favorite terminal application and run the following command:
open Package.swift
Once your project is open in Xcode, it’ll fetch all the dependencies defined in the manifest. This may take a few minutes to complete. Once that’s finished, build and run the Run scheme to make sure the starter project compiles. As a last step before you start coding, it’s always a great idea to browse through the starter project’s source code to get a sense of the layout and various pieces.
How SMS Auth Works Behind the Curtain
You’ve most likely used an app with SMS authentication before. Insert your phone number, move to another screen, enter the code received in the SMS and you’re in. Have you ever thought about how it works behind the scenes?
If you haven’t, fear not: I’ve got you covered!
- The client asks the server to send a code to a phone number.
- The server creates a four- or six-digit code and asks an SMS provider to deliver it to the phone number in question.
- The server adds an entry in the database associating the sent code with the phone number.
- The user receives the SMS and inputs it in the client.
- The client sends the code back to the server.
- The server queries the database for the phone number and tries to match the code it saved before to the code it received.
- If they match, the server looks in the database to see if a user is associated with the phone number. If it doesn’t find an existing user, it creates a new one.
- The server returns the user object, along with some sort of authentication token, to the client.
You can see the steps detailed above in this diagram:
Interacting With AWS SNS
To execute step two in the diagram above, you’ll need to create a class that asks SNS to send the text message. In the Sources ► App folder, create a new Swift file named SMSSender.swift. Make sure you’re creating this file in the App target. Next, add the following:
import Vapor
// 1
protocol SMSSender {
// 2
func sendSMS(
to phoneNumber: String,
message: String,
on eventLoop: EventLoop) throws -> EventLoopFuture<Bool>
}
There are a few things to notice here:
- You define a protocol called
SMSSender
, which creates an abstraction around sending an SMS. This means it can potentially be used to create many classes, each with its own mechanism for SMS delivery. -
sendSMS(to:message:on:)
receives a destination phone number, a text message and the currentEventLoop
, and it returns anEventLoopFuture<Bool>
. This is a future value that indicates if sending the message succeeded or failed. You can learn more aboutEventLoopFuture
and asynchronous programming in this article or Vapor’s documentation.
Next, you’ll create the class that implements this protocol. Under the Sources ► App folder, create a file named AWSSNSSender.swift and add the following code to it:
import Vapor
import SNS
class AWSSNSSender {
// 1
private let sns: SNS
// 2
private let messageAttributes: [String: SNS.MessageAttributeValue]?
init(accessKeyID: String, secretAccessKey: String, senderId: String?) {
// 3
sns = SNS(accessKeyId: accessKeyID, secretAccessKey: secretAccessKey)
// 4
messageAttributes = senderId.map { sender in
let senderAttribute = SNS.MessageAttributeValue(
binaryValue: nil,
dataType: "String",
stringValue: sender)
return ["AWS.SNS.SMS.SenderID": senderAttribute]
}
}
}
This is the class definition and initialization. Here’s an overview of what the code above does.
- This keeps a private property of the
SNS
class. This class comes from the AWSSDKSwift dependency declared in Package.swift. Notice that in the second line, you need to import theSNS
module. - SNS allows setting specific message attributes. You’re interested in
SenderID
so that the SMS messages arrive with the sender name of your app. The class will usemessageAttributes
whenever a message is sent as part of the payload. - The initializer receives your AWS access key and the matching secret. You pass these on to the
SNS
class initializer. - The initializer may also receive an optional
senderId
. Use themap
method on the
Optional
argument to map it to themessageAttributes
dictionary. IfsenderId
isnil
,messageAttributes
will also benil
. If it has a value,map
will transform the string into the needed dictionary.
For security, and to allow for easier configuration, don’t hardcode your AWS keys into your app. Instead, a best practice is to use environment variables. These variables are set in the environment in which the server process runs, and they can be accessed by the app at runtime.
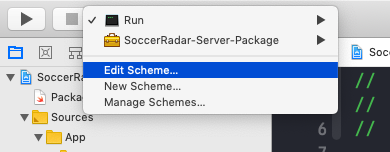
To add environment variables in Xcode, edit the Run scheme:

You can also edit the current scheme by typing Command + Shift + ,
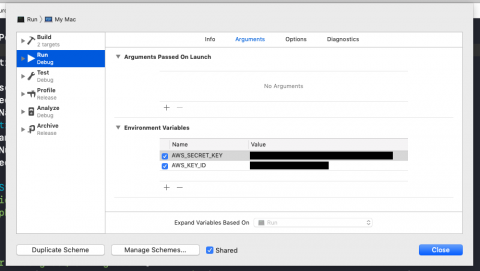
Then, select the Arguments tab. Under Environment Variables, click the + button to add a new variable.
You’ll need two variables: AWS_KEY_ID and AWS_SECRET_KEY. Add the corresponding value for each one:

Add the values of the variables in Xcode.
Next, add an extension below the code you just wrote to make AWSSNSSender
conform to the SMSSender
protocol:
extension AWSSNSSender: SMSSender {
func sendSMS(
to phoneNumber: String,
message: String,
on eventLoop: EventLoop) throws -> EventLoopFuture<Bool> {
// 1
let input = SNS.PublishInput(
message: message,
messageAttributes: messageAttributes,
phoneNumber: phoneNumber)
// 2
return sns.publish(input).hop(to: eventLoop).map { $0.messageId != nil }
}
}
This protocol conformance is straightforward. It delegates the request to publish a message to the AWS SNS service like so:
- First, you create a
PublishInput
struct with the message, the attributes created in the initialization and the recipient’s phone number. - Next, you ask the
SNS
instance to publish the input. Because it returns anEventLoopFuture<PublishResponse>
in anotherEventLoop
, usehop(to:)
to get back to the request’s event loop. Then map the response to a Boolean by making sure itsmessageId
exists. The existence of themessageId
means that the message has been saved and Amazon SNS will try to deliver it.
Finally, you still need to initialize an instance of AWSSNSSender
and register it in the configuration. In Vapor 4, services can be registered to the Application
instance using storage
. Open SMSSender.swift and add the following code:
// 1
private struct SMSSenderKey: StorageKey {
typealias Value = SMSSender
}
extension Application {
// 2
var smsSender: SMSSender? {
get {
storage[SMSSenderKey.self]
}
set {
storage[SMSSenderKey.self] = newValue
}
}
}
To allow registering a service, you need to:
- Declare a type that conforms to
StorageKey
. The only requirement is having atypealias
for the type of the value you’ll store — in this case, aSMSSender
. - Extending
Application
, add a property forSMSSender
and implement the getter and the setter, which each use the application’sstorage
.
Now it’s time to initialize and register the service. Open configure.swift and add this block of code after try app.autoMigrate().wait()
:
// 1
guard let accessKeyId = Environment.get("AWS_KEY_ID"),
let secretKey = Environment.get("AWS_SECRET_KEY") else {
throw ConfigError.missingAWSKeys
}
// 2
let snsSender = AWSSNSSender(
accessKeyID: accessKeyId,
secretAccessKey: secretKey,
senderId: "SoccerRadar")
// 3
app.smsSender = snsSender
Here’s what you’re doing in the code above:
- You retrieve the AWS keys from your environment variables, throwing an error if your app can’t find them.
- You initialize
AWSSNSSender
with those keys and the app’s name. In this case, the name is SoccerRadar. - You register the
snsSender
as the application’sSMSSender
. This uses the setter you defined in theApplication
extension in the previous code block.
Once you have the sender configured, initialized and registered, it’s time to move on to actually using it.
Your First API: Sending the SMS
When looking at the initial code in the starter project, you’ll find the kinds of definitions outlined below.
Models and Migrations
In Vapor 4, for each model you define, you need to perform a migration and create — or modify — the entity in the database. In the starter project, you’ll find the models and migrations in the folders with the same names.
-
User
/CreateUser
: This entity represents your users. Notice how the migration adds a unique index in thephoneNumber
property. This means the database won’t accept two users with the same phone number. -
SMSVerificationAttempt
/CreateSMSVerificationAttempt
: The server saves every verification attempt containing a code and a phone number. -
Token
/CreateToken
: Whenever a user successfully authenticates, the server generates a session, represented by a token. Vapor will use it to match and authenticate future requests by the associated user.
Others
-
UserController
: This controller handles the requests, asks SNS to send the messages, deals with the database layer and provides adequate responses. - A
String
extension with a method and a computed property.randomDigits
generates ann
-digit numeric code, andremovingInvalidCharacters
returns a copy of the originalString
that has had any character which is not a digit or a+
removed.
Before creating your API method, it’s important to define which data will flow to and from the server. First, the server receives a phone number. After sending the SMS, it returns the phone number — formatted without dashes — and the verification attempt identifier.
Create a new file named UserControllerTypes.swift with the following code:
import Vapor
extension UserController {
struct SendUserVerificationPayload: Content {
let phoneNumber: String
}
struct SendUserVerificationResponse: Content {
let phoneNumber: String
let attemptId: UUID
}
}
Vapor defines the Content
protocol, which allows receiving and sending request and response bodies. Now, create the first request handler. Open UserController.swift and define the method that will handle the request in the UserController
class:
private func beginSMSVerification(_ req: Request) throws -> EventLoopFuture<SendUserVerificationResponse> {
// 1
let payload = try req.content.decode(SendUserVerificationPayload.self)
let phoneNumber = payload.phoneNumber.removingInvalidCharacters
// 2
let code = String.randomDigits(ofLength: 6)
let message = "Hello soccer lover! Your SoccerRadar code is \(code)"
// 3
return try req.application.smsSender!
.sendSMS(to: phoneNumber, message: message, on: req.eventLoop)
// 4
.flatMap { success -> EventLoopFuture<SMSVerificationAttempt> in
guard success else {
let abort = Abort(
.internalServerError,
reason: "SMS could not be sent to \(phoneNumber)")
return req.eventLoop.future(error: abort)
}
let smsAttempt = SMSVerificationAttempt(
code: code,
expiresAt: Date().addingTimeInterval(600),
phoneNumber: phoneNumber)
return smsAttempt.save(on: req)
}
.map { attempt in
// 5
let attemptId = try! attempt.requireID()
return SendUserVerificationResponse(
phoneNumber: phoneNumber,
attemptId: attemptId)
}
}
Here’s a breakdown of what’s going on:
- The method expects a
Request
object, and it tries to decode aSendUserVerificationPayload
from its body, which contains the phone number. - Extract the phone number and remove any invalid characters.
- Create a six-digit random code and generate the text message to send with it.
- Retrieve the registered
SMSSender
from theapplication
object. The force unwrap is acceptable in this case, as you previously registered the service in the server configuration. Then callsendSMS
to send the SMS, passing the request’s event loop as the last parameter. - The
sendSMS
function returns a future Boolean. You need to save the attempt information, so you convert the type of the future from Boolean toSMSVerificationAttempt
. First, make sure the SMS send succeeded. Then, create the attempt object with the sent code, phone number and an expiration of 10 minutes from the request’s date. Finally, store it in the database. - After sending the SMS and saving the attempt record, you create and return the response using the phone number and the ID of the attempt object. It’s safe to call
requireID()
on the attempt after it’s saved and has an ID assigned.
Alright — time to implement your second method!
Your Second API: Authenticating the Received Code
Similar to the pattern you used for the first API, you need to define what the second API should receive and return before implementing it.
Open UserControllerTypes.swift again and add the following structs inside the UserController
extension:
struct UserVerificationPayload: Content {
let attemptId: UUID // 1
let phoneNumber: String // 2
let code: String // 3
}
struct UserVerificationResponse: Content {
let status: String // 4
let user: User? // 5
let sessionToken: String? // 6
}
In the request payload, the server needs to receive the following to match the values and verify the user:
- The attempt ID
- The phone number
- The code the user received
Upon successful validation, the server should return:
- The status
- The user
- The session token
If validation fails, only the status should be present, so user
and sessionToken
are both optional.
As a quick recap, here’s what the controller needs to do:
- Query the database to check if the codes match.
- Validate the attempt based on the expiration date.
- Find or create a user with the associated phone number.
- Create a new token for the user.
- Wrap the user and the token’s value in the response.
This is a lot to handle in a single method, so you’ll split it into two parts. The first part will validate the code, and the second will find or create the user and their session token.
Validating the Code
Add this first snippet to UserController.swift, inside the UserController
class:
private func validateVerificationCode(_ req: Request) throws ->
EventLoopFuture<UserVerificationResponse> {
// 1
let payload = try req.content.decode(UserVerificationPayload.self)
let code = payload.code
let attemptId = payload.attemptId
let phoneNumber = payload.phoneNumber.removingInvalidCharacters
// 2
return SMSVerificationAttempt.query(on: req.db)
.filter(\.$code == code)
.filter(\.$phoneNumber == phoneNumber)
.filter(\.$id == attemptId)
.first()
.flatMap { attempt in
// 3
guard let expirationDate = attempt?.expiresAt else {
return req.eventLoop.future(
UserVerificationResponse(
status: "invalid-code",
user: nil,
sessionToken: nil))
}
guard expirationDate > Date() else {
return req.eventLoop.future(
UserVerificationResponse(
status: "expired-code",
user: nil,
sessionToken: nil))
}
// 4
return self.verificationResponseForValidUser(with: phoneNumber, on: req)
}
}
Here’s what this method does:
- It first decodes the request body into a
UserVerificationPayload
to extract the three pieces needed to query the attempt. Remember that it needs to remove possible invalid characters from the phone number before it can use it. - Then it creates a query on the
SMSVerificationAttempt
, and it finds the first attempt record that matches the code, phone number and attempt ID from the previous step. Notice the usefulness of Vapor Fluent’s support for filtering by key path and operator expression. - It attempts to unwrap the queried attempt’s
expiresAt
date and ensures that the expiration date hasn’t yet occurred. If any of these guards fail, it returns a response with only theinvalid-code
orexpired-code
status, leaving out the user and session token. - It calls the second method, which will take care of getting the user and session token from a validated phone number, and it wraps them in the response.
If you try to compile the project now, it’ll fail. Don’t worry — that’s because verificationResponseForValidUser
is still missing.
Returning the User and the Session Token
Right below the code you added in UserController.swift, add this:
private func verificationResponseForValidUser(
with phoneNumber: String,
on req: Request) -> EventLoopFuture< UserVerificationResponse> {
// 1
return User.query(on: req.db)
.filter(\.$phoneNumber == phoneNumber)
.first()
// 2
.flatMap { queriedUser -> EventLoopFuture<User> in
if let existingUser = queriedUser {
return req.eventLoop.future(existingUser)
}
return User(phoneNumber: phoneNumber).save(on: req)
}
.flatMap { user -> EventLoopFuture<UserVerificationResponse> in
// 3
return try! Token.generate(for: user)
.save(on: req)
.map {
UserVerificationResponse(
status: "ok",
user: user,
sessionToken: $0.value)
}
}
}
}
There’s a lot going on here, but it’ll all make sense if you look at everything piece by piece:
- First, look for an existing user with the given phone number.
-
queriedUser
is optional because the user might not exist yet. If an existing user is found, it’s immediately returned inEventLoopFuture
. If not, create and save a new one. - Finally, create a new
Token
for this user and save it. Upon completion, map it to the response with the user and the session token.
Build and run your server. It should compile without any issues. Now it’s time to call your APIs!
Testing the APIs With cURL
In the following example, you’ll use curl
in the command line, but feel free to use another GUI app you might feel comfortable with, such as Postman or Paw.
Now open Terminal and execute the following command, replacing +1234567890
with your phone number. Don’t forget your country code:
curl -X "POST" "http://localhost:8080/users/send-verification-sms" \
-H 'Content-Type: application/json; charset=utf-8' \
-d $'{ "phoneNumber": "+1234567890" }'
Oops. This request returns an HTTP 404 error: {"error":true,"reason":"Not Found"}
.
Registering the Routes
When you see a 404 error, it’s most likely because the functions weren’t registered with the Router
in use, or the HTTP method used doesn’t match the registered method. You need to make UserController
conform to RouteCollection
so you can register it in the routes configuration. Open UserController.swift and add the following at its end:
extension UserController: RouteCollection {
func boot(routes: RoutesBuilder) throws {
// 1
let usersRoute = routes.grouped("users")
// 2
usersRoute.post("send-verification-sms", use: beginSMSVerification)
usersRoute.post("verify-sms-code", use: validateVerificationCode)
}
}
The code above has two short steps:
- First, it groups the routes under the
users
path. This means that all routes added tousersRoute
will be prefixed byusers
— for example,https://your-server.com/users/send-verification-sms
. - Then it registers two HTTP POST endpoints, providing each endpoint with one of the handler methods you defined above.
Now, open routes.swift and add this line inside the only existing function. This function registers your app’s routes:
try app.register(collection: UserController())
Calling the First API
Build and run your project again and try the previously failing curl
command by pressing the up arrow key followed by Enter. You’ll get the following response with a new UUID:
{
"attemptId": "477687D3-CA79-4071-922C-4E610C55F179",
"phoneNumber": "+1234567890"
}
This response is your server saying that sending the SMS succeeded. Check for the message on your phone.
Excellent! Notice how the sender ID you used in the initialization of AWSSNSSender
is working correctly.
Calling the Second API
Now you’re ready to test the second part of the authentication: verifying the code. Take the attemptId
from the previous request, the phone number you used in the previous step, and the code you received and place them into the following command. Then run the command in Terminal:
curl -X "POST" "http://localhost:8080/users/verify-sms-code" \
-H 'Content-Type: application/json; charset=utf-8' \
-d $'{"phoneNumber": "+1234567890", "attemptId": "<YOUR_ATTEMPT_ID>", "code": "123456" }'
If you replaced each parameter correctly, the request will return an object with three properties: the status, the user object and a session token:
{
"status": "ok",
"user": {
"id": "31D39FAD-A0A9-46E7-91CF-AEA774EA0BBE",
"phoneNumber": "+1234567890"
},
"sessionToken": "lqa99MN31o8k43dB5JATVQ=="
}
Mission accomplished! How cool is it to build this yourself, without giving up on your users’ privacy or adding big SDKs to your client apps?
Where to Go From Here?
Download the completed project files by clicking the Download Materials> button at the top or bottom of this tutorial.
Save the session token in your client apps as long as the user is logged in. Check out Section III: Validation, Users & Authentication of the Server-Side Swift with Vapor book to learn how to use the session token to authenticate other requests. The chapters on API authentication are particularly helpful.
You can also read the documentation of Vapor’s Authentication API to better understand where you should add the session token in subsequent requests.
Do you want to continue improving your SMS authentication flow? Try one of these challenges:
- Start using a PostgreSQL or MySQL database instead of in-memory SQLite and make changes to your app accordingly.
- To avoid privacy issues and security breaches, hash phone numbers before saving and querying them, both in the
User
and theSMSVerificationAttempt
models. - Think of ways to improve the flow. For example, you could add a
isValid
Boolean to make sure the code is only used once, or delete the attempt upon successful verification. - Implement a job that deletes expired and successful attempts.
We hope you enjoyed this tutorial. If you have any questions or comments, please join the forum discussion below!