Deploying Kitura with Docker & Kubernetes: Getting Started
Kitura servers built in Swift are pretty cool, but it’s even cooler to deploy them in the cloud! See how to build a Docker image, then deploy to Kubernetes. By Audrey Tam.
Optional: Viewing in Xcode
If you feel more comfortable when you can view the files in Xcode, enter this command:
swift package generate-xcodeproj
This creates an xcodeproj file in the project folder. Open the project in Xcode by double-clicking this file in Finder, or enter this command in Terminal:
open EmojiJournalServer.xcodeproj
You can also use this command to open the project in Xcode:
xed .
Pushing
In a browser, login to Docker Hub and create a new repository named emojijournal.

Back in Terminal, still in the EmojiJournalServer directory, run this command:
docker tag emojijournal-run:latest <your Docker username>/emojijournal:v1.0.0
You’re creating a tag that refers to your local Docker image — the tag matches your new repository name, and adds a version number.
latest. This ensures that Kubernetes pulls and deploys any new images you push to Docker Hub, because the new image has a different tag.
Now push your tagged image to your Docker repository:
docker push <your Docker username>/emojijournal:v1.0.0
Once that has completed, go back to your browser and reload your Docker Hub repo page to confirm it’s there:

Deploying from Docker to Kubernetes
OK, you’re all set to deploy your app to your IBM Cloud Kubernetes cluster! All you need is a Helm chart … what? how? No worries, it’s already in your Kitura app! You just have to customize it with the name of your Docker image.
In the terminal window with working directory EmojiJournalServer, cd to the directory containing the chart files:
cd chart/emojijournalserver/
Next, open EmojiJournalServer/chart/emojijournalserver/values.yaml in your favorite text editor, and edit the image:repository value:
repository: <your Docker username>/emojijournal
Kubernetes looks in Docker Hub by default, so you don’t need to specify the URL — just write the image name as you would in a docker pull command.
And you don’t have to change the tag value, because that’s the tag I told you to use! ;]
Save values.yaml, then initialize Helm:
helm init
This command configures the local Helm client and installs the Tiller server into your Kubernetes cluster. Tiller interacts with Kubernetes to install, upgrade, rollback, query and remove Kubernetes resources based on your Helm chart.
And — finally! — install the chart into your Kubernetes cluster:
helm install --name emojijournal .
Error: could not find a ready tiller pod, run tiller in your terminal, Control-C to stop it, and then try again.Here’s the output of this command, for my deployment:
NAME:   emojijournalserver
LAST DEPLOYED: Sat Feb  9 16:19:28 2019
NAMESPACE: default
STATUS: DEPLOYED

RESOURCES:
==> v1/Service
NAME                TYPE      CLUSTER-IP      EXTERNAL-IP  PORT(S)         AGE
emojijournalserver  NodePort  172.21.136.154  <none>       8080:32078/TCP  0s

==> v1beta1/Deployment
NAME                           DESIRED  CURRENT  UP-TO-DATE  AVAILABLE  AGE
emojijournalserver-deployment  1        0        0           0          0s

==> v1/Pod(related)
NAME                                            READY  STATUS   RESTARTS  AGE
emojijournalserver-deployment-85f48f796c-zc8sl  0/1    Pending  0         0s
The app is starting up, so the values of CURRENT, AVAILABLE, READY, etc. are all 0.
Enter this helm command to see these values updated to 1, once your app is running:
helm status emojijournal
Kubernetes Terminology
So many moving parts! Time for some definitions:
- Service: An API object that describes how to access applications, such as a set of Pods, and can describe ports and load-balancers.
- Deployment: An API object that manages a replicated application.
- Cluster: A set of machines, called nodes, that run containerized applications managed by Kubernetes. A cluster has several worker nodes and at least one master node.
- Pod: The smallest and simplest Kubernetes object. A Pod represents a set of running containers on your cluster. A Pod is typically set up to run a single primary container.
- Node: A node is a worker machine, which may be a VM or a physical machine. It has an External IP address — available from outside the cluster — and an Internal IP address, routable only within the cluster. IBM Cloud’s names for these are Public IP and Private IP.
To access your application, you have to find the external IP address of the worker node it has been deployed to. Where is it? Time to go exploring!
Enter this kubectl command for another view of your deployed service:
kubectl describe service emojijournalserver
The output lists the same cluster IP address as the helm status command, and also an Endpoint, a Port (8080) and a NodePort (32078, for me):
Name:                     emojijournalserver
Namespace:                default
Labels:                   chart=emojijournalserver-1.0.0
Annotations:              prometheus.io/scrape=true
Selector:                 app=emojijournalserver-selector
Type:                     NodePort
IP:                       172.21.136.154
Port:                     <unset>  8080/TCP
TargetPort:               8080/TCP
NodePort:                 <unset>  32078/TCP
Endpoints:                172.30.172.155:8080
Session Affinity:         None
External Traffic Policy:  Cluster
Events:                   <none>
Accessing your Deployed App
Because you deployed your app to IBM Cloud, you can also view information about it there. On the IBM Cloud Kubernetes Clusters page, select your emojijournalcluster. Then, on the emojijournalcluster page, click the Kubernetes Dashboard button:

Scroll down to see your app in the Deployments section, with one Pod running:

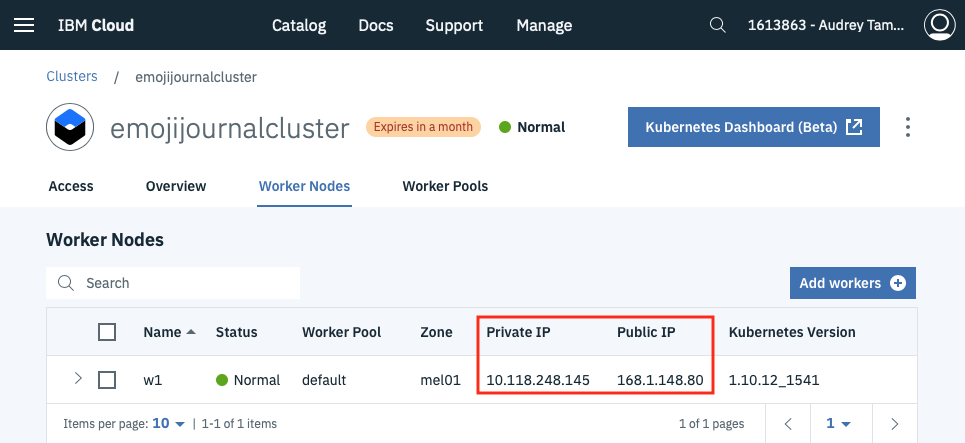
The information in the Kubernetes Dashboard matches the output of the helm and kubectl commands above. But your app is in IBM Cloud, which adds another set of information. Back in the IBM Cloud emojijournalcluster page, select the Worker Nodes tab to see — aha! —Private and Public IP addresses:
Alternatively, enter this ibmcloud command in Terminal, to get the Public IP address:
ibmcloud cs workers emojijournalcluster
Now you’ve got the numbers you need! In a browser, open {Public IP}:{NodePort}. You should see the Kitura welcome page:

Add /client to the browser location to see the EmojiJournal entries:

Success!
Connecting to a Database in Kubernetes
Our Server Side Swift with Kitura book uses a PostgreSQL database for EmojiJournalServer, and shows you how to deploy PostgreSQL and EmojiJournalServer to Kubernetes. This is more straightforward than deploying Cloudant/CouchDB because there’s a Helm chart for PostgreSQL in the stable Helm repository. The CouchDB Helm chart is in the incubator.
A similar, but shorter route is IBM’s ToDoBackend tutorial, which shows you how to:
- Build a Kitura ToDo application with a REST API inside the application.
- Add a PostgreSQL database to the application.
- Build your application into a Docker image and deploy it to a Kubernetes cluster.
Both of these tutorials run Kubernetes in Docker, completely on your Mac.