How to Submit An App to Apple: From No Account to App Store – Part 1
How to submit an app to the Apple App Store from beginning to end. In the first half of this two-part series, you’ll learn how to set up an Apple Developer Account, generate certificates and prepare your app for the store. By Rony Rozen.
First Steps On Your New Account
After submitting and paying for your iOS Developer registration, you’ll need to wait for Apple to process your order. If you had to fax your information to Apple because you’re in a country without an online Apple Store, you’ll need a little more patience. In either case, eventually you’ll get an email from Apple like this one:

At the same time, you should receive an email from iTunes Connect.
At this point you should download Xcode by proceeding to the Apple App Store using the App Store icon on your application dock. Apple places the latest non-beta release in the App Store. Search for Xcode or click here. While you will only be using Xcode very briefly in this tutorial, there are many other excellent tutorials on RayWenderlich.com to teach you how to use it!
Now go to the Developer Center and sign in. After providing your credentials, you’ll finally be in!
The Developer Center has a LOT of information. There are programming guides, downloadable code, documentation, videos, the very helpful developer forum and a support center.
Spend some time exploring to familiarize yourself with what’s available. Be aware that some of this information may be confidential, especially if it involves beta versions of any SDKs or Tools.
In this tutorial, you’re going to focus on two areas that you’ll use a lot when developing your apps: the Certificates, IDs & Profiles area and iTunes Connect.
Here’s a brief introduction to each of them.
Certificates, IDs & Profiles
As you may already know, a non-jailbroken iOS device is only able to run apps approved by Apple and installed through the App Store.
Apple achieves this by requiring that every app run by iOS has a signed Apple Certificate. Apps installed from the App Store come bundled with a certificate, which the system verifies before it allows the app to run. If there’s no signature or if the signature is invalid, the app won’t run.
As a developer, you need to be able to run your apps on your own devices on a regular basis as you’re developing them. In order to do this, you need a way to create and sign your own certificates.
That’s where the Certificates, IDs & Profiles area comes in. This section allows you to generate what Apple calls “profiles”. Profiles, sometimes called “code signing identities,” are files generated by the Developer Center that allow Xcode to sign your apps in a way that allows iOS on your devices to identify them as valid.
There are two types of profiles:
- Development profiles. These are tied to specific devices, so the app can only run on those.
- Distribution profiles. These are used to sign your app before you submit it to Apple for approval. Although they contain no device-specific information, you can’t use them to install apps on any device yourself because Apple still has to sign the app after the approval process.
The Certificates, IDs & Profiles area can also generate push certificates in case your app wants to send push notifications.
iTunes Connect
iTunes Connect is the portal you’ll use to submit an app. This is where you’ll register a new app, enter the app’s description and screenshots, choose the price, and configure game center and in-app purchases.
This is also the portal you’ll use to agree to new contracts, set your financial data (so you can bank that profit) and check your sales.
You’ll spend the rest of part one working in the Certificates, IDs & Profiles area. In Part Two of this tutorial, you’ll look at iTunes Connect.
Certificates, IDs and Profiles
Now, you’re going to use the Certificates, IDs and Profiles area to set up the information you need in order to deploy your app to your device (and later, the App Store).
Note that there is a simpler way to do this in Xcode called Automatic Device Provisioning, which you will cover in Part Two. But for now, you’re going to go through the process step-by-step. You’ll understand how things work better this way, and it’s very useful to know when submitting to the App Store.
If you still have your Developer Center page in front of you (if not, log in again), simply click the Certificates, IDs & Profiles link on the left side or click on the gear icon in the middle of the page:

There are many things you’ll need to do from this area. Some of them you’ll only have to do once, such as generating your certificates and registering your devices. Others you’ll have to repeat for every app you make, such as generating development and distribution profiles.
Generating Certificates
First you’ll need to generate two certificates: one for your development profiles, and another for your distribution profiles. As the text on the page explains, you can request a certificate either via Xcode or manually. Since it’s really useful for you to understand the manual process, in this tutorial you’ll be uploading a Certificate Signing Request (or CSR) from your Mac.
Make sure the drop down in the upper left says iOS, tvOS, watchOS, then click on the + in the upper right:

On the next page, select iOS App Development as the certificate type and click Continue at the bottom:

The portal then shows an explanation of how to generate a CSR using Keychain Access. To follow the instructions, you need to open the Keychain Access app on your Mac. If you don’t know where it is, search for it using Spotlight.
Once the program is open, choose Keychain Access\Certificate Assistant\Request a Certificate From a Certificate Authority…:

In the Certificate Assistant window, fill in your email address and name, choose Saved to disk and click Continue:

Save the file somewhere on your Mac. That’s your CSR created, now to generate that certificate.
Go back to the Developer Center in your browser; you should now click Continue.

Click Choose File…, locate the CSR file you just created and select it, then click Continue.

You will now see a screen that says your certificate is ready. Click Download, and double-click the development certificate file to install it in the keychain:

Click Add in the Keychain Access dialog to complete the installation:

Now that you have your certificate for your development profiles, you need to create a certificate for your production or distribution profiles. In your browser, click Add Another. Under Production select App Store and Ad Hoc, and click Continue at the bottom as before:

Go through the same process as before to submit the same certificate signing request you used for your development certificate.
When it’s ready, click Download, and double-click the distribution certificate file to install it in the keychain.
Note: The distribution certificate is called ios_distribution.cer, whereas the development certificate you downloaded before is called ios_development.cer.
Note: You may have noticed some text at the bottom of the screens talking about Intermediate Certificates. When you launch Xcode, or if you have already launched Xcode, it will install these automatically for you. Should you ever need to install them for some reason in the future just click the + as if creating a new certificate and scroll down to the link to download the file:

This will download a file called AppleWWDRCA.cer. Double-click this file to install it. It will open Keychain Access again in case you closed it.
Now look in Keychain Access and you will see your two installed certificates as follows:
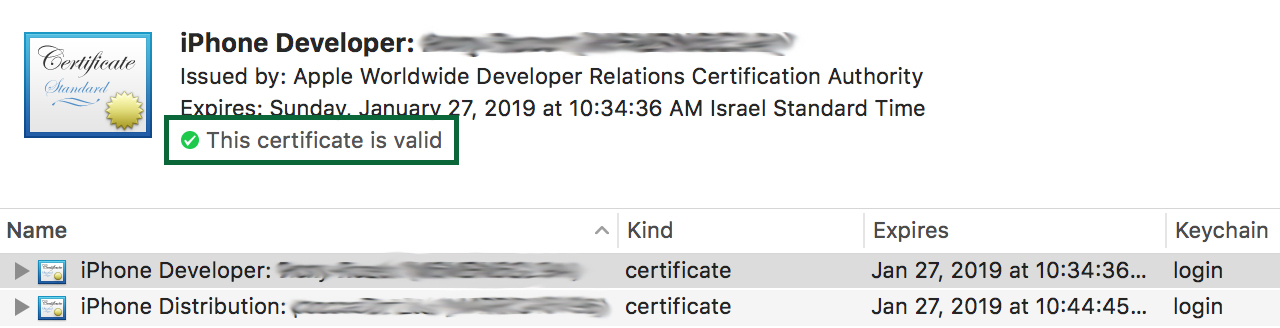
Note: If you do not see the message This certificate is valid with a green check-mark, then you have either not launched Xcode yet, or you need to install the Intermediate Certificates, as described above. The easiest fix is to launch Xcode and let it update the intermediate certificate for you.
You can now close Keychain Access.