fastlane Tutorial: Actions and Plugins
In this fastlane tutorial, you’ll use actions and plugins to overlay your app icon, upload to Firebase and message your team once the beta build is ready. By Mark Struzinski.
Finding your Firebase App ID
You need to tell Firebase where to upload your apps. To do that, you have to use the unique identifier of the app you created earlier.
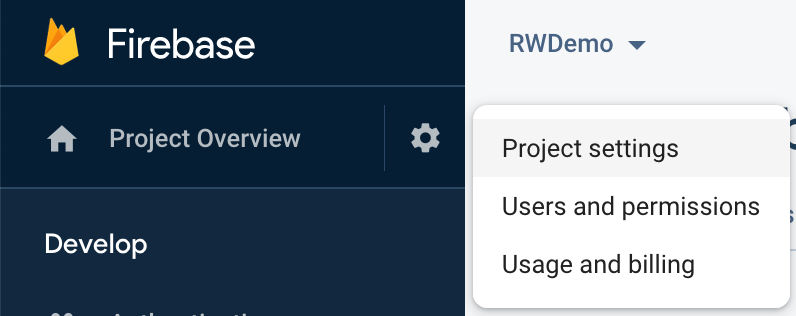
To find this value in the Firebase Console, click the settings cog in the left-side menu and select the Project Settings option:
From the General tab, scroll down to the Your apps section and look for the value under App ID.
Take note of the ID. You’re now ready to start integrating the plugin.
Setting up the Firebase App Distribution Plugin
Next, you need to set up the Firebase App Distribution plugin. This tool allows you to upload to Firebase from fastlane with an action.
From Terminal, run the following command to add the App Distribution plugin to your fastlane installation:
bundle exec fastlane add_plugin firebase_app_distribution

Now that you’ve installed the plugin, you’ll create your next lane.
Creating an Upload Lane
Open your Fastfile and add the following lane, being sure to replace [[FIREBASE APP ID]] with the App ID you noted when setting up the Firebase project:
desc "Upload to Firebase"
lane :upload_firebase do
  # 1
  firebase_app_distribution(
    # 2
    ipa_path: "./fastlane/builds/mZone Poker.ipa",
    # 3
    app: "[[FIREBASE APP ID]]",
    groups: "beta-testers",
    # 4
    release_notes: "Added icon overlay and started distributing via Firebase"
  )
end
This is what the code above does:
- Invokes the
firebase_app_distributionaction provided by the newly-added plugin. - Tells the action where on your machine it can find the .ipa you want to upload.
- Specifies the app to upload to and the group of testers that should have access to it.
- Provides release notes so your beta testers know what’s new in this build. For now, you’re just hard-coding a string to keep it simple. If you’re using Git, however, you can combine other actions such as changelog_from_git_commits to automatically populate the release notes for you.
After all that setup, you’re probably looking forward to testing this, so run the following command from Terminal:
bundle exec fastlane upload_firebase
A few minutes after the lane completes, you’ll get an invitation by email to test your beta from Firebase. Great job! You now have a way to generate a beta inside a repeatable build script.
For your final step, you’ll learn how to send a message to a Slack group when a build is available.
Messaging Your Team on Slack
For this step, you need to have a Slack account with access to a workspace.
You then need to add an Incoming WebHook that allows Firebase to post incoming messages to Slack. To do this, visit the Incoming WebHook app in the Slack App Directory and click Add to Slack. You’ll then see the configuration page:

On this page, select an existing channel from the Choose a channel… drop-down or click create a new channel and follow the steps. Once you’ve selected your desired channel, click Add Incoming WebHooks Integration and you’ll get a Webhook URL:

Go back to the Fastfile and add another new lane by entering the following code under the last lane you added:
desc "Send Slack notification for build"
lane :send_slack do
  # 1
  build_number = get_build_number

  # 2
  version_number = get_version_number

  # 3
  slack(
    message: "App build complete for Version: #{version_number} (#{build_number})",
    success: true,
    payload: {
      "Build Date" => Time.new.to_s,
      "Built by" => 'fastlane'
    },
    slack_url: "[[SLACK INCOMING WEBHOOK URL]]"
  )
end
Don’t forget to replace [[SLACK INCOMING WEBHOOK URL]] with the Webhook URL you obtained.
This lane does the following:
The action receives the following values:
- Uses the built-in
get_build_numberaction to retrieve the current build number. - Uses the built-in
get_version_numberaction to get the current app marketing version. - Runs the
slackaction to post a message to your Slack workspace with a build notification.The action receives the following values:
- message: The message to post, which uses the build number and marketing versions from step one and two.
- success: A Boolean indicating build success.
- payload: Additional message data to pass along. Must contain a hash of keys and values. In this case, you’re passing the build time and a Built by attribute.
- slack_url: your incoming webhook URL.
Test your new lane by running the following command from Terminal:
bundle exec fastlane send_slack
You’ll get a notification in your #test channel in Slack:

There are a ton of customization options available with this action. If you’d like to learn about the full range of parameters available for the slack action, check out the fastlane documentation.
Putting It All Together
Now, you can combine your new actions into one lane. Under send_slack, add the following:
desc "Create and distribute a beta build"
lane :beta do
  increment_build_number
  overlay_icon
  build_beta
  upload_firebase
  send_slack
end
The only thing that’s new here is increment_build_number. This built-in action takes the existing build number, increments it by one and saves it in your Info.plist under the CFBundleVersion key.
A unique build number identifies each binary submitted to the App Store and any testing services you use. The rest of this lane strings together the actions you’ve built in this tutorial.
To test your complete implementation, run the following in Terminal:
bundle exec fastlane beta
Where to Go From Here?
Download the final project by clicking the Download Materials button at the top or bottom of this tutorial.
In this tutorial, you learned how to prepare and build a binary for beta testing, update the app icon to show build information, upload a test build to Firebase and send a notification message to your team via Slack when it’s ready.
There are many more actions available via fastlane and through fastlane plugins. To take your fastlane skills even further, review all the available actions and plugins and try some other ones out!
If you don’t find something that meets your needs, consider building your own and contributing it to the community.
For further in-depth tutorials, check out our course, fastlane for iOS. There are also screencasts on Submitting Your App With fastlane, Taking Screenshots and App Provisioning.
We hope you enjoyed this tutorial. If you have any questions or comments, please join the forum discussion below!