fastlane Tutorial: Actions and Plugins
In this fastlane tutorial, you’ll use actions and plugins to overlay your app icon, upload to Firebase and message your team once the beta build is ready. By Mark Struzinski.
Creating a Lane for Icon Overlay
Open a plain text editor like Atom or Visual Studio Code. From the base directory of the starter project, open ./fastlane/Fastfile and add the following code underneath platform :ios do:
desc "Overlay the app icon with build information"
lane :overlay_icon do
  # 1
  build_number = get_build_number
  # 2
  version_number = get_version_number
  # 3
  version_icon(
    appiconset_path: "mZone Poker/Assets.xcassets/AppIcon.appiconset",
    text: "beta: #{version_number} (#{build_number})"
  )
end
This code does the following:
- Uses the built-in
get_build_numberaction to retrieve the current build number. - Uses the built-in
get_version_numberaction to get the current app marketing version. - Calls the version_icon plugin’s
version_iconaction to update the app icon with an overlay that shows the app version and build number across the bottom.
Now, open Terminal and run the following command:
bundle exec fastlane overlay_icon
You’ll see some terminal output and a success message. After the script finishes, take the following steps to validate the changes and create the overlay:
- Go to the project directory in Finder.
- Navigate to the following path: mZone Poker ▸ Assets.xcassets ▸ AppIcon-Versioned.appiconset. This is a copy of the original icon set. The Icon Versioning plugin created this icon set as a duplicate of the original and created the overlay for the beta icons here.
- Select one of the files and preview it.
You’ll now see an overlay on the icon containing the marketing version and build number:

Now that you’ve generated a new App Icon for your beta build, it’s time to generate the build itself using fastlane’s gym action.
Creating a Build
fastlane comes with an official library of actions. They ship with fastlane and you can call them from any lane. To view the full list of available actions, check out fastlane’s actions documentation. Gym is one of those commands.
Setting up Gym to Build
You need to generate a binary so you can perform an upload for beta testers. You’ll use the gym command to generate an .ipa file for this.
Open fastlane/Fastfile in your text editor and create a new lane underneath overlay_icon with the following code:
desc "Build beta ipa"
lane :build_beta do
  # 1
  enable_automatic_code_signing
  # 2
  gym(
    export_method: "ad-hoc",
    # 3
    xcargs: "ASSETCATALOG_COMPILER_APPICON_NAME=AppIcon-Versioned"
  )
end
This lane:
- Turns on automatic code signing, which means you don’t have to fuss with provisioning profiles and other code-signing settings.
- Runs the
gymcommand and sendsad-hocthrough for theexport_methodparameter value. This builds the app for testing. Any devices attached to your Apple Developer account on the portal can run the app. - Overrides the
ASSETCATALOG_COMPILER_APPICON_NAMEbuild setting to force the build into using the previously-generated AppIcon-Versioned asset instead of the default app icon selected in Xcode. This is a great way to ensure that you only apply your beta icon when making beta builds.
Save the Fastfile and run your new lane with the following command:
bundle exec fastlane build_beta
If this is your first time running the gym command from fastlane, you might get a codesign prompt like the following:
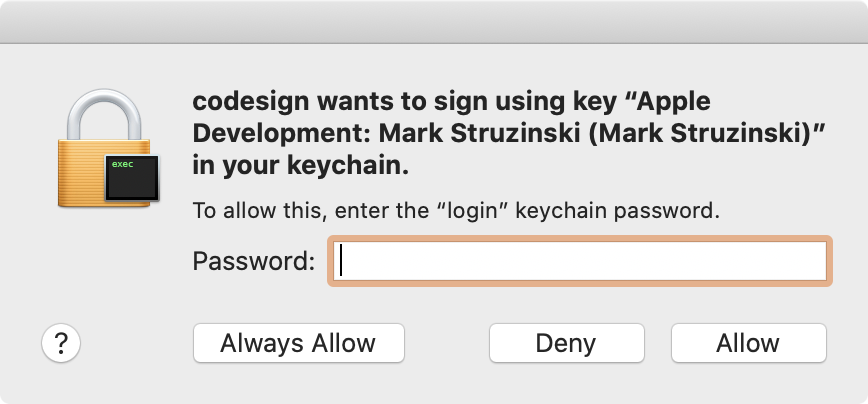
If so, enter your administrator password and select Always Allow to continue. Once fastlane has finished building your app, you’ll get a success message. Just above that, you’ll see where on the file system it saved your build.
Navigate Finder into the ./fastlane/builds/ directory and you’ll see mZone Poker.ipa waiting for you to upload it. :]

Uploading to Firebase
Your next step is to make your builds available to testers. There are several platforms that allow uploading ad-hoc builds for testing. In this case, you’ll use Firebase.
Before getting started with Firebase, you’ll need to set up an account and install the local command line interface (CLI).
Setting up a Firebase Account
If you don’t have a Firebase account already, go to Firebase and set one up. This gives you access to Firebase App Distribution, which is the tool you’ll use to distribute beta builds.
Once your account is active, the next step is to install the Firebase CLI.
Setting up the Firebase CLI
Go to the Firebase CLI installation page and follow the directions to set it up. After configuring the CLI, follow the instructions to log in and run the recommended test.
Setting up Your Project on Firebase
After you set up the tools, it’s time to create a project and app on Firebase.
A project is a logical container for one or more apps. You can have multiple apps under one project and they can all share settings, testers and other Firebase values.
Follow these steps to create your project:
- Go to the Firebase console.
- Click the Add project option.
- Give your project a name.
- Choose whether to enable Google Analytics or not — you don’t need to for this tutorial.
- Continue through the remaining screens until Firebase redirects you to the Project Overview for your newly-created project.
Now that you’ve set up your Firebase project, it’s time to add an app within your new project.
Setting up Your App on Firebase
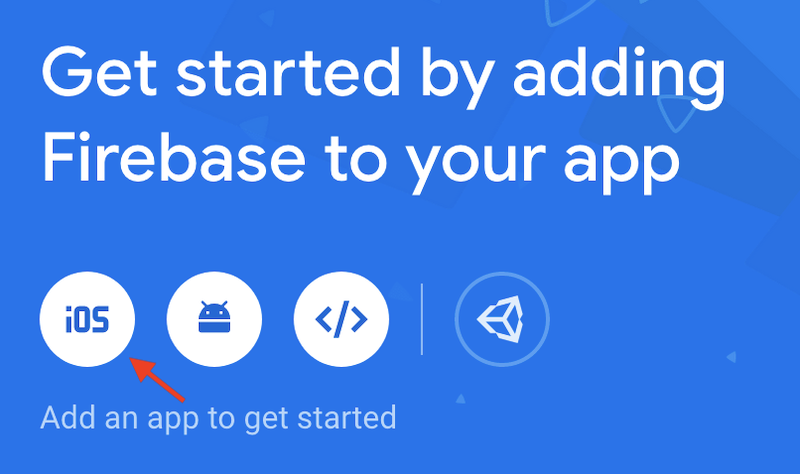
On the Project Overview page, you’ll see a prompt to add Firebase to your app. Select the rounded iOS button to start configuring your app:
Set up your new app by typing the bundle identifier that you used earlier in Xcode into the iOS bundle ID field. Leave the other two fields blank and click Register app.

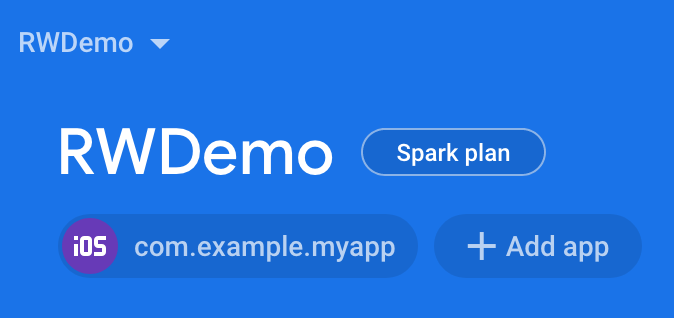
Select Next for the next three steps since you don’t need to configure the Firebase SDK within this app. Once you reach step 5, click Continue to console to return to the Project Overview. You’ll see your app displayed at the top of the page:
Next, you’ll set up App Distribution for the mZone Poker app.
Setting up App Distribution
To set up App Distribution for your newly-created app, head to the dashboard by clicking the App Distribution item in the menu on the left of the screen:

The first time you visit, Firebase will present you with resources to help you learn more about the feature. In this case, you can just click Get Started to jump right in.
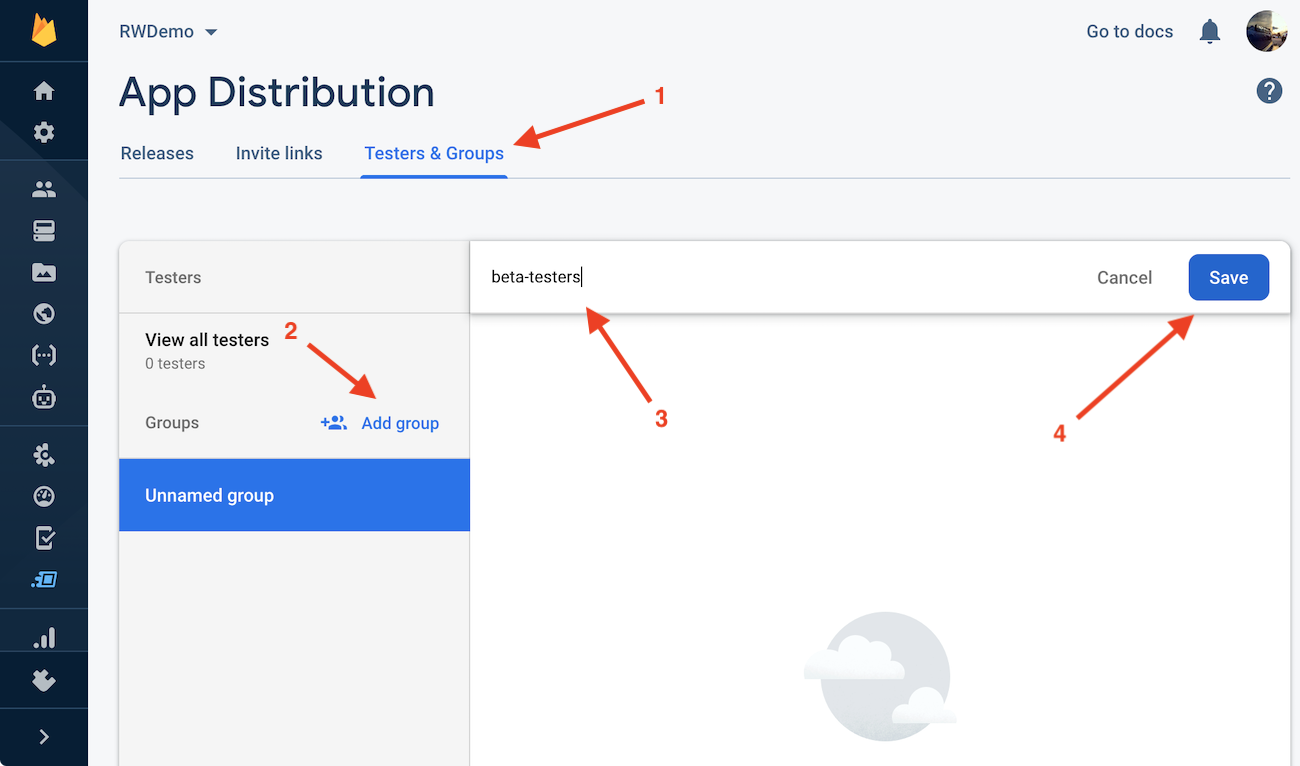
From this screen, go to the Testers & Groups tab and click Add Group. From there, name your new group beta-testers and click Save.
Here, you’ll see a button to Add testers. Click it, type your own email address and press Enter to add yourself as a tester:

Now, you can test any builds you upload to Firebase. Before you start uploading, however, there’s one more thing you’ll need from the Firebase Console: your Firebase App ID.