iPadOS Multitasking: Using Multiple Windows for Your App

In this iPadOS Multitasking tutorial, you’ll learn how to get the most out of iPad screens and multitasking features for your app. By David Piper.

Leave a rating/review
Download materials
Save for later
Share

The iPad’s wonderful display allows for apps that wouldn’t be possible on an iPhone’s small screen. By adding support for multitasking on iPadOS and using multiple windows for your app, you can harness the full potential of the big screen.

In this tutorial, you’ll work on MarvelousHeroes, an app that displays a list of heroes from the Marvel universe. This app has two lists: One gives an overview of heroes and the other lists your favorites. By selecting a hero, you can get more information, like a description or the number of comics he or she appears in.

While MarveolousHeroes is already a great app, multitasking will make it even better. It may get annoying to mark every single hero you like as a favorite. Thus you’ll add the possibility to open two instances of this app side by side and drag a hero from the overview to the favorite list completely in SwiftUI.

Now you can take all your heroes with you!

In this tutorial, you’ll learn about the following multitasking topics:

  • What is iPadOS multitasking?
  • How to support multiple windows?
  • How to preview size classes in SwiftUI?
  • How to handle size classes in SwiftUI?
  • How to implement drag and drop?
  • How to work with NSItemProvider?

Without further ado, it’s time to dive in.

Getting Started

Download the starter project using the Download Materials button at the top or bottom of this tutorial. The starter project is set up to download and display hero images.

Before you run the project, you need to create a Marvel developer account to get a public and private API key. You’ll need these keys to gain access to the heroes.

Open the Marvel developer portal. Click Get a Key on the website:

Marvel developer portal

Follow the steps on the next pages to create a new Marvel developer account. Then check My Developer Account to find your keys.

public and private keys

Open MarvelConfiguraton.swift. Replace the placeholder values in publicKey and privateKey with your keys.

Build and run. Ensure your requests are successful. To verify, select All Heroes in the NavigationView. Then, you’ll see the downloaded hero images like this:

MarvelousHeroes with the list of heroes is selected

Ah, the great 3-D Man and A-Bomb — who doesn’t love these famous superheroes? ;]

Multitasking in iPadOS

There are three ways to work with multitasking on iPadOS. The image below shows the possible multitasking app layouts:

Schematic overview of Slide Over, Split View and Picture in Picture

  • Slide Over: The first image shows Slide Over. A user opens an app as a small overlay over another app. This type is useful if you want a quick look at the information provided by another app while still focusing on the main app in the background.
  • Split View: Split View lets you open two apps side by side in three possible setups: Both views could have the same width, or one could take up to two-thirds of the screen while the other uses the remaining space. This type of multitasking is great for working and interacting with two apps at the same time. The middle picture shows a Split View configuration, where both apps have half the screen.
  • Picture-in-Picture: The last type of multitasking focuses on videos. As you can see in the last image, a user can watch a video in a small window while still using other apps.

In this tutorial, you’ll focus on Slide Over and Split View.

To explore how MarvelousHeroes looks with Split View:

  • Open the app.
  • Slide up from the bottom of the screen to bring up the dock.
  • Tap and hold your finger on the MarvelousHeroes icon.
  • Drag the icon to the right border of the iPad.
  • Lift your finger.

Split view animation without enabling multiple windows support.

But, nothing happens.

Apps don’t support multitasking out of the box. Don’t worry — to support Split View and Slide Over, all you need to do is to check a box. 

Enabling Multiple Windows Support

Click MarvelousHeroes at the top of the Project navigator. Under TARGETS, click MarvelousHeroes. Click General. Check Supports multiple windows:

Enable the option Supports multiple windows in the project settings

You’ve enabled multiple windows support.

Build and run. Open two instances of MarvelousHeroes side by side to see something like this:

MarvelousHeroes with two instances open in Split View

Now, you can use MarvelousHeroes in Slide Over and Split View.

Size Classes

You can imagine how you might want to change your app’s layout when it’s displayed in something other than a full-screen window. Fortunately, iOS makes it simple for you to detect and respond to exactly this situation using something called a size class.

A size class is an attribute that describes the height and width of your content as either regular or compact. Thus, your app can have four possible combinations of width and height:

  • Regular width and regular height.
  • Regular width and compact height.
  • Compact width and regular height.
  • Compact width and compact height.

Without multitasking, all iPads, even iPad minis, have regular width and height in portrait and landscape orientation. But when using Split View, the available screen sizes reduce and the size classes change.

Apple provides an overview of all possible combinations in its Human Interface Guidelines. Altogether, there are 15 combinations listed with split views of two-thirds, one-half and one-third of the screen size. These combinations cover all iPads, from the big 12.9″ iPad Pro down to the 7.9″ iPad mini 4.

You don’t need to run to the closest Apple Store and buy different devices to test for different size classes. In fact, you don’t even need to run your app in the simulator. You can use SwiftUI previews right in Xcode.

Previewing Size Classes in SwiftUI

SwiftUI offers a tool to preview how your app looks while writing code: Preview. What an appropriate name. :]

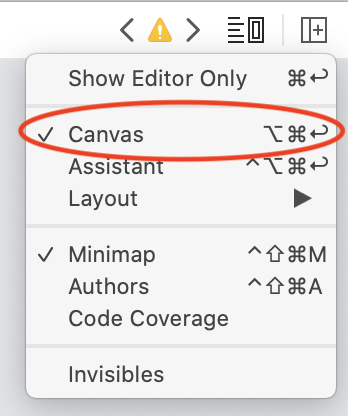
Open HeroList.swift. Click Adjust Editor Options. In the drop-down, ensure Canvas is checked.

Options to show the Canvas in Xcode

Once you see the Canvas, you should see the SwiftUI preview of your code. If you don’t, click Resume in the upper-right corner.

At the bottom of HeroList.swift, you’ll find HeroList_Previews. This struct has a property called previews that defines what displays in the Canvas. Currently, it creates an initial state containing two heroes with mock data that pass to HeroList, visible in the Canvas.

The SwiftUI preview isn’t limited to representing only one device size. You can add more instances of your view with different device size containers. You can even configure some properties to control a view presentation.

In HeroList_Previews, replace the following code:

return HeroList(state: state)

With the following code:

// 1
return Group {
  // 2
  HeroList(state: state)
    .previewDevice(PreviewDevice(stringLiteral: "iPad Pro (9.7-inch)"))
    // 3
    .previewDisplayName("Compact width")
    // 4
    .environment(\.horizontalSizeClass, .compact)
  // 5
  HeroList(state: state)
    .previewDevice(PreviewDevice(stringLiteral: "iPad Pro (9.7-inch)"))
    .previewDisplayName("Regular width")
    .environment(\.horizontalSizeClass, .regular)
}

Here’s what you’ve added:

  1. To simultaneously preview different versions of a view, you use Group.
  2. Inside Group, you can add as many view instances as you want. Each of these views can have a different configuration. In the first HeroList, you use previewDevice to define the device. You use iPad Pro 9.7″ by passing "iPad Pro (9.7-inch)" as the string literal to the initializer of PreviewDevice.
  3. Give the device a name. Otherwise, it’ll get confusing when you work with many previews at once.
  4. You overwrite horizontalSizeClass to define the preview’s size class. You’ll start by presenting the iPad in a compact size class by using .compact.
  5. Then, you repeat the previous steps to show another preview of HeroList using .regular.

Your preview will look something like this:

Screenshot of preview for MarvelousHeroes in Xcode

Cool, now you can preview many size classes at once. :]

However, both views look the same because there’s no code to handle different size classes yet.

Handling Size Classes in SwiftUI

SwiftUI uses the property wrapper @Environment to access values relevant for all views. These values include the color scheme, layout direction and user’s locale. They also include horizontalSizeClass, which you’ve used to configure the previews above.

Open HeroRow.swift. Replace body with:

// 1
@Environment(\.horizontalSizeClass) var horizontalSizeClass

var body: some View {
  Group {
    // 2
    if horizontalSizeClass == .regular {
      HStack {
        MarvelDescriptionSection(hero: hero, state: state)
        Spacer()
        MarvelImage(hero: hero, state: state)
      }
    // 3
    } else {
      VStack {
        HStack {
          MarvelDescriptionSection(hero: hero, state: state)
          Spacer()
        }
        Spacer()
        HStack {
          Spacer()
          MarvelImage(hero: hero, state: state)
          Spacer()
        }
      }
    }
  }
}

Here’s the code breakdown:

  1. You get information about the current size class by using @Environment. Here, you access its horizontalSizeClass via the key path. Think of a key path as a function to access a property of a class or struct, but with a special syntax. With (\.horizontalSizeClass) you get the value of the current Environment and horizontalSizeClass.
  2. Then, you check whether the current size class is regular or compact in your SwiftUI view’s body property. A row consists of a description block and an image. The Marvel description block contains information about the current hero. Use HStack when the current size class equals .regular. This is because there’s enough space to place these views next to each other.
  3. If the size class is .compact, the app doesn’t have as much horizontal space as before. So you place the description block above the image. Extra HStacks and Spacers help to neatly align the views.

Open HeroList.swift. Look at the preview again. Now, it’ll look like this:

Screenshot of preview for MarvelousHeroes in Xcode with changes for the size class

Build and run. When presenting two list of heroes in Split View, your app will look like this:

MarvelousHeroes with handling size classes

Now MarvelousHeroes not only supports two windows but also changes the layout when used in different class sizes. :]

But there’s one more thing you can add to get the full potential for multi-window support: drag and drop.

Implementing Drag and Drop

Users can tap the favorite button to add a hero to their favorite heroes. But, what if all the heroes are your favorite heroes? It would be annoying to do this for every hero.

Fortunately, there’s drag and drop. You’ll add the ability to drag a hero from the overview view and drop it in the favorites list view.

You may wonder how it’s possible to send data from one instance of an app to another or even to a different app. In iOS and iPadOS, the source app encodes a dragged item as Data and wraps it inside NSItemProvider. On dropping an element, the destination app unwraps and decodes it.

The source app defines the type of the dragged object by providing a Uniform Type Identifier, or UTI. There are many types you can use to describe the data your app is passing around, such as public.data or public.image. You’ll find a list of all available UTIs in Apple’s documentation about UTType or on Wikipedia.

In the case of your hero, public.data is the correct UTI.

The destination app defines a list of UTIs as well. The destination app must handle the source app’s data type to perform a drag and drop interaction.

You can define these types as raw strings or use Apple’s MobileCoreServices, which defines constants for different UTIs.

You’ll use NSItemProvider to pass around your hero. It contains the data and transports it to the receiving app. Then, the receiving app loads the hero asynchronously. Think of NSItemProvider as a promise between two apps.

To wrap a hero in NSItemProvider, MarvelCharacter needs to implement two protocols: NSItemProviderWriting and NSItemProviderReading. As you can guess, the first protocol adds the ability to create an NSItemProvider from a given hero. The other converts a given NSItemProvider back to an instance of MarvelCharacter.

The image below summarizes the collaboration between the source and destination apps.

Overview of collaboration between source and destination app when performing a drag and drop operation

Working with NSItemProvider

Inside the Model group, create a new Swift file called MarvelCharacter+NSItemProvider.swift. At the end of the file, add the following code to conform to NSItemProviderWriting:

// 1
import UniformTypeIdentifiers

// 2
extension MarvelCharacter: NSItemProviderWriting {
  // 3
  static var writableTypeIdentifiersForItemProvider: [String] {
    [UTType.data.identifier]
  }
  // 4
  func loadData(
    withTypeIdentifier typeIdentifier: String,
    forItemProviderCompletionHandler completionHandler:
    @escaping (Data?, Error?) -> Void
  ) -> Progress? {
    // 5
    let progress = Progress(totalUnitCount: 100)
    // 6
    do {
      let encoder = JSONEncoder()
      encoder.outputFormatting = .prettyPrinted
      encoder.dateEncodingStrategy = .formatted(.iso8601Full)
      let data = try encoder.encode(self)
      // 7
      progress.completedUnitCount = 100
      completionHandler(data, nil)
    } catch {
      completionHandler(nil, error)
    }
    // 8
    return progress
  }
}

Here the code breakdown:

  1. Imports UniformTypeIdentifiers to gain access to the UTI constants.
  2. Creates an extension on MarvelCharacter to conform to NSItemProviderWriting.
  3. NSItemProviderWriting requires an implementation of writableTypeIdentifiersForItemProvider. This property describes the types of data you’re wrapping as an array of UTIs. In this case, you’ll only provide one type: public.data. But, instead of using the raw string, use the type UTType.data, which is part of the new UniformTypeIdentifiers framework.
  4. The protocol requires a method called loadData(withTypeIdentifier:forItemProviderCompletionHandler:). One of the parameters is a closure called forItemProviderCompletionHandler. This completion handler expects an optional Data as an input parameter. So you need to convert a hero to data and pass it to this closure.
  5. loadData(withTypeIdentifier:forItemProviderCompletionHandler:) returns an optional instance of Progress which tracks the progress of data transportation. The destination app can observe and cancel this progress. This method creates a new Progress that has a total unit count of 100, representing 100 percentage. Once the progress has reached a completed unit count of 100, the transportation of a hero is finished.
  6. Next, convert an instance of MarvelCharacter to Data by using a JSONEncoder. You need to set dateEncodingStrategy to match the date format of the received JSON.
  7. Set the property completedUnitCount of progress to 100. This indicates you’ve finished the operation and the progress object has reached 100 percent. Call the completion handler with the encoded hero data.
  8. Finally, return progress.

Good work! Now you can create an NSItemProvider wrapping the data you want to send.

Next, implement NSItemProviderReading to recreate a hero when dropping in the destination app. Add the following code to the end of MarvelCharacter+NSItemProvider.swift:

// 1
extension MarvelCharacter: NSItemProviderReading {
  // 2
  static var readableTypeIdentifiersForItemProvider: [String] {
    [UTType.data.identifier]
  }
  // 3
  static func object(
    withItemProviderData data: Data,
    typeIdentifier: String
  ) throws -> Self {
    let decoder = JSONDecoder()
    decoder.dateDecodingStrategy = .formatted(.iso8601Full)
    do {
      guard let object = try decoder.decode(
        MarvelCharacter.self,
        from: data
        ) as? Self else {
          fatalError("Error on decoding instance of MarvelCharacter")
      }
      return object
    } catch {
      fatalError("Error on decoding instance of MarvelCharacter")
    }
  }
}

Here, you:

  1. Create a new extension making MarvelCharacter conform to NSItemProviderReading.
  2. As before, you need to specify a list of supported UTIs. Since the app accepts the same type of item as it provides, return [UTType.data.identifier].
  3. Then, implement object(withItemProviderData:typeIdentifier:). This method converts the given Data back to a hero. Since MarvelCharacter already conforms to Codable, use JSONDecoder.

Perfect! Now that you can create an NSItemProvider given a hero and the other way around, it’s time to add support for drag and drop.

Supporting Drag and Drop in SwiftUI

Go to HeroRow.swift and add the following code right below Group in body:

.onDrag { () -> NSItemProvider in
  return NSItemProvider(object: self.hero)
}

When dragging a row, this modifier takes a closure returning an NSItemProvider. Since the hero of the dragged row conforms to NSItemProviderWriting, you can call the initializer of NSItemProvider.

Now, you’ll update the list of favorite heroes. Open FavoriteList.swift. Add this method right below body in FavoriteList:

func addFavoriteHero(from itemProvider: [NSItemProvider]) {
  // 1
  for provider in itemProvider {
    guard provider.canLoadObject(ofClass: MarvelCharacter.self) else {
      continue
    }
    // 2
    _ = provider.loadObject(ofClass: MarvelCharacter.self) { hero, _ in
      // 3
      guard
        let hero = hero as? MarvelCharacter,
        !self.state.favorites.contains(where: { $0.name == hero.name })
        else { return }
      // 4
      DispatchQueue.main.async {
        self.state.favorites.append(hero)
        self.state.favorites.sort {
          return $0.name < $1.name
        }
      }
    }
  }
}

Here's a breakdown:

  1. To ensure you can handle the received providers, you loop over them and call canLoadObject(ofClass:). If this method returns false, continue with the next provider.
  2. Call loadObject(ofClass:) for each provider to decode the wrapped data back to a hero.
  3. In the closure, check that the given hero isn't already a favorite before adding it to the list. Otherwise, he'll show up more than once in the favorites list.
  4. Finally, sort the favorite heroes by name, so the order is the same as in the overview list. Notice, you used DispatchQueue.main.async so the code executes in the main thread asynchronously.

Now it's time to add dropping. At the top of the file, add the following import statement:

import UniformTypeIdentifiers

In FavoriteList, replace body with the following code:

var body: some View {
  VStack {
    ZStack {
      Circle()
        .fill(Color("rw-green"))
        .frame(width: 200.0, height: 200.0)
        .onDrop(of: [UTType.data.identifier], isTargeted: nil) { provider in
          self.addFavoriteHero(from: provider)
          return true
        }
      Text("Drop here!")
        .foregroundColor(.white)
    }
    List {
      ForEach(state.favorites) { hero in
        HeroRow(hero: hero, state: self.state)
      }
    }
  }
}

This code adds a circle with the raywenderlich.com color scheme right above the list and a short text. The text tells the user this is the right place to drop a hero.

This time, onDrop takes a list of UTIs defining types the modifier can handle. It also takes a closure to handle the received NSItemProvider wrapping the dropped items.

Build and run. Open two instances: One with all heroes and one with the favorites. Drag one item from the list to the green Drop Here! circle in favorites.

The app will look like this:

MarvelousHeroes with a hero dropped on the dropping area

Place your finger above the dropping area, and a green circle with a plus symbol appears in the corner of the row. It indicates you can drop the hero here.

Notice your app is still interactive while you perform a drag or drop operation, as is standard for all apps.

You can add items to a drag interaction by tapping more heroes while still holding the dragged items. Because it's possible to drop all heroes at once, you need to handle an array of NSItemProvider in onDrop above.

But it's a little strange to drop the hero on the circle if the list is right below it. Wouldn't it be better if you could drop the hero right on the list? Try to do that and see the app crashes.

At the moment with SwiftUI, an empty list can't handle drops, but there's a way around this problem. 

Handling Drops on Lists

You'll use a trick to make this work. The app won't crash when dropping on a non-empty cell. So, by adding cells with empty content, you can drop a hero on the list. 

Open MarvelCharacter.swift. Add the following code to MarvelCharacter:

// 1
var isEmptyHero: Bool = false
// 2
static var emptyHero: MarvelCharacter {
  let hero = MarvelCharacter(name: "", description: "")
  hero.thumbnail = MarvelThumbnail(path: "", extension: "")
  hero.isEmptyHero = true
  hero.downloadedImage = CodableImage(image: UIImage())
  return hero
}

Here's the code breakdown:

  1. This adds a boolean property isEmpytyHero.
  2. Here you add emptyHero to provide a hero without name, description, stats or image. By presenting this hero in the favorite cell, it looks like it's empty. But since there's a hero within the cell, the list accepts drops.

Next, open MarvelousHeroesState.swift. In MarvelousHeroesState, replace favorites with:

@Published var favorites: [MarvelCharacter] = [
  .emptyHero,
  .emptyHero,
  .emptyHero
]

This code adds some empty heroes as the initial state of the favorites list. Each row of this list will seem empty, so the whole list appears to have no heroes.

Open FavoriteList.swift. Right below ZStack, replace List with the following code:

List {
  ForEach(state.favorites) { hero in
    HeroRow(hero: hero, state: self.state)
  }
  .onInsert(of: [UTType.data.identifier]) { _, provider in
    self.addFavoriteHero(from: provider)
  }
}

This onInsert(of:perform:) takes a list of the UTIs it can handle. You also need to define a closure to process the dropped NSItemProvider. Use addFavoriteHero(from:) as before in the onDrop modifier.

Finally, handle the empty heroes in the favorite list by sorting them below all the non empty heroes. Open Extensions.swift and add following code at the end of the file:

extension Array where Element == MarvelCharacter {
  mutating func appendSorted(_ newElement: Element) {
    append(newElement)
    sort {
      if $0.isEmptyHero { return false }
      if $1.isEmptyHero { return true }
      return $0.name < $1.name
    }
  }
}

This extension adds a method to all Arrays consisting of MarvelCharacter. It appends the new hero and sorts all empty heroes at the end of the array.

There are two places heroes are added to favorites. Open FavoriteList.swift. In addFavoriteHero(from:), replace following code:

DispatchQueue.main.async {
  self.state.favorites.append(hero)
  self.state.favorites.sort {
    return $0.name < $1.name
  }
}

With the following:

DispatchQueue.main.async {
  self.state.favorites.appendSorted(hero)
}

This adds the hero and sorts favorites.

Finally, open FavoriteButton.swift and replace addHeroToFavorites() with:

private func addHeroToFavorites() {
  state.favorites.appendSorted(hero)
}

Also, add following code to the beginning of body:

guard !hero.isEmptyHero else {
  return Button(action: { return }, label: { Text("") })
}

This shows a Button without any text and action for a hero where isEmptyHero is true.

Build and run. Drop a hero on the favorite list. This time, the app doesn't crash.

MarvelousHeroes with a hero dropped on the favorite list

Congratulations, now you can drop heroes all over FavoriteList. :]

Where to Go From Here?

You can download the completed project files by clicking the Download Materials button at the top or bottom of this tutorial. 

Multitasking is a powerful technique to improve iPad apps. Now you know how to use it to make your users love your app.

If you want to dive deeper into multitasking on iPad, make sure to check out our iPadOS Multitasking video course. You'll learn how to use state restoration and open new windows of your app with a separate UI, taking your iPad app to the next level. :]

For more information about SwiftUI, check out the SwiftUI: Getting Started tutorial or the SwiftUI by Tutorials book.

I hope you enjoyed this tutorial. If you have any questions, please visit the forums.