Getting Started with Cloud Firestore and SwiftUI
In this tutorial, you’ll learn how to use Firebase Cloud Firestore to add persistence to a SwiftUI iOS application with Swift. By Libranner Santos.
Updating Cards
The app lets users mark when they get the correct answer. If that’s not the case, a message pops up telling them they failed the last time they tried.
Open Card.swift and modify the id so it looks like this:
@DocumentID var id: String?
id won’t be part of it. The next time you run the app, your previous models won’t show.
Add this import statement at the top:
import FirebaseFirestoreSwift
With this code, you ensure when Firebase’s SDK converts the document to a Card, the Document Id used in Cloud Firestore is mapped to id. To execute operations on a single document, you need to reference it using its document id.
Open CardRepository.swift and add the next method to CardRepository:
func update(_ card: Card) {
  // 1
  guard let cardId = card.id else { return }

  // 2
  do {
    // 3
    try store.collection(path).document(cardId).setData(from: card)
  } catch {
    fatalError("Unable to update card: \(error.localizedDescription).")
  }
}
This code:
- Checks that
card.idhas a value. - Captures any exceptions generated by the code. If something goes wrong while updating a document, the app terminates with a fatal error.
- Using
pathandcardId, it gets a reference to the document in the cards collection, then updates the fields by passingcardtosetData(from:encoder:completion:).
Now you need update your view model. Open CardViewModel.swift and add the following method to CardViewModel:
func update(card: Card) {
  cardRepository.update(card)
}
Open CardView.swift. Add the following code after the second Spacer() in frontView:
if !cardViewModel.card.successful {
  Text("You answered this one incorrectly before")
    .foregroundColor(.white)
    .font(.system(size: 11.0))
    .fontWeight(.bold)
    .padding()
}
This code shows a message if the property successful of the card is equal to false.
Before proceeding, add the following three methods to CardView:
// 1
private func markCardAsUnsuccesful() {
  var updatedCard = cardViewModel.card
  updatedCard.successful = false
  update(card: updatedCard)
}

// 2
private func markCardAsSuccesful() {
  var updatedCard = cardViewModel.card
  updatedCard.successful = true
  update(card: updatedCard)
}

// 3
func update(card: Card) {
  cardViewModel.update(card: card)
  showContent.toggle()
}
This code provides two methods to take care of the successful and unsuccessful answer cases, as well as a method to take care of updating the card.
Here’s what each method does:
- Copies
cardViewModel.cardtoupdatedCardand setssuccessfultofalse. Then it callsupdate(card:). - Copies
cardViewModel.cardtoupdatedCardand setssuccessfultotrue. Then it callsupdate(card:). - Passes the updated card to
update(card:), so the view model can update the model. Then callstoggle()onshowContentto trigger the flip animations.
Next, replace backView with the following:
var backView: some View {
  VStack {
    // 1
    Spacer()
    Text(cardViewModel.card.answer)
      .foregroundColor(.white)
      .font(.body)
      .padding(20.0)
      .multilineTextAlignment(.center)
      .animation(.easeInOut)
    Spacer()
    // 2
    HStack(spacing: 40) {
      Button(action: markCardAsSuccesful) {
        Image(systemName: "hand.thumbsup.fill")
          .padding()
          .background(Color.green)
          .font(.title)
          .foregroundColor(.white)
          .clipShape(Circle())
      }
      Button(action: markCardAsUnsuccesful) {
        Image(systemName: "hand.thumbsdown.fill")
          .padding()
          .background(Color.blue)
          .font(.title)
          .foregroundColor(.white)
          .clipShape(Circle())
      }
    }
    .padding()
  }
  .rotation3DEffect(.degrees(180), axis: (x: 0.0, y: 1.0, z: 0.0))
}
Here you added two new buttons so the user can indicate if they answered the question correctly.
Build and run.
Tap any of your cards and tap the thumb-down icon. At the bottom, the front view displays a message that says You answered this one incorrectly before:

Removing Cards
The user should be able to remove cards when needed.
Open CardRepository.swift and define remove(_:) at the bottom of CardRepository, as follows:
func remove(_ card: Card) {
  // 1
  guard let cardId = card.id else { return }

  // 2
  store.collection(path).document(cardId).delete { error in
    if let error = error {
      print("Unable to remove card: \(error.localizedDescription)")
    }
  }
}
This code:
delete(completion:) also provides a closure where you can handle any errors. The code inside the closure checks if there’s an error and prints it to the console.
- Checks that
card.idhas a value and stores it incardId. - Gets a reference to the document in the Cards collection using
pathandcardIdand then callsdelete. This deletes the document from the collection in Cloud Firestore.
Open CardViewModel.swift and add this method to it so your view model can call remove(_:) on CardRepository, passing the actual Card:
func remove() {
  cardRepository.remove(card)
}
Finally, open CardView.swift and add cardViewModel.remove() in the trailing closure for the primaryButton inside the Alert, so it looks like this:
Alert(
  title: Text("Remove Card"),
  message: Text("Are you sure you want to remove this card?"),
  primaryButton: .destructive(Text("Remove")) {
    cardViewModel.remove()
  },
  secondaryButton: .cancel())
This calls remove() on the cardViewModel. The view model then executes the logic to remove the card from the database.
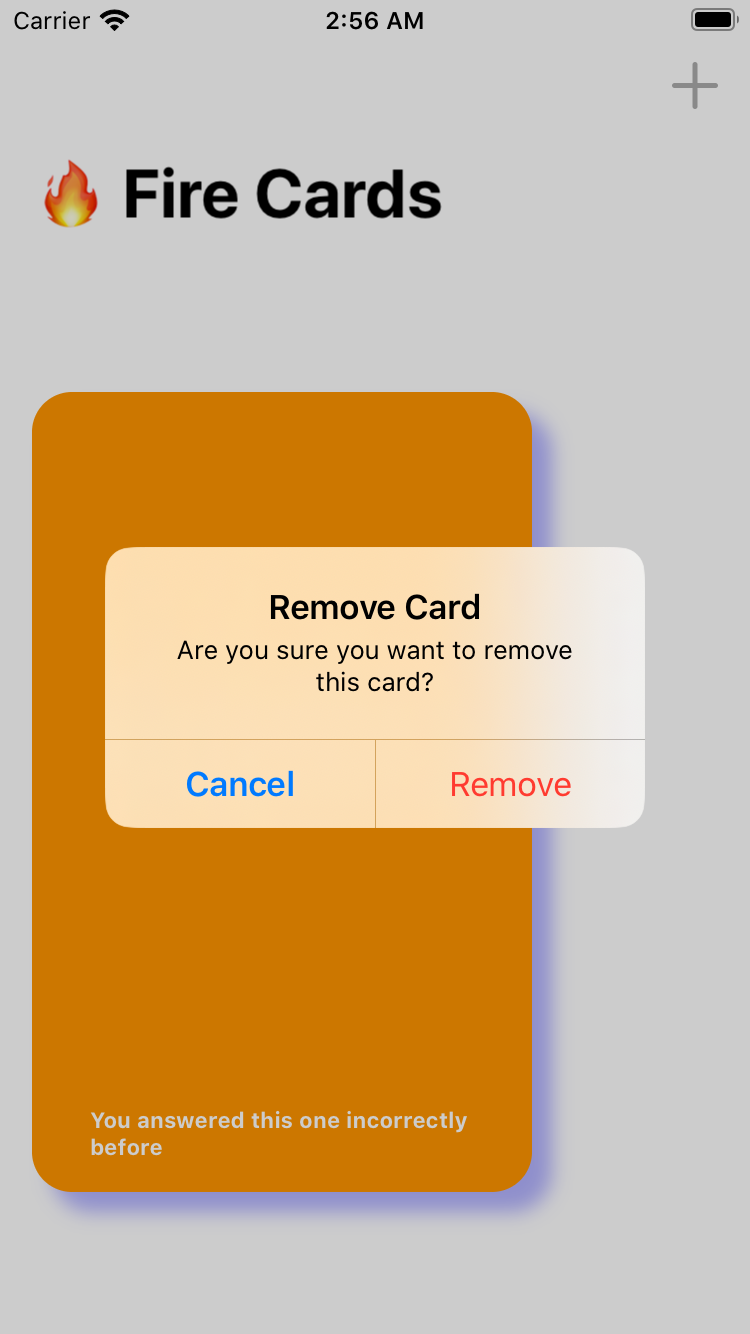
Build and run.
Drag any of your cards to the top. An alert appears asking you to confirm the action. Tap Remove and your card will disappear.
Securing the Data
Security is essential to any app. Firebase provides a set of authentication methods you can use to let users authenticate into your app. For this project, you’re going to implement Anonymous Authentication.
Anonymous Authentication is an authentication type that lets you create temporary accounts for users who haven’t signed up for your app, giving them a layer of security. Combined with Security Rules, Anonymous Authentication provides enough security for this app.
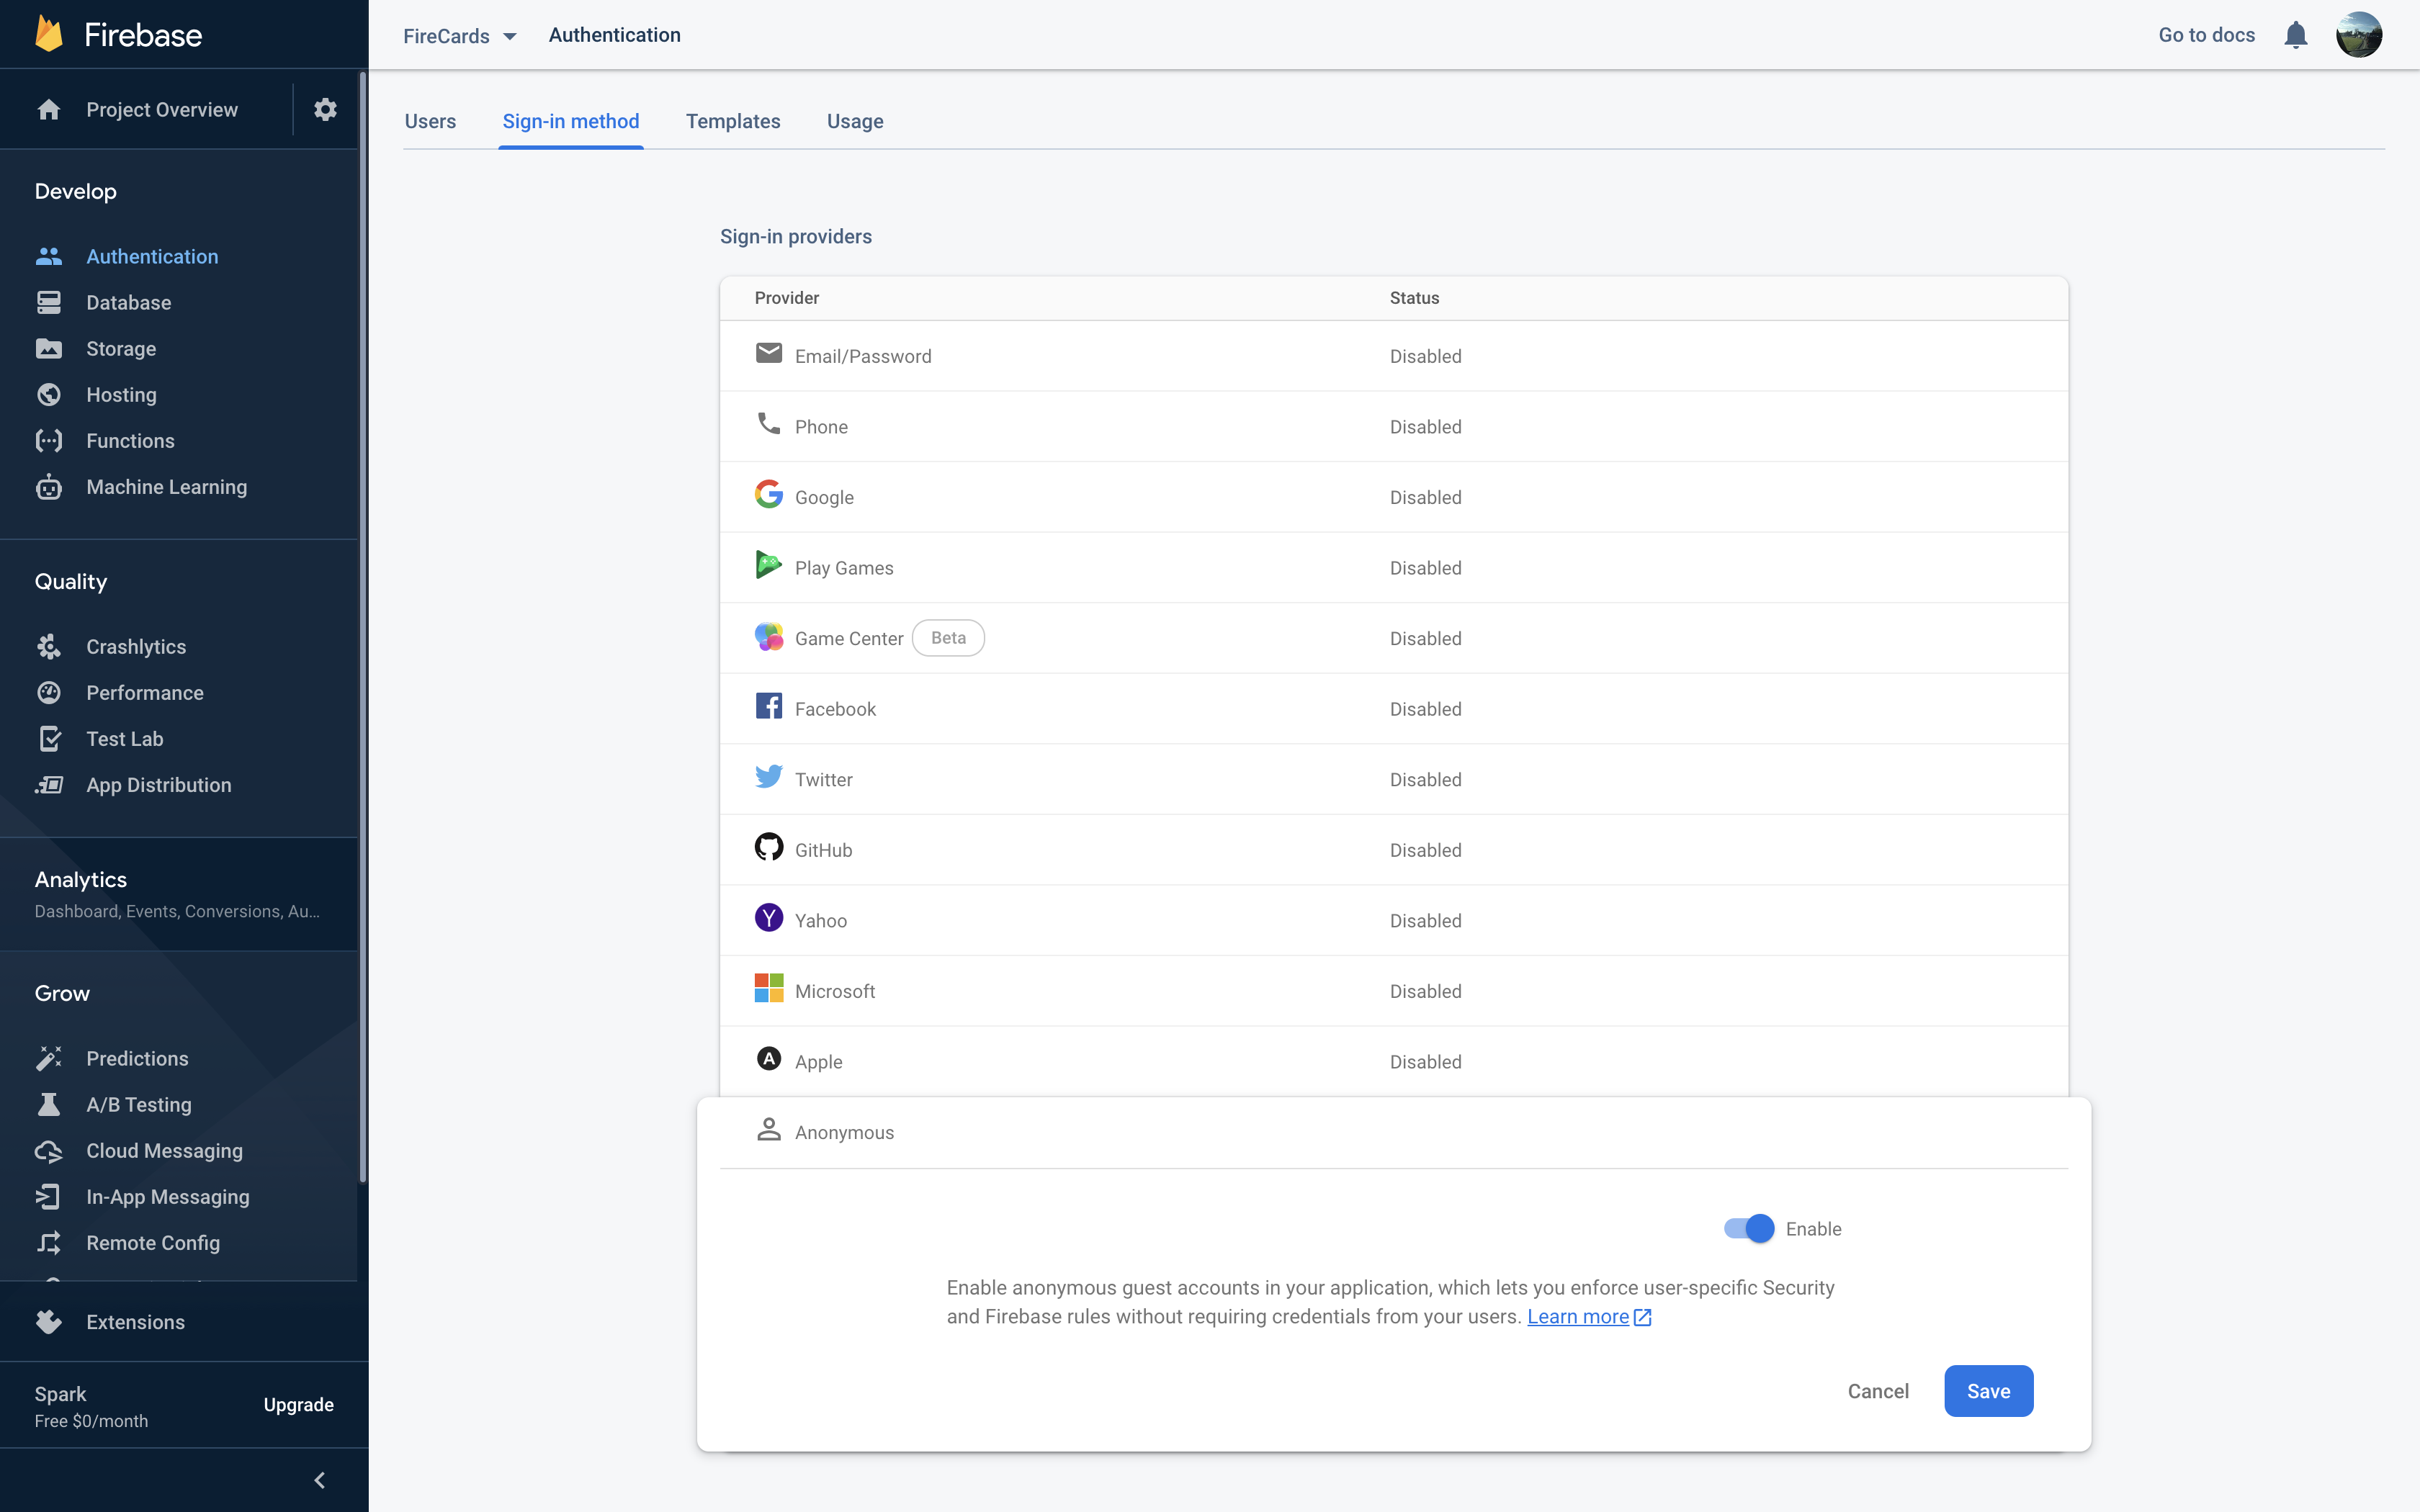
To activate this authentication mode, go to Firebase Console, select Authentication on the left sidebar and then Sign-in method on the top navigation bar. Go to the bottom of the Providers List, select Anonymous and enable it by clicking the toggle on the right. Finally, click Save.
Now you’ll need to create an Authentication Service.
Creating an authentication service
In the Project navigator, create a new Swift file under Services and name it AuthenticationService.swift.
Add the code below to the new file:
import Firebase

// 1
class AuthenticationService: ObservableObject {
  // 2
  @Published var user: User?
  private var authenticationStateHandler: AuthStateDidChangeListenerHandle?

  // 3
  init() {
    addListeners()
  }

  // 4
  static func signIn() {
    if Auth.auth().currentUser == nil {
      Auth.auth().signInAnonymously()
    }
  }

  private func addListeners() {
    // 5
    if let handle = authenticationStateHandler {
      Auth.auth().removeStateDidChangeListener(handle)
    }

    // 6
    authenticationStateHandler = Auth.auth()
      .addStateDidChangeListener { _, user in
        self.user = user
      }
  }
}
This code:
By checking if it’s nil, you avoid unnecessary calls. This value stores locally, so after the first time, the app uses the same user.
- Declares
AuthenticationServiceand conforms it toObservableObject. - Defines
userwhich will contain theUserobject when the authentication process happens. It also defines anauthenticationStateHandlerproperty to catch changes in the user object, such as when the user signs in or out. - Implements
init()and callsaddListeners()so it’s called when the class is instantiated. - Adds
signIn()which takes care of signing in to Firebase.Authstores the Firebase user object incurrentUser. - Checks if there’s already a handler instantiated and, if so, removes it.
- Assigns
addStateDidChangeListener(_:)listener toauthenticationStateHandler.
Nice, you have your Authentication Service all set up!