RxJava Filtering Operators
In this tutorial, you will learn about a group of powerful RxJava operators that will allow you to work only with the data you require at a certain step of the data transformation process: the RxJava Filtering Operators. By Andres Torres.
RxJava is a powerful library for handling asynchronous code based on events. It avoids callbacks by providing a composable style of programming. RxJava provides many versatile operators you can use to process your data in straightforward ways.
In this tutorial, you’ll learn about RxJava Filtering Operators, a group of powerful operators that let you work with the data you need at a specific step of the data transformation process.
In the process you’ll learn how to:
- Take a select number of elements from your data stream.
- Let your data stream skip elements based on a condition.
- Filter your data based on a predicate.
- Take an element only after the user finishes giving input.
- Act on sequential elements only when they differ.
These operators will form the base of your RxJava vocabulary. Time to dive in!
To start learning RxJava read this Reactive Programming with RxAndroid tutorial.
To start learning RxJava read this Reactive Programming with RxAndroid tutorial.
Getting Started
Download the starter project by clicking on the Download Materials button at the top or bottom of the tutorial. Then, open the starter project in Android Studio, where you’ll find Foodeat, a restaurant-searching app.
Build and run. You’ll see the following screen:

You’ll see a list of restaurants ordered from highest to lowest rated. The app stores the restaurants in a Room database. You’ll also see a search field and a menu with some items that represent filtering criteria on the toolbar.

You’ll develop features to filter information based on the criteria given by the search field and menu items. With this information, you’ll quickly pick somewhere to eat. :]
Before you start coding, take a moment to review some theory about what RxJava is.
What is RxJava?
RxJava is a library that extends the observer pattern for processing asynchronous code by using sequences and functional style operators. RxJava provides several advantages. With it, you can:
- React to new data in a sequential and isolated manner.
- Simplify multithreading.
- Avoid callback hell.
- Use operators that let you declare how to process data in each step of the chain in a simple way.
To make the most of these advantages, RxJava provides several helpful operators.
What are RxJava Filtering Operators?
RxJava comes with several operators to process data streams. You’ll use RxJava Filtering Operators extensively throughout your RxJava career. These filtering operators apply conditional constraints to the events you receive on your data stream.

You can apply these constraints to limit the values emitted by your stream, ensuring you work with only the elements you need. For example, the image above shows you can use a filter operator to get only even values from your stream.
The most common filtering operators are:
debouncedistinctelementAtfilterignoreElementslastskipskipLasttaketakeLasttakeUntil
While you’ll only work with a handful of these operators in this tutorial, you can use what you learn here to implement the other filtering operators. The first operator you’ll use is take.
Using the Take Operator
The take operator emits only the first n items emitted and then completes.

You’ll use this operator to take and display the highest rated restaurants. Open RestaurantViewModel.kt and replace getTopRestaurants() with:
fun getTopRestaurants() {
  _restaurantsLiveData.value = Resource.Loading

  restaurantSource
      .take(5)
      .showResults()
}
Here you get the stream of restaurants, let through only the first five emitted values, and then show the results. Look at the bottom of RestaurantViewModel.kt. You’ll see showResults():
//1
private fun Observable<Restaurant>.showResults() {
  this.toList() //2
      .subscribeOn(Schedulers.io()) //3
      .map { Resource.Success(it) } //4
      .subscribe(_restaurantsLiveData::postValue) //5
      .addTo(disposables) //6
}
This handy extension function helps you keep your code clean and DRY, or Don’t Repeat Yourself. Here’s a detailed breakdown:
- You create an extension function for showing the results for any
ObservableemittingRestaurantvalues. - As soon as the
Observablecompletes, you create a list with all the emitted values. - Then you subscribe to the corresponding scheduler.
- You wrap the resulting list in a
Resourceobject with a type ofSuccess. - Next, you send all the
Resourcevalues to the correspondingLiveData. - Finally, you add the resulting disposable to a
CompositeDisposablewhich is disposed of when theViewModelis removed. This avoids memory leaks. Remember to always clean up after yourself. :]
restaurantsSource, is the direct result from the query to your Room database. The second one, restaurantSource, is the previous observable but its elements are flatten so you can work directly with each element to assure the stream completes.
Build and run. Go to the toolbar menu and tap the Top 5 Rated item. You’ll now see the filtered list showing the highest-rated restaurants.

The Take Operator Variations
There are many overloads and variations of take you can choose from to best suit your needs:
-
takeLast: Only emits the final n items emmitted by anObservable. This operator needs anObservablethat completes to know which elements are last. Otherwise, it won’t emit them. -
takeUntil: Emits items until a secondaryObservabletriggers by emitting an item or terminating. -
takeWhile: Emits items while a specified condition is true. -
elementAt: This is not necesarily a direct descendant of thetakeoperator. But, by specifing an index, you can take that particular element in the corresponding index, achieving a very similar behavior.
Next, you’ll work with the skipwhile operator.
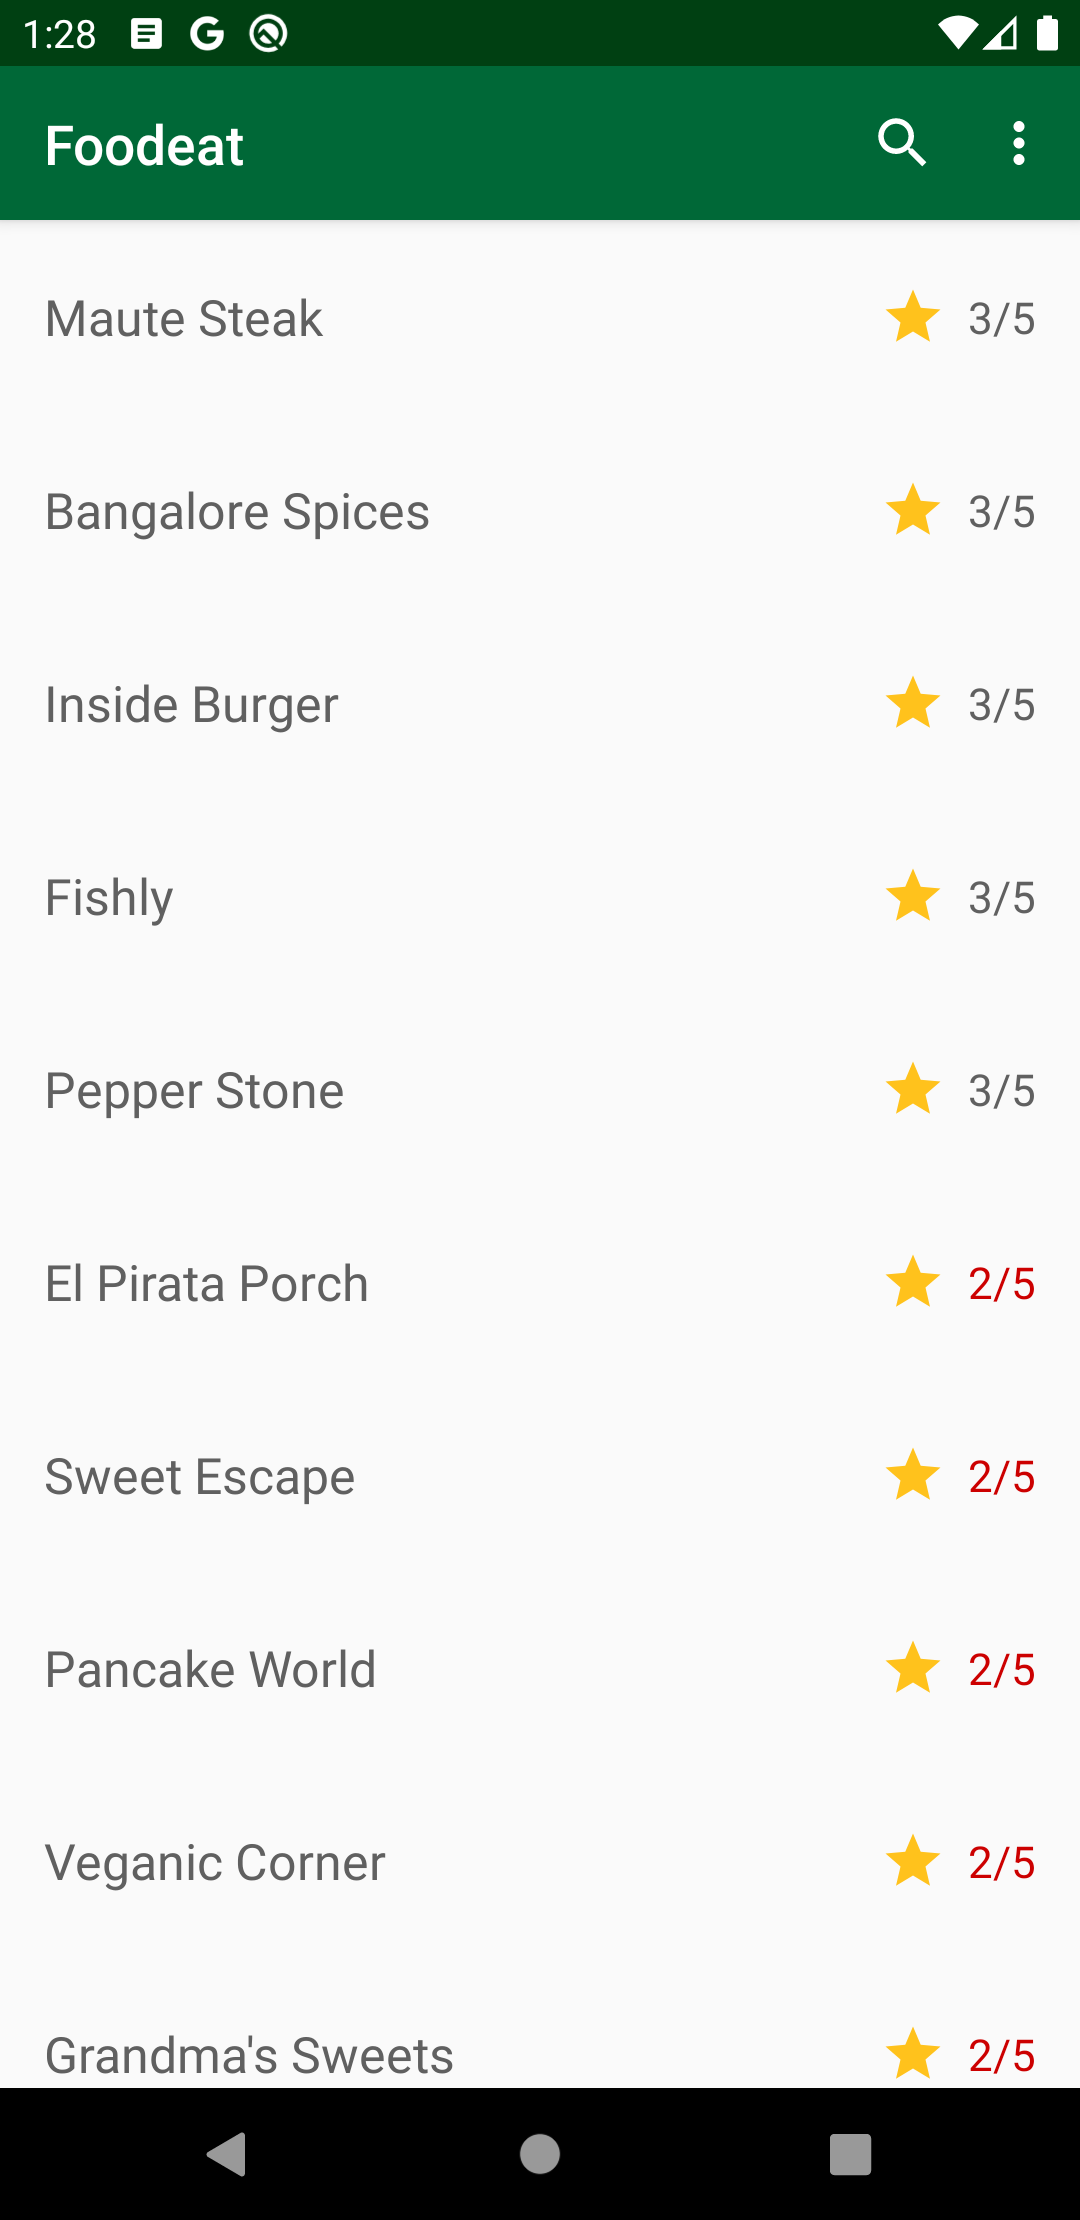
Using the SkipWhile Operator
Next, you’ll filter your restaurant list to show only restaurants rated three stars or fewer. You can start reducing your short-list for possible restaurants the next time you go out. :]
The skipWhile operator lets you skip values while a certain condition is true. When the condition is no longer met, the Observable starts emitting the rest of the values.

In RestaurantViewModel.kt, replace getLowestRatedRestaurants() with:
fun getLowestRatedRestaurants() {
  _restaurantsLiveData.value = Resource.Loading

  restaurantSource
      .skipWhile { it.rating > 3 }
      .showResults()
}
You get the restaurant stream of values, then skip all the values while the rating is above three.
Build and run. Go to the toolbar menu, but this time tap the Rated 3 and Below item. Now, you’ll see a list with all the restaurants with a rating of three stars and below. Instead of taking or skipping a specific number of items, you’re filtering for a particular condition.
Now that you’re more comfortable filtering your data, it’s time to go further.