Introducing CryptoKit
Cryptography is key to protecting your users’ data. This tutorial shows you how to use Apple’s new CryptoKit API to authenticate or encrypt your app’s data. By Audrey Tam.
Signing the Digest
Hashing data doesn’t protect you from malicious changes, as a malicious attacker will just send the correct digest for their changed data.
Hash-based Message Authentication Code (HMAC) protects against malicious changes by signing the digest with a symmetric cryptographic key. A common use case is signing the digest of a file so the app’s server can check that you’re authorized to upload files.
“Symmetric key” means the sender and receiver both know the secret key. HMAC uses the secret key to derive inner and outer keys. Then it creates an internal hash from the data and the inner key. Finally, it creates the signature from the internal hash and the outer key.
Diagram of Hashed Message Authentication Code

Diagram of Hashed Message Authentication Code
That’s what the algorithm does. But to create a symmetric key with CryptoKit, you only have to type this line:
let key256 = SymmetricKey(size: .bits256)
So much less work than Apple’s old C cryptography API, where you had to convert bits and bytes and remember to remove the key from memory when you were done!
The most common attack against HMAC is brute force to uncover the secret key, so the security of HMAC depends on the size of the secret key. CryptoKit allows three key sizes: .bits128, .bits192 and .bits256.
Next, add these two code statements:
let sha512MAC = HMAC<SHA512>.authenticationCode(
  for: data, using: key256)
String(describing: sha512MAC)
You’re creating the digest for data using your symmetric key, so now the digest is called an authentication code or signature.
Run the playground. Click Show Result to see the signature’s description:
Description of CryptoKit HMAC 512-bit signature

Description of CryptoKit HMAC 512-bit signature
You’ve produced a 512-bit (64-byte) signature for the baby image.
To send this signature over the network, convert it to Data:
let authenticationCodeData = Data(sha512MAC)
Now Dumbledore sends the signed data to you-as-Harry. You-as-Harry already have the same secret key key256. Type this code to authenticate what you’ve received:
if HMAC<SHA512>.isValidAuthenticationCode(authenticationCodeData,
   authenticating: data, using: key256) {
    print("The message authentication code is validating the data: \(data))")
  UIImage(data: data)
}
else { print("not valid") }
If the signature is valid, you-as-Harry view the data, knowing it’s really what Dumbledore sent.
Run the playground. Click Show Result next to the print statement and next to the UIImage:
CryptoKit authenticating HMAC signature and data

CryptoKit authenticating HMAC signature and data
HMAC lets you verify the sender’s identity and the integrity of the data, but doesn’t encrypt the data. If you forget to use TLS, and Voldemort intercepts the transmission, he’ll suspect that Harry is one of his horcruxes.
Or Voldemort might decide to manually encrypt his list of horcruxes, to be absolutely sure Dumbledore and Harry can’t find and destroy them.
Data encryption is what cryptography is all about, so here it comes.
Encrypting and Authenticating Data
Even with TLS encrypting network data, you might want to send encrypted files to users. For example, if they’ve made an in-app purchase, you’d send them the encrypted file and (separately) the key to decrypt it.
The current state of the art is an Authenticated Encryption with Associated Data (AEAD) cipher. An AEAD cipher uses different keys for encryption and MAC, and the MAC hashes the cipher text, not the plain text. Everything is combined into a sealed box.
There are two AEADs in common use: Advanced Encryption Standard Galois/Counter Mode (AES-GCM) and ChaCha20-Poly1305. Both are new to Apple’s cryptography API. AES-GCM is the established standard from NIST. Daniel J. Bernstein developed ChaCha20-Poly1305 in case an attacker manages to break AES-GCM.
In 2019, almost all TLS traffic used AES, but ChaCha20-Poly1305 is increasing in popularity because it’s much faster than AES-GCM on mobile devices that don’t have hardware support for AES-GCM. But feel free to use AES-GCM in your apps, because iOS devices have AES hardware :].
AES and ChaCha20 are cipher algorithms. GCM and Poly1305 are MAC algorithms. Bernstein developed ChaCha20 from his earlier Salsa cipher. ;]
To create a sealed box, an AEAD cipher takes these inputs:
- Plaintext to be encrypted
- A secret key
- A unique initialization value — IV or nonce: This prevents replay attacks, like someone (who really needs to get a life) resending the same shopping cart order many times.
- Optional: Additional non-secret Data, authenticated but not encrypted. This is the AD in AEAD.
Then the seal operation:
- Uses the key and nonce to generate a secondary key.
- Uses the key and nonce to encrypt the data into encrypted data of equal length — the
ciphertext. - Uses the secondary key to generate a keyed digest of any additional data, the encrypted data and the lengths of each.
- Uses the key and nonce to encrypt the keyed digest, then appends the encrypted keyed digest to the encrypted data.
I’ve left out the associated data in this diagram:
Diagram of CryptoKit Sealed Box seal operation
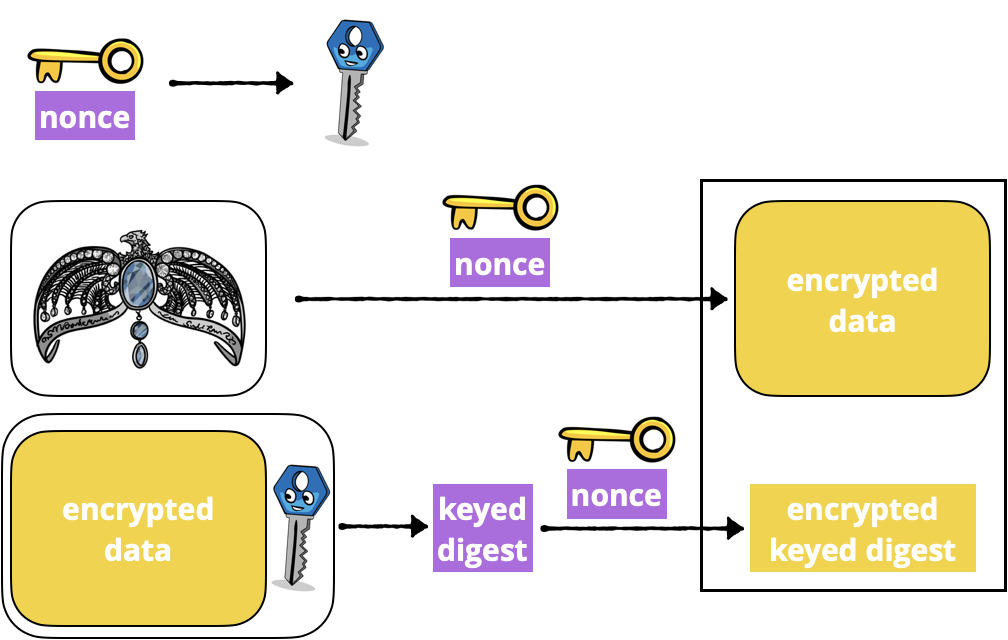
Diagram of CryptoKit Sealed Box seal operation
That looks like a lot of work, doesn’t it? Well, here’s all you need to type, to create a sealed box:
let sealedBoxData = try! ChaChaPoly.seal(data, using: key256).combined
You supply the data and key to get a sealed box. Its combined property is of type Data, which you can send over the network.
To use AES-GCM instead, you’d replace ChaChaPoly with AES.GCM.
Now Dumbledore sends the sealed box data to Harry. You-as-Harry type this code to turn it back into a sealed box:
let sealedBox = try! ChaChaPoly.SealedBox(combined: sealedBoxData)
You-as-Harry already have the same secret key as Dumbledore, so you can open the sealed box and decrypt its ciphertext:
let decryptedData = try! ChaChaPoly.open(sealedBox, using: key256)
Run the playground.
CryptoKit code for ChaChaPoly seal and open operations

CryptoKit code for ChaChaPoly seal and open operations
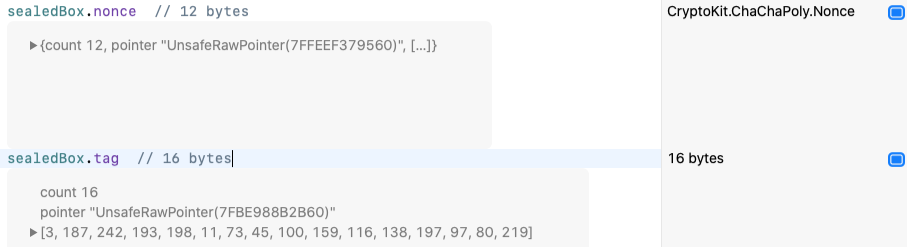
Notice the size of sealedBoxData is 28 bytes more than the image data. Add these lines to see what else is in the sealed box:
sealedBox.nonce  // 12 bytes
sealedBox.tag  // 16 bytes
Sizes and contents of CryptoKit sealed box nonce and tag
Sizes and contents of CryptoKit sealed box nonce and tag
Both algorithms select a nonce for you, then pack it into the sealed box for open to use. So easy! The 16-byte tag is the encrypted keyed digest — the signature that authenticates the data. The nonce changes each time you create the sealed box, and this changes the encrypted keyed digest too. So your actual nonce and tag values don’t match my screenshot.
Finally, just to prove the encrypted data can’t be viewed, add these lines:
let encryptedData = sealedBox.ciphertext
UIImage(data: encryptedData)
UIImage(data: decryptedData)
Run the playground. Show Result for both lines:
Encrypted data cannot be viewed as UIImage.

Encrypted data cannot be viewed as UIImage.
That’s how easy it is to send encrypted data, but both sender and receiver need to know the secret key. What if this isn’t possible?