Getting Started With Core Haptics
In this Core Haptics tutorial, you’ll learn how to create and play haptic patterns, synchronize audio with haptic events and create dynamic haptic patterns that respond to external stimuli. By Andrew Tetlaw.
Syncing Audio Events
Up to now, you’ve kept the audio and haptics separate, but Core Haptics also supports audio events in haptic patterns. Before you use this feature, you have to register each audio resource with the haptic engine, which will return a resource ID that you can use to identify which audio waveform to use for an event.
Add the following properties to HapticManager:
var sliceAudio: CHHapticAudioResourceID?
var nomNomAudio: CHHapticAudioResourceID?
var splashAudio: CHHapticAudioResourceID?
These hold your audio resource IDs.
Next, add the following method after init?():
private func setupResources() {
  do {
    if let path = Bundle.main.url(forResource: "Slice", withExtension: "caf") {
      sliceAudio = try hapticEngine.registerAudioResource(path)
    }
    if let path = Bundle.main.url(forResource: "NomNom", withExtension: "caf") {
      nomNomAudio = try hapticEngine.registerAudioResource(path)
    }
    if let path = Bundle.main.url(forResource: "Splash", withExtension: "caf") {
      splashAudio = try hapticEngine.registerAudioResource(path)
    }
  } catch {
    print("Failed to load audio: \(error)")
  }
}
setupResources() checks the path to each of your audio files. It then registers them using registerAudioResource(_:options:), which returns the resource ID.
If the file isn’t found, the property will remain nil, and you can check for that in your pattern methods. You haven’t started the splash pattern yet; that’s coming later. ;]
Now, you need to add a call to setupResources() at the end of init?():
setupResources()
Add the audio event to the pattern in nomNomPattern(). Replace return try CHHapticPattern ... with:
var events = [rumble1, rumble2, crunch1, crunch2]

// 1
if let audioResourceID = nomNomAudio {
  // 2
  let audio = CHHapticEvent(
    audioResourceID: audioResourceID,
    parameters: [],
    relativeTime: 0)
  events.append(audio)
}

// 3
return try CHHapticPattern(events: events, parameters: [])
- First, you check that the resource ID is not
nil. If the check fails, you’ll only use the haptic events. That’s your fallback. - You create the audio event using the special initializer in
CHHapticEventfor audio events, passing in the resource ID. - Finally, you return the pattern.
While you’re there, add the audio to the slice pattern. Replace the return try CHHapticPattern ... in slicePattern() with:
var events = [slice, snip]

if let audioResourceID = sliceAudio {
  let audio = CHHapticEvent(
    audioResourceID: audioResourceID,
    parameters: [],
    relativeTime: 0)
  events.append(audio)
}

return try CHHapticPattern(events: events, parameters: [])
This is very similar to what you did in nomNomPattern(). You check that the resource ID for slicing action is not nil in order to create an audio event with the resource ID.
Because you’re now including audio in your haptic patterns, there’s no need for the game scene to play that audio. Open GameScene.swift and find setUpAudio().
At the end of that method, you’ve set the sliceSoundAction, splashSoundAction and nomNomSoundAction properties:
sliceSoundAction = .playSoundFileNamed(...)
splashSoundAction = .playSoundFileNamed(...)
nomNomSoundAction = .playSoundFileNamed(...)
You’ll need to change these so that the game scene plays the haptic pattern instead of the audio, but only if the haptic manager successfully registered those audio resource IDs and can play them.
Replace the code from above in setUpAudio() with the following:
guard let manager = hapticManager else {
  sliceSoundAction = .playSoundFileNamed(
    SoundFile.slice,
    waitForCompletion: false)
  nomNomSoundAction = .playSoundFileNamed(
    SoundFile.nomNom,
    waitForCompletion: false)
  splashSoundAction = .playSoundFileNamed(
    SoundFile.splash,
    waitForCompletion: false)
  return
}

setupHaptics(manager)
That code first makes sure that hapticManager isn’t nil. If it is, it creates the sound actions as normal. This is the first fallback position.
If hapticManager is not nil, it calls setupHaptics, which you’ll now add under setUpAudio():
private func setupHaptics(_ manager: HapticManager) {
}
You’ll use setupHaptics(_:) to create the SKAction objects that play your haptic patterns, but you also need a fallback in case the haptic audio resource ID is nil. In that situation, you can create an SKAction group that’ll play the sound and run the haptic pattern, without audio, together.
Add the following to setupHaptics(_:):
// 1
let sliceHaptics = SKAction.run {
  manager.playSlice()
}
if manager.sliceAudio != nil {
  // 2
  sliceSoundAction = sliceHaptics
} else {
  // 3
  sliceSoundAction = .group([
    .playSoundFileNamed(SoundFile.slice, waitForCompletion: false),
    sliceHaptics
  ])
}
- First, you create the haptics action. It’s a simple
runaction that callsplaySlice(). - If
sliceAudiois notnil, you assign this action tosliceSoundAction. - However, if
sliceAudioisnil, you create agroupaction with two child actions. The first is theplaySoundFileNamedaction and the second yoursliceHapticsaction.
Now, add the same approach for nomNomSoundAction:
let nomNomHaptics = SKAction.run {
  manager.playNomNom()
}
if manager.nomNomAudio != nil {
  nomNomSoundAction = nomNomHaptics
} else {
  nomNomSoundAction = .group([
    .playSoundFileNamed(SoundFile.nomNom, waitForCompletion: false),
    nomNomHaptics
  ])
}
This is very similar to sliceSoundAction, except that you use nomNomHaptics.
For now, add a simple playSoundFileNamed action for splashSoundAction:
splashSoundAction = .playSoundFileNamed(
  SoundFile.splash,
  waitForCompletion: false)
You haven’t designed that haptic experience yet; this avoids a crash when you run the game and splashSoundAction is nil.
Build and run! Now, Core Haptics plays your slice and the nom-nom audio.
Setting a Reset Handler
Now that you’re using haptic audio resources, you have a new problem to consider. If the haptic server on your device recovers from a failure, then your haptic engine instance resets. When that happens, the engine stops and loses all audio resource ID references. To prevent that, you need a reset handler.
Adding a reset handler is easy. First, add this new method to HapticManager:
func handleEngineReset() {
  do {
    // 1
    try hapticEngine.start()
    // 2
    setupResources()
  } catch {
    print("Failed to restart the engine: \(error)")
  }
}
- Apple recommends that you first try to start the engine.
- If that works, you restore any audio resource IDs you’ve previously registered.
Next, add the following to init?() to call handleEngineReset() when the engine resets:
hapticEngine.resetHandler = { [weak self] in
  self?.handleEngineReset()
}
See the Apple documentation on Preparing Your App to Play Haptics for more information.
For your next step, you’ll add haptics when the crocodile misses the pineapple.
Ramping Intensity Up and Down — Pineapple Splashdown
Listening to the Splash.caf sound effect, there’s a heavy *splish* followed by a longer, tailing *splash*. Add a new method to HapticManager to make a pattern that represents that sound experience:
private func splashPattern() throws -> CHHapticPattern {
  let splish = CHHapticEvent(
    eventType: .hapticTransient,
    parameters: [
      CHHapticEventParameter(parameterID: .hapticIntensity, value: 1.0),
      CHHapticEventParameter(parameterID: .hapticSharpness, value: 0.1)
    ],
    relativeTime: 0)

  let splash = CHHapticEvent(
    eventType: .hapticContinuous,
    parameters: [
      CHHapticEventParameter(parameterID: .hapticIntensity, value: 0.5),
      CHHapticEventParameter(parameterID: .hapticSharpness, value: 0.1)
    ],
    relativeTime: 0.1,
    duration: 0.6)

  var events = [splish, splash]
  if let audioResourceID = splashAudio {
    let audio = CHHapticEvent(
      audioResourceID: audioResourceID,
      parameters: [],
      relativeTime: 0)
    events.append(audio)
  }

  return try CHHapticPattern(events: events, parameters: [])
}
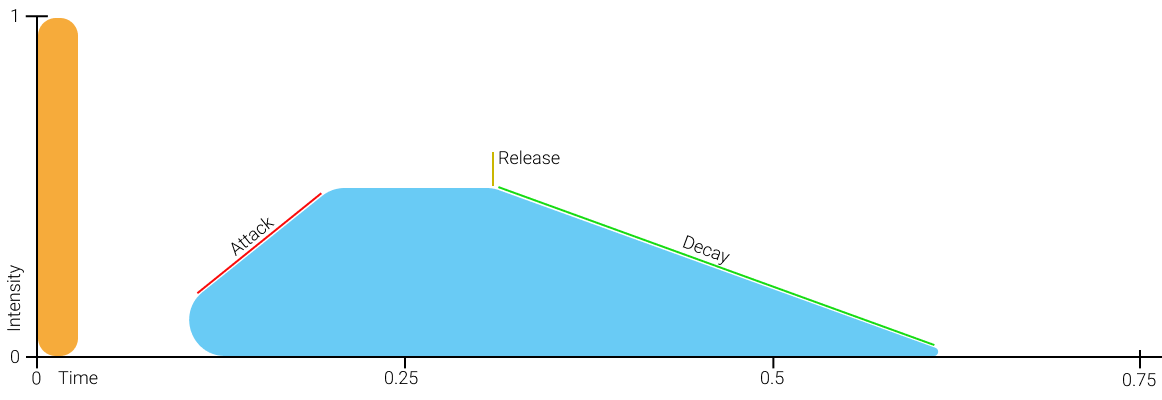
Your new haptic experience has a single strong, but rounded, transient event at the start for the *splish*, and then a longer, softer continuous event that starts at 0.1 seconds and lasts for 0.6 seconds for the *splash*:

Before you can play it, you need to add a new method to HapticManager, beneath playNomNom():
func playSplash() {
  do {
    let pattern = try splashPattern()
    try playHapticFromPattern(pattern)
  } catch {
    print("Failed to play splash: \(error)")
  }
}
Return to setupHaptics(_:) in GameScene.swift, remove the temporary splashSoundAction code, then add the following code to set splashSoundAction:
let splashHaptics = SKAction.run {
  manager.playSplash()
}
if manager.splashAudio != nil {
  splashSoundAction = splashHaptics
} else {
  splashSoundAction = .group([
    .playSoundFileNamed(SoundFile.splash, waitForCompletion: false),
    splashHaptics
  ])
}
Build and run and test it. The *splish* works well, but the *splash* is just a long rumble; it’s too one-dimensional. It should be more like a cresting wave. Fortunately, there are event properties that can help you. Update the splash event with three new properties:
let splash = CHHapticEvent(
  eventType: .hapticContinuous,
  parameters: [
    CHHapticEventParameter(parameterID: .hapticIntensity, value: 0.5),
    CHHapticEventParameter(parameterID: .hapticSharpness, value: 0.1),
    CHHapticEventParameter(parameterID: .attackTime, value: 0.1),
    CHHapticEventParameter(parameterID: .releaseTime, value: 0.2),
    CHHapticEventParameter(parameterID: .decayTime, value: 0.3)
  ],
  relativeTime: 0.1,
  duration: 0.6)
-
.attackTimeis a property that controls how many seconds it takes for the event to reach the specified intensity value from0at the start of the event. Think of it as the ramp-up time. -
.decayTimeis the opposite, representing the time it takes for the intensity to ramp down to0. -
.releaseTimecontrols when the decay ramp down begins.
Build and run and experience the disappointing letdown of missing the crocodile and splashing into the ocean. Can you feel the wave? It should ramp down to 0 intensity just before the sound finishes playing.