Making A Mac App Scriptable Tutorial
Allow users to write scripts to control your OS X app – giving it unprecedented usability. Discover how in this “Making a Mac App Scriptable Tutorial”. By Sarah Reichelt.
5 (1) · 1 Review
Scripting Your App
Before you start, make sure to quit any running instance of the app that Script Editor might have opened.
Build and run Scriptable Tasks; right-click on the icon in the Dock and select Options/Show in Finder. Quit the Script Editor app and restart it to let it pick up the changes to your app.
Open the Library window, and drag the Scriptable Tasks app from the Finder into the Library window.
If you get an error saying the app is not scriptable, try quitting Script Editor and starting it again as it sometimes doesn’t register a freshly built app. If it still fails to import, go back and double-check your changes to the SDEF file.
Double-click Scriptable Tasks in the Library to see the app’s dictionary:

You’ll see the Standard Suite and the Scriptable Tasks Suite. Click on the Scriptable Tasks suite, and you will see what you put into the SDEF file. The application contains tasks, and a task has four properties.
Change the scripting language in the dictionary to JavaScript using the Language popup in the toolbar. You will see the same information but with one important change. The cases of classes and properties have changed. I have no idea why this is, but it’s one of those “gotchas” you need to watch out for.
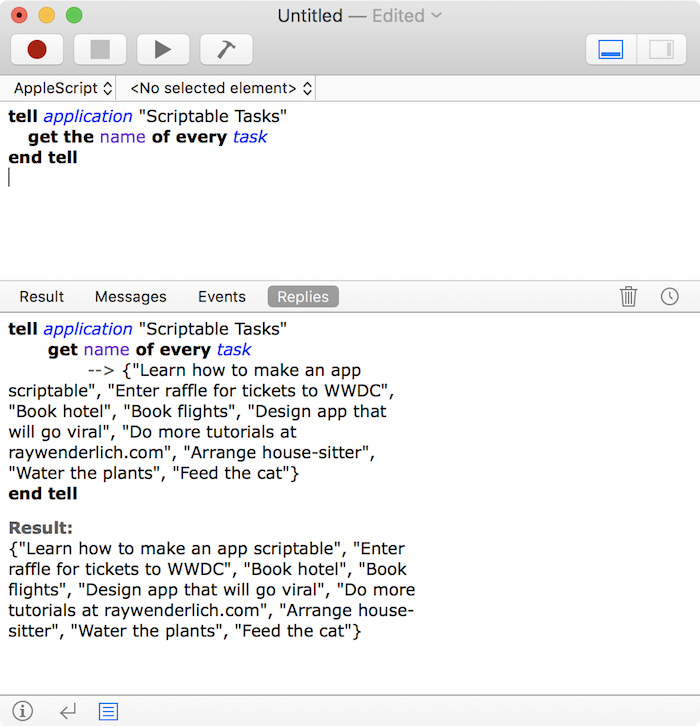
In Script Editor, make a new script file and set the editor to show Log/Replies. Test either of the following scripts, making sure to select the appropriate language in the language pop-up:
tell application "Scriptable Tasks"
  get every task
end tell
or
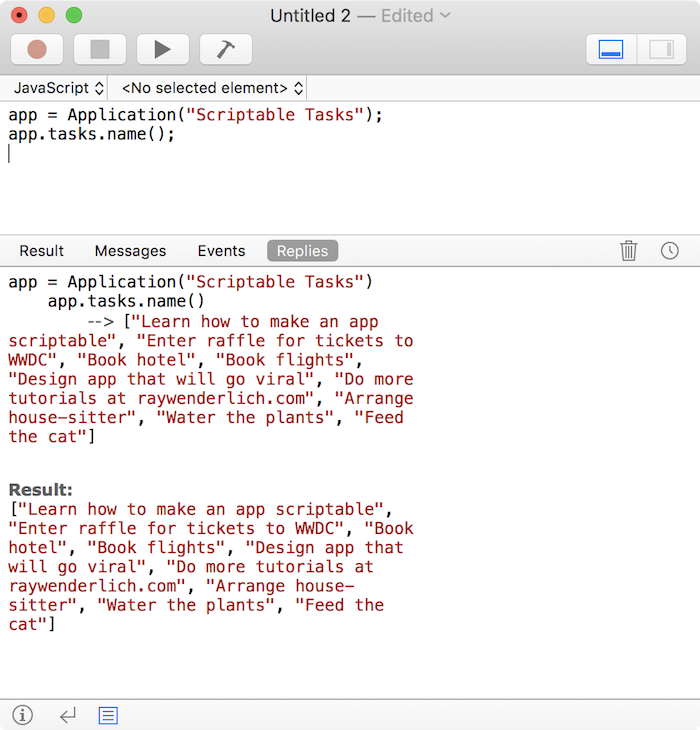
app = Application("Scriptable Tasks");
app.tasks();
In the log, you will see a list of the tasks by ID. For more useful information, edit the scripts as follows:
tell application "Scriptable Tasks"
  get the name of every task
end tell
or
app = Application("Scriptable Tasks");
app.tasks.name();
Try out a few more of the sample scripts you downloaded earlier. When running the scripts, make sure you set the Script Editor to show Log/Replies so that you can see the results along the way.
Each script quits the app before running it again; this is to reset the data after any edits so that the sample scripts work as expected. You wouldn’t normally do this in your own scripts.
Note: Script Editor can get very confused as you build updated versions of the app, because it tries to keep a version running at all times if you have an open script that is using the app. This often ends up as an older version of the app, so before every build, quit the app.
If you see two copies of the Scriptable Tasks app running at any time, or if there appears to be a script error in any of the samples, you can be sure that Script Editor has glommed on to the wrong version of the app. The easiest fix is to quit all copies of the app and quit Script Editor. Clean the Xcode build (Product/Clean), then build and run again.
Restart Script Editor and when it opens the script, click Compile and then click Run. And if THAT doesn’t work, delete Derived Data for the app in ~/Library/Developer/Xcode/DerivedData.
Try out the next two sample scripts:
3. Get Tasks.scpt
This script retrieves the number of tasks and the names of tasks using various filters. Make note of the following:
- JavaScript counts from 0, AppleScript counts from 1.
- Text searches are case-insensitive.
4. Add Edit Tasks.scpt
This script adds new tasks, toggles the completed flag on the first task, and tries to create a task with the same name as another.
Hmmm… creating a task with the same name worked! Now you have two “Feed the cat” tasks. The cat will be thrilled, but for the purposes of this app, task names should be unique. Trying to add a task with a name that is already in use should have produced an error.
Back in Xcode, look in AppDelegate.swift and you can see that when the script wants to insert an object, the app delegate passes that call to its dataProvider. In DataProvider.swift, look at insertNew(task:at:), which inserts an existing task into the array or appends a new task to the end.
Time to add a check here. Replace the function with the following:
mutating func insertNew(task: Task, at index: Int) -> [Task] {
  // 1
  if taskExists(withTitle: task.title) {
    // 2
    let command = NSScriptCommand.current()
    command?.scriptErrorNumber = errOSACantAssign
    command?.scriptErrorString = "Task with the title '\(task.title)' already exists"
  } else {
    // 3
    if index >= tasks.count {
      tasks.append(task)
    } else {
      tasks.insert(task, at: index)
    }

    postNotificationOfChanges()
  }

  return tasks
}
Here’s what each commented section does:
- Use an existing function to check if a task with this name already exists.
- If the name is not unique:
- Get a reference to the scripting command that called this function.
- Set the command’s
errorNumberanderrorStringproperties;errOSACantAssignis one of the standard AppleScript error codes. These will be sent back to the calling script.
- If the name is unique:
- Process the task as before.
- Post a notification of data changes. The ViewController will see this and update the display.
Quit the app if running, then build and run your app. Run the 4. Add Edit Tasks scripts again. This time you should get an error dialog and no duplicate tasks will be created. Sorry about that, cat…

5. Delete Tasks.scpt
This script deletes a task, checks if a particular task exists and deletes it if possible, and finally deletes all completed tasks.