How to Make a Game Like Jetpack Joyride using LevelHelper and SpriteHelper [Corona Edition] – Part 4
This is a post by special contributor Bogdan Vladu, an iOS application developer and aspiring game developer living in Bucharest, Romania. Hello again, and welcome to the fourth and final installment of the tutorial series on LevelHelper and SpriteHelper. I said by the end of this series you would have an exciting game to play, […] By .
This is a post by special contributor Bogdan Vladu, an iOS application developer and aspiring game developer living in Bucharest, Romania.
Hello again, and welcome to the fourth and final installment of the tutorial series on LevelHelper and SpriteHelper. I said by the end of this series you would have an exciting game to play, and we’re almost there!
Last time, in Part Three, we came close to completing our game. We fully implemented collisions between the player and the other game elements, enabling the player to die and score points. We also made the player fly and added some nice sounds and animations.
But there are still a few improvements we can make. For one thing, we need a way to keep track of the score, and while we’re doing that we might as well add some cute moving bunnies that will be worth more points.
Our game looks nice, but I’ll take you through adding a background layer to give the illusion of a never-ending outdoor scene visible through the windows. We’ll make the background layer move so that the scene through the windows is always slightly different.
And wouldn’t it be interesting if we made some of our lasers rotate? Keep reading to complete the game!
Getting Started: Rotating Lasers
We’re picking up with the project as we left it at the end of Part Three. You can download that version of the project here.
The first thing we’re going to do is make our lasers rotate. We can’t have this game be too easy! So open up your project in LevelHelper, and make sure you have the latest version of your level open.
The first step is to go to Define Tags and define a new tag. Call it ROTATING_LASERS.
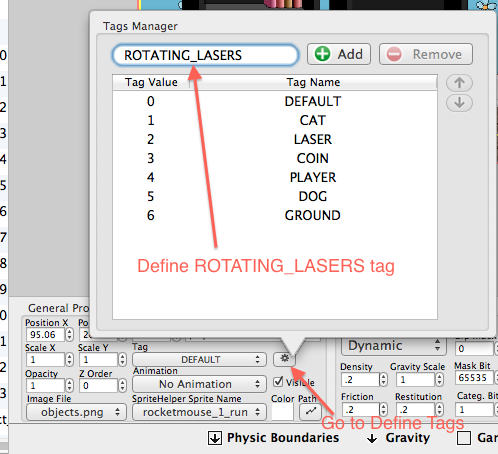
We will use this new tag to reference the lasers we select to rotate (not all of them… we’re not that evil, are we?) when we implement the rotation via code.
Now select a couple of the lasers in the level. Make sure the lasers you select have room to rotate. Assign the ROTATING_LASERS tag to these lasers.

Once you’re done tagging the lasers, save the level and open your gameLogic.lua. Navigate to the global variables at the top and add the following:
local rotatingLasers = nil;
Then place the following after you load the level inside “enterScene” method:
rotatingLasers = loader:spritesWithTag(LevelHelper_TAG.ROTATING_LASERS);
Here we take reference to all the sprites that have the tag ROTATING_LASERS.
Now that we’ve grabbed the lasers that we want, let’s make them rotate! Go inside your onEnterFrame method and write this at the end:
for i=1, #rotatingLasers do
	local rotLaser = rotatingLasers[i];
	rotLaser.rotation = rotLaser.rotation+1;
end
If you run the game now, the chosen lasers will rotate, but the player won’t die when it makes contact with them. This is because we haven’t registered a collision event for the ROTATING_LASERS tag. To do that, add the following inside the setupCollisionHandling method:
loader:registerPreColisionCallbackBetweenTags(LevelHelper_TAG.PLAYER, LevelHelper_TAG.ROTATING_LASERS, mouseLaserCollision);
Running the game now, the lasers will rotate and kill the player just as the non-rotating lasers do. Congrats, you have just added another layer of difficulty to our game. That said, you may want to play-test the game some more at this point to make sure the player can still get through the level!
If you run the game and collide with one of the rotating lasers you will notice that the player does not fall to the ground when it dies because of a collision with the laser. This is because the laser is not transformed to a sensor.
We need to add the following statement before the “if(playerIsDead == true)then statement inside mouseLaserCollsion method, so modify the mouseLaserCollision method like this:
local function mouseLaserCollision(event)

	local laser = event.spriteB;

    -- If we make the laser a sensor, the callback will be called only once - at first collision.
    -- This is not good as we want to kill the player when the laser changes to active.
    -- So we make the laser sensor, so that the player and laser don't collide, durring this collision.
    -- Then we keep track of the lasers that needs to change back to not being sensors
    -- and in the enterFrame we set back the lasers to isSensor = false

    laser.isSensor = true;
    lasersThatNeedHandling[#lasersThatNeedHandling+1] = laser;


    if(playerIsDead == true)then
        return;
    end

    if(laser:activeFrame() ~= 1)then
	    audio.play( laserSound )
	    killPlayer();
    end
end
Moving Bunnies
Running and flying over sleeping cats and dogs and dodging rotating lasers is all fun, but let’s add another reward component to the game to give it more complexity. I have just the ticket: bunnies. Cute, helpless bunnies that our player can kill for points.
Open SpriteHelper, and go to File\New. Then open Finder and navigate to the ArtPack folder (download it from Part One if you don’t have it), select the bunnies images and drag them into the SpriteHelper window. Then click the “Pack Sprites” button.

Now select all the sprites in the list and enable the “Is Sensor” option from the Physic Properties menu. (Note that our other reward component, coins, are also sensors.)

Next, create the following two animations using the bunny frames:
Animation Name: BunnyRun
Speed: 0.400
StartAtLaunch: YES
LoopForever: YES
Frames: bunny_1, bunny2
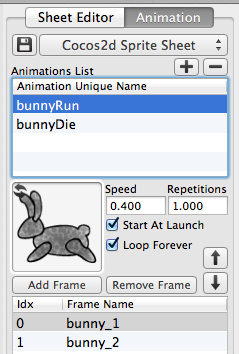
Animation Name: BunnyDie
Speed: 0.400
StartAtLaunch: YES
LoopForever: NO
Frames: bunny__die_1, bunny_die_2

When you’re done creating the animations, save the scene inside the Images folder of your project.

Going back to LevelHelper, we can see the bunny animations inside the Animations section. Select the BunnyRun animation and drag it into your level.

We now have a bunny in the level, but it will not be visible because we need to move him with the
parallax.
To add the bunny to the parallax, go to the Parallax tab, select our parallax and add the bunny sprite to it. Set the x component of the movement ratio to 1 so that the bunny moves at the same speed as our level.

If we run the level in Scene Tester we cannot see the bunny. This is because we need to set the batch z order on the bunny image.
Navigate the the Images section and set the batch z on the bunny image to 3. This will put the bunny in front of everything except the player.

Running the level again in Scene Tester, we can see the bunny moving with the parallax, but the bunny appears to be moving in place. We want the bunny to move from right to left and from left to right. To do this, we have to make him move on a path.
Navigate to the Beziers section and click NEW to create a new bezier that will describe the path of the bunny.

Click within the level view to draw the bunny’s path, and click the Finish button when you’re happy with the bezier.

Now select the “Path” option in the bezier properties to tell LevelHelper to treat that bezier as a path.
Note:
- By default, beziers are a simple line. You can make them true beziers by deselecting “Line” in the properties menu.
- You can edit a bezier by pressing the Edit button and then dragging the points.
- While editing the bezier, you can create a new point by holding COMMAND and clicking on a line of the bezier.
- While editing the bezier you can remove a point by holding ALT (Option) and clicking on a point.

Well, now we have our path defined, but the bunny sprite doesn’t know that it should move on that path. Let’s make the bunny aware of this.
Select the bunny, then in the General Properties section, click on Path.
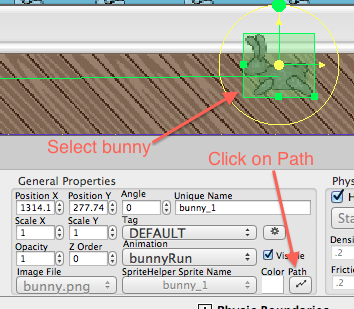
In the Path Settings dialogue, select the bezier that describes the path from the list, then make the motion cyclic by selecting “Cyclic Motion.”
Set the amount of time you want the bunny to take to move from one end of the bezier to the other. Then select “Flip Sprite X At Ends” so that the bunny is always facing in the direction it is moving. Otherwise, it will appear to be moving backwards half the time.

If you run the level inside Scene Tester now, the bunny should move on the path and also move with the parallax. This is cool, eh? LevelHelper is the only editor that lets you move sprites on a path and with a continuos scrolling parallax at the same time.
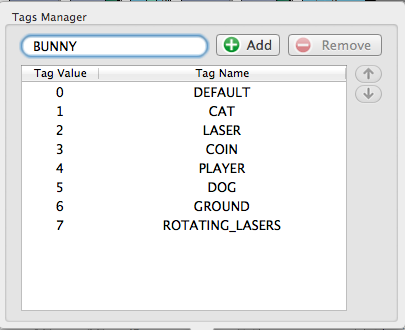
The last step in LevelHelper is to define a new tag called “BUNNY” and assign it to the bunny sprite. Once you’ve done this, save the level.

Time to move back to our Corona project – let’s write some code that will make the bunny die when the player collides with it.
Add the following at the end of the setupCollisionHandling method:
loader:registerPreColisionCallbackBetweenTags(LevelHelper_TAG.PLAYER, LevelHelper_TAG.BUNNY, mouseBunnyCollision);
This informs LevelHelper of the collision callback, but we also need to define the method for the callback. Add the following before the setupCollisionHandling method:
function mouseBunnyCollision(event)
    if(playerIsDead)then
        return;
    end

    local bunny = event.spriteB;

    if(nil ~= bunny)then

    	if(bunny.sequence == "bunnyRun")then
	        scoreHitAtPosition({x = bunny.x, y = bunny.y}, 500);
			audio.play(bunnyHitSound);
			bunny:startAnimationWithUniqueName("bunnyDie")
			bunny.lhPathNode:setPaused(true)
        end

    end
end
In the above code, we test for a dead player and do nothing if that’s the case. We then take the bunny sprite from the contact and test if it’s valid and whether it’s running the “bunnyRun” animation.
If the bunny sprite meets both conditions, we give 500 points to the user and play the bunny hit sound (part of the sound pack downloaded in Part Three of this series). We then start the bunnyDie animation on the bunny sprite and stop the sprite’s movement on the path.
Since we are starting an animation on the bunny lets register that animation. Add the following where you register the animations:
animationMgr:registerAnimationWithNameOnSpritesWithTag("bunnyDie", LevelHelper_TAG.BUNNY);
As you can see in this case we are registering the “bunnyDie” animation on all the sprites that have the tag BUNNY, in our case all the bunnies.
If you run the game now, you’ll see that the bunny dies when he collides with the mouse. But if you loop through the entire level, you’ll see that the bunny you killed doesn’t reappear in the level: it stays dead! So let’s do the same thing we did with the coins in Part Three and reset the bunny.
Find your spriteInParallaxHasReset method and modify it to look like this:
function spriteInParallaxHasReset(sprite)
    if(LevelHelper_TAG.COIN == sprite.lhTag)then
		sprite.alpha = 1;
    elseif(LevelHelper_TAG.BUNNY == sprite.lhTag)then
		sprite:startAnimationWithUniqueName("bunnyRun");
		sprite.lhPathNode:setPaused(false);
    end
end
Above, we simply check for the BUNNY tag, and when we find a sprite that is a bunny, we set its animation to bunnyRun and unpause its path movement.
The complete project up to this point can be downloaded here.