Using Meshroom to Insert Real Life Objects in Unity
In this article you’ll learn how to use Photogrammetry to photoscan and insert real life objects into your Unity projects with Meshroom. By Sean Duffy.
Creating Photoscans With Meshroom
Meshroom is an open-source photogrammetry app you can use to create 3D models from photographs. You’ll use it to create a photoscan of the dragon sculpture.
Download the latest version here and install it. You need either Windows or Linux to run the software.
Upon running Meshroom, you’ll see the main interface. You can do everything you need to create your photoscan in this view.
Here’s a quick run-through of each section of the main interface:

- This is where you drag and drop the photos you want to recreate in 3D.
- The Image Viewer is simply a preview pane for individual photos.
- Once the process begins, the 3D Viewer shows you the results of the reconstruction of your object. It also shows you the different angles your photos were taken at based on metadata the program gets from your images.
- Graph Editor shows the pipeline of processes the app runs through to reconstruct your object in 3D. Each stage is represented by a Node. These are a series of inputs and outputs with processing that occurs at each stage. Your photos run through this pipeline, with the result of each stage feeding into the next.
- In the Node pane you can access details about individual nodes in the Graph Editor. You can tweak each node’s settings, but for this tutorial, the default settings are enough.
Importing Photos to Meshroom
Now, locate the downloaded dragon sculpture photos. Then drag and drop them into the Images pane in Meshroom.
The photos appear in the Images pane in filename order.

Next, click File ► Save As… and choose a new folder location somewhere on your drive and save the project as Dragon.mg.

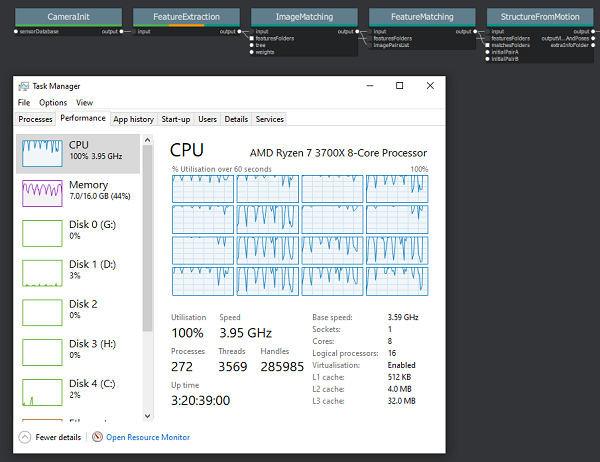
Now, close all non-essential apps in preparation for the Meshroom reconstruction process. The scan won’t start if your computer is low on resources.
Beginning the Meshroom Reconstruction Process
At this point, you’re ready to begin reconstruction. As Captain Picard would say, make it so! Click the Start button to begin the process.

While the process is running, you can track its progress in the Graph Editor view. Notice a small colored progress bar on each node. Your CPU will also most likely max out for 15 to 30 minutes, depending on its speed.
On completion, you’ll see the resulting scan in the 3D Viewer pane.
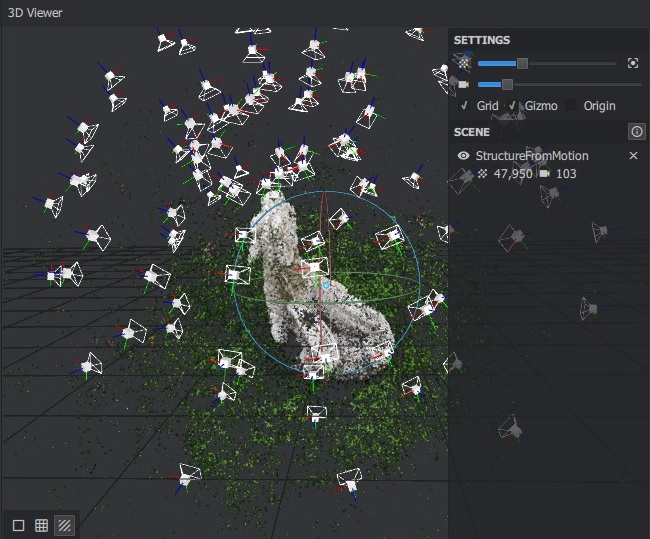
Now Left-click and drag your mouse cursor to rotate, or Middle-click and drag to pan the 3D view around. Bask in the 3D glory your CPU cycles have helped create!
Next, open the folder where you saved your Meshroom project file. You’ll notice a folder called MeshroomCache. This is where the scanned object files were output.

Importing to Blender
Next, you’ll use Blender, a popular 3D computer graphics application, to import the dragon 3D model scan and clean it up in preparation for import to Unity.
If you don’t have Blender version 2.80 or higher installed, download and install it now. You can download it here.
After the installation has finished, launch Blender.
If you’re new to Blender, take a deep breath in and relax! While the interface and controls can be confusing for beginners, you’ll find many key combinations and screenshots to help you here.

With the Blender launch screen open, click General under New File. The new file contains a cube object by default. Click the Cube to select it, then press Delete to get rid of it. Now you have a clean space to work in:

Next, click File ► Import ► Wavefront (.obj). Navigate to the MeshroomCache folder, where Meshroom saved your scanned object model files. Under this folder, find the model in the sub-folder MeshroomCache/Texturing/GUID. GUID is a folder name with a random ID assigned when your scan finished.
Then, double click texturedMesh.obj to import the scan to Blender.

The import might take a while because the photoscanned model file is quite large.
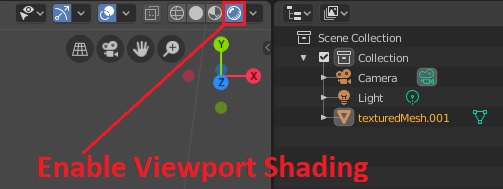
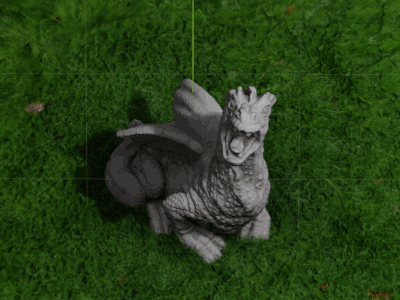
Start by getting a feel for how the photoscanned dragon looks by default. Click the Viewport Shading button in the main Blender viewport to enable full Viewport Shading and texturing.
Next, hold Shift + Middle Mouse and drag the viewport to pan the main dragon model to the middle of your screen. Then hold Middle Mouse and drag to rotate the viewport. You can zoom in and out by scrolling the mouse.
Look at how good the scan looks by default. Great job! :]
Touching Up With Blender
The model is complex with high vertex count and detail. Next, you’ll reduce the polygon count with a quick and effective Blender modifier called Decimate.
For commercially released games that need more optimization, you might want to spend more time reducing polygon count. For now, Decimate does a good enough job.
Using the Scene Collection panel in Blender, click texturedMesh ► Modifiers ► Add Modifier.

From the selection, choose Decimate.

A small configuration area appears with the Decimate options.
Now, choose Collapse with a Ratio of 0.1, and Factor of 2.0. Then click Apply.
This reduces the detail in the entire model and reduces the vertex count by a factor of about 10! You shouldn’t notice too much visual loss in detail, and your Unity profiler and game performance will love you for this!

Removing the Grass
Now to tackle the elephant in the room.
If you’re planning to create a scene where a dragon sits in the middle of a playground or pristine section of green grass, then you’re already set. But you going to place this particular dragon in a Viking village setting, so this grass won’t do.
Now, you’ll focus on removing the grass from the mesh.
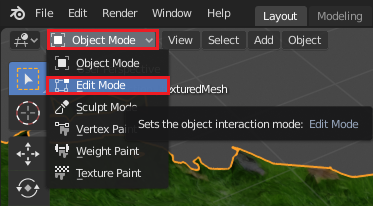
In Blender, change from Object Mode to Edit Mode. You can use the UI to do this, or press Tab on the keyboard.
Notice your viewport changes to show all the dragon’s vertices selected.

Selecting the Vertices
Next, you’ll select only the vertices for the area of grass around the dragon’s base and then delete them.
Be warned: The next step requires a fair bit of patience.
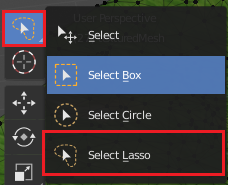
First, select the Select Lasso tool by pressing Shift + Space, L. That’s Shift and Space together and then L.
Or, use the UI tool bar to choose the Select Lasso tool.
Next, use a combination of Middle Mouse click and drag to rotate and Middle Mouse + Shift click and drag to pan t around to view the model from all angles.
From each angle, Lasoo selects vertices of the areas of grass and carefully around the base of the dragon. Between each selection, press Shift when selecting new areas to ensure they’re added to your existing vertex selection.
Here’s a GIF that illustrates this process:
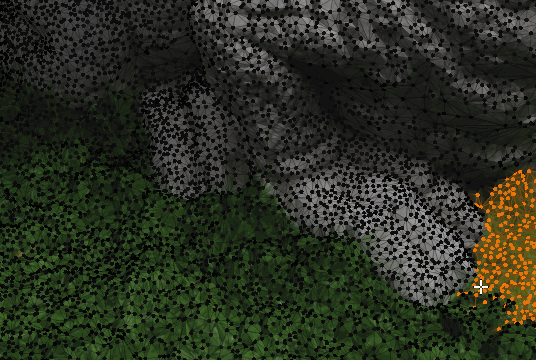
You need to rotate the view occsasionally to also select vertices that are behind bumps and ridges in the grassy mesh.
If you select some vertices that you don’t want to delete, Shift + Left Click them individually to remove them from your selection.
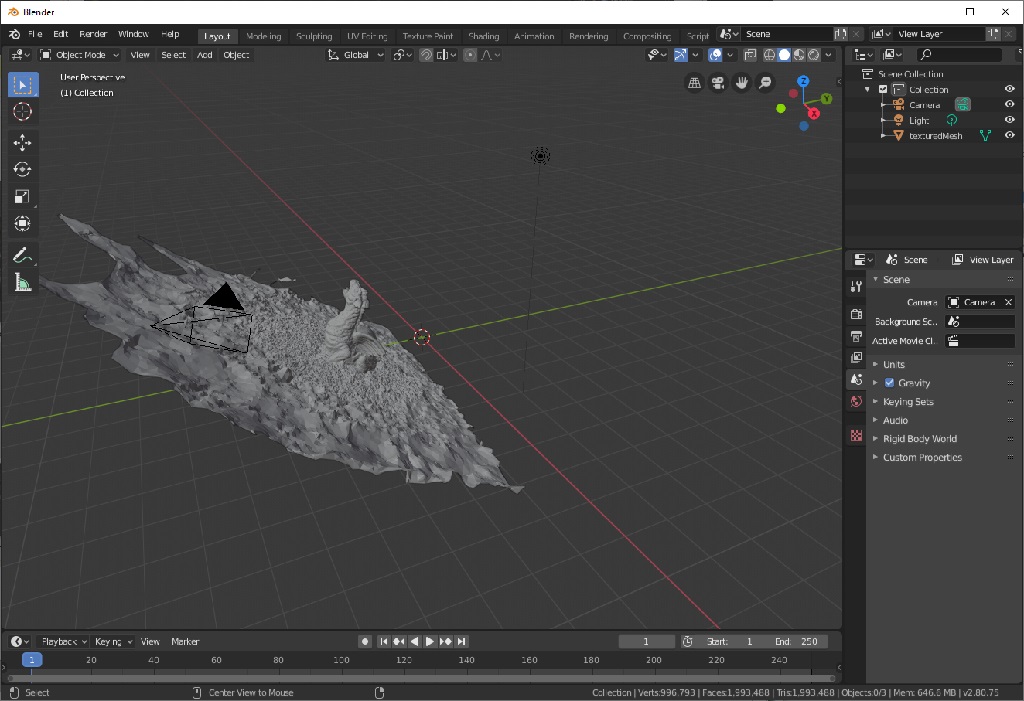
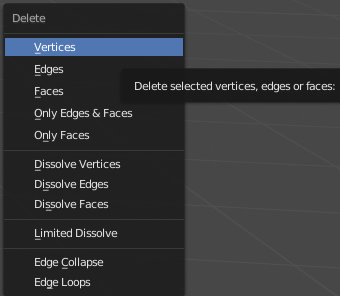
Once you have all grass and surrounding vertices selected, press Delete ► Vertices to delete them.
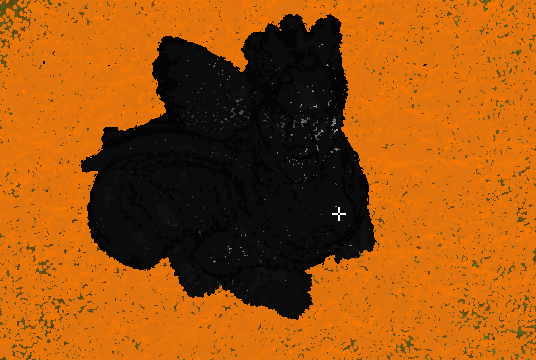
Have a good look around the remaining mesh, zooming in and out and rotating the view. Repeat the select and delete process again for any vertices that you missed.
You’ll get something resembling this menacing fellow once done:
